Table of Contents
This is an old revision of the document!
EVO: Engine Control
Electronic Fuel Injection System (EFI)
Engine Sensors (Carb & EFI)
Cam Position Sensor
This information applies to 1986-1997 All Models & 1998-2003 'S' Models
These models use a Cam Sensor Plate that is separate from the Ignition Control Module (ICM).
This information does not apply to the non-'S' models of 1998-2003 which use an integrated Ignition Control Module included on the Cam Sensor Plate in the nosecone. It also does not apply to 2004-later models which use a Crankshaft Position Sensor (CKP) instead of a Cam Sensor.
The Cam Sensor is a Hall-effect device mounted on the Cam Sensor Plate. It is used in conjunction with a rotor 'cup' mounted to the end of the camshaft. As the cup rotates, it passes through the Cam Sensor. Slots in the cup walls are 'timed' to the engine, allowing the cam sensor to indicate to the ICM the position of the cam shaft, and therefore, the position of the crankshaft. This information is used to time the firing of the spark plugs.
The Cam Sensor connects thru the main wire harness to the Ignition Control Module. It uses a 3-pin connector, known as 14A/B. It is located under the engine (left side near the kick stand). The 14A (plug) comes from the Cam Sensor Unit - the 14B (socket) is on the main harness and goes to the ICM.
(You can test fire the ICM from this connector: See Here.)
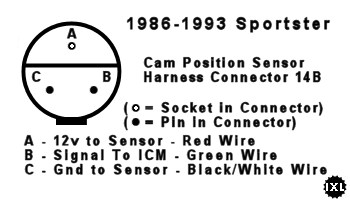
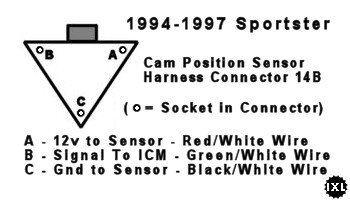
On Connector 14B (3-pins), the wires function as follows:
- Pin(A) Red/White - 12v Power from ICM to Cam Sensor 1)
- Pin(B) Green/White - Rotor Signal from Cam Sensor to ICM
- Pin(C) Black/White - Ground from ICM to Cam Sensor
(Note: the 1998-2003 Sport models use the same Cam Sensor & Connector as the 1994-1997 models)
Testing the Cam Sensor
You can test the Cam Sensor by inserting a stick pin or needle in the backside of Pin(B) on connector 14A while it is still connected together with 14B (to obtain power). Then connect your multimeter RED probe onto the pin/needle placed in Pin(B) and your BLACK meter probe on a solid ground point. Pull the spark plugs (so the engine turns easily but won't start) and turn the keyswitch on. Then use the starter button to bump (rotate) the engine.
When the engine is rotated, the slotted cup rotor (in the 'nosecone') on the end of the camshaft will pass thru the cam sensor creating an alternating output on Pin(B). Since the sensor has a 12v power source, the measured voltage is predicted to be from below 2v to above 10v, alternating.
CKP - Crankcase Position
The CKP sensor (first used with the 2004 rubbermount models) is located in the front left side of the crankcase. It replaces the nosecone cam position cup & sensor plate.
The CKP sensor is a variable reluctance device that generates an AC voltage. This signal is sent to the ECM where it is used to reference crankshaft position, phase (front TDC compression stroke) and engine rpm. It functions by taking readings off the 30 teeth on the left side flywheel (32-tooth positions, but two teeth are missing to establish the front TDC reference point). The ECM uses the slowing down of the crankshaft on the compression stroke to determine phasing, therefore, the plugs should be installed when checking for ignition spark (use an extra plug to check spark).
If the CKP signal is missing or too weak, the ECM will prevent the ignition & fuel injectors from firing, thus preventing engine operation.
Testing/Troubleshooting 2)
Disconnect the electrical connector (front left-side of crankcase) for the CKP Sensor.
(A) Check resistance between each lead of the CKP sensor and ground - Each side should be more than 1-megohm of resistance.
(B) Set your meter to Volts-AC (⇐20v) and connect across both leads of the CKP Sensor - Crank the engine for about 5 seconds - You should read a minimum of 1v-AC on the CKP Sensor leads. Turn off power.
(C) Keep your meter connected to the sensor connector - Set your meter to Ohms - Between the two leads, you should read 600-1200 ohms.
 RESULT
If any test fails - remove the CKP sensor from engine, clean any debri from sensor, reinstall properly - Recheck your results - If the unit still fails (especially if no voltage), replace the CKP.
See this __XLForum Thread__.
NOTE: The CKP P/N for 2004-2005 models is currently 32804-04B (long cable). The CKP P/N for 2006-2017+ models is currently 32707-01C (short cable), which is also used on some BT models.
MAP - Manifold Absolute Pressure
(Used on 1998-2003 Sport models & all 2004-2006 models)
The Manifold Absolute Pressure (MAP) sensor was introduced on the 1998-2003 Sport models and was then used on all 2004-2006 models. These are carburetored models. The MAP sensor is mounted on the intake manifold which distributes the incoming air/fuel mixture from the carburetor into the two cylinders. It replaced the older VOES function (described here). The 2007-later models used a combined TMAP sensor - see below.
The MAP sensor provides information to the ICM/ECM to alter the timing of the spark based on the current vacuum conditions in the manifold. Under varying engine load conditions which alters the vacuum level in the intake manifold, the information from the MAP sensor allows the ICM/ECM to alter the timing to create better combustion.
TMAP - Temperature/Manifold Absolute Pressure
(Used on 2007-later models)
The TMAP sensor combines an IAT (Intake Air Temperature) and a MAP (Manifold Absolute Pressure) sensor into a single component. The TMAP sensor is mounted on the intake air manifold which distributes incoming air from the throttle body into the two cylinders.
The TMAP sensor provides information to the ECM upon which the ECM alters the timing of the spark and the injection of fuel based on the current vacuum conditions in the manifold. By altering the spark timing and fuel, better combustion occurs in varied situations.
The MAP Sensor in the TMAP Sensor
- The MAP monitors the changing vacuum (pressure) in the manifold that occurs as you ride, change speeds and vary the engine load via the throttle position. It is temperature compensated and uses a complex algorithm to help offset the pulsating wobble effect of the HD V twin's assymetrical firing setup.
- It is a very major component of the final speed density calculation that ulimately determines the injector's pulse width required to sustain the best A/F ratio at any given time.
- There are several codes that it can throw out such as:
| DTC | Trouble Indicated |
| P0107 | Map Sensor Open/Low |
| P0108 | Map Sensor High |
- The P0107 indicates that the reading was either absent or fell below the minimum range for some period of time. If not calibrated correctly or working properly the ECM will fix a canned value and use the other inputs to adjust the A/F ratio. It will in an EFI setup greatly affect your richness/leaness if it is skewed or not registering accurate readings.
TESTING the MAP SENSOR
- This requires a digital multi-meter set to the 0 - 20 volt dc setting.
- Typically most MAP sensors are simply a set of resistive strain guages mounted on a suitable substrate and forming a bridge circuit.
- With the ignition switch turned to ON, test the leads as follows:
- (Input Power) Probe the R/W wire 3) lead and verify it has +5 volt.
- (Signal Out) Remove the hose from intake manifold and if needed add an extension to it so you can easily apply a vacuum with with a vacuum gauge or your mouth.
- Draw as much vacuum as you can and seal it (with your tongue) while probing the V/W wire 4) to read between 3.5 to 4.5 volts.
- Then release the vacuum slowly and see the voltage drop as you do, confirming the lead signal functions.
- This will confirm the functionality of the MAP sensor.
- This signal is the one that the ECM uses to assess the state of load on the engine relative to the Throttle Position Sensor and the tachometer reading.
The IAT Sensor in the TMAP Sensor
The Intake Air Temperature (IAT) portion of the TMAP sensor is a thermistor device, meaning that at a specific temperature, it will have a specific resistance across its terminals. As this resistance varies, so does the voltage sent back to the ECM. • At high temperatures, the resistance of the IAT sensor is very low, which effectively lowers the signal voltage. • At low temperatures, the resistance is very high, allowing the voltage to rise close to 5 volts.
The ECM monitors this voltage to compensate for various operating conditions.
| Temp °F | Ohms | Volts |
|---|---|---|
| -4 | 29121 | 4.9 |
| 14 | 16599 | 4.8 |
| 32 | 9750 | 4.6 |
| 50 | 5970 | 4.3 |
| 68 | 3747 | 4.0 |
| 77 | 3000 | 3.8 |
| 86 | 2417 | 3.6 |
| 104 | 1598 | 3.1 |
| 122 | 1080 | 2.6 |
| 140 | 746 | 2.2 |
| 158 | 526 | 1.7 |
| 176 | 377 | 1.4 |
| 194 | 275 | 1.1 |
| 212 | 204 | 0.9 |
| Values are +-20% | ||
- The HD MAP sensor has a thermister as well to register the intake temperature.
Information for this section collected from Fe Head's contribution to an XLForum Thread.
IAT - Intake Air Temperature
TMAP - Temperature/Manifold Absolute Pressure
The TMAP sensor combines the MAP and IAT in a single component.
ETS - Engine Temperature Sensor
TPS - Throttle Position Sensor
O2S - Oxygen Sensor
VSS - Vehicle Speed Sensor
The VSS is a hall-effect device located on the engine, just above the sprocket cover and near the rear of the starter solenoid. The sensor output is varied by proximity to the teeth on the 5th gear in the transmission.
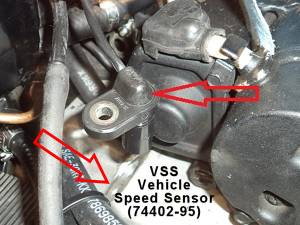 (1995-2003) (1995 = P/N 74421-95 - 1996-2003 = P/N 74402-95)
The VSS is a 12v-based hall-effect sensor. The 12v power source is supplied by the speedometer on the RED wire, the BLACK wire is ground and the WHITE wire is the pulsing signal sent directly to the speedometer.
Because the external final drive ratio may vary by model (883 vs 1200), the speedometers are different for different models because they must internally account for the difference in final drive ratios.
Troubleshooting - For models from 1998-2003, you should check your speedometer for Diagnostic Codes to see if there is an indication of a faulty sensor reading. If you are experiencing erratic speedometer readings, removing and cleaning the sensor should be done to obtain a clean signal.
The sensor output is a square-wave which varies from 'less than 3v' (when at a tooth) to 'greater than 6v' (at a gap). A multimeter on a low DC scale should be able to observe this output on the WHITE wire of the sensor.
If you are able to observe the above voltages from the sensor, but the speedometer is still erratic or otherwise malfunctioning, be sure to test all the wiring between the sensor and the speedometer. As a last resort, replacement of the speedometer may be in order.
(2004-2013) (2004-2012 = P/N 74402-04A - 2013 = P/N 74402-05B)
The VSS is a 5v-based hall-effect sensor. The 5v power source for the sensor (BLACK/RED wire of the twisted pair) comes from the ICM/ECM and the pulsing output from the sensor (BLACK/BLUE wire of the twisted pair) goes to the ICM/ECM for processing. The ground connection (BLACK wire) is part of the main harness.
Internally, the ICM/ECM calculates the appropriate speed information and sends that information to the speedometer and the TSM over the Serial Data Bus. Since the ICM/ECM makes the calculations, the speedometer and TSM do not have to account for any variations.
Troubleshooting - Check your speedometer for Diagnostic Codes to see if there is an indication of a faulty sensor reading.
The sensor output is a square-wave which varies within the 0v to 5v range, depending on the proximity to a tooth. The middle pin of the connector is the output and is, typically, the BLACK/BLUE wire. A multimeter on a low DC scale should be able to observe this output variation.
If you are experiencing erratic speedometer readings, removing and cleaning the sensor should be done to obtain a clean signal.
If you are able to observe the above voltage variations from the sensor, but the speedometer is still erratic or otherwise malfunctioning, be sure to test all the wiring between the sensor and the ICM/ECM as well as the Serial Data Bus connection. As a last resort, replacement of the speedometer may be in order.
(2014-on) (P/N 74402-05B)
The VSS sensor is the same 5v-based hall-effect sensor as 2013. The ECM (Engine Control Module) handles all the processing of the signals and sends data to the speedometer over the new CANbus communications connection.
Note this very informative __XLForum Thread__ regarding the VSS.
BAS - Bank Angle Sensor
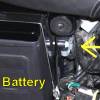
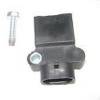 The Bank Angle Sensor, as an individual component, was used on Sportsters from 1998 to 2003. Using an internal v-shaped channel and steel ball, it is intended to kill the ignition if the bike lean angle exceeded 55 degrees, such as in an accident or tip over. It is attached, upright, to the side of the battery box, toward the rear, using a locating pin and one screw. It has a 3-wire connector.
The sensor can be tested while the bike is running, by placing a magnet at the top of the sensor. If the ignition stops, the sensor is working. The sensor is sometimes unreliable, either failing to allow the bike to start or by not shutting down on tipover. Some have chosen to bypass the unit by shorting the LtGreen/Gray Wire to the Black wire, while also capping the solid Gray wire (which is the power from the Ignition Fuse).5)
Beginning in 2004, the bank angle function is included inside the Turn Signal Module (TSM/TSSM).
To reset the ignition function after the BAS has been triggered, turn off the keyswitch, set the bike upright, turn the keyswitch on.
IAC - Idle Air Control
Fuel Injectors
Oil Pressure Switch
The Oil Pressure Switch is located at the Oil Filter mount. It is a pressure-actuated diaphragm-type switch that indicates a lack of oil pressure. The switch grounds the sensor wire when there is insufficient oil pressure to open the switch and causes the oil light to illuminate on the indicator bar or the speedometer.
If the idle speed should fall below 1000rpms, the light may activate as a warning.
Neutral Indicator Switch
 The Neutral Indicator Switch is located forward of the main drive gear shaft on the right crankcase half, partially behind the final drive tranmission sprocket. A pin on the transmission shifter drum contacts the switch plunger to indicate a neutral position of the transmission. The switch grounds the sensor wire causing the neutral indicator lamp to light (on the indicator bar or in the speedometer).
The sensor cannot be removed for replacement without removing the final drive transmission sprocket.
Jiffy Stand Switch (HDI only)
Electric Fuel Pump (EFI)
Low Fuel Sensor
Starting in 2007, all Sportster models had an Electronic Fuel Injection system. This included an electric fuel pump with a Low Fuel Sensor. The sensor uses a float with a magnet to trigger the sensor when the fuel is low. Some owners found the low fuel indicator to be erratic and the consensus was that the float that triggers the sensor was getting stuck.
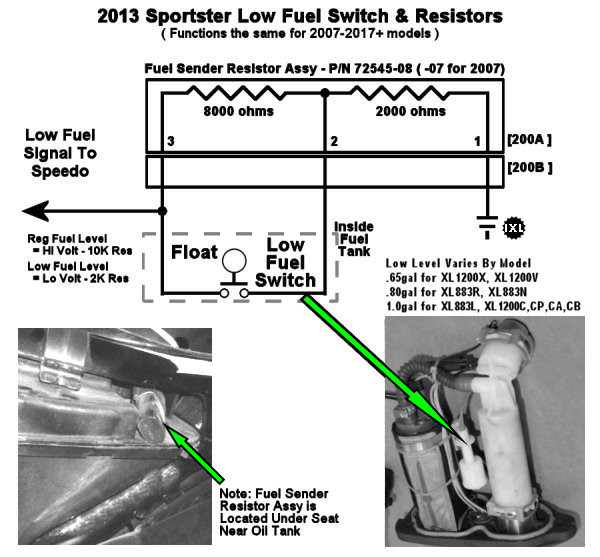
In the speedometer, there is a Low Fuel Indicator that responds to the Low Fuel Sensor. This is accomplished using a Fuel Sender Resistor Assembly, consisting of two resistors (one 8K ohms and the other 2K ohms) to allow altering the voltage on the connection to the speedometer.
The speedometer sends power to the Fuel Sender Resistor Assy (thru a pull up resistor) while monitoring the same line for a change in voltage level. When the fuel is above the Low Level, the resistor assembly presents a 10K resistance above ground, thus keeping the supplied voltage at a high level. When the fuel reaches the Low Level, the switch in the fuel pump assembly closes it's contacts and effectively shorts across the 8K resistor portion of the Fuel Sender Resistor Assy. There remains the 2K resistor to limit current draw, but the effect is to lower the voltage on the output line to a level which the speedometer interprets as a Low Fuel Level condition.
The following illustration is a functional schematic of this sensor/indicator operation.


