Table of Contents

EVO: Suspension - Sub-01E
1200S Suspension: Settings for Factory 39mm Cartridge Valve Forks and Gas Canister Piggyback Shocks
- The factory Showa forks and shocks for the 1200S model Sportster are adjustable in compression, rebound damping and spring pre-load. 1)
- The pre-load setting will need to be adjusted first per your body weight before the motorcycle is ridden for any distance. 2)
- If pre-load adjustment is correct and with the rebound and compression damping at factory settings, your bike should handle and ride properly. 3)
- If you are unhappy with these settings, they can be re-evaluated. Rebound and compression settings are subjective to each individual rider and riding conditions. 4)
- To get the proper settings, you'll need the pre-load adjusted properly, tires inflated properly and a familiar bumpy or rough terrain. 5)
- Set the all damping settings to the Factory Recommendations and ride over a variety of rough road / bumpy conditions at different speeds. 6)
- If the bike is not stable and comfortable, adjust damping to suit your individual conditions. 7)
- If you are unsure which knobs control which feature, see Suspension Adjusting Knobs with explanations and pictures of fork and shock adjusters.
- See also Troublshooting Suspension Settings
- Note: Changes in load weight requires a change in pre-load settings. Less weight = lower pre-load, more weight = higher pre-load. Caution: Do not exceed the GWWR for your bike (on label on the frame steering head).
- Definitions:
- Damping: Resistance to movement; affects how easily the suspension can move and limits oscillations of the system once movement begins.8)
- Compression; The suspension compresses when the wheel moves up.9)
- Rebound; the suspension rebounds when it moves back from being compressed,10) akin to re-coil.
- Pre-load; springs are compressed a little during assembly. This initial compression provides a 'loaded' condition in the spring while sitting by itself and can be adjusted for different degrees of 'pre-load'. 11)
S Model Suspension Adjustments
- The front forks and rear shocks allow for multiple compression, and rebound adjustments and the settings for both fork legs and must be identical as should each rear shock mirror image the other. If not, your front and / or rear suspension can suffer from poor handling conditions which could lead to loss of control and / or personal injury. 12)
- Make all adjustments in 1 to 2 click increments as to not skip the 'best adjustment'. Test after each adjustment and when the 'next' adjustment makes no difference, return to the previous setting and move on to the next adjustment settings. 13)
- Spring Pre-load Testing (Do This First) - The most important adjustment in the equation and must be adjusted first, assuring the frame has the proper amount of travel. You need 2 people to correctly adjust the pre-load for front and back as a unit. 14)
- The rider will mount up, hold the bike upright, let the kickstand up and bounce the rear end up and down a few times to insure the suspension is free and not binding anywhere. Then stand up and take the body load off the bike. With the bike “unloaded”, measure the distance between the fork axle center and the bottom of the lower clamp (tree). Then measure from the upper shock bolt center to the lower shock bolt center. 15)
- Next, in full gear, the rider will sit on the bike in a riding position with both feet on the pegs, (helped to steady with the second person), bounce a few times on the seat and re-take the original measurements. 16)
- Subtract the second measurements from the first and the result should be between 1/2“ and 1”. If it is not, adjust the pre-load as below to obtain the proper range while re-testing as above.17)
- Spring Pre-load adjustments
- Front Forks
Turn spring adjusting nut with a 7/8“ wrench clockwise to increase or counter-clockwise to decrease pre-load amount.
Adjuster turns independent of top adjusting knob. - Rear Shocks
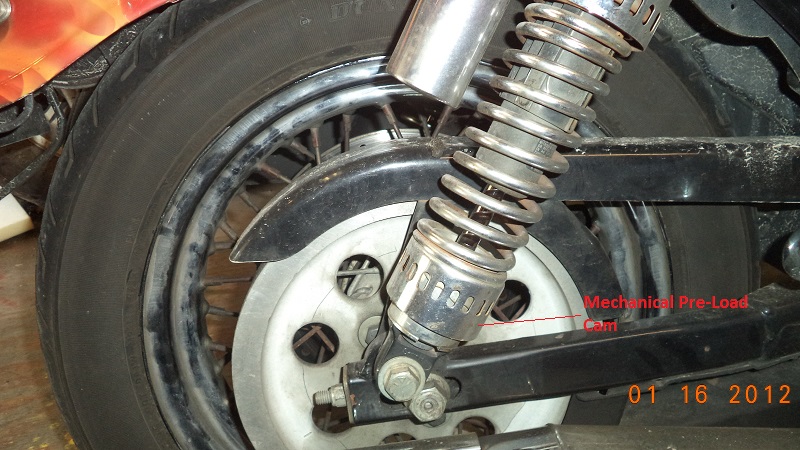
Turn the spring adjuster cam with a spanner wrench clockwise to increase and counter-clockwise (off cam position) to decrease shock pre-load to the desired position.
- Compression and Rebound Settings
- Front Fork Compression Damping - The damping control has 14 settings made from the base of each fork leg. Rotating the adjuster in the “H” direction (clockwise) gives a harder setting. Rotating the adjuster in the “S” direction (counter-clockwise) gives softer damping. 18)
- Front Fork Rebound Damping - The rebound adjuster has 15 positions. Turning the adjuster clockwise to the last setting yields the slowest rebound (most amount of rebound damping). Turning the knob counterclockwise to the last setting yields the fastest rebound (least amount of damping). 19)
- Rear Shock Compression Damping - The compression damping control has 12 click stops between hard (position 1) and soft (position 15). Adjust by turning the top knob on the piggy-back canister clockwise towards the “H” to increase or counter-clockwise towards the “S” to decrease the amount of compression damping.
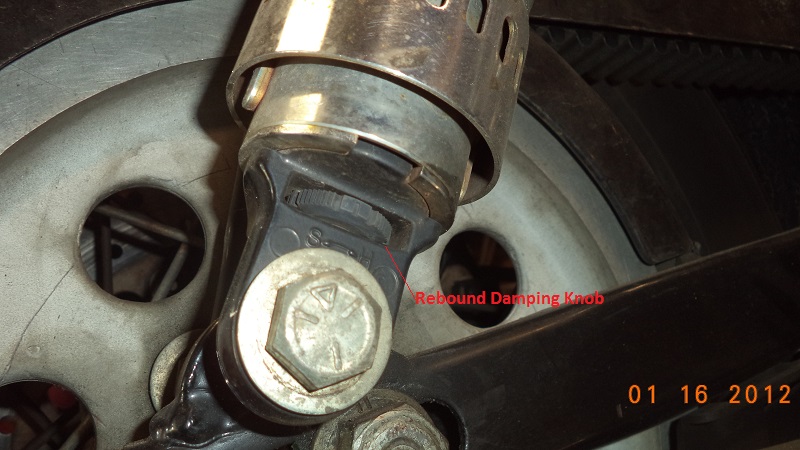
- Rear Shock Rebound Damping - The rebound damping control has 12 click stops between hard (position 1) and soft (position 15). Adjust by turning the knob in the lower shock “Eye” clockwise toward the “H” to increase or counterclockwise toward the “S” to decrease the amount of rebound damping.
S Model Suspension Adjusting Knobs
| Forks | Adjuster | Where to Find It20) |
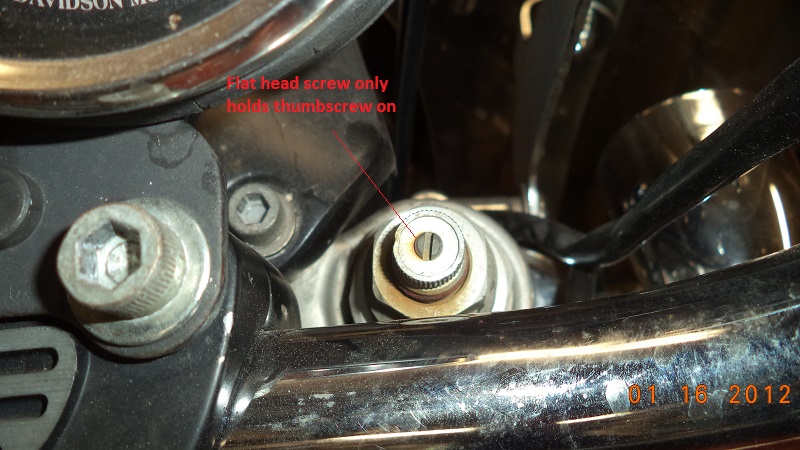
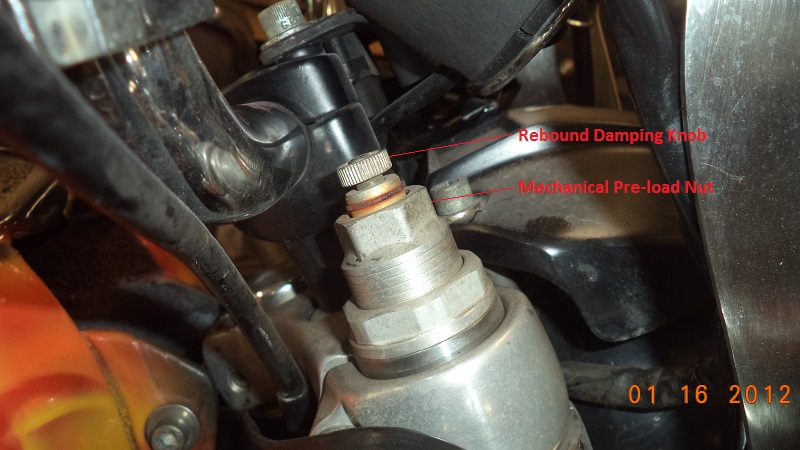
| Rebound Damping Adjuster | Top Dial Knob (pic #1-#2 below) | |
| Mechanical Pre-load Nut | Below the Top Knob (pic #2 below) | |
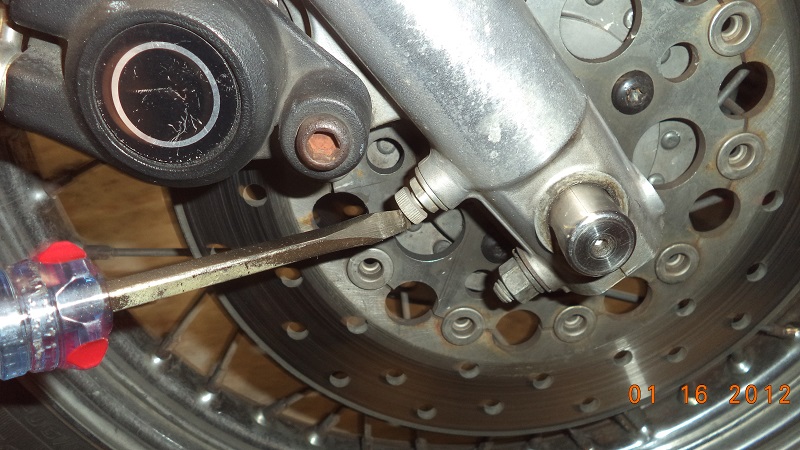
| Compression Damping Adjuster | Dial on Lower End of Slider (pic #3 below) | |
| Rear Shocks | Adjuster | Where to Find It21) |
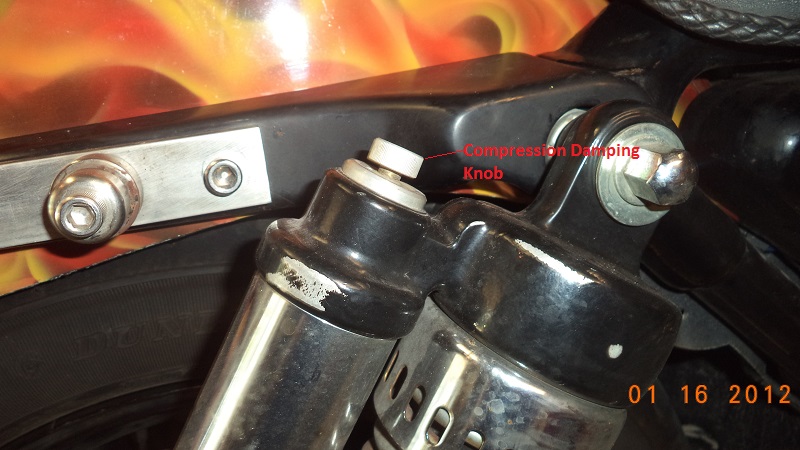
| Compression Damping | Top Dial Knob (pic $4 below) | |
| Rebound Damping | Dial in the Lower Shock “Eye” Casting (pic #6 below) | |
| Mechanical Pre-load | Adjuster Cam below the springs (pic #5 below) |
S Model Fork and Shock Adjustment Pics
Click on a pic to enlarge:
S Model Factory Recommended Suspension Adjustments from 'Maximum Hard Settings
| Rotate adjusters to full clockwise (position 1) or maximum hard position first, then back off to desired setting 25) | |
|---|---|
| Fork Rebound | Position 8 |
| Fork Compression | Position 13 |
| Rear Shock Compression | Position 8 |
| Rear Shock Rebound | Position 6 |
- You may hear all sorts of explanations as to how to adjust the knobs. But the trick is to learn how the changes you made affect how the bike rides. 26)
- Might as well start with both knobs in the middle of the range. Then move the compression adjuster one or two clicks at a time until you go from full soft to full hard and do enough riding at each position so you can tell the difference. 27)
- Too much compression damping makes the bike ride stiff, too little makes the bike bouncy and/or bottom out. Find the happy medium.28)
- Then start working with the rebound adjuster. Too much rebound damping may cause packing down, where the shock cannot extend after hitting a bump and gets shorter and shorter. Too little rebound damping can literally throw you off the seat.29)
- Eventually, you will find the best positions. The least amount of damping in both directions will allow the wheel to track road bumps most effectively. Be careful when test riding after making changes because the bike can handle quite differently. 30)
S Model Troubleshooting Suspension Settings
| Bike wallows thru turns | Increase rebound 31) |
| Feels loose or vague after bumps | |
| Wheel tends to 'pogo' over bumps (continued bounce over multiple bumps) |
|
| Wheel responds to bump but doesn't return to ground fast enough (packing down effect) | Reduce rebound 32) |
| Bike bottoms out or dips while cornering | Increase compression 33) |
| Bike has excessive brake dive | |
| Harsh ride especially over washboard terrain | Reduce compression 34) |
| Bumps kick thru handlebars or seat | |
| Suspension doesn't respond to bumps (tire chatter while cornering) (jolting over rough terrain |