Table of Contents

IH: Carburetor, Intake Manifold & Exhaust - Sub-01G
Tillotson Carb Functions, Adjustments, Tuning
See also in the Sportsterpedia:
Tickler
A tickler is any device that is inserted into the bottom hole to 'massage' a little extra gas from the diaphragm.
With the advent off Ethanol, fuel seems to evaporate faster. 1)
By 'tickling' the diaphragm via paperclip or spring type pin, you are allowing fuel to enter the accelerator galley via gravity.
Now when you twist the throttle you will get a clean shot of fuel into the intake.
The Tillotson carburetor runs great, once started.
But even with electric start, when cold, it sometimes takes quite a bit of cranking to get it going. 2)
Sometimes sometimes twenty kicks later, no start. When warm it sometimes takes 3-4 seconds of cranking to start which still seemed too long.
(even with the carb rebuilt, timing, plugs and valve adjustment all spot on)
The one interesting symptom when trying to start it is that there is usually no sound of the cylinders actually trying to fire.
Its almost as if it's not getting fuel.
The Tillotson is unusual in that it does not have a conventional float bowl or even a float, but a fuel chamber.
It has a diaphragm that uses engine vacuum which opens the needle valve to allow fuel to flow into the carb.
This seems to be the genesis of the problem.
No or not enough fuel in the fuel chamber and not enough vacuum generated during cranking to allow fuel to flow into the carb.
The diaphragm in the V-twin kits may be less flexible than the original, contributing to this problem.
There is an old trick of using a paperclip to depress the diaphragm through a small hole in the diaphragm cover on the bottom of the carb.
Starting will improve significantly.
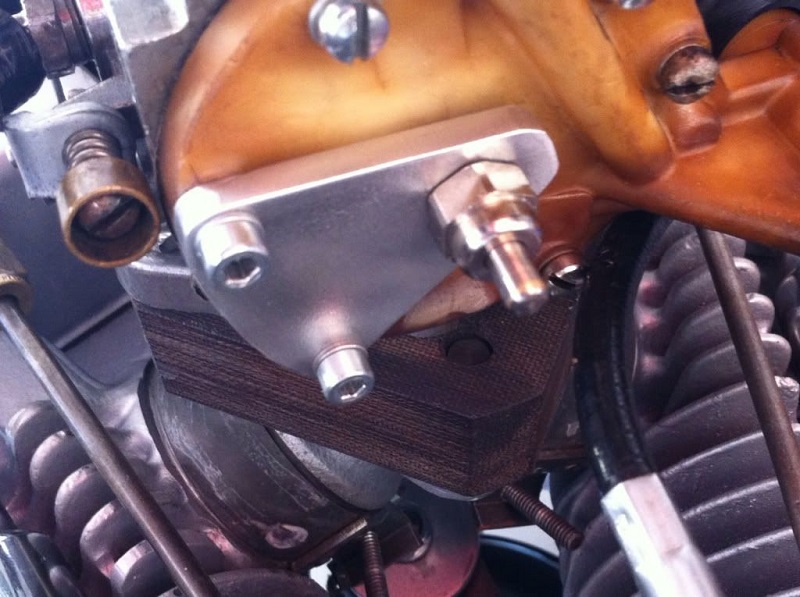
Using the paperclip method can be cumbersome with the fuel line, original air cleaner, circuit breaker and tach cable in the way.
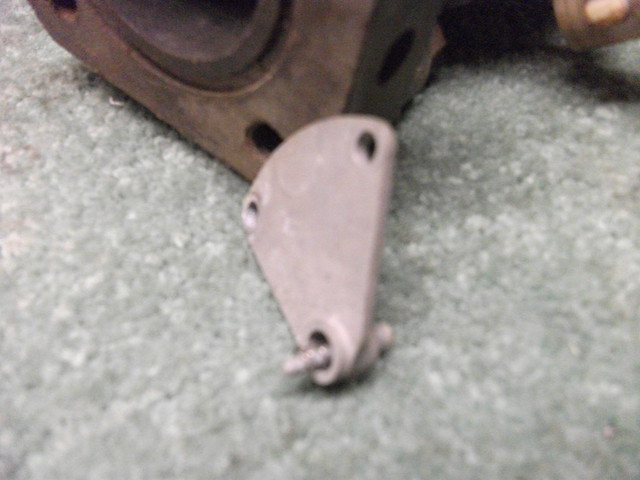
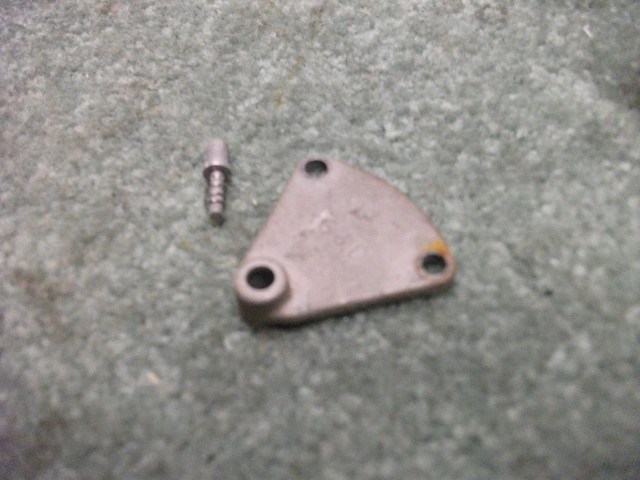
This was made by S&D installed on a HD2D model.
 3)
3)  4)
4)
Since vintage ticklers are now pretty much unobtainable, the one below was homemade.
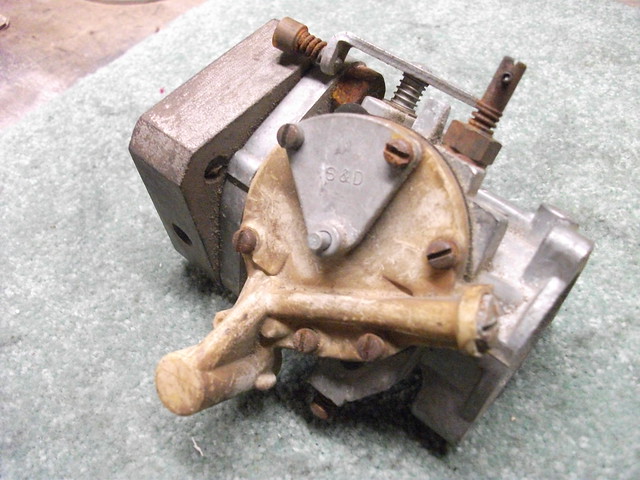
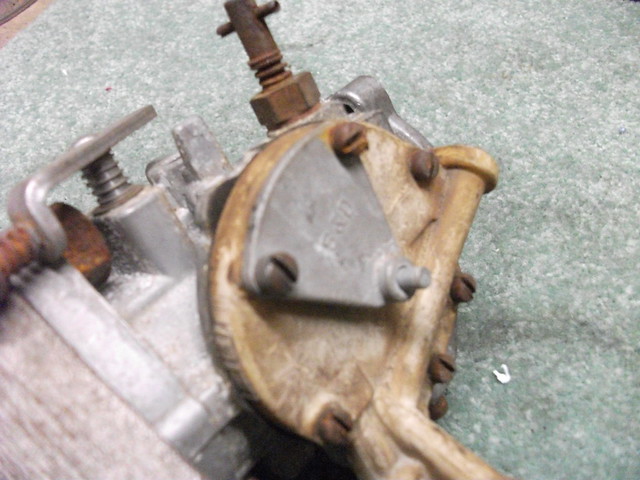
This is an original Tillotson on a 1969 XLH.
 7)
7)
Testing and Repair Checklist
- On January 15, 1968, the MoCo issued a service checklist to aid in testing and repairing (instead of returning for warranty) Tillotson carburetors due to some dealers having difficulty diagnosing problems on 1966 → Sportsters & 1967 → Electra Glides. 8)
- Before disassembling the carb to correct any (non)performance, it should first be established that external adjustments have been made and are correct. In many cases, the intermediate and idle speed needles are incorrectly adjusted cause poor performance. 9)
- Correct adjustment can be determined in the shop and verified by a road test:
- Adjustments (a tachometer is recommended): 10)
- Seat idle and intermediate needles, gently, and open both 7/8 turn.
- Start the engine and warm up for at least 3 minutes at fast idle.
- Set the engine throttle so that the engine runs at app. 2000 RPM.
- Without changing the throttle setting, turn the intermediate needle slowly in the direction which produces the highest RPM. The engine should not miss or surge at this position.
- Back off the intermediate needle 1/8 turn to slightly richen the mixture. This is the correct intermediate needle adjustment.
- Readjust the idle needle & the idle speed stop screw to produce a smooth idle at desired speed (900-1100 RPM).
- All these tests should be performed (in sequence) before further disassembly or repairs are made.
- Testing (prior to removal from engine): 11)
- The accelerator pump should be inspected for proper operation. Remove the air cleaner and prime the carburetor by inserting a toothpick through the small hole in the bottom of the plastic pump cover and gently work the diaphragm several times. Operate the throttle lever (both rapidly and then slowly several times with the fuel valve turned on. The pump should deliver a strong & constant jet of fuel with each stroke. Failure to do so indicates defective diaphragm valves or pump plunger.
- Clean the high, intermediate & low speed channels to (most likely) dislodge any loose dirt in the passages. Remove the high speed screw plug located on the rear side of carburetor opposite intermediate adjustment needle. Lightly seat the intermediate needle and apply air pressure (90 psi max.) to the screw plug hole. Next, open the intermediate and idle needles three or four turns and again apply air pressure (90 psi max.). Reset both adjustment screws (see adjusting measures above). Ride the bike to evaluate the carburetor's performance.
- Check the inlet needle and seat for leakage. Make sure that all of the plastic cover screws are tight. Remove the fuel and vent lines, install a bulb tester (94750-68) to the fuel inlet fitting, plug the vent fitting with your finger and pressurize tester while noting any leakage. A moistened needle and seat should hold app. 1 to 1-1/2 psi. Release at app. 3-5 psi. A dry needle and seat will not hold as well as a moist one.
- Remove the carb but do not disassemble it yet. Inspect the intermediate adjustment needle and spring to see if the spring coils are binding before the needle seats. If the needle does not seat grind a small amount of material from each end of the spring. You can check to see if the needle is seating by applying blue dye to the needle taper and screwing it down lightly into the seat and noting the mark on the needle taper.
- Check the main nozzle ball check valve for leakage. Seal one side of the venturi with your finger and apply alternate pressure and vacuum by mouth using the grommet end of tool (96960-68) seated in the venturi. Vacuum should release ball & pressure should seat it in the nozzle assembly.
- Removing the main nozzle welch plug. If leakage is evident, the carburetor must be disassembled and the main nozzle check valve assembly replaced. To replace the main nozzle, puncture welch plug with pointed tool (avoiding center). Remove the nozzle welch plug and use the stepped end of a punch (96962-68) on the nozzle, tapping it through and into the venturi using a plastic hammer. Use the larger end of the tool to install the new check valve in the same manner.
- Inspect the idle needle and seat in the carburetor bore for any distortion or a cracked casting.
- Inspect the choke relief disc (upper half of the choke) for distortion or stress cracks at the area rotating on the choke shaft.
- Disassembly, inspection and replacement of parts (replace damaged parts only after completing all of the above tests). 12)
- Remove the plastic diaphragm cover and inspect the accelerator pump leather for fold-over or the coil spring out of the correct position. Check the accelerator pump outlet ball check valve to see that the ball is free (Late 1968). Inspect the gasket and diaphragm for distortion or misplacement on the carb body. The diaphragm must not be stretched or have a rippled appearance particularly within the valley portion which should be uniform in shape (gasket should be assembled next to the body).
Lightly, attempt to rotate the metal diaphragm washer (riveted to the upper side of the diaphragm). If the diaphragm plate rotates freely with no drag, replace the diaphragm assembly. The diaphragm plate should not be loose. Prior to removal of the inlet lever, the initial needle seat leakage test should be performed 10-12 times with the bulb tester. Close the bulb valve. Apply pressure to the inlet to seal the vent fitting. Open the bulb valve and again apply pressure. This repetition checks the sealing of the needle in the seat insuring that it is not sticking open at the lever pin or at the groove in the needle. - Inspect the inlet needle lever for correct adjustment. It should be flush with the surrounding floor of the carb body. If not equipped with a shackled needle, replace with kit (27588-66). Torque seat to 45 in-lbs.
- Test the economizer ball check for leakage and correct operation. Using the hose end of tool (96960-68), place it over the economizer welch plug hole so that it seals off the surrounding area. With alternate pressure and vacuum applied by mouth, ball check should release and seal. Replace any defective parts.
Welch Plug or Expansion Plug
- Inspection:
- A close inspection around the walls of a welch plug can reveal possible leaks.
- Removal: 13)
- Whenever a welsh plug is removed, a new one should be installed in it's place, especially since a large part of the time, removal of one means destroying or deforming it.14)
- Drill an 1/8“ hole thru it (just deep enough to break thru to the other side) off center and pry it out with a small punch. Be careful not to drill too deep which could destroy the nozzle assembly or casting. While prying it out, be careful not to damage the casting counter-bore edges around the plug.
-
- The plug should be seated with a flat end punch that is slightly smaller than the diameter of the plug. The plug should be flat and not concaved to assure a tight fit. If leakage is suspected due to a rough or damaged welch plug seat in the casting, apply a small amount of epoxy or suitable sealant to the edges after installing it.
- Installation Recommendations from Hubbard Spring http://www.hubbardspring.com/install_reco.php?cid=45
Intake Leaks
Finding and Fixing the Cause of the Degradation That Leads to Intake Leaks:
Article by Dr Dick of the XLFORUM 17)
- Leaks will develop over time. While diagnosing, you're doing the seemingly most logical thing by focusing on the seals & clamps. But, you may not be seeing the obvious. If your tire kept leaking after you fixed the inner tube, time after time, you would start thinking that a bigger patch would work better than the last one you used as well as start looking for nails in the drive way. Same thing here.
- The Big Picture:
- Finding and fixing the cause of the degradation that leads to the leaks:
- The main factor is the pulses in the manifold that push & pull on the seals. If you put your hand over the throat of the carb with the bike running, you will feel how strong these forces are. When you're cruising, the throttle plate is barely open in the carb. So forces on this plate are just like what you feel with your hand over the throat. So, it's the seals that flex with each piston stroke. As they flex, fuel seeps into the interface between the seals and the head / manifold and acts like oil in there allowing more movement still until the rubber itself loses it integrity and fails.
- The key here is to reduce the micro movement that the seals need to deal with. Consider what the factory did compared to what you have done. If the seals you're using 1st came on a 1979 or later, the air cleaner is big & beefy and it used a bracket system that held the manifold / carb / air cleaner solid. This removed the seals from having to restrain most of the forces in the manifold. Now the seals just had to seal and not support as much. Then the clamps they used were split in the middle, each acted like 2 skinny clamps (not one wide beefy one). So, when clamped, there was INDEPENDANT sealing pressure on the head spigot & on the manifold spigot, allowing the seal to flex somewhat in between while not moving in the clamped areas. Now, in addition to this when the motor gets warm, it grows taller. The manifold seals need to be able to deal with this. A taller motor means that the distance between head spigots grows.
- So, in summation what the factory did that you probably don't have is mount / carb / manifold solid when the clamps are loose. Then the clamps just seal in 4 independent areas, so that area between clamp halves is free to flex without forcing any movement between rubber & metal.
- Here's the bottom line. If, when all is assembled, you cant wiggle the carb / manifold / a/c in relation to the motor (solid mounted) then your problems are 80% over. If you go to split clamps also, then your as good as you can get with rubber band seals.
- The O-ring set up is subject to the same principals. It's more robust in mechanical design than the band. So, it's even more reliable. But, it's more misunderstood in the way it goes together so it gets a bad rap. If you've got factory O-ring heads, then not using an O-ring is just shorting yourself.
- Now that you have the problem areas defined, if you can get your mind wrapped around them, going to the O-ring will be more attractive.
- The advantage of the O-ring is that the clamp can be used to help make a solid connection between manifold & head (no rubber in between). This totally removes the rubber / metal interface of the clamp-rubberband-spigot (the core of the degradation you are trying to rid yourself of). The reason most O-ring setups fail, is the commonly held idea that the closer the manifold and head get to 'no gap fit', the better the O-ring will seal. Totally wrong and the cause of 99% of O-ring sealing issues. When the manifold is set tight against the head, there is a groove created that the O-ring lives in. Common belief is the O-ring seals in this groove. It doesn't. In fact, this makes the groove smaller in volume than the O-ring volume. So, when the clamp compresses the O-ring on its way to getting tight to the spigots, the O-ring fills the groove and forces the manifold away from the head in order get enough volume to fit into. Now nothing aligns right and it leaks right from the start.
- The correct action is leaving a gap of .030' -.060” (1/32“-1/16”) between the head and manifold at the skinny lip. This gap needs to be even all around on both heads at the same time. It's in this little gap that the O-ring seals when the clamp squeezes it. When setting heads & jugs for alignment, putting manifold & O-rings (but no clamps) in place, the inside of the manifold should match the inside of the intake port all by itself with no forcing. Don't worry if the gap seems to big. It will shrink when the heads & jugs get tightened. The last test is, when the clamps get tightened, the alignment is still on before you tighten the clamps. You will note that the O-rings are proud of the spigot diameters. When the clamps squeeze the O-rings to the spigot diameter, the seal to gap occurs. During tightening, you may have to tap the manifold back into alignment until the clamps grab onto the spigots.
Links,Parts and Services for Tillotson Carbs
Original P/N for a Sporty Tillotson repair parts kit 27147-66 18)
Original P/N for a Big Twin Tillotson repai parts kit 27137-66
- Parts list for Tillotson HD carbs:
- Service manual for Tillotson carbs:
- Servicing for Tillotson carbs:
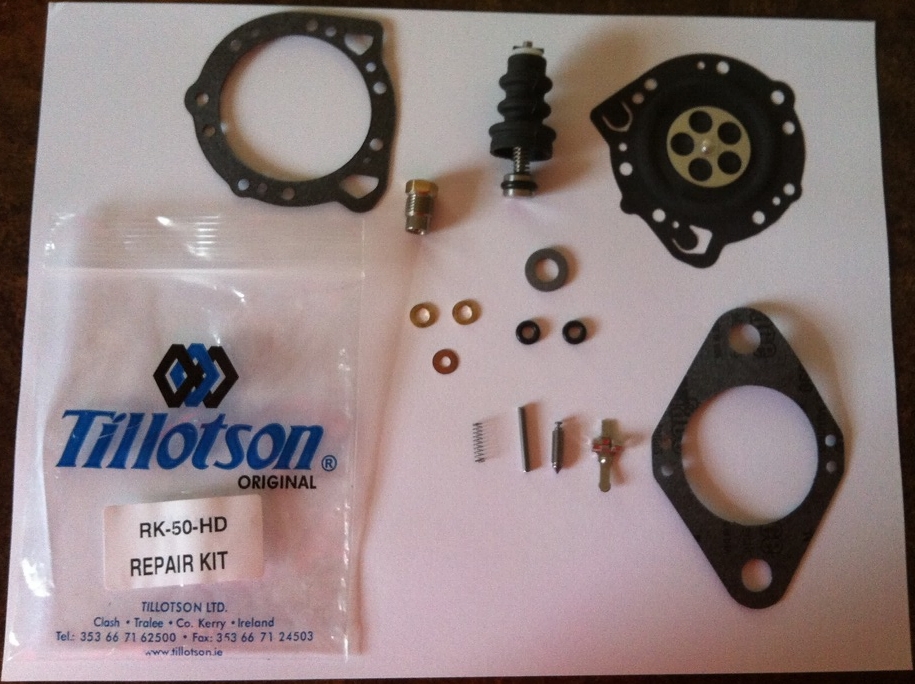 |
| Tillotson Carburetor repair/ refresh kit19) |