Table of Contents

IH: Oiling & Lubrication - Sub-03P
77-85 Oil Pump Inspection
With the replacement of the gear driven oil pump by the new gerotor style pump;
HD issued a recommendation to dealers regarding servicing of the new style oil pumps. 1)
Zero gerotor (gear) side clearance must be maintained by the flat spring between the upper and lower separator plates for adequate oil pressure.
For the spring to function properly, the upper face of the lower feed gerotors must extend slightly above the cover to prevent any side clearance.
(which would allow oil to get past the gerotors and reduce oil pressure)
If you have reduced oil, no oil pressure (oil light comes on or stays on) or otherwise need to disassemble the oil pump for any reason,
The gerotors and their corresponding operating surface in the housing and the cover should be checked and serviced accordingly.
Inspect the oil pump cover and body
Look for debris while disassembling
Grit / Debris found in the oil pump can give clues to potential motor problems.
While removing each part starting from the cover, make note of the color of the oil, any grit or metal particles and what color they are.
- What color debris or glitter came from where?
- Yellow or gold (brass/bronze) colored particles/grit:
Wrist pin bushings, flywheel thrust washers, rocker arm bushings and cam cover bushings.
Non - metallic (can't pick up with a magnet). - Silver (aluminum) colored particles/grit:
Engine case, pistons, oil pump.
Non - metallic (can't pick up with a magnet). - Silver (metal) colored particles/grit:
General to excessive metal to metal wear from motor, oil pump drive gear teeth,
Broken bearings, races, rods, hardfacing off the rollers and crank pin, crankshaft failure, cam spacer washers,
Potentially anything metal from the motor or oil pump.
Metallic - (can pick up with magnet).
- Note the size and texture of particles/debris found in the oil pump:
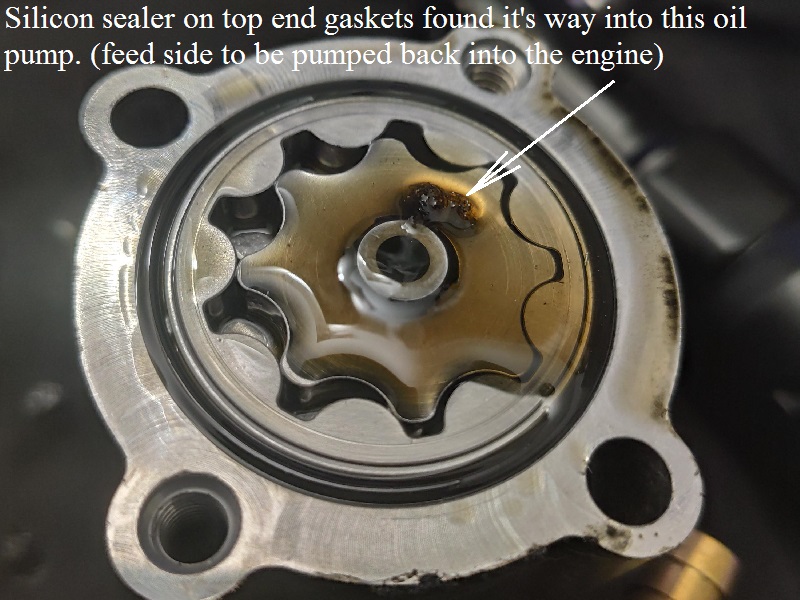
Aluminum or metal particles from wear or damage, goopy mush from gasket sealers, colored chips from a recent paint job, gasket material, rags or other. - Which side of the pump is it in, feed or return?:
Debris in the return side came out of the motor into the pump.
Debris in the feed side came from the oil tank (which most likely came from the motor to the oil tank).
For long term diagnosis, this may not find a smoking gun problem.
But in cases of sudden failure, it may be an important clue as in where to start looking for problems. - Silicone should not be used anywhere on a Sportster motor.
If so, you may find pieces of it in the oil pump or in the small orifics and oil galleys within the motor.
The push / pull of crankcase pressure can implode gaskets and especially sealants like silicone.
This will stop up the oil paths in the motor and if caught early enough, can be flushed out before catastrophic damage happens.
| Silicone 'gummy bear' sheet found in the feed side 2) |
 |
Inspect the ridge in the cover
- Using a straightedge across the feed gerotor set (installed) surface;
Measurement should be taken with a feeler gauge from the gerotor surface to the ridge of the edge of the aluminum cover.
The thin, feed gerotors (26492-75) in the oil pump cover (26486-75) should extend .001“-.005” above the cover's aluminum ridge.
The later feed gerotors extend up to .011“ above the ridge.
If the feed gerotors do not extend above the ridge within the specified range,
Remove and sand the ridge evenly until the gerotors extend properly when inserted.
Lay some sandpaper on a flat surface (#280 grit then #400 grit to finish).
Invert the cover and sand the ridge then check the measurement with a micrometer.
Make sure that both the inner and outer gerotors are the same thickness also.
Inspect the gerotor surface for flatness in the oil pump cover and housing
An oil pump cover found with an uneven gerotor surface should be removed.
If the gerotor widths measure equally but they are not equal in height when placed into the cover, the cover surface is not flat.
If the gerotors will not sit flat in the cover then the cover should be replaced.
Be sure to check the gerotors in the new/replacement cover using a straight edge to assure a level surface and the proper elevation above the ridge.
Be sure to check the gerotor surface in the housing also.
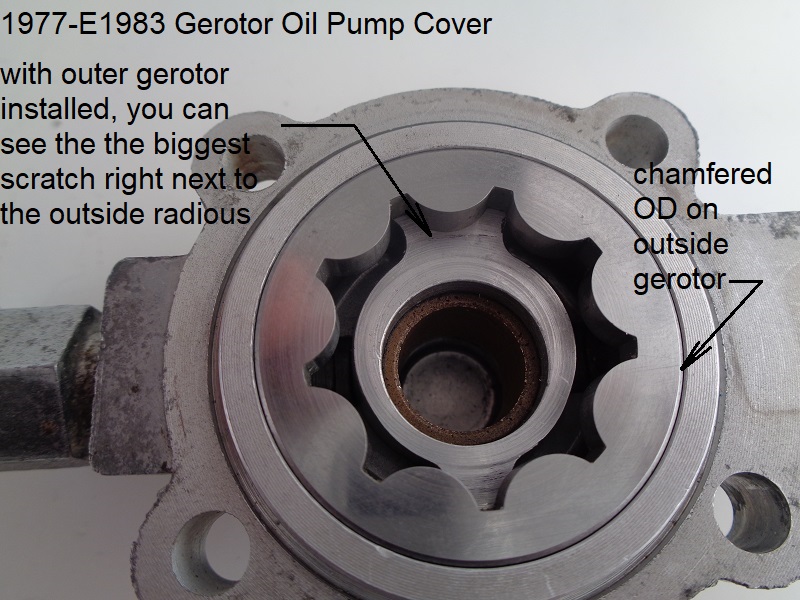
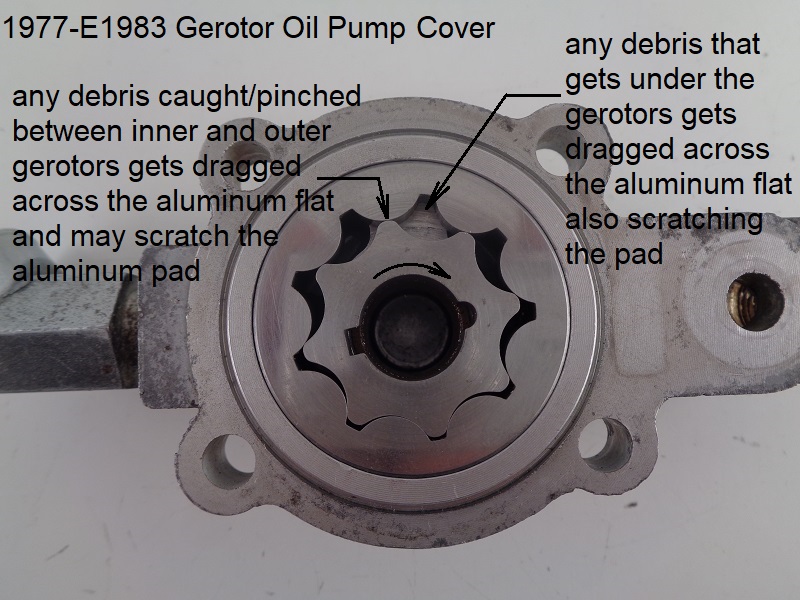
Inspect the gerotor surface in the cover and housing for deep scratches or gouges
Many (most perhaps) used oil pumps have scratches on both the gerotors and pump surfaces that the gerotors ride on.
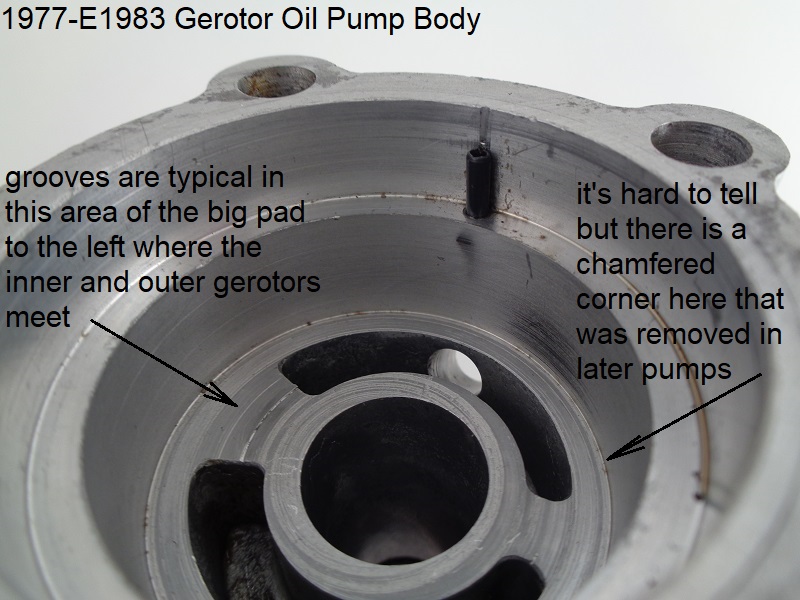
But, there is one certain spot that seems to be scratched more times than others. 4)
It's on the larger of the two pads in the pump body and the cover seem to usually have more wear.
Sometimes, the small pad is scratched or damaged also but not always.
The gap between the inner and outer gerotors on both the feed and return sides tends to be scratched as in the pics below.
Debris caught between these two gears cannot slide over and fall to the other cavity and out of the pump.
It gets locked between the teeth and ripped across the aluminum surface.
In theory, no particles of any size should be able to spin around to the small pad.
This is mainly due to the pressure generated by the spring washer and the gerotor spacing there.
Also, any debris picked up from the source side cavity should drop down into the feed side cavity and out of the pump.
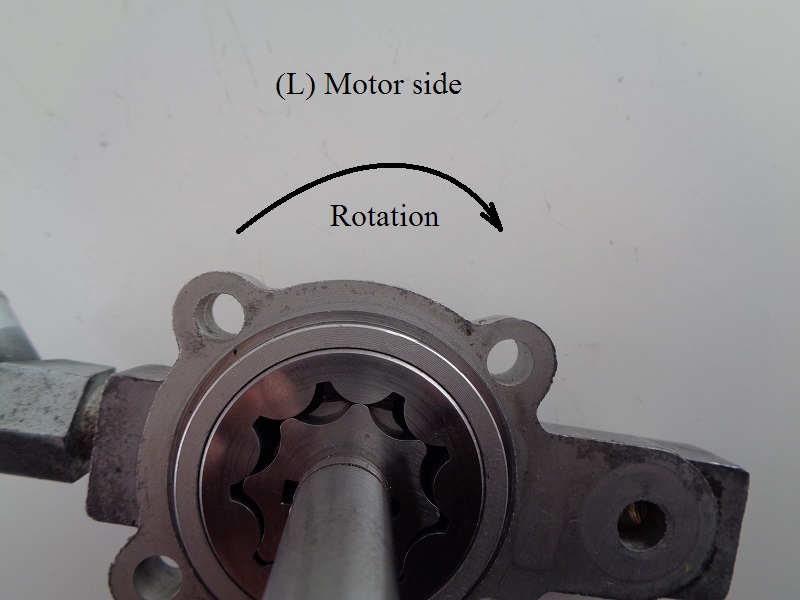
The side toward the motor is where oil is transferred to and from the pump.
The inner and outer gerotors come together on the other side (right side).
This spacing relationship doesn't change between the motor side or the outside of the pump due to the offset gearshaft.
But in reality, debris gets caught in or between the gears and gets dragged over the aluminum flats.
Some then find their way under the gerotors while the spring washer flexes from the stress.
The debris spins around under the gerotors and wears scratches in the flats (pads) or worse.
There should be some amount of reduced pressure because of the scratches (depending on how may and how deep).
Pressure generated to the output cavity can squirt back to the input side through these scratches.
How much pressure loss would depend on the width, depth, length of the scratches and oil viscosity at the time.
To make the pump inoperative or not make pressure (from the scratches alone);
The scratches would have to be proportional to the relative volume of all four gerotor reservoirs combined.
Then, the check valve would have to accept less pressure flow than the backpressure from the pump.
The gerotor surface in the cover would have to be eat up pretty bad to make the pump completely ineffective.
The pump would have less pressure loss with multi-weight or straight weight oil when cold than hot.
They'll both flow faster when hot.
| Gerotor rotation (cover shown) 5) | |
 |  |
Classifying Scratches in Gerotor Surfaces
HD says that if there are any notable scratches on the gerotor riding surfaces in the oil pump housing or cover, then they should be replaced.
Further comments by Hippysmack:
In thinking about it;
Oil is sucked uphill from the crankcase sump thru a small drilled oil galley in the case to the oil pump.
Oil is transferred from one inlet cavity to it's corresponding outlet cavity by way of pressure (not gravity).
The spinning gerotors force oil from the inlet to the outlet.
(due to further restrictions up the feed path).
So pressure loss is more concerning on the feed side (for this discussion, pressure loss thru the scratches in the gerotor surface in the pump cover).
It takes pressure to make the oil run uphill from the pump to the engine.
Whereas oil flow loss thru scratches is more concerning on the return side.
Easier to wetsump if oil is not flowing out fast enough.
This is more prevalent on the feed side than return due to back pressure further up the feed oil path.
When a tooth first enters the rather long inlet cavity, pressure starts building as it rotates around the end of that cavity.
Until the feed tooth is fully over the big pad in the cover, some oil squirts back into the inlet cavity from backpressure.
Once the tooth is fully on top of the big pad, pressure builds from there as it rotates toward the outlet cavity.
Oil is transferred out the pump from there and the pressure in that side of the gerotor is relieved until the next rotation.
This will lower the pressure to the extent of how deep the scratches are.
Deep scratches allow more oil pressure or oil flow to recirculate from the outlet back to the inlet within the oil pump.
This makes for less oil gauge pressure on the feed side as well as less oil flow to the motor.
This makes for less oil flow back to the oil tank.
They apparently didn't want to get into the weeds… as I've done here.
The feed path from the pump has many turns and restrictions that build pressure.
Since oil is not compressible, it can't absorb any of that pressure.
So excess pressure is sent backwards from the restrictions.
This is how oil can recirculate from the feed outlet back to the feed inlet through out of service clearances and oil pump pad wear.
When the pressure is reverted backward, it runs back to the inlet side of the pump.
If backpressure is allowed to constantly run back to the inlet side, it will send oil back up the feed hose.
If you normally would have say 4psi at idle on the pump outlet, you'd now have 2 psi on the outlet and 2 psi going back to the inlet.
The backpressure from the feed side would push more oil faster under the gerotors than the return side with less backpressure.
If the oil tank vent line is stopped up, backpressure on the return side of the pump will be greater and send more oil under the gerotors back to the sump.
The fact that there hasn't been a lot of talk on degrees of scratches in the oil pump says that most probably don't worry too much about them.
But then, you end up seeing that one complete teardown due to an oil pump problem and you get to wondering yourself.
Click Here to see expected oil pressure when tested with an oil gauge.
Click Here to see the page in the Sportsterpedia on how to install an oil gauge.
Checking oil pressure should be routine maintenance. You can measure the current oil pressure and keep a log on future pressure changes.
Hot oil pressure isn't that much at idle even with a new oil pump. Oil pump wear will lower that reading.
In fact, the figures in the FSM for expected oil pressure do assume the pump is in good (non worn) shape.
If pressure is low, you might want to look into the oil pump or other points along the oil path.
Low pressure doesn't immediately mean the housing or cover is scratched too bad.
But if you take a reading, replace the pump and take a new reading…. that does tell you something.
Below are a few used oil pumps showing scratches of varying degrees. Further comments are posted on top of the pics.
These are simply observations and it's up to the individual to decide how much wear on the gerotor surfaces in the oil pump are acceptable.
Any marked reusable should still be pressure tested and observed if you'll be using them.
| Metal chunk lodged in return inlet. The one medium scratch on big pad is some concern. Small amount of recirculation oil internally. Metal debris lessens amount of pickup oil at once. May be reusable with further observation 6) | Deep and wide channel ripped into big pad. Light scratches across small pad. High possibility of recirculating oil internally, (feed outlet to feed inlet thru big pad scratch) Owner said oil was not returning. Should be replaced. 7) | A gearshaft pin sheared and got into the return cavity. It broke out a corner of the big pad. The remaining flat surface of pad is undamaged. Should be reusable with further observation. 8) |
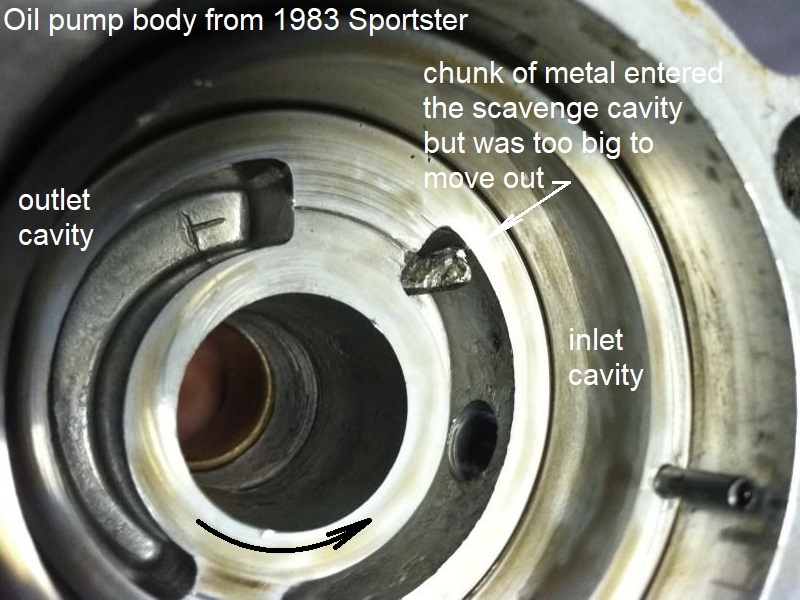 |  |  |
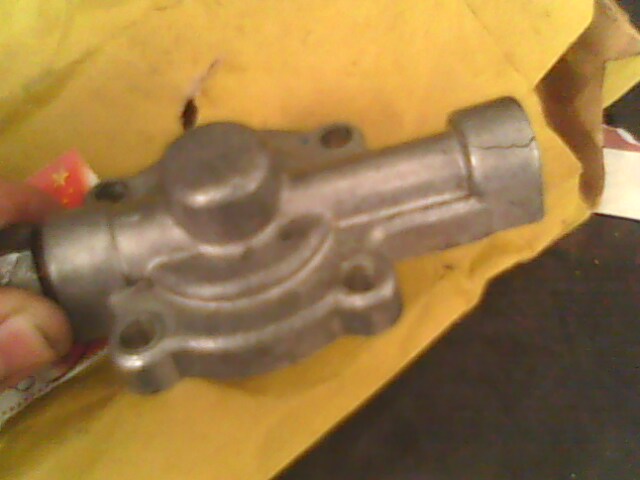
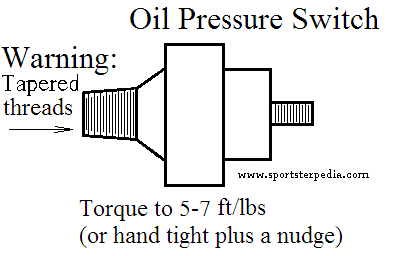
Check for cracks in the housing and cover
The cover below was cracked at the oil pressure switch end from tightening the pressure switch too tight.
The crack was welded over and a Dremil tool was used to reshape the cover.
Due to warpage during welding, the threads need to be chased with a tap to straighten them back out.
Inspect the Housing Roll Pin
The roll pin is installed into the “shelf” between the housing bores and it normally shouldn't see any shear force.
All internals depend on the strength of the solid pins, and the drive gear.
The outer separator plate has a slot in it that installs over the roll pin.
Normally the only force on the roll pin is stationary pressure from the outer plate wanting to turn with the feed gerotor under it.
However, sudden jolts or back pressure on the pump can strengthen that stationary pressure against the roll pin and either pull it out or shear it off.
Give the roll pin a slight tug with needle nose pliers to make sure it is good and pressed in and doesn't want to wiggle.
If there is any looseness or wiggle, pull it out and replace it now so you don't find it inside the motor later.

Inspect the gearshaft and bushings for damage or wear
- Check the gearshaft teeth for pits, breakage or wear. Replace the gearshaft as necessary.
Also do not forget to check the teeth on the oil pump drive gear on the pinion shaft.
If the teeth on it are thin, replace the drive gear.
Pinion shaft runout can wear the drive gear teeth down thin enough to break off and float with the oil. - Clean areas where the shaft sits in a bushing with steel wool if needed.
If it's not possible to smooth the areas out, replace the shaft. - Inspect the gearshaft bushings both the housing and the cover.
Look for scoring, excess wear and noticeable damage. Replace as necessary. - Check for a warped or seized bushing around the gearshaft.
The gearshaft should spin easily in the bushing without bumps or grinding.
Pull the spring washer out of the pump, reassemble without the spring and lightly spin the gearshaft listening for noises and feeling for smooth turning.
The only thing may make an oil pump bushing seize is if the oil lines are connected backwards (or low oil supply) creating heat around them. - Measure the gearshaft to bushing clearance on both the upper and lower bushings (maximum .0005”).
Replace any bushing with a clearance larger than that.- Clean the bushings and gearshaft of all oil / residue before measuring.
- Use a telescoping bore gauge to find the bushing ID.
Do not use a caliper alone to measure the ID of the bushings as it will not be accurate. - Measure the bore gauge (caliper shown below).
If you're not comfortable with using a caliper, then use a micrometer. - Measure the area on the gearshaft where each bushing will reside (upper portion for upper bushing, lower portion for lower bushing).
- Subtract the gearshaft OD from the bushing ID and that's the clearance referenced in the FSM.
Pics 12)
![]()
![]()
![]()
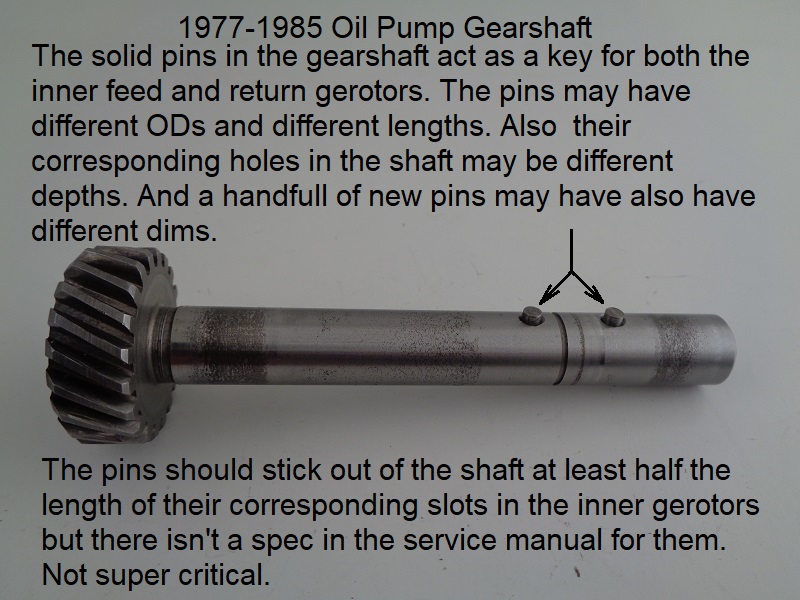
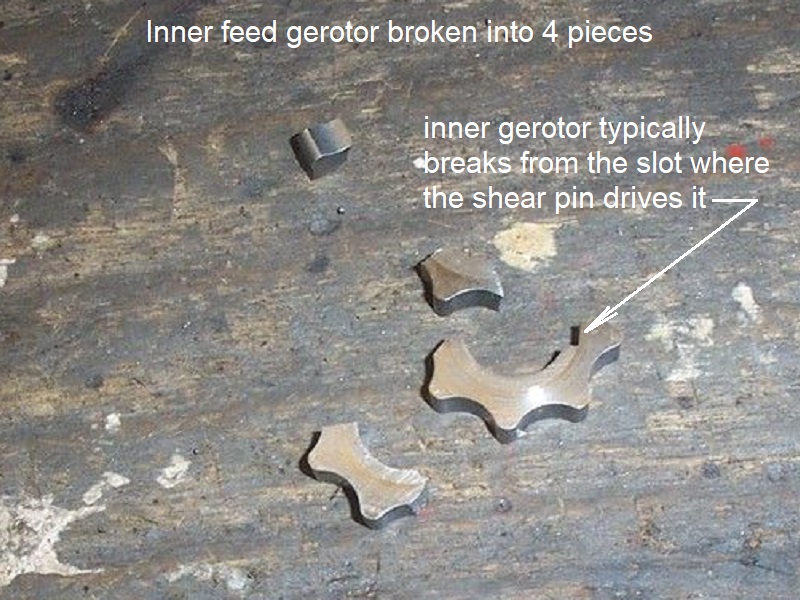
Gerotor shear pins
- The solid shear pins in the gearshaft may be different lengths and/or different OD.
There is no spec for the pins in the service manual. - The pins main function is to turn the gerotors.
Pin construction is designed to be the weak point and let go if the pump gets jammed with solid objects.
(like bits of metal etc in the gears, or if the oil pump bushings seize etc). - Just putting a new shear pin back in without fully rebuilding the pump and checking for jamming or seizing is begging for the same thing to happen again. 13)
- The gerotors are much taller than the pin thickness.
- So the height of the slot allows a fudge factor on quick throttle blips and the gerotors won't be affected.
The gearshaft will rise some on higher throttle and there is built in “up and down” clearance in the pump to allow this.
- The pins are not pressed into the gearshaft and the holes in the gearshaft for the pins are different depths on several used gearshafts inspected.
Knowing this, it makes sense to be aware that the holes in the shaft can wallow out or the loose fit of the pins can wear the pins faster.
You can buy a handful of new pins only to find they are all different dims as well.
If you find real slop in the pin fit to the gearshaft, either replace the pins and/or the gearshaft.
Do not buy hardened pins as that will defeat the purpose of the “shear pin” design. If the pins only protrude slightly into the gerotor slots, use longer pins.
The pics below are used parts but show the pin locations and how they look installed with a gerotor on the shaft.
Pins align with the square slot in the gerotors. 14)

Inspect both gerotor sets
Clean both gerotor sets with solvent, brake cleaner etc.
Inspect inner and outer pieces of both gerotor sets closely for cracks (most cracks are going to run vertically).
It may be hard to see cracks from a distance or when the gerotors are oily / dirty.
Cracks can happen when debris gets pinned between the inner and outer gerotors.
As they spin around and pinch something between them, the offending item tries to bind or lock up the gerotors while the geasrshaft still wants to spin.
Technically, the solid shear pins on the gearshaft should also be checked for damage if you find a cracked gerotor.
The pins should shear before that much pressure is put on the gerotors.
If aftermarket hardened pins are used instead of OEM pins, they could hold up and not shear which transfers gearshaft energy to the gerotors instead.
This is another example of parts designed to fail before others down line do.
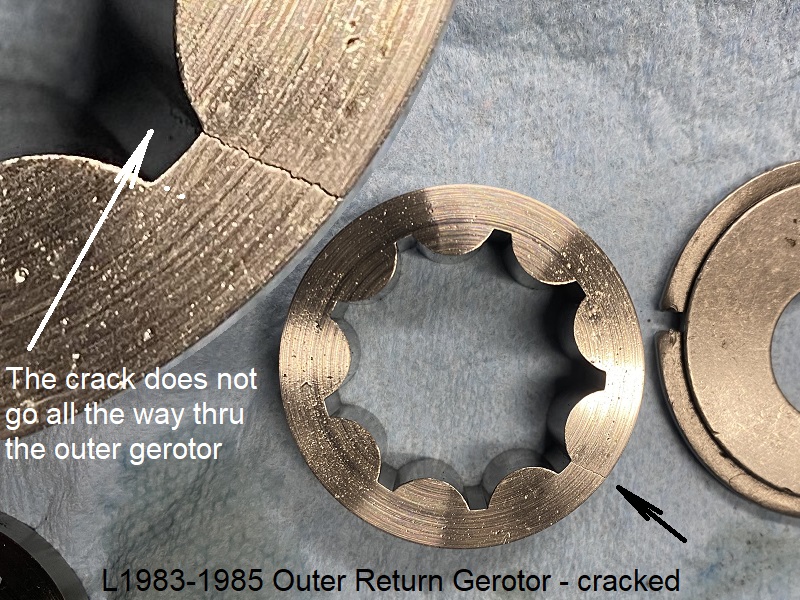
(L - below) The outer return piece below was cracked but not all the way through. Being cracked at all is still a problem (could result in lower oil pressure).
Replace any gerotors with damaged teeth, nicks or cracks.
The problem will only get worse (gerotor will break into pieces) and oil pressure will be lower until the gerotor breaks.
(R - below) The inner feed gerotor broke into 4 separate pieces starting from the slot in the gerotor where the gearshaft pin catches it.
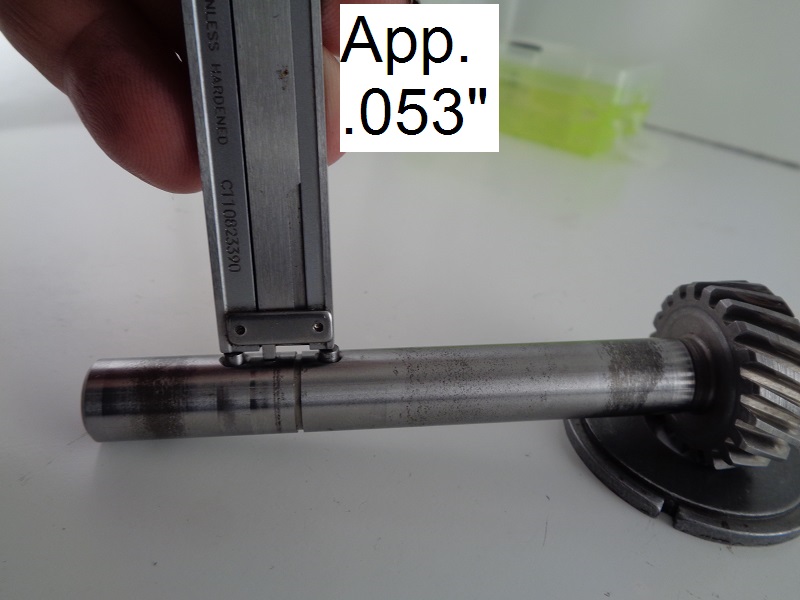
Check inner to outer gerotor clearance on each gerotor set.
Each gerotor set is made with an inner and outer piece. Mesh the two pieces together (as they normally would sit in operation).
This clearance has a direct relationship to oil pump flow and oil pressure.
The wider the clearance the more the gerotors lose their ability to hold enough pressure to the outlet cavity.
They also the ability to transfer oil from the feed cavity back to the inlet cavity and recirculate oil within the oil pump.
- Arrange so there is 1 inner tooth facing the center of the wide outer radius.
Use a feeler gauge between the inner tooth and outer radius there for a maximum of .004“ clearance between them.
If the clearance is larger than .004”, replace the affected gearotor set. Repeat for the other gerotor set.
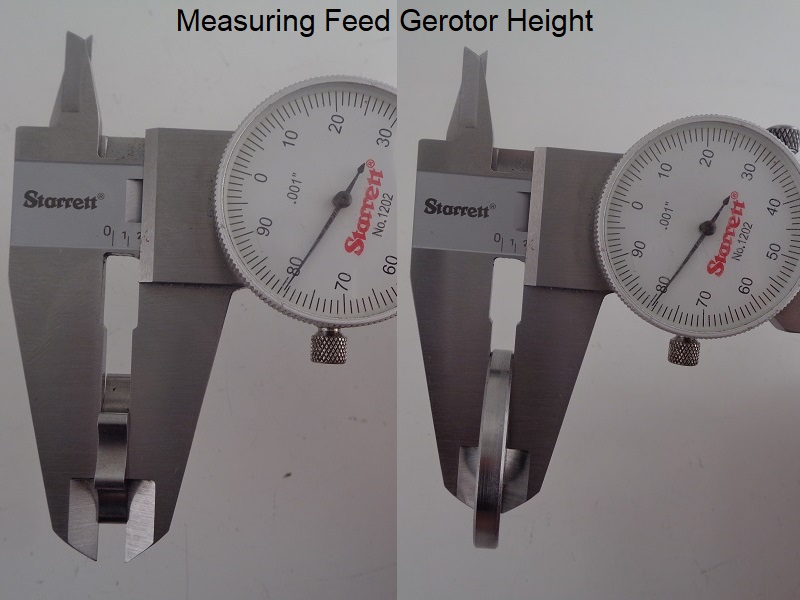
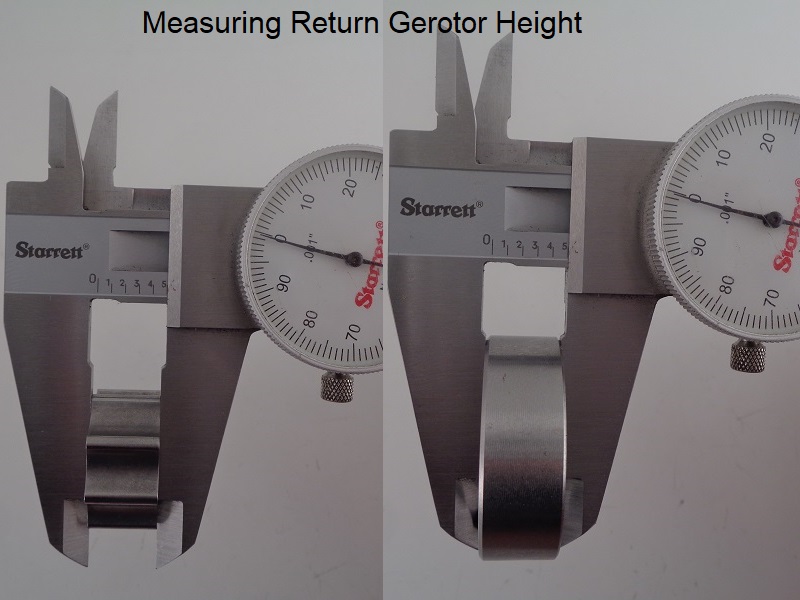
- Measure the height of each inner and outer gerotor set.
Each inner and outer piece (feed side) should be the same height, each inner and outer (return side) should be the same height.
Replace gerotors as a set respectively if the inner and outer pieces are not the same height.
A micrometer will reveal tighter measurements rather than the caliper used below.
However, there are so many small variances in these pumps that less than .001“ increments isn't going to be the hill to trash your pump on.
Inspect the Seals and O-rings
It's never a bad idea to replace seals and O-rings every time you go into the oil pump.
If they still hold tight enough and aren't damaged or compromised, they can be reused.
But they need to be inspected for cracks and deformities first.
If you used carburetor cleaner or some type solvent to soak the oil pump for disassembly, it's best to replace all the O-rings.
Replacing the pump gaskets is a no brainer.
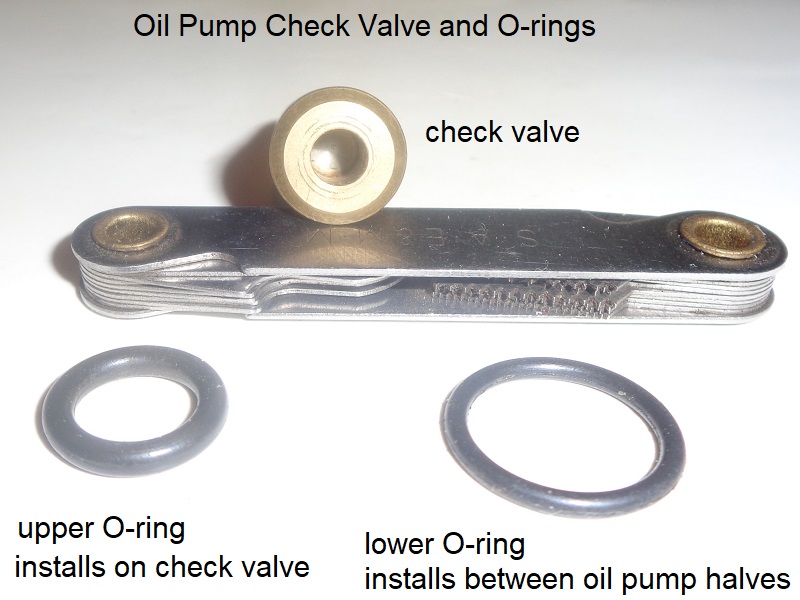
- Inspect the check valve and cover to housing O-rings and make sure they are not damaged/deformed/out of round.
The upper O-ring should fit tightly around the check valve and show some resistance when installing the assembly in it's bore.
The lower O-ring should fit naturally in it's seat without bending. - Inspect the gearshaft seal for deformity and / or wear.
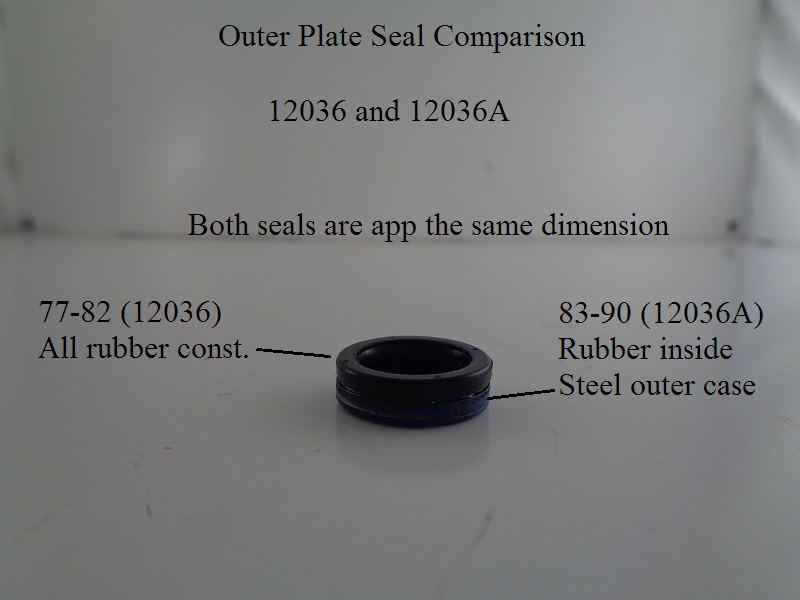
There were 2 different type outer plates that each require their own type shaft seal.
The early rubber shaft seal just sits there between the plates and hugs the shaft. It always needs to hug the shaft.
If it's deformed or easy to slide off the shaft, replace it.
The later shaft seal is rubber inside with a steel outside that presses into the late outer cover.
Check to make sure it's properly seated in the plate and it's ID hugs the shaft all the way around.
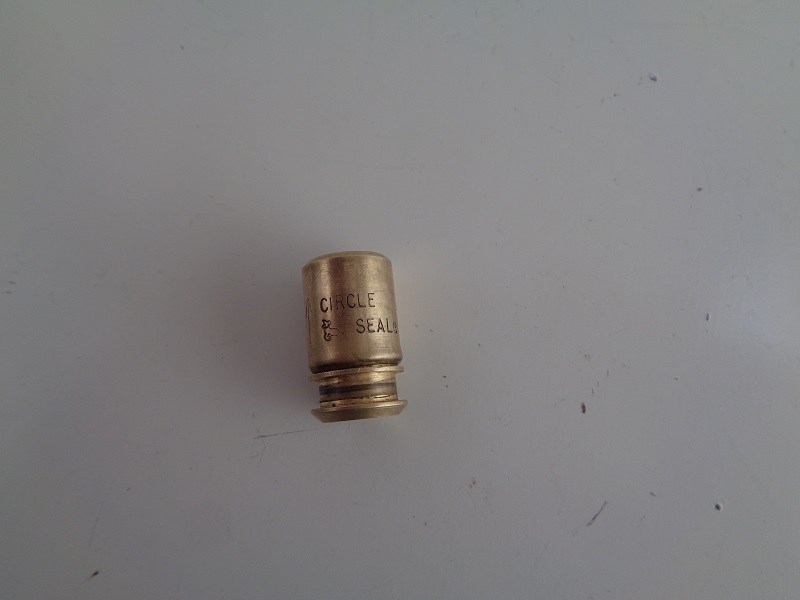
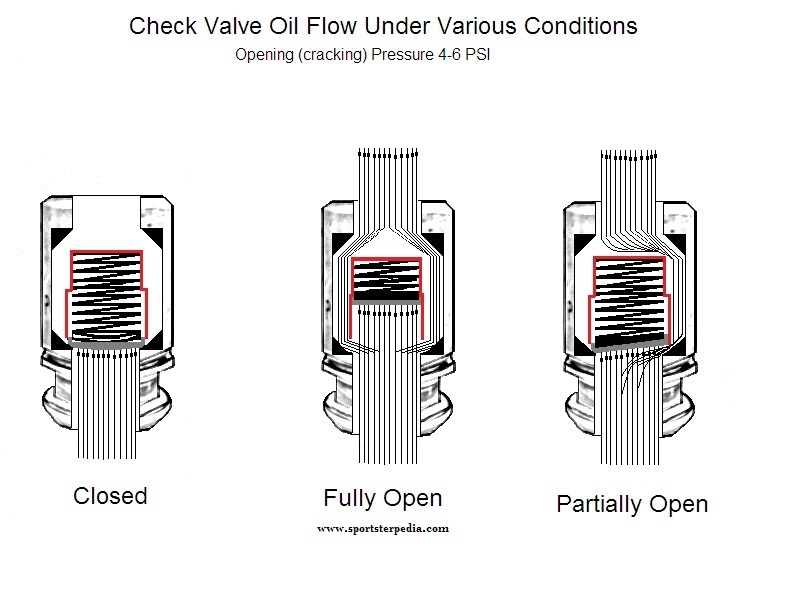
Inspect the oil check valve
Click Here to read more about the oil pump check valve in the Sportsterpedia.
- Make sure it's not clogged and the internal spring closes the cup / disc properly.
The spring loaded cup inside the valve should be free to move and should return to it's closed, seated position.
It the check valve is damaged in any way, the complete valve assembly should be replaced.
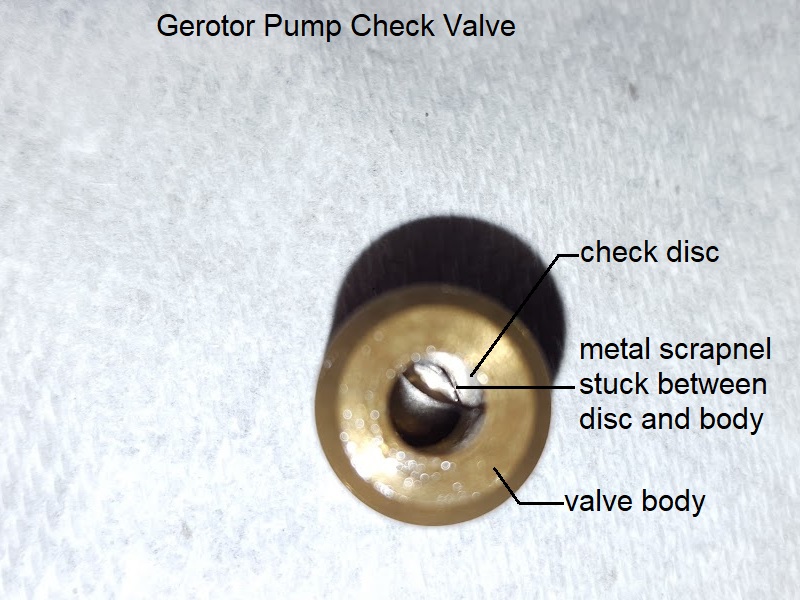
There are no replaceable parts to it. - Loose metal particles can get stuck between the disc and the valve body keeping the disc from closing.
If you find metal debris in the check valve, there may also be metal that made it's way past the check into the motor.
(R) below, the check valve was stuck open with metal debris.
Inspect the spring washer
The spring resides between the separator plates (between the feed and scavenge gerotors) and is supposed to keep pressure against both plates.
The inner plate stops at the housing bore “shelf” and doesn't push against the return gerotors.
The outer plate does push against the feed gerotors due to the spring washer behind it.
The spring washer basically keeps the flat outer plate against the flat feed gerotor surface.
(essentially stopping feed oil from entering the return side of the pump)
This should keep down cross connection of oil between the feed and return side.
However, sediment / debris that may get under the plates can kick them at an angle causing cross connection of oil.
If a piece of trash / debris gets into the supply side of the cavity and crunched between the gerotors;
It gets carried past the output cavity and spins around to the other side where the inner and outer gears come together.
The small space between the gears there won’t change.
So any debris that doesn’t get crunched up here causes the gerotor to jolt and rise / fall toward the spring.
(since there is nowhere to go against the cover or body)
The debris slides and rotates between the gerotor and the aluminum cover or body and rips into the aluminum surface on its way around.
So, the spring can be a blessing or a curse depending on how you look at it. It helps keep the pump from locking up immediately from debris.
But it also allows for the destruction of the gerotor surfaces.
Even so, the spring washer is the heart of that barrier between feed and return oil in the oil pump.
The shaft seal also stops oil from traveling up or down along the shaft especially keeping feed oil from pumping up the shaft into the cam chest.
But without the spring washer, feed oil would simply bypass the plates and circulate from the feed inlet to the return outlet of the oil pump.
Replace the spring if broken or there are any “fingers” broken off.
