Table of Contents
This is an old revision of the document!

IH: Oiling & Lubrication
Oil Leaks
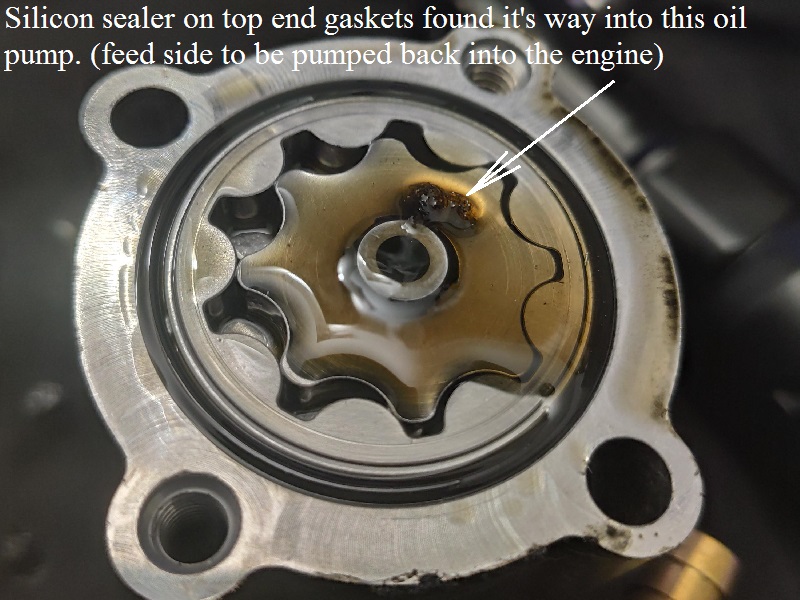
First and foremost, do not use silicone sealer on any engine, oil pump or related parts or gaskets to stop a leak.
The heat coupled with crankcase pressure pulses can break pieces of it loose and send them through the engine.
These pieces may stop up oil passages and starve the engine of oil.
The gaskets / seals made for Sportsters are more than efficient for stopping leaks.
If you have continual leaks after installing new gaskets, chances are it's not the gasket's fault.
There may be manufacturing, fitting, high internal pressure pulses, warped sealing surfaces or other issues to address.
Silicone can break up into small film sheets and float around the oil path stopping up the small restricted passages.
Both feed and return sides of the oil pump create suction on their inlet sides as they rotate.
The feed side of the pump is gravity fed from the tank and the feed gerotors send pressure into the engine.
It is mainly dependent on gravity oil from the tank.
The scavenge side of the pump is fed by crankcase pressure pushing the oil to the scavenge port in the crankcase.
It is more dependent on the flywheels to get the oil to the scavenge port.
If there is an obstruction in the return path from the crankcase to the oil tank, it will slow the flow of oil out of the engine. This can cause weak or no oil flow.
If the scavenge side of the oil pump is not flowing oil fast enough to the tank, oil will build up in the sump.
This can result in higher crankcase pressure, more oil film spinning around the flywheels, engine drag, blowing rocker box gaskets and general oil leaks.
In an instance where used silicone was used to seal the gaskets, pieces of silicone (or sheets) could be sucked in, stretched and broke off into the engine.
This silicone 'gummy bear' sheet was found in the oil pump.
 1)
1)
An oil leak could also be a crankcase pressure problem. A situation where the engine is both blowing out and then pulling in air from the rocker box gaskets.
04-up engines seem to be more susceptible to crankcase pressure problems.
It's important to inspect and change out the breather valves periodically. Read more about the breather valves below.
Visual Inspection
Loose Bolts
- DO NOT try to simply tighten the head or rocker bolts that may be loose.
All multiple bolt fasteners are required to be torqued in a cross pattern.
Likewise, simply tightening only the bolts that are loose will change the clamp load on the ones that are tight and not touched.
If you feel it's simply a loose bolt, loosen all the bolts on the rocker box / head / etc.
Then torque them back using the correct specs and tightening sequence.
Leaking with Engine Running (weeping gaskets)
See also Wet Sumping in the Sportsterpedia.
Weeping cylinder base gaskets:
Please do not jump the gun. Clean the area and ride the bike.
- The first thing usually thought of with weeping gaskets is loose bolts.
- Too much vacuum in the engine caused by a failing breather valve or incorrectly timed breather gear can implode or work loose gaskets.
- Don't rule out a crankcase seam leak until you've cleaned and inspected it.
Using powder to detect a leak:
- Degrease the bike until there's no oil remaining.
Then take some Soft n Dri (women's antiperspirant spray), talcum powder etc. and spray it around the rocker gaskets (or other suspected leaking area). 2)
It will go on clear but when it gets heated will turn to a white powder. Just a light film is all it takes.
Whenever it starts leaking it'll show up exactly where the leak is.
- Clean the engine, then start it and use a bright light to see where the leak is coming from. 3)
The light should make the liquid oil shine. You may only have to run your scoot for a few seconds to start leak.
| Evo Rocker boxes sprayed with powder antiperspirant to detected oil leaks. 4) | |
 |  |
Leaking with Engine Shut Off
Sit Sumping. See more about Sit Sumping in the Sportsterpedia.
- Clean the area thoroughly (like with rake cleaner and air blow dry). 5)
Let it sit long enough to begin leaking and blow some talcum powder over the area.
The talc will stick to the oil and pinpoint the origin.
- Take an old bike tube and cut a piece while retaining the valve stem. 6)
Use a hose clamp to tighten it over the filler neck on the oil tank.
Then put a lb are two of air pressure on it and see if that helps you locate where it's coming from.
Leaking Out the Breather Vent
Oil leaking out the breather vents (or oil carry-over) can happen for many reasons.
First, the air leaving the engine can carry oil mist with it which is normal.
Oil is supposed to be fed to the engine, lube the related parts and be sent back to the tank as quick as possible.
If the oil is allowed to stay in the engine too long before returning to the tank, the result is more oil 'carry-over' inside the engine than designed for.
Carry-over, where do you start? What are you looking for? First you've got to qualify the complaint.
Ask the right questions.
- When does it carry- over?
- Driving at steady highway speeds? See Wet Sumping here.
- After the bike's been sitting for a couple of days and you start it up? See Sit Sumping here.
- Clean the affected area and ride or run the bike and reproduce the problem with the breather hose in a baby bottle (or other) test catch can as described here.
This will help you better understand the amount of carryover you're dealing with.
- Start the diagnostics and separate the systems qualifying each one as you go.
- Oil tank:
- Return lines:
- Venting system:
- And finally the motor:
Diagnosing the Cause of Oil Leaks
See also in the Sportsterpedia:
Obviously you must find exactly what is leaking before you can determine what will be needed to fix it. 7)
Degrease the area in question and run the bike a little and watch the area for the beginning signs of seepage.
Check torque on the bolts on covers and parts with gasket/seals but do not tighten more than the specs in the FSM to stop a leak.
That may result in stripping the threads.
If you have a gasket / seal that has needed replacing several times, you must find the cause of the continued failure and then repair that.
In some cases, a considerable amount of the engine has to be disassembled just to get to the problem. Refer to your FSM for the proper procedures.
Always keep a close watch on oil levels if you know you have a leak.
Crankcase Pressure Problems
Excess oil coming from the breather vent could be a symptom and the root cause can sometimes be related to an imbalance in crankcase pressure.
Fixing the imbalance can be mean from re-routing the vent lines to replacing the umbrella valve to replacing the rings.
It depends on what the problem is.
- Engine crankcase pressure is designed to have a slight vacuum with the engine running.
A non functioning breather valve can create a situation where air is not able to leave the engine normally to the point where oil/air mist gets too thick.
Then the oil doesn't separate fast enough from the air and comes out the vents.
- In a perfect world, you would only have a slight oil mist coming out of the crankcase breather which could easily be routed into the air cleaner.
(keeping the E.P.A. happy by depositing the oil back into the engine instead of dripping on the ground).
This problem has been almost eliminated with the OEM breathers venting into the A/C.
To clarify, oil mist from the breather is always present to some degree.
It's just not as visible when the vent is connected to the air cleaner.
- Make sure make sure there are no kinks or low spots in the breather hose that would stop or slow down the engine from breathing.
This would bottle up crankcase pressure and cause the internal pressure to implode the gaskets and create a leak.
Also make sure there are no obstructions (sludge) in any bends that may be in the hose.
However, a few drips of oil out a vent hose while parked is normal.
This does not qualify as oil 'puking' out of the vent (which is more of a sudden rush of oil).
- The breather vent usually works fine on OEM engines. Problems have been noted however when bigger pistons / performance upgrades have been added.
Engine upgrades sometimes comes with extra baggage.
Bigger pistons brings with it more air displacement under the pistons (higher air volume in the lower case, more oil getting splash around).
- Aftermarket accessories sometimes seem better than they are. Just because someone made it doesn't make it work as it should.
Some aftermarket breathing systems and accessories can make normal oil carryover visible sooner than OEM systems.
- A stopped up / restricted air filter on the end of the breather hose can back up crankcase pressure and cause an imbalance inside.
- Heavy oil flow 'puking' from the breather vent only on cold start up could be from a sit-sumping condition where oil is draining into the sump when parked.
Your motor may be filling with oil while the bike is not running and it all gets pushed out the breather when you start the bike.
Inspecting the Oil Tank
Overfilled Oil Tank
Read more on Overfilling the Oil Tank here in the REF section of the Sportsterpedia.
How about that oil sucking gremlin that steals half a quart every evening? You feel compelled to bring that oil level up to spec the next morning. 8)
- Before topping off the oil tank, run the engine if possible for about a 30 min. ride.
- This heats up the oil to operating temperature and suspends the solids in the oil instead of it laying on the bottom of the case.
- This also allows the oil pump to send most of the oil in the engine back to the tank before you add more so you get a more accurate account of the oil level.
- Failure to warm the engine first can result in an overfull condition in the system and you can end up blowing the cap off the oil tank and a big mess.
- Overfilling your oil tank can also result in engine drag (wetsumping) and puking oil out the air cleaner.
When the tank is slightly over filled, oil that was standing in the sump is added to the tank via the oil pump, thus raising the level in the tank.
The excess oil in the tank will either flow back into the gearcase via the tank vent or up and out of the oil cap.
Excess oil that returns to the gearcase through the tank vent is picked up with crankcase air pressure and blown out the engine breather valve(s).
So, depending on your venting setup, oil can be blown into the air cleaner or out the vent lines due to overfilling the oil tank.
It can also blow the cap off the oil tank. - The oil tank is vented to the gearcase / cam chest in the engine using a stand pipe in the oil tank.
Too much oil in the tank overcomes the vent (which is only supposed to send air from the tank to the gearcase).
The result will be oil being sent back to the gearcase and out the engine breather.
Damaged or Flooded Oil Tank Vent / Return Tube
Vehicles with oil tanks, that have all the fittings on the bottom of the tank, use a stand tube inside the tank for the vent line. 9)
- Short, damaged or tilted stand tubes:
- The top of the stand tubes should be above the oil level at all times. Check aftermarket oil tanks to be sure of this before using them.
- If the stand tube is damaged below the oil level or the level of oil is above the top of the stand tube;
Oil carry over will continue until the level of oil is below the damaged portion or the top of the stand tube. - Tilted stand tubes:
- Oil may carry over thru a tilted stand tube as long as the oil supply exists.
Diagnostics #1:
- With the oil level correct in the tank and the ignition off, pinch off the vent hose and remove it from the crankcase vent hose fitting.
- Direct the hose into a catch pan and un-pinch the hose.
- Bike should be upright.
- If oil begins to trickle out of the vent hose, allow it to run until it stops.
- Recheck oil level in the tank.
- Down a quart? Must be a short or damaged stand tube.
- Replace the oil tank.
- No oil ran out the vent hose?
- Don't give up.
- Leave the vent hose unconnected and cap off the crankcase vent fitting.
Note: If you do not cap off the vent fitting, you're going to have a real live mess. - Now start the engine and remember to keep that hose pointed into the catch pan.
- If oil begins to trickle out you have a tilted stand pipe.
- Try switching the return oil hose with the oil tank vent hose at the oil tank before you replace it.
This simple act may save both time and money by not replacing the tank. - No trickle from the vent hose?
- So the problem's not in the oil tank. Reconnect the crankcase vent hose and move on to the next step.
Diagnostics #2: Return system vs motor:
- Remove the return hose at the oil pump return fitting and plug the hose so oil doesn't run everywhere.
- Select a length of oil hose long enough to reach the oil tank filler neck when connected to the oil pumps return fitting.
Note: Before connecting the test hose, note the number of threads exposed on the return fitting to return elbow connection. - Remove the fitting and elbow and inspect how far the fitting is screwed into the elbow.
- The fitting may be restricting the return oil flow. If so, modify the fitting as required and reinstall.
- Now connect the test hose to the return fitting and direct the open end of the hose in to the oil tank.
- Run the engine and note if the carry- over is much improved or stops.
- If it stops or improves, the problem is between the oil pump return fitting and the oil tank.
Note: In rare instances you may have to ride the bike to reproduce the same set of circumstances to be sure you've corrected the problem. - Remember, put the breather hose in a non-breakable container, secure both the bottle and hose to the frame.
- A plug must be fabricated to hold the test return hose in the oil tank filler neck and control spillage of oil from the oil tank.
- A modified oil dipstick plug may fill the bill.
Important: No restrictions in the test return hose. - The carry-over cleared up?
- Start looking for that restriction i.e., a pinched return hose, after market oil filter, oil cooler, plugged fitting or hose.
- Friends let's bow our heads and repeat after me.
I will never willingly install any fittings, probes or adapters which reduce the oil pump's ability to return oil to the oil tank as this will lead to carry over big time.
Amen!
Diagnostics #3:
- So it's still carrying over and you've performed every test including checking that return fitting.
- Oil can be getting into the engine in a number of ways.
- This carry over will occur upon start up after the vehicle has sat for a couple of days.
- If no improvement, the problem may be deeper than this.
- Continue with the following section.
- Now that your anticipation has built to a fevers pitch. Go ahead, pull off the pump, take off that earn cover.
- But know what you're looking for. Examine the following:
- Oil pump return pockets for damage, grooves, a sheared drive gear key.
- A damaged breather gear or pocket or out of time.
- Don't just look at it, pull it out.
- A damaged gasket surface between the trap area and the cam compartment.
- A cracked or porous cam cover.
- A plugged evacuator hole in the trap compartment.
- A plugged return passage to the return gears.
- If you do find it, remember during oil pump reassembly turn the seal around between the feed and return gears.
- The I.D. lip should face the feed gears.
Inspecting the Engine Oil Return System
Restricted Oil Return Hose
- Oil carry over will occur while driving the vehicle at highway speeds. The amount of carry over is directly related to the amount of restriction. 10)
- More restriction, more carryover. In most cases the restriction is minor and translates to a small amount of carry over, which if left alone creates a bothersome mess.
- Start looking for pinched hoses or a restrictive oil filter.
Transmission Vent Hose
Check the tranny vent hose for kinks or a blockage.
Blow on the hose end to make sure you can push air thru it. Do not used compressed air as that can damage the sprocket shaft seal.
Reroute the hose if it is showing a kink in placement or replace it if you can't blow through it.
There should be no sags in the hose between the attachment to the engine and the open end of the hose.
There are a couple of Service Bulletins discussing proper vent hose routing with illustrations.
Test for Excess Primary Compartment Vacuum
You can test for too much vacuum in the primary with the engine running / transmission in neutral. 11)
You can make your own slack pretty cheap out of some 2×4 pieces, a 2-3 ft ruler and a clear tube.
Or you can adapt a clear hose to the tranny vent line and drop it into a glass of water.
If one inch or more of vacuum is present, the sprocket shaft seal may be allowing engine crankcase pressure (air/oil mist) past it.
Primary Oil Smell Like Gas?
Where did the gas smell come from?
See Why Does the Oil Smell Like Gas in the Sportsterpedia.
A failed transmission sprocket seal will allow engine oil/mist mixed with fuel into the primary.
The rotation of the sprocket rotor, clutch and transmission gears, especially at high revs, has the capability of making a lot of positive (pushing) pressure.
This generated air pressure is usually vented from the tranny vent hose.
If the carb were to leak gas into the crankcase and mix with the engine oil;
Then the pressure builds in the primary due to a kinked hose;
The primary pressure could open the seal and vent into the crankcase.
The crankcase is always pulsating positive and negative pressure (push pull air motions are generated).
So while the primary opens the seal, the CC is pulsating oil/gas/mist into the primary.
There is an internal spring on the seal to hold it against the shaft.
If the spring fails, it's failed for good until it's replaced.
However, higher pressure than designed for can skeet oil past the seal.
And when that pressure subsides, the spring lays back down.
The seal still works as long as the nitrile rubber hasn't been compromised in the process.
Internal Inspection
Check the breather valve
The umbrella valves are simple rubber flaps that will get hard over heat and time.
They should be inspected periodically for hardness and replaced if they are not soft.
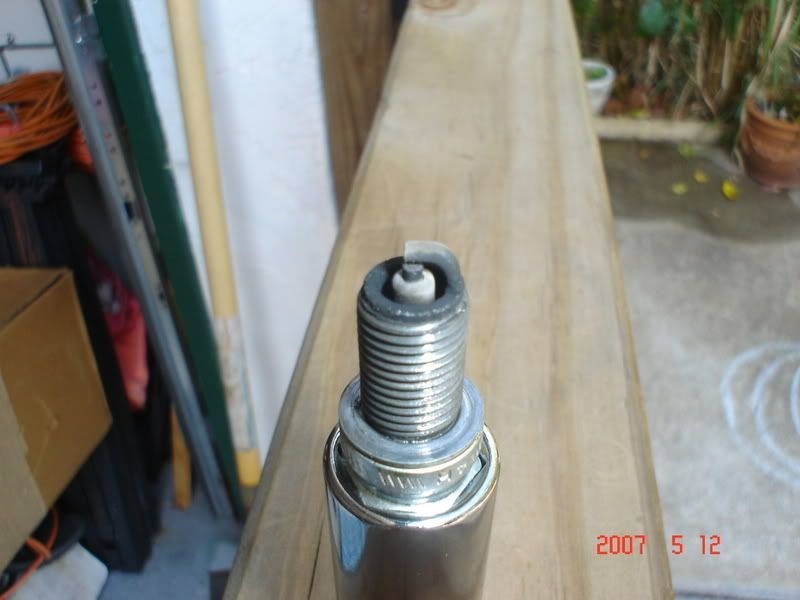
Check the spark plugs for oil fouling
Worn rings or an imbalance in crankcase pressure can send oil up into the combustion chamber and foul the plugs.
Check the plugs for wet oil saturation.

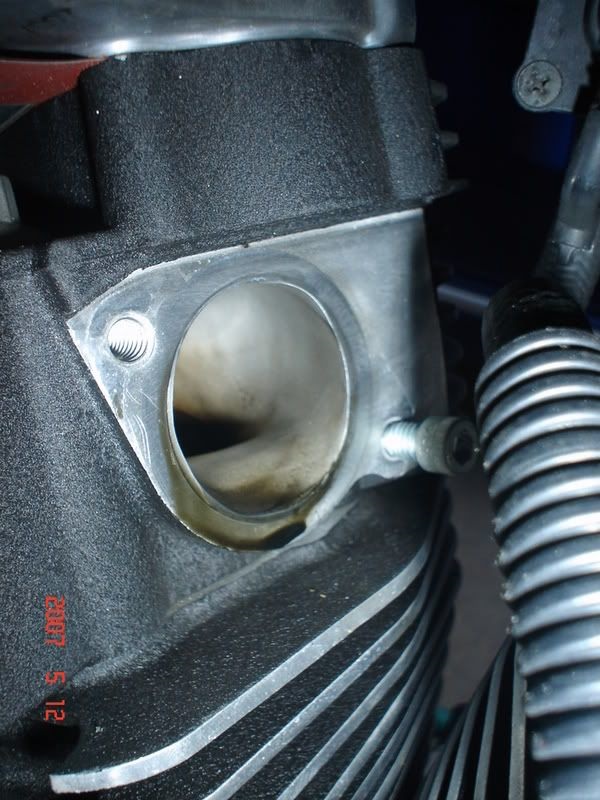
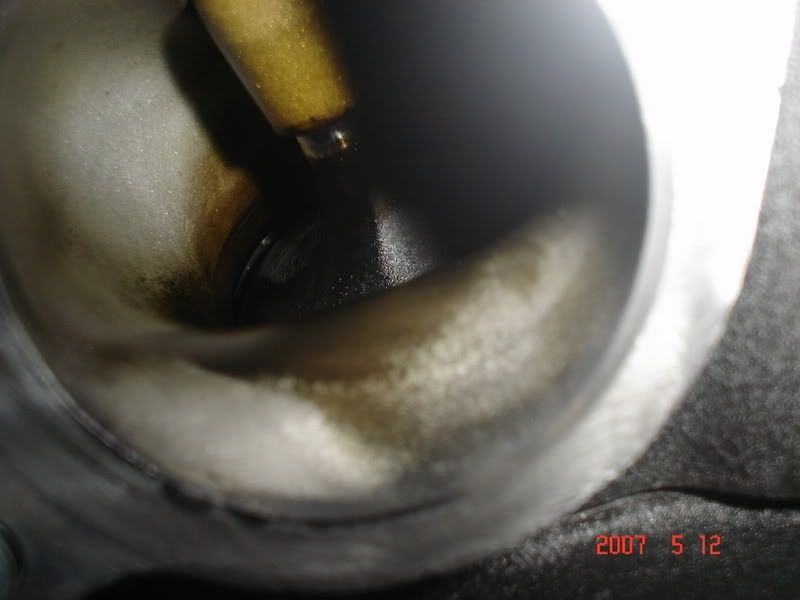
Check intake and exhaust ports in the heads
You can pull your exhaust pipes and intake manifold and look at the valves to see if the oil is leaking past the valve stem seals. 14)

Check oil smudge marks when removing the heads
When dismantling the top end (or to bring parts to your mechanic)and before cleaning the head gaskets / surfaces, check them for oil smears. 18)
Smudge marks can be a give away as to where any leaks might occur. Also take a few pics of them (no flash, direct light and a steady hand).
The gasket has been known to raise around the head oil drain and only on the inside edge of the gasket.
So no outward sign of the leak. With the head removed an experienced eye may be able to spot the problem.
Transmission Sprocket Splines
A service replacement mainshaft sprocket nut (35049-71) was made available to prevent transmission oil leakage from the sprocket splines on 1971-E1984 models.
The new sprocket nut encloses the end of the mainshaft and provides a metal to metal seal between the sprocket, lockwasher and nut.
(when tightened to 35-65 ft-lbs torque)
See TSB #M886 on the Service Bulletin page in the Sportsterpedia.