Table of Contents

REF: Engine Mechanicals - Sub-01A
Timing Inspection Hole and Plug - Sealing and Thread Repair
This is a common problem with all 57-03 Sportsters. It doesn't matter if you’re working on an Ironhead or Evo, drain plug or timing inspection plug. The problems and solutions are all the same.
Common Causes of Stripped or Damaged Threads
- These are aluminum internal (case) and steel external (plug) threads (5/8“x18 NF straight bolt cut).
- It is a common occurrence to damage these threads or for them being found to be damaged. Whoever threaded the plug in last may have not taken the time to insure proper thread starting before using a wrench to install the plug and cross-threaded them. Over tightening the plug can crack / stretch the threads and thermal expansion can warp and gall them 1). Sometimes the threads get corroded and galled to the point that removing the plug takes the threads out with it. You can't be certain that the threads haven't been galled before you remove the plug. 2) If you've noticed oil seeping from this plug, the threads are at least suspect.
- The threads can appear to strip for no apparent reason. The problem with drain and timing plugs are the same. 3)
- Common occurrences include: 4)
- No problems the last time the plug was installed.
- No problems when the plug was pulled out last.
- But when trying to re-install the plug and with little to no torque, the threads did strip.
- You may have had it out 100 times before and can’t understand what happened now. 5)
Case in Point:
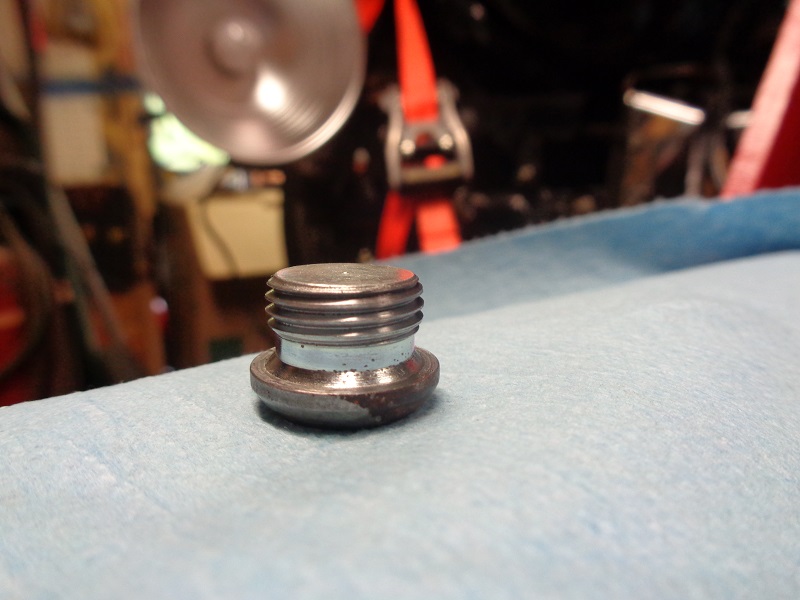
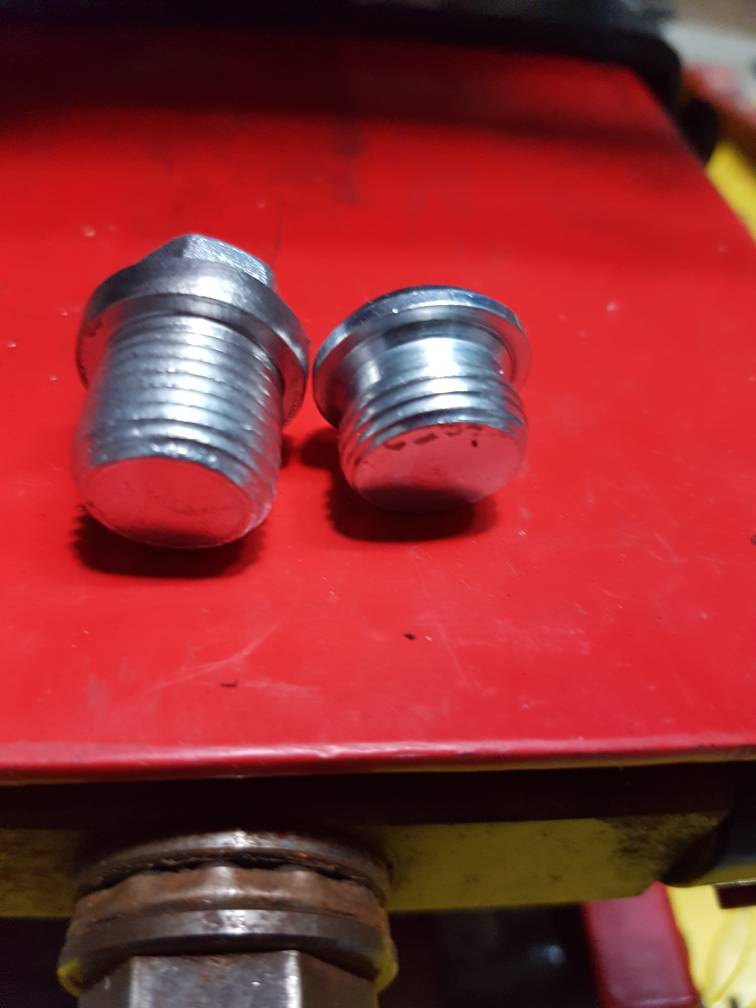
- Below is a case drain (left) and a Colony acorn style timing plug (right).
| See this undercut unthreaded area? All oil plugs are made like this in Milwaukee. 6) |
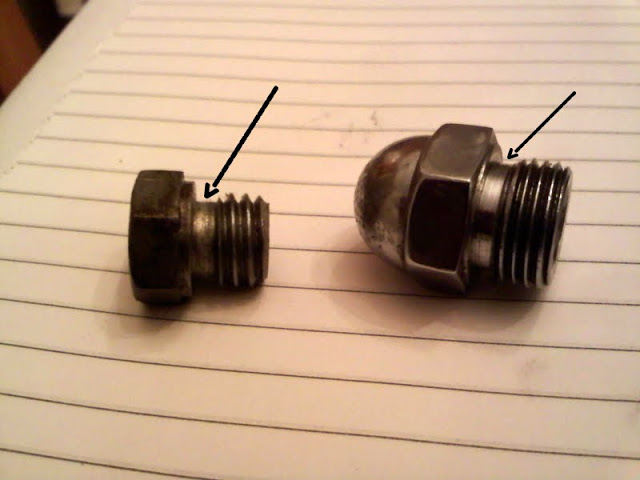 |
- If there was no undercut, the threads would have incomplete form next to the underside of head. These incomplete threads wouldn’t allow the flat sealing face of the plug to contact the case before the threads were bound up in the tapped hole. So, the malformed threads get cut away by the undercut. The (necessary) undercut is where the problem comes from. The tapped threads in the case run the length of the hole except that there is a (one thread) counter-bore in the front of the case.
- In both positions, when the plug gets put into the hole (hand tight) to the sealing surface, there are a few aluminum threads that end up in the undercut of the plug. The plug thread in this area doesn’t have a mating thread when you tighten the plug. It is unsupported. 7)
- The aluminum threads above the undercut do mate to the plug. Then, you put the wrench to it. Under the tightening torque, the aluminum female threads (that are in contact with the male plug threads, above the undercut) get slightly deformed. The aluminum threads, in contact with the plug, get yanked towards the aluminum threads that are just hanging free in the undercut. This creates a sort of cross-threaded condition in the case. A deformed thread just above a non-deformed thread that lives in the undercut. At this point the plug is tight, as in (the last time you tightened it). 8)
- The next time you remove the plug, (this time) something is present that was too subtle to notice when you break the plug free. It turns freely out about 1/8 turn and then gets too tight to remove by hand so you put the wrench on it and spin the plug out. 9)
- It’s right here that the stripping has begun. It got tight because the plug was forcing the deformed female threads back into sync with the non-deformed female threads that live in the undercut. So, the deformed threads get flexed back by the undercut threads as they need to get back in sync for the plug to unscrew. This force of synchronization flexes the undercut threads also. Flexing a piece of cast aluminum back and forth will cause it to break or let loose. 10)
- So, it’s not necessarily the design of the oil plug that causes the damage but more of the way the wrenching gets done over the years. Because the damage gets done on the previous in / out cycle, it gets hidden by time the next fatal in / out happens. That’s why it seems to strip out of the clear blue sky. 11)
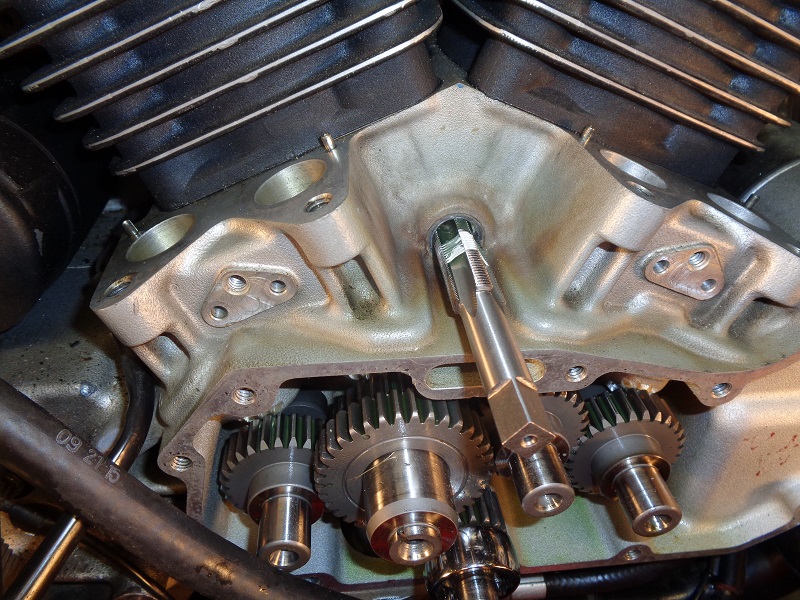
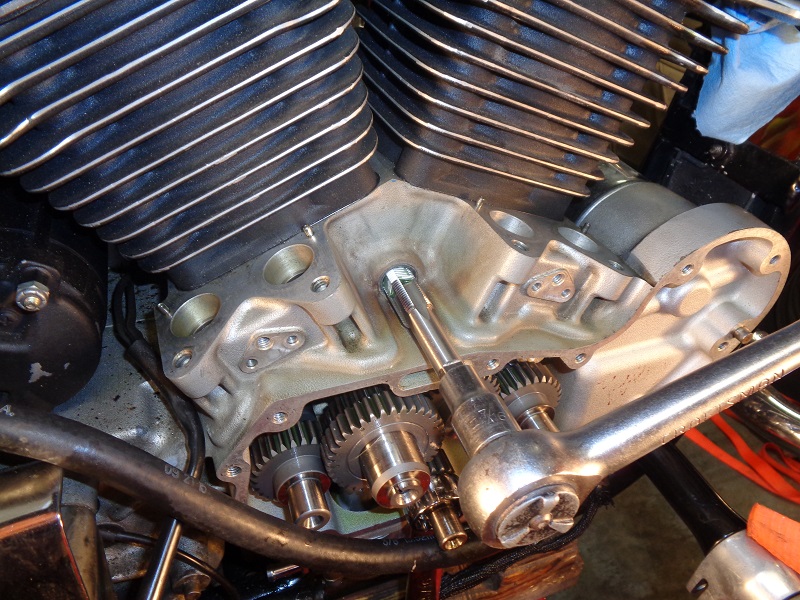
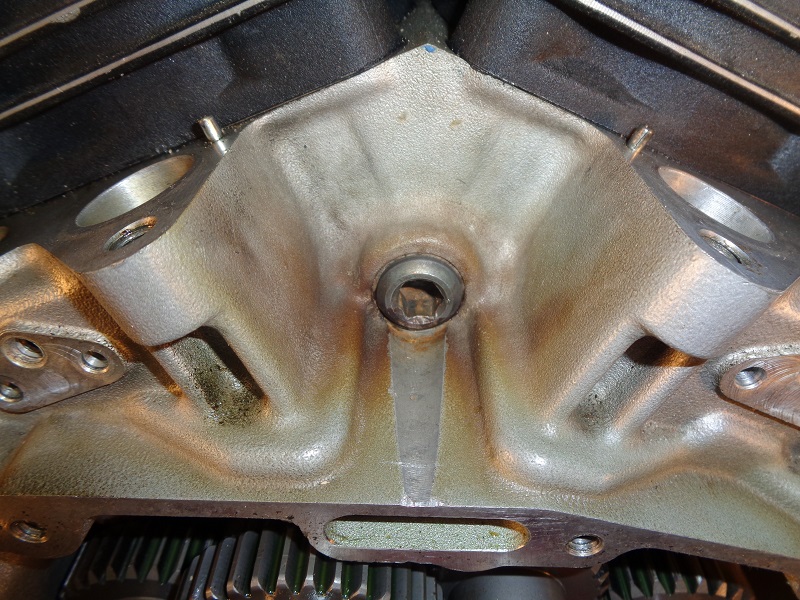
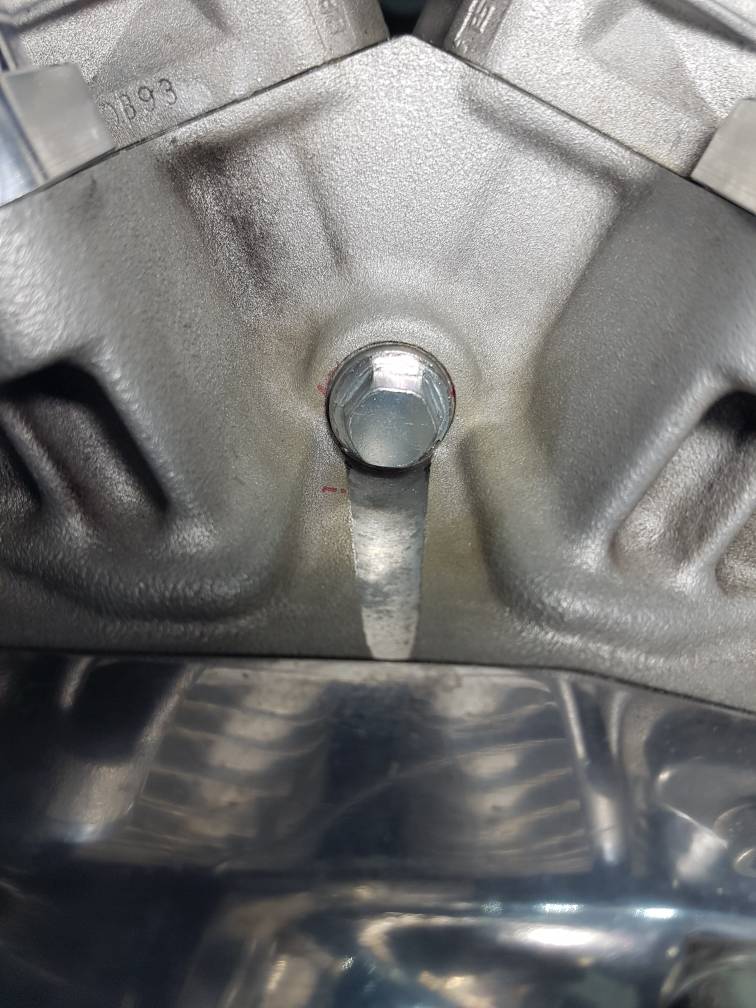
| Timing inspection hole location on a pre-91 engine case (centered between the two cylinders on the left crankcase) 12) | Timing inspection hole location on a 91-03 engine case (centered between the two cylinders on the right crankcase) 13) |
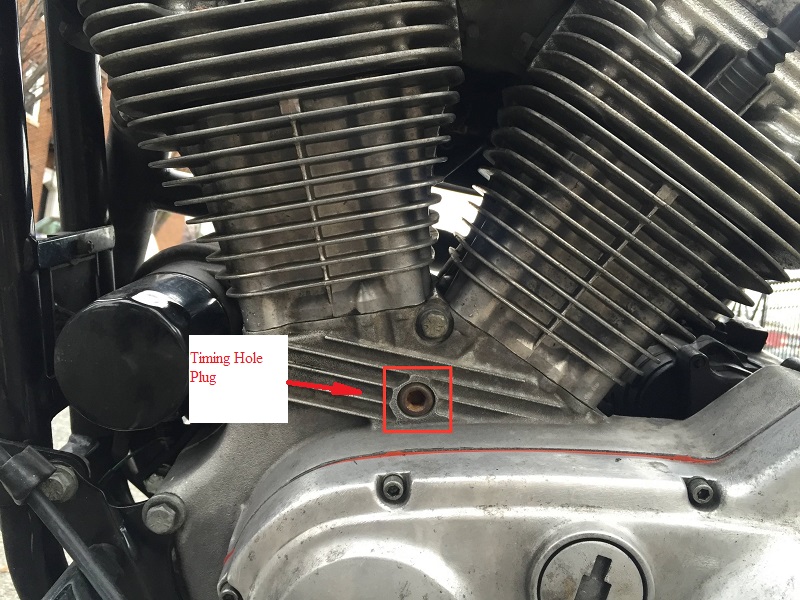 |  |
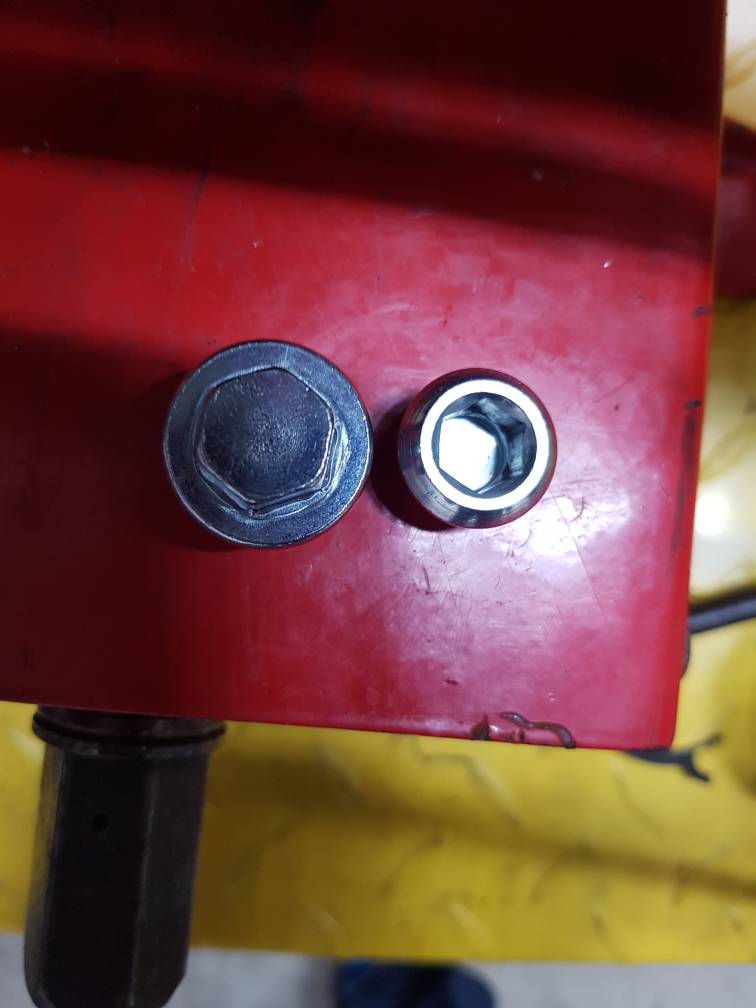
| This plug can be removed with a 3/8” hex tool (Allen wrench). |
 |
* Once removed, check the threads on the plug and in the case for damage before trying to re-install the plug. Any damage(no matter how small) can be compounded each time you re-install the plug. This will also give you a clue as to what you may encounter the next time you remove it (for instance, if it is necessary to give it a 'soft hug' when re-installing instead of how you are used to handling it) so as to preserve the threads for as long as possible. These are straight (not tapered) threads on the plug and in the case. There is no need for the plug to have tapered threads with it having a head on the end. Inspect them closely and, in the case of warped or damaged threads, first try to repair or 'chase' the existing threads if you have any left. This will keep you from having to drill into the case if it isn't necessary.
Leaking Oil From the Plug
See Leaking Oil From the Drain / Timing Plug in the Sportsterpedia.
Temporary Repair Options
In an emergency or as patch until you can have a permanent solution done, here are some possible ideas in the Sportsterpedia to keep you riding (Drain Plug Sealing and Temporary Fixes). A temporary repair is just that. It may blow out at any time. It's best to have a spare with you in case the current temporary fix blows out, especially if your away from home. 14)
Installing the Plug
- Torque value: 10-15 ft. Lbs. (14-21 Nm) on a dry plug with good threads in the case. 15)
- You should use anti-seize on the plug threads before installing it to help prevent galling and damage upon the next removal. The anti-seize will add pre-load to the threads so you should also lower the torque applied when installing the it to avoid a new problem with a broken or stretched bolt. 16)
- The threads can strip easily so be careful with it. Clean the threads for both the plug and the hole, thread the plug into the case using fingers only, then snug up to “firm plus a little more”. Regarding the “just snug”: you have to trust this stuff. Too tight and you got a problem. The plug has fine threads that resist loosening from vibration. “Trust” is the key word.17) 18)
- The plug and the case threads are different metals and torque will usually always side towards the metal on the plug. This leaves the aluminum case threads more vulnerable to damage from over-torque.
- Blue Loctite can also be used to seal the threads 19) but it also adds more torque necessary to remove the plug. If you know you already have a certain amount of thread damage (as in when you installed the plug last), increasing torque while removing the plug may add to that damage.
- If you can't spin the plug in or out by hand, don't put a lot of torque on it. It may not hold on the next seating. You my want to GENTLY retighten it or try chasing the threads first. 20)
- The first time you loosen one of these plugs it may be real tight. Don't make the mistake of over-tightening when you install it. You'll probably find that they get tighter all by themselves. 21)
Permanent Repair Options
- In theory, the best advice is to split your cases and have it done proper by your local machine shop. 22)
- However, the foregoing is under the assumption the engine is assembled. This would obviously not be as big of an issue with the engine out and the case split. Repairs of the timing inspection hole are much easier for you or most machine shops without the flywheel in the way or concerns of metal shavings getting into the engine.
- If the case threads are not stripped but the factory plug just doesn't want to thread in right, threads in sideways or doesn't seal:
- If the case threads are stripped and the plug just sits there and spins without tightening up:
- Try an Aftermarket plug or bolt with longer threads to catch the good threads in the rear of the case.
Chasing the Existing Threads
See also the warped or damaged thread repair section of the Sportsterpedia.
- A tap and a die is normally used to chase the threads in the case and on the plug respectively back to their original shape / cleanliness and usually done with plenty of good cutting oil.
However, for this application, fluidity can be detriment to the cause. With the small amount of threads on the plug and the imminent danger of getting cut shavings (swarf) into the engine case thru the timing hole, it is best to use thick lube or even axle grease to lube the tap to chase the case threads.
While chasing the threads, your following the existing 'centered' thread pattern. 23)
You only have to run the tap in far enough to clear the length of the plug, not to the end of the case threads.
Tools Needed
- You can generally purchase these at most machinist supply stores online cheaper than you can buy them from motorcycle supply stores 'made for Harleys'.
- They do not have to be expensive. They simply have to be the right size and shape for your application.
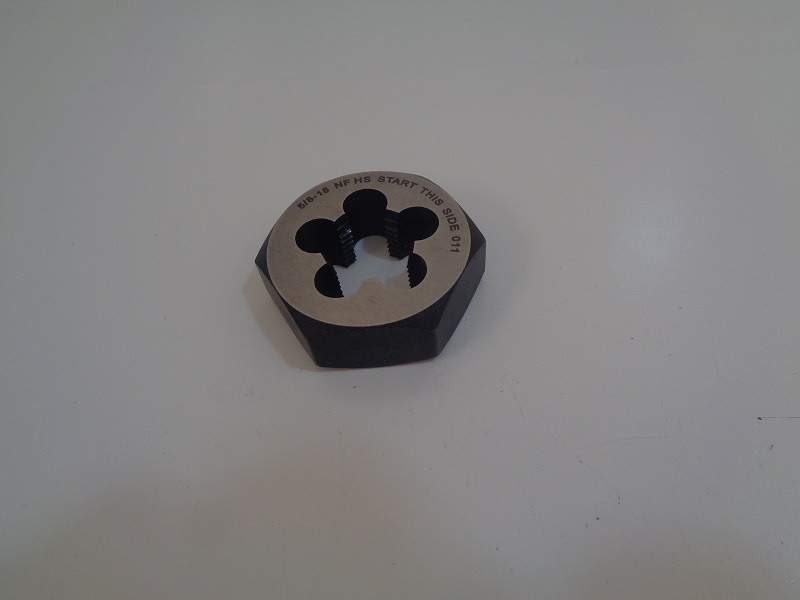
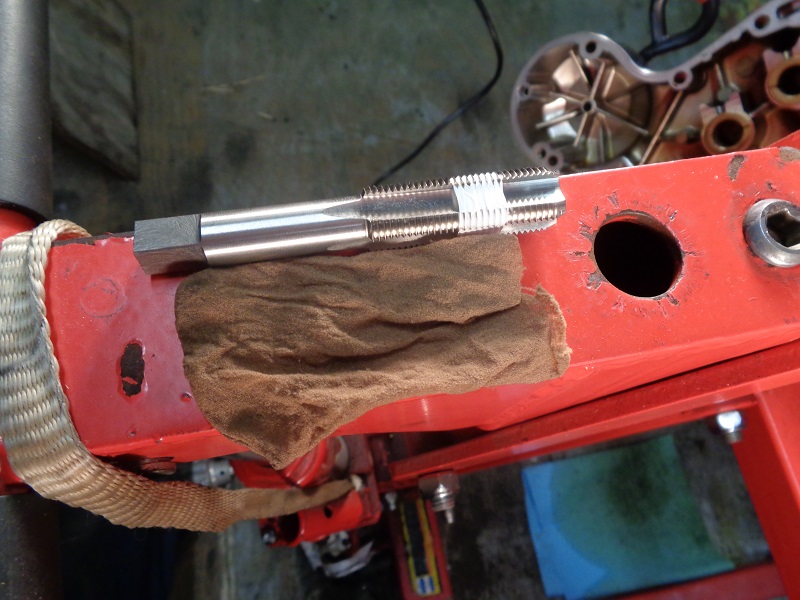
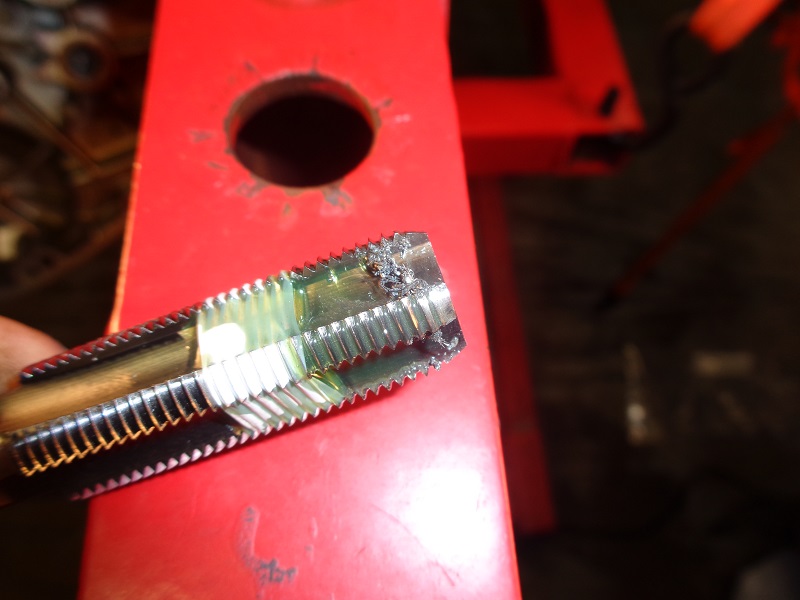
| 5/8“x18 NF 'bottoming' hand tap for the case threads (which is flat on the end with a short a taper) | 5/8”x18 NF die for the plug |
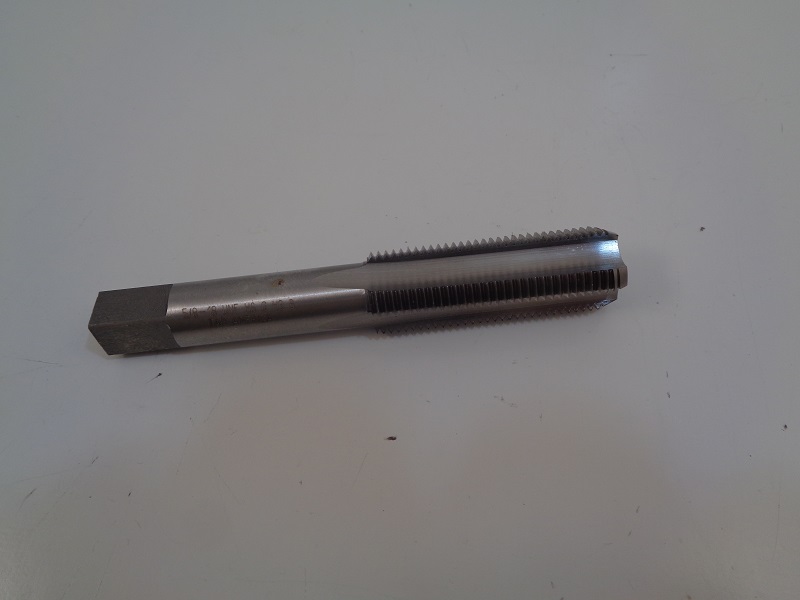 |  |
- Choosing the right tap
- A bottoming tap only has a very short taper on the end to allow it to get inside the hole. It will immediately cut the threads before it bottoms out into the flywheel. 24)
- A tapered (not to be confused with tapered thread) or plug style tap has a longer tapered end. The tapered end does not cut any threads and it will bottom out against the flywheel before the threads are finished cutting. It is designed to help you center up in the hole for tapping new threads. If you continue turning from that point, you risk back pressure on the tap which could crack the case. If you aren't planning on doing this again, you could cut off the taper 25) (with a Dremil cutting tool) but leave a slight amount of it to allow you to get into the hole before the threads start. But, it's just better to buy the correct tool.
- Choosing the right die
- You can use a standard round or a hex die. Either will do the job and possibly be held in your palm for use. But, if your threads are bad enough to need repairing this way, you probably need to buy the wrench for it.
- The round one requires a spanner wrench to hold it for use. Although it can be clamped in a vise, if you have to turn too hard it will just spin out of the vise. Again, it's best to have the tools.
- The standard hex die can be clamped into a vise, held by a standard open end wrench or a socket. You can also purchase the die wrench that fits it.
- Tap Wrench: These come in different sizes so make sure it's correct for a 5/8“ tap.
- Die Wrench: The rounded O.D. die works best with the holder wrench to fit it. Some die and die holders have a different OD depending on the brand.
- Thick lube or grease is needed to catch and hold the shavings and keep them from flinging through the engine case. You will need to clean the threads after your done repairing them. Using compressed air from the engine out through the hole will not work while using lube since the shavings will cling to it and not be blown out of the hole.
- Optional Items:
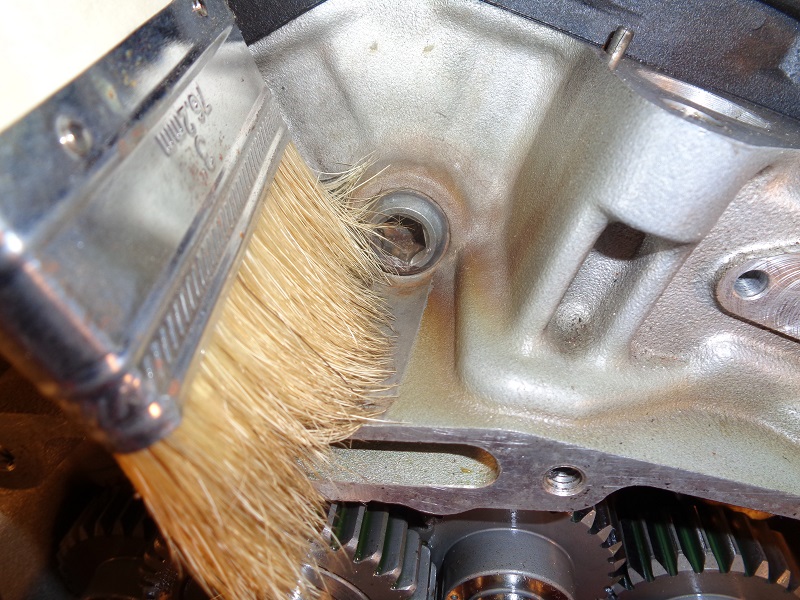
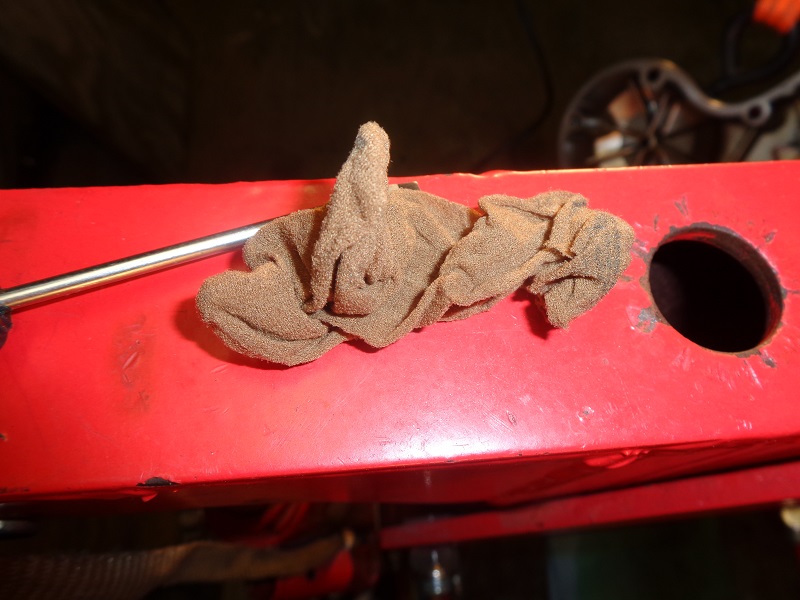
- Panty Hose: Stuff a small piece (3” - 4“ long) of panty hose into the hole prior to any work (between the flywheel and the case while allowing a small amount to be gotten to later with a pick). Make sure the material is not in the way of your work. You wouldn't want to snag it and spin shavings everywhere. The grease on the tap should also help minimize snagging the material. You could also grease the panty hose. When the job is complete grab the panty hose with a hook pick and needle nose pliers (so you don't let go of the panty hose) and pull it out while turning it counterclockwise to help remove the chips from the threads. Any foreign material not already caught up in the threads should be stuck to the panty hose. 26) Pull the material slowly out, so as not to pop any debris off of it into the engine, and it will act as a brush.
Thread Repair
| Start off by cleaning the area outside the plug | Cut a short piece of panty hose app. 3” - 4“ long |
 | 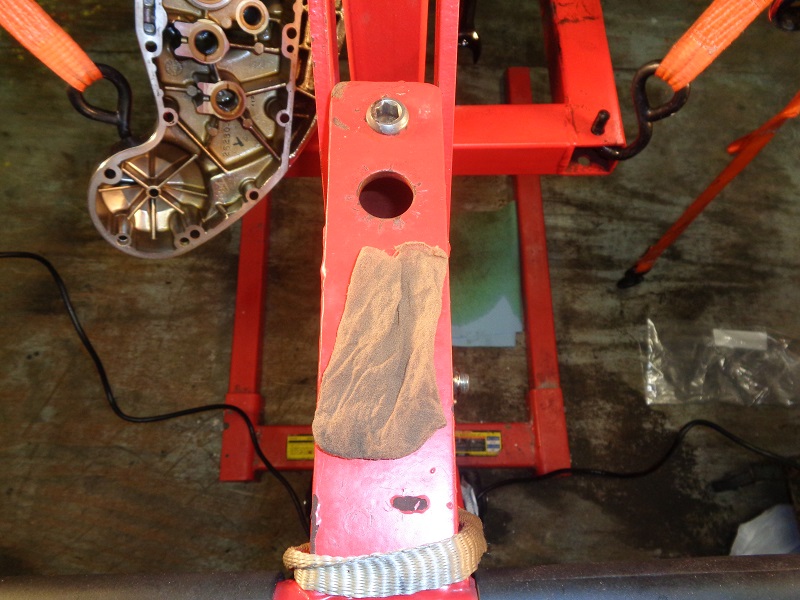 |
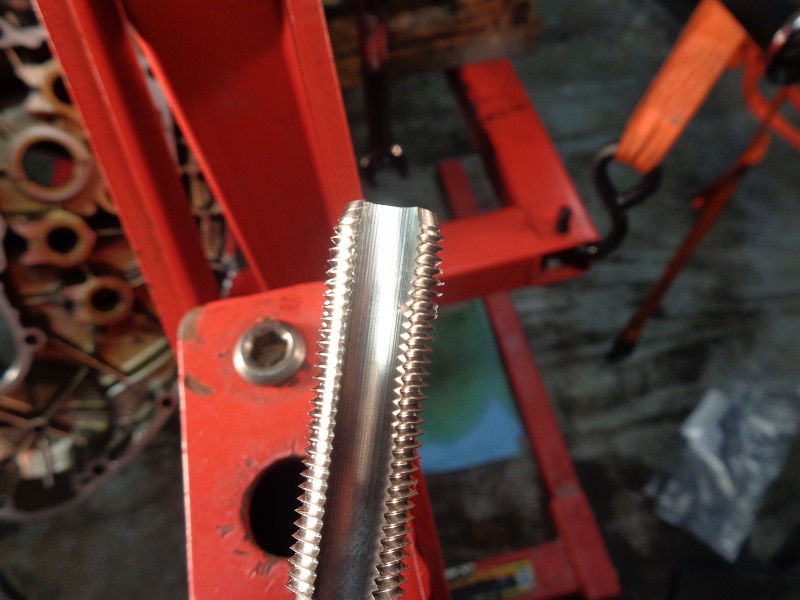
| Tape the length of threads to repair on the tap using the plug as a guide | The pick is to guide and maneuver the panty hose |
 |  |
| Pack the panty hose beyond the intended repair area | Lube the end of the tap, especially the flutes |
 |  |
- Don't try to run the tap all the way in at once. Turn in about 3/4 turn, back the tap out, clean it, lube it and go back in for 3/4 turn and repeat.
This will also minimize debris when you get done.
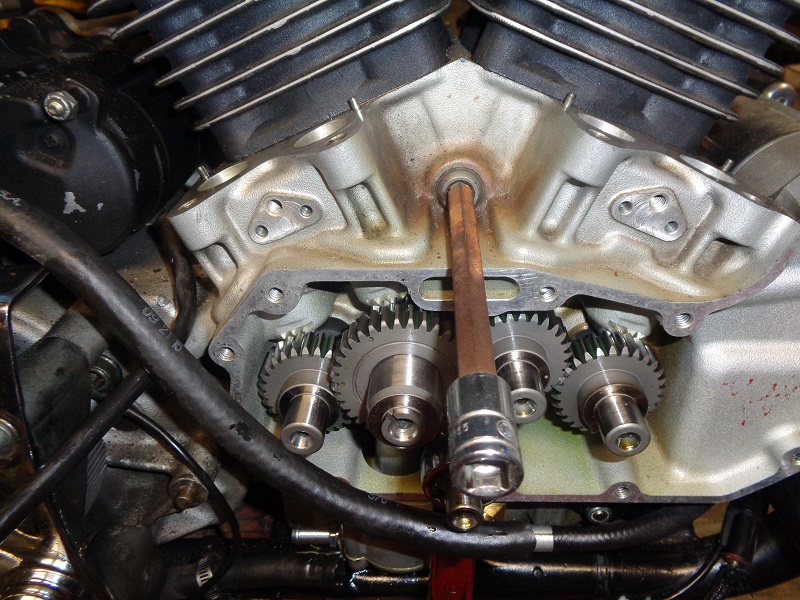
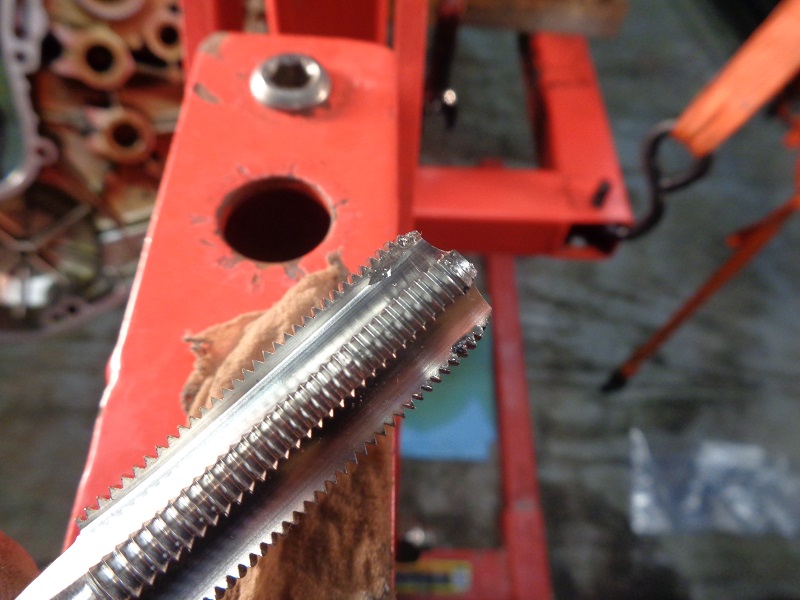
| Start the tap by hand. Be sure you catch a few good threads as you turn in order to retain the original straightness and center | Run the tap in all the way to the taped area and then back it out |
 |  |
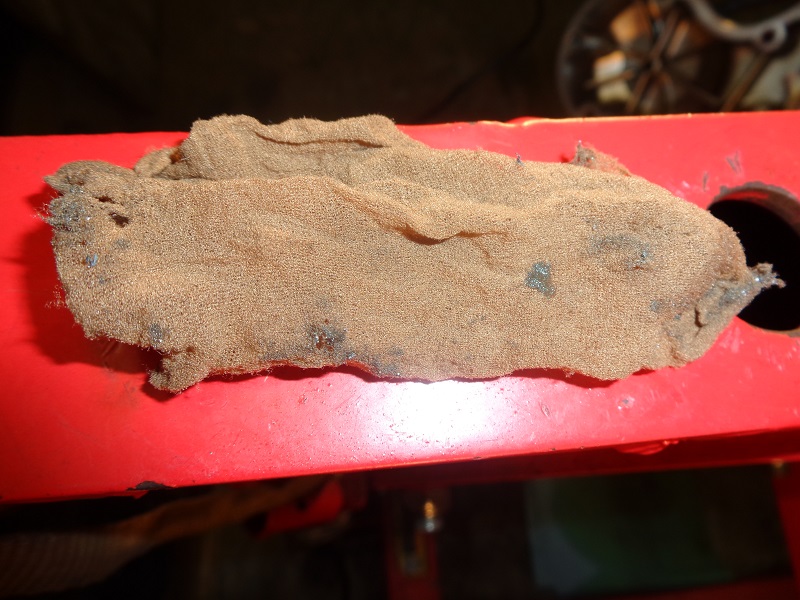
| Flutes catch and keep the bulk of the shavings | The panty hose keeps small particles out of the engine case. The shavings on the panty hose pictured got there from the tap running into it. Without the panty hose, the shavings would have simply stuck to the flutes in the tap. But it is piece of mind |
 |  |
| Fish the panty hose out with the pick. Once it's peeping out the hole, back it out by turning counterclockwise as you would the plug while pulling to help clear the threads | Shavings cling to the panty hose |
 |  |
| With the threads repaired, they now need to be cleaned up | Run the tap back in by hand. The remaining chips will cling to it |
 |  |
| Remove the tap, clean it and repeat until your comfortable with the results | |
 |  |
| Once satisfied with cleanliness, cut a new piece of panty hose, poke it thru the center of the hole, pack it in as before, grab it with the hook and turn it out counterclockwise |
|
 |  |
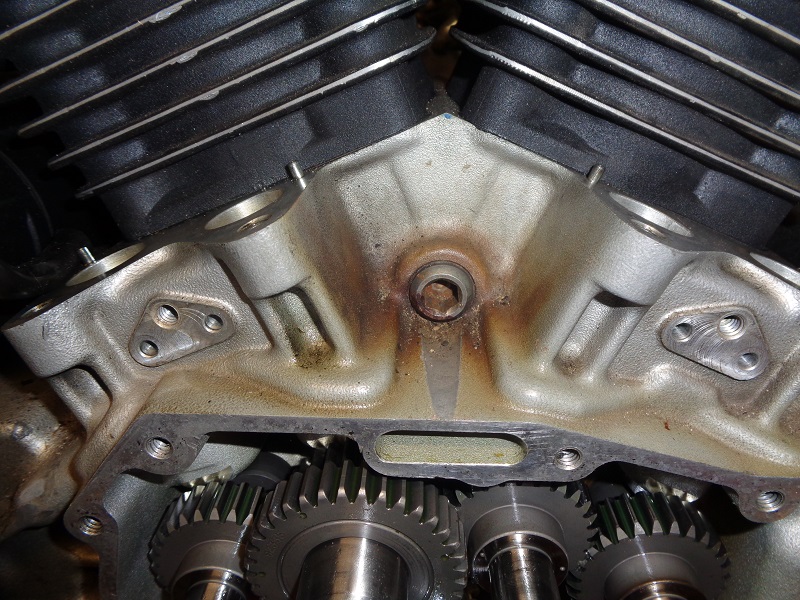
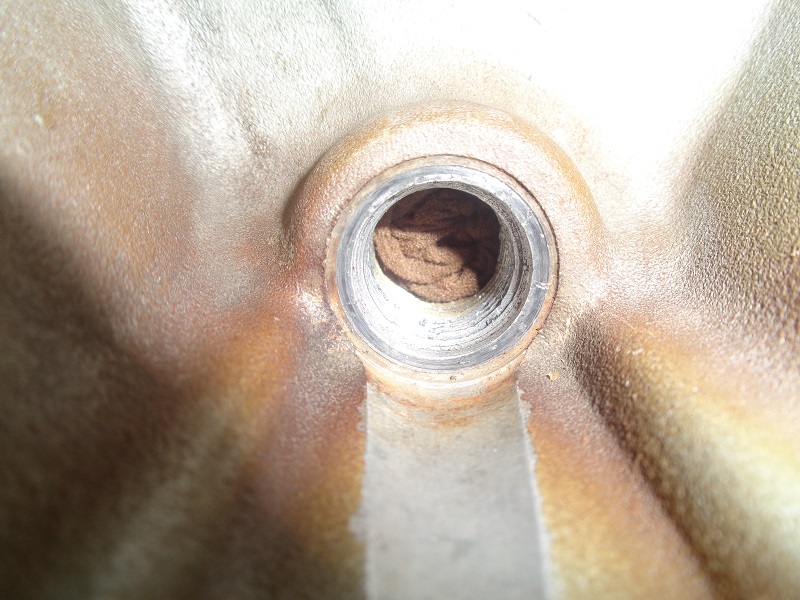
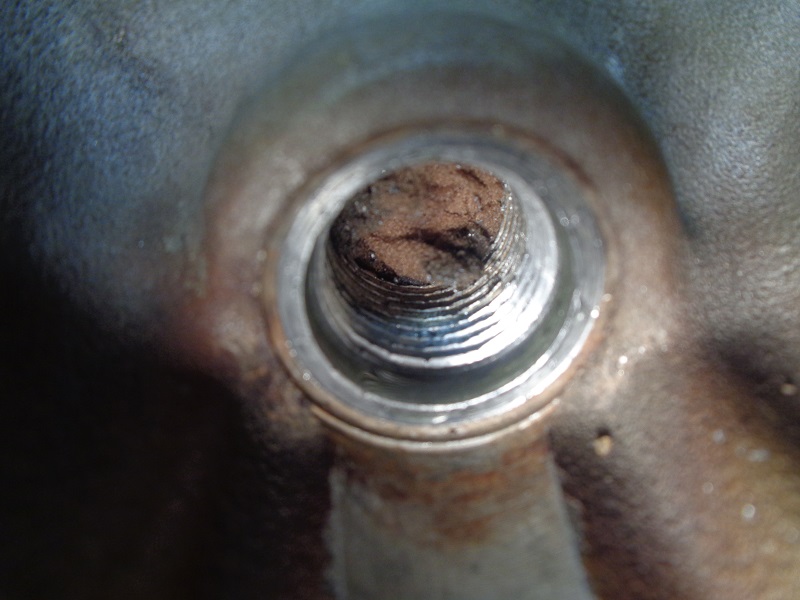
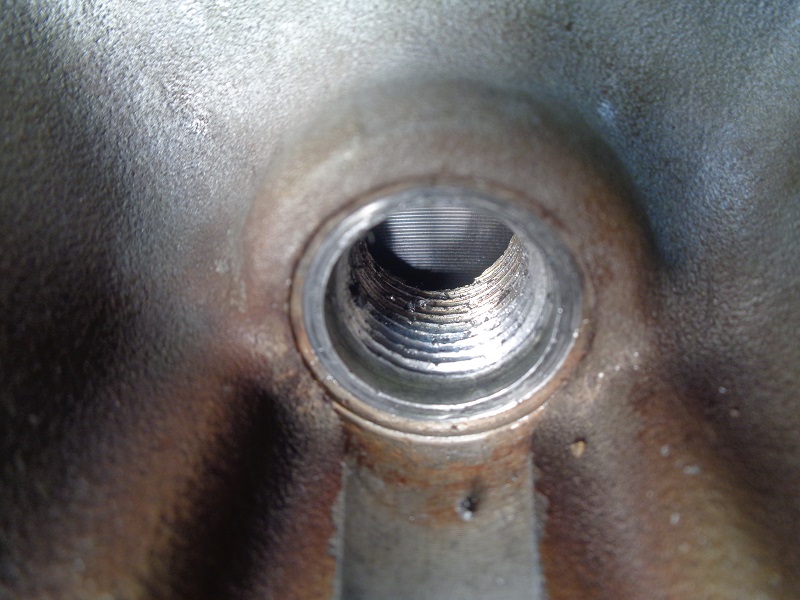
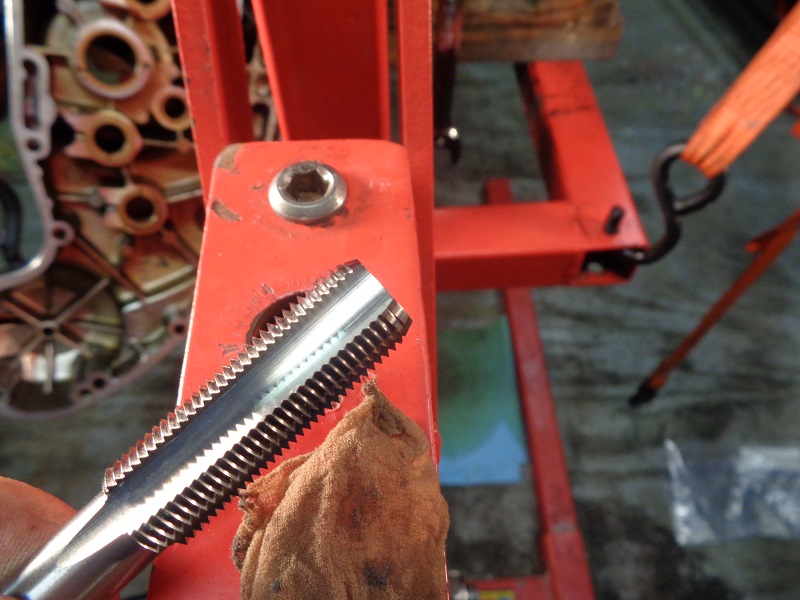
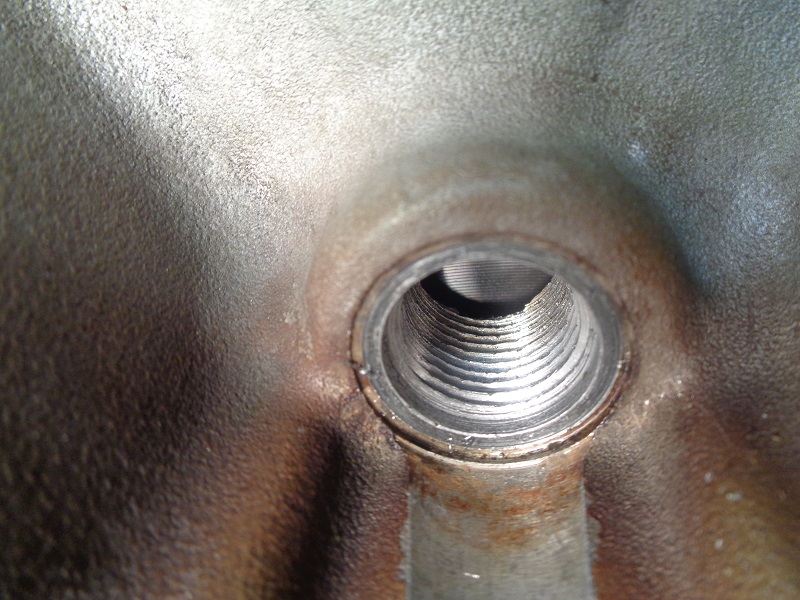
| Check for debris and when satisfied, your done with the case threads | Before chasing the threads |
 |  |
| After chasing the threads. Notice the tap did not add any meat back to the threads. It simply straightens the threads (or what's left of them) back to their original condition. Install anti-seize on the plug threads and Teflon tape on the neck (if desired) and install the plug |
|
 |  |
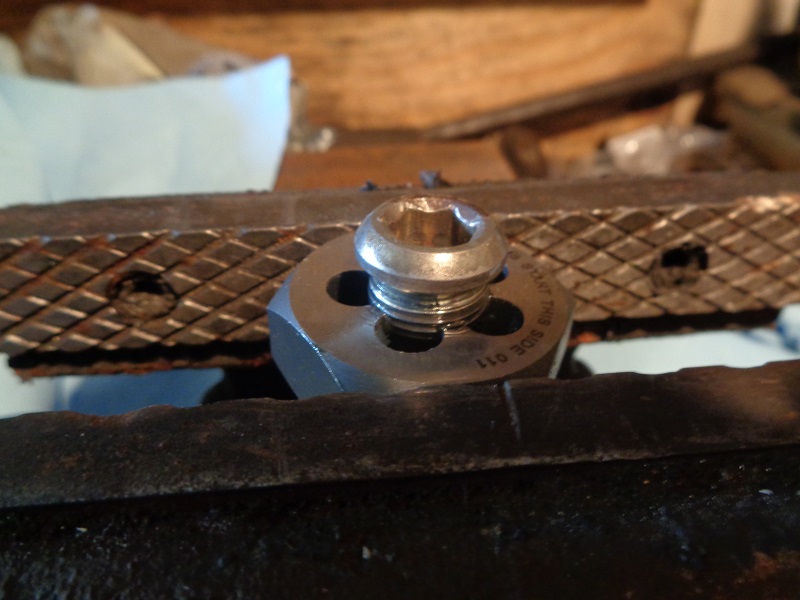
| It's a good idea to chase the threads on the plug to match the newly refurbished threads in the case. Coat the threads with cutting oil and hand start the plug in the die to insure proper thread alignment |
|
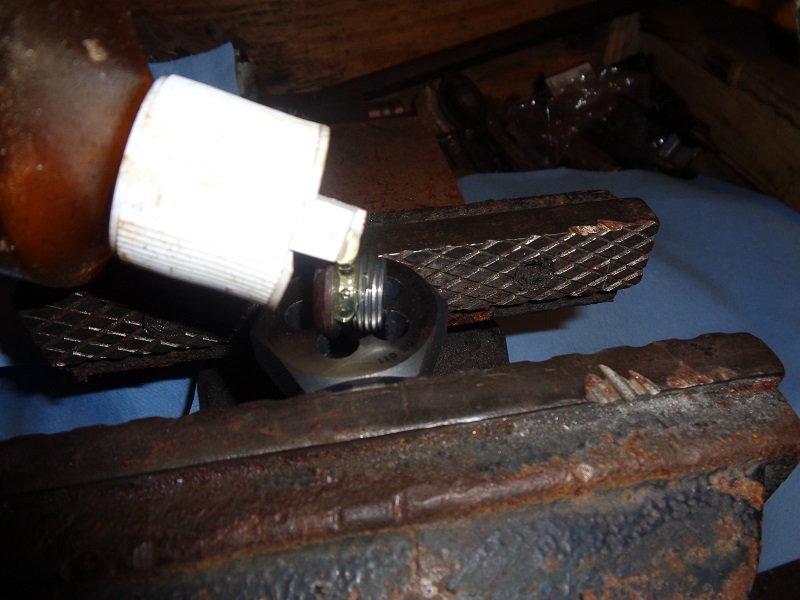 |  |
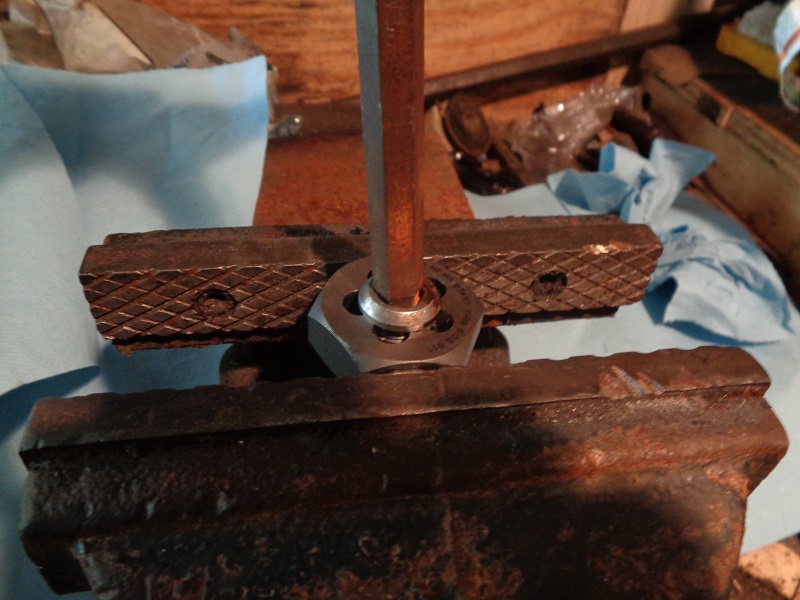
| Run the plug down the die with the wrench and insure the head sits flat against the die. Then all you have to do is clean the debris with brake cleaner or WD-40 |
|
 | 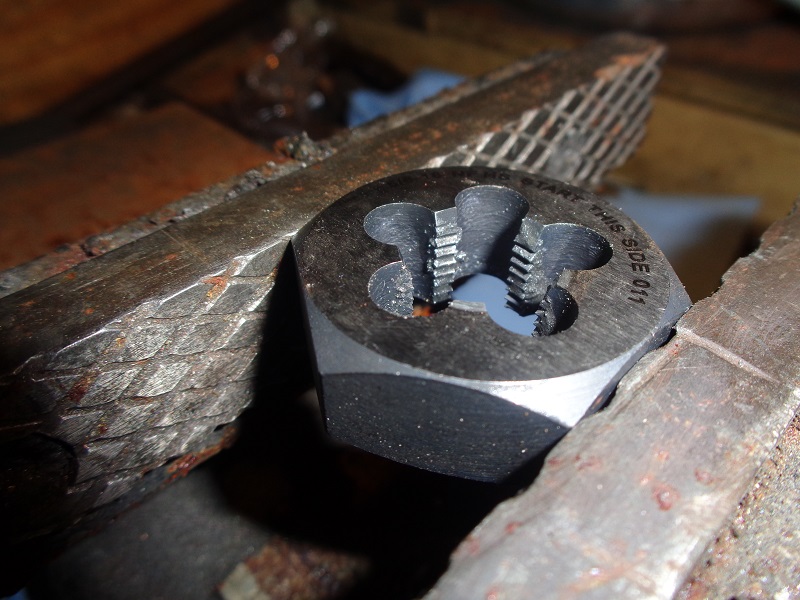 |
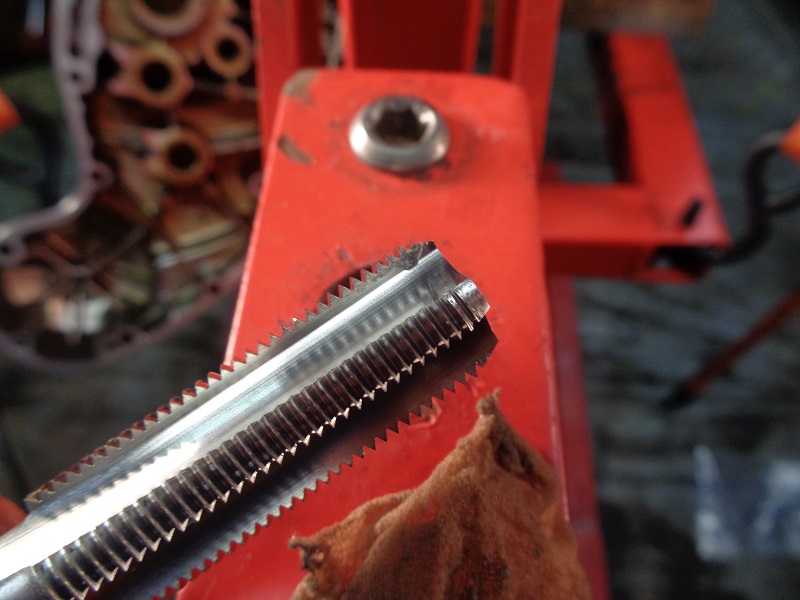
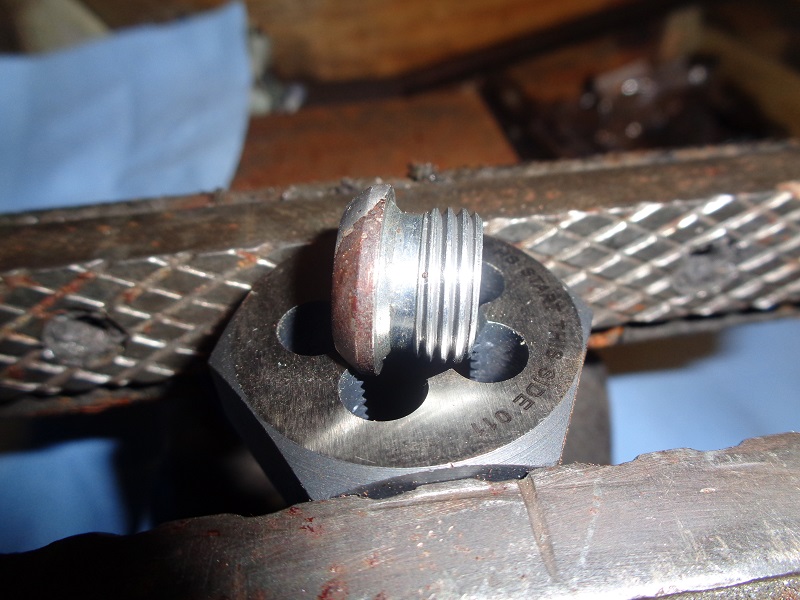
| Before chasing the threads | After chasing the threads |
 |  |
Using an Aftermarket Drain Plug or Bolt with Longer Threads
The factory timing hole plug can be up to app. 1/2 the length of the threads in the case on Evo engines and the entire length minus a couple threads on IHs. If you have stripped threads in the front half of the case, chances are the threads in the rear half of the case hole are still good.
- Aftermarket 'drain plugs' can be purchased at auto parts stores and can be a suitable replacement for the factory plug.
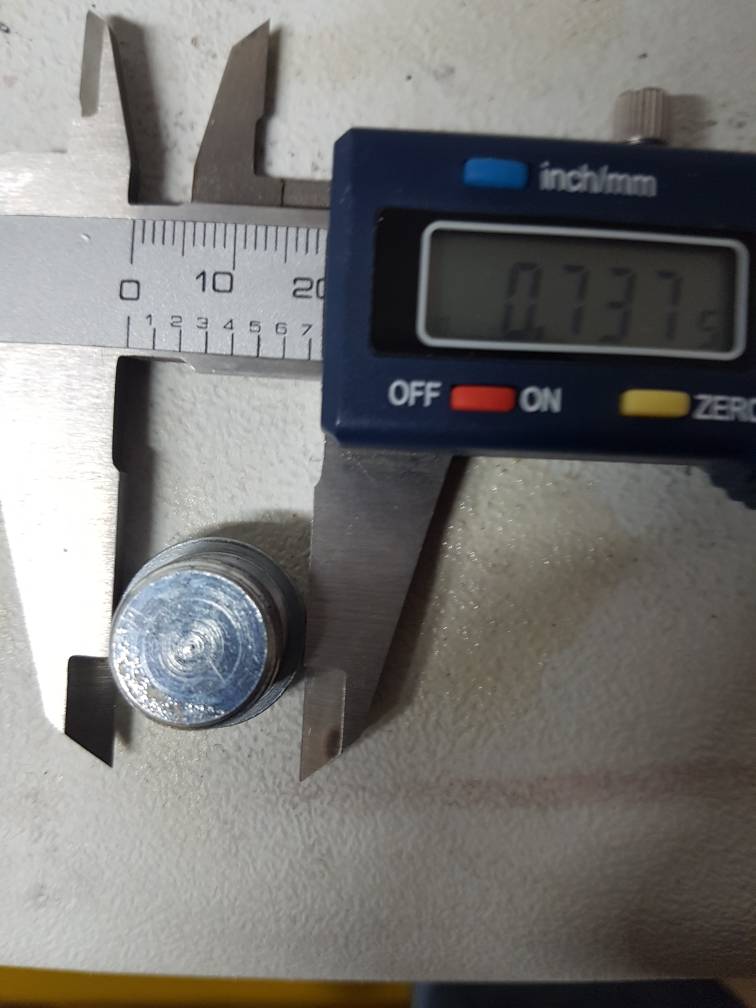
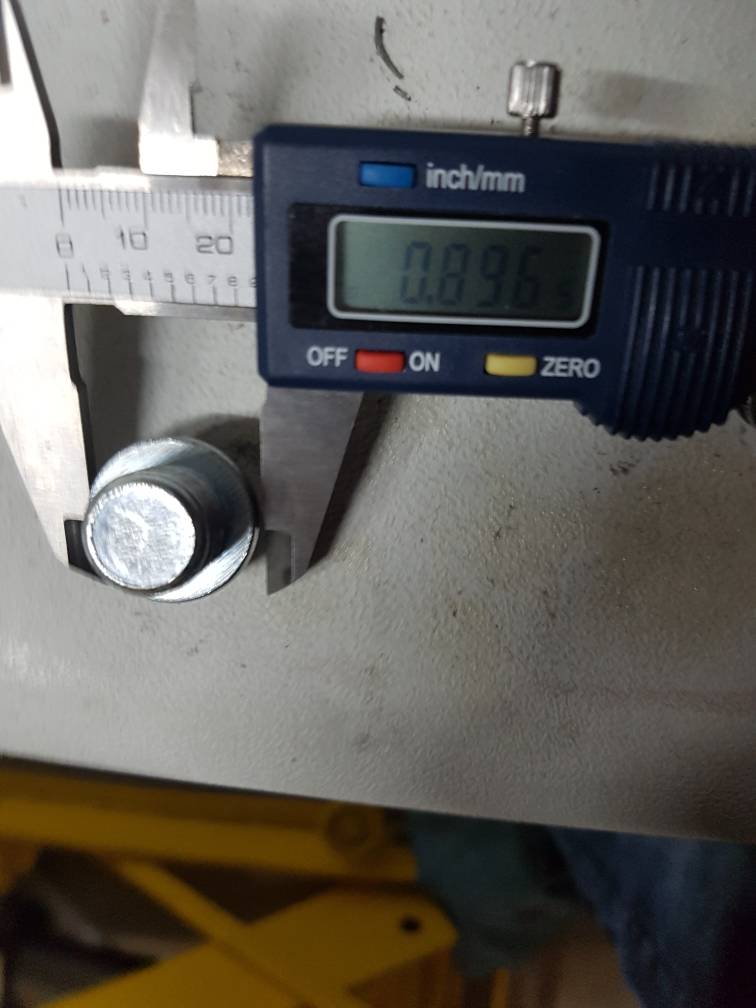
- You'll need to check the O.D. of the head and make sure it will seat properly to the machined mating surface in the case. If it's too big, you may need to round sand or grind the head diameter slightly with a grinder. 27)
- While using a bench grinder, mark one flat of the head with a sharpie marker to verify when you've made a complete rotation of the drain plug. This visual helps in allowing you to keep the head the same diameter all the way around. Keep nice even pressure while turning the plug against a medium grit wheel and clean the edges on a wire wheel (with light pressure applied). 28)
- Some, if not all, aftermarket drain plugs are longer than the stock plug and will catch those last few threads in the rear of the hole. 29) Just make sure the threads are 5/8”x18 and the length is shorter than the length of the case hole. So, you may have to measure the length of the hole depending on your year model. It doesn't need to stick out of the back of the hole and be an obstruction to the flywheel.
| The head may be larger than the original but it can be ground to fit with a bench grinder. 30) | ||
 |  |  |
| Measure the heads on the old and new plug, grind the new one if needed. 31) | ||
 |  |  |
Cutting New Threads for an Oversized Plug
- If the existing threads are gone or not usable, new threads of bigger diameter will have to be cut into the case hole to install a bigger plug. This can be done with the engine assembled but you have to take certain precautions to keep the cut shavings from entering the engine.
- However, make no mistake, this IS a machining process however slight. There is a chance to screw this up and does require some planning and patience. Most anybody can do this using the processes below. You'll be drilling app. 1/2 the hole length slightly bigger to allow for the next size thread tap. This basically consists of removing the existing (front) threads in the case and cutting larger threads into that portion of the hole.
Caution: drilling too far into the back threads towards the flywheel will most likely end up with aluminum chips into the engine without proper precautions in place. You only need to remove enough material to accept the tap.
Enlarging the hole for a bigger tap
Prepping the Hole
- First, clean the work area so as to not induce outside trash / debris into the case. If there is trash in the threads, you can use a 90° angled pick to scraped them loose and cut a small piece of rag or panty hose to shove thru the middle of hole, pack it in and then turn counterclockwise and outward as in the pics above. Any loose debris within the hole can get shoved into the case with the next steps if not cleaned out first.
- Debris control:
- Compressed air method: Blow regulated air into the crankcase, adjust the air pressure so there's a decent flow of air coming out of the timing plug hole. The air pressure should blow the chips out of the hole. 32) It may not blow out any debris caught up in the threads however but you can clean it out from there without inducing chips into the engine.
Caution: If using a hand drill, the air pressure should be stronger than the force of the drill bit slinging chips.- On IH engines, connect a regulated air hose to the crankcase breather. 33)
- On frame mount Evo engines, this is a little more involved. The carburetor needs to come off to get the crankcase breather holes (one in each head). Either plug both of them with a 1/2“ bolt, remove the cam cover vent at the oil tank and blow air into that hose. Or plug one of the breather holes and blow air into the other one.
- Grease method: Cover the case hole and drill bit with thick lube or grease to catch the chips. Inducing compressed air will not be effective while also using grease since the chips will be stuck in the grease and not blow out. These are aluminum shavings, not steel. The steel moving parts inside the engine should consume any minor amount of aluminum that does get in there. And it will come out with the next fluid changes. 34)
- Cut and stuff a small piece (3” - 4“ long) of panty hose into the hole prior to any work (between the flywheel and the case while allowing a small amount to be gotten to later with a pick). Make sure the material is not in the way of your work. You wouldn't want to snag it and spin shavings everywhere. The more you can stuff in and behind the hole, the better. But with little room between the back of the hole and the face of the flywheel, only a short piece will be all you can get in there. Although, you can try as big of a piece as you want. Use the pick to stuff the material between the case and the flywheel all around the hole and leave some packed in the rear of the hole.
- Insert a 1/2” steel expansion plug (freeze plug) into the hole for more protection and against the panty hose to keep from rolling the panty hose up on the bit and also to help guard against chips into the engine. This will allow the bit to spin against it instead of the nylon. Just make sure to grease the freeze plug also.
- Lube the drill / reamer bit, especially in the flutes, with some thick assembly lube or grease. The grease on the bit should also help minimize snagging the material. You could also grease the panty hose but the dry material will probably catch and hold more debris. When the job is complete grab the panty hose with a hook pick and needle nose pliers (so you don't let go of the panty hose) and pull it out while turning it counterclockwise to help remove the chips from the threads. Any foreign material not already caught up in the threads should be stuck to the panty hose. 35) Pull the material slowly out, so as not to pop any debris off of it into the engine, and it will act as a brush.
This Can Be Done with a Hand Drill or a Reamer
- Either of which needs to run in straight or you'll end up with a leak.
- The Colony oversized plug has 11/16“x16 NS coarse threads with a pre-drill tap size of 5/8”. You'll need to do the math if your using a different size plug thread. Here, you'll be removing the existing threads (or what’s left of them) to the next pre-drill requirement size to accept the larger tap (and to just past the length of the new plug). 36).
- Centering up: In order to get a good seal on the new plug, the hole will have to be drilled or reamed straight with the existing hole center line. You can take your chances, eyeball it and hope for the best. But, it's better to use a 5/8“ bushing pressed against the sealing edge of the hole with one hand while drilling / reaming through it with the other to keep the new hole from straying.
- A standard 5/8” bushing has an O.D. of 7/8“ (.875”) which is too big to set flat against the machined sealing edge of the case (shy of .820“).
- This may not be as big of an issue on pre-91 models due to the hole sitting higher up off the gear case. However, the hole sits low enough on 91-03 models that a bushing O.D. larger than the machined recess will cause the hole to be off center as the O.D. will rest on the gear case top and not low enough to center up. So, for these year cases (and prior years for safety), the O.D. of the bushing will need to be turned down (just enough to clear the outside of the case) to roughly match the recess unless you can find a thin walled 5/8” bushing. It's cheaper to take a standard bushing to a machine shop than to have them make one from scratch.
Drilling the Hole
This is how this task is usually accomplished and it will sling chips as you drill. See Debris Control above.
- Caution:
- Use light pressure on the drill. The cast aluminum case can be drilled rather quickly and deeper than you need to go before you know it. The drill bit will bite and follow thru without a lot of pressure applied to the drill.
Reaming the Hole
- This can also be accomplished with a 5/8“ chucking reamer instead of a drill and you can turn it slower by hand than using a drill with a tapping spanner or a small pipe wrench thru the bushing (as noted above) and greased.
- This is also assuming your case threads are stripped if your contemplating a larger plug and the remaining I.D. of the thread diameter has been compromised. But, it's a good idea to do a quick check with a small inside bore gauge to make sure.
- The pre-hole diameter for reaming to a 5/8” hole would be (.606“ - .6125”) so you'd basically just be cutting out the existing threads (or what's left of them plus the crud) with the reamer.
Choosing the Right Reamer
- Chucking Reamer: This is what you'll need as it has a very short taper on the end allowing you to cut what you need without running into the flywheel before you get what you need done. The tool holder for this type reamer is usually a drill chuck or bit holder from a drill press or end mill. However, a large “T” handle or tapping spanner can be used and a small pipe wrench can also be used for a tool holder for this reamer.
- Hand Reamer: All hand reamers have a long taper (to help you center up in the hole) which is too long for this application. Obtaining center and keeping a straight hole will need to be done with a 5/8“ bushing instead.
Tapping Threads for a Bigger Plug
- You can re-thread the case hole with a 1/4” NPT pipe tap and change to a regular pipe plug. 37)
- This '71 XLCH case was tapped for a M20 X 1.5 drain plug.
 |
| Aftermarket drain plug on a '71 XLCH 38) |
Installing Thread Inserts
See also 91-03 Timing Inspection Hole and Plug Pics and App. Dims to help in deciding what size inserts you need.