Table of Contents
This is an old revision of the document!

REF: Engine Mechanicals - Sub-01H
Clearancing For and Test Fitting Cams
Clearancing
It's important to state that none of these mods are mandatory unless there is a clearance problem with upgraded parts.
The MoCo has already done all the clearancing needed OEM parts.
Upgrades such as bigger cams and valves sometimes comes with more clearancing needed.
Below are some examples of clearance issues to check before / during assembly.
Cam Lobes
| The underside of the lifter bosses often need a little grinding to keep the cam lobes from contacting. 1) | Big cam lobes also may try to hit the pinion race, which protrudes from the case slightly. It sticks out farther on 2000-up motors. 2) | If the lobe is contacting the pinion race, it's better to modify the lobe than the race (this is a Red Shift 567). Notice the chamfer on the lobe below. Modifying that race is difficult and risky. People have done it and trashed the bearing in the process. 3) |
An example of chamfering the cam lobes was done by XLF member ~Grind~: 4)
![]() 5)
5) ![]() 6)
6) ![]() 7)
7)
Lifters
See also 91-99 Lifter Pin Upgrade to 00-05 Lifter Pin Screws in the Sportsterpedia.
Another thing to check is tappet pin clearance. 11)
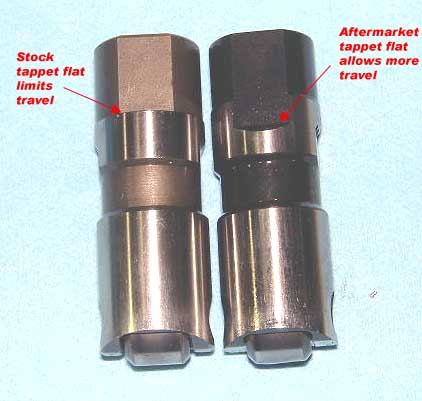
The tappet pin rests against the flat on the tappet to keep the tappet from rotating in the bore.
But a bigger cam lobe lifts the tappet farther and on stock lifter, it can run out of travel.
Aftermarket lifters as shown below sometimes have longer flats.
| Stock vs Jims lifter tappet flat comparison. 12) |
 |
Small base circle cams can help with all these clearances.
It's because they achieve their extra lift, at least in part, by letting the lifter down farther as opposed to raising the lifter more.
The 575's are small base circle so it makes them simpler to install.
But small base circle cams often introduce one other problem and that's the clearance between the bottom of the tappet and the top of the cam bushing.
When the lobe sets the tappet down, the roller needs to keep following the lobe.
But sometimes with a small base circle cam the lifter will hit the cam bushing and thus not come all the way down.
Easy to fix with some careful, slight grinding on the tappet on the underside of the axle support boss.
Lifter Bore O.D.
Big cam lobes can hit against the lifter bore O.D.
Below, the area where the cam lobe spins around was clearance using a sanding drum.
Four plugs were made to go in the camshaft bushings to keep from hitting them with the die grinder.
Rocker Box
See more on Clearancing and inspecting the Rocker Boxes in the Sportsterpedia.
Check the clearance between the rocker arm and the underside of the rocker box cover. 16)
With high lift cams, the rocker arm will often make contact with the rocker box top.
You can use a little play-dough or modeling clay to check this clearance.
Place it in the areas as in the pic below, install it and turn the engine over.
Then remove the cover and see if anything got up intp the clay and where.
Pull the tops and look for little marks on the inside. 17)
There shouldn't be any outside of factory casting marks.
Rocker or pushrod contact will appear as marks that shouldn't be there.
If any are found, a little strategically located grinding cleans it right up.
Occasionally, 536 cams can cause the rocker arms to hit the rocker box tops (on the pushrod side).
This is rare, but it can happen.
Contact here should cause any damage, but it'll cause noise and leaks. 18)
A lot of rocker box top leaks have been traced to this.
The most critical clearance in the rocker box is the clearance between the valve springs and all areas of the rocker box around it. 19)
If the valve spring or retainer is allowed to touch the rocker box, it forces the valve to land sideways on the seat.
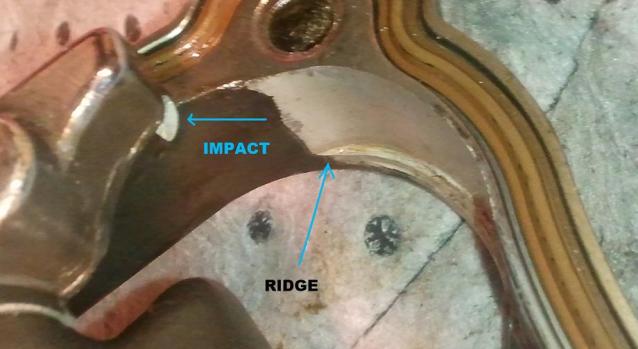
Rocker Arm Contact
This condition was noticed when using S&S roller rocker arms and big cams. But these areas can be checked while using stock or other rocker arms also. Symptoms were a ticking noise on the top end on cold starts. 32) The roller rockers were just grazing the rocker box assembly. All 4 were just barely nicking the box. It stopped when the bike got warm and stretched. Clearance can be done with a die grinder or Dremil Tool.
| You can see where the contact occurs. 22) | |
Here are some useful cam installation links:
From Hammer Performance: http://www.hammerperf.com/ttxlcaminstall.shtml
From NRHS: http://www.nrhsperformance.com/tech_xlcaminstall.shtml
Test Fitting
Factory fitting of the cams is (or rather was) all about noise control. 23)
By selecting the cam gears sized specifically for the engine they were going in, they could walk that fine line between noisy and too-tight.
The noise from the gears being a tad loose doesn't hurt anything. Too-tight however can cause localized tooth heating and failure.
So when you replace the cams with non-original cams, you just have to make sure you're not too-tight, which is why you should do a basic test fit.
Aftermarket cams are all made on the loose side and you rarely get into trouble when using them.
In 2000, they changed the tooth cut on the pinion connection to the #2 cam, to a “high contact ratio” design.
This tooth design apparently got the noise level down to an acceptable amount without having to deal with multiple gear sizes.
There's only one size for each.
In 2001, this change was propagated to all the cam interconnecting gears as well.
To do a basic test fit of your cams.
Install all 4 cams in the gearcase with the pinion gear removed.
Use a fair amount of assembly lube in the bushings and in the gear teeth.
Rotate them by hand and make sure they all spin freely without binding.
Then, install all 4 cams in the cam cover and make sure they spin freely without binding.
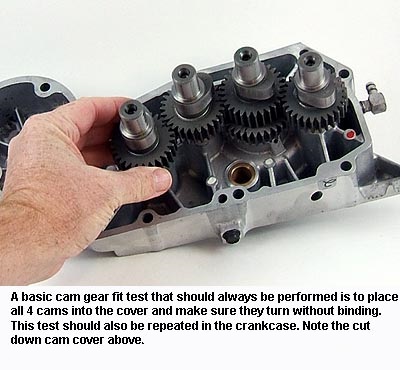 |
| Test fitting cams in the cam cover 24) |
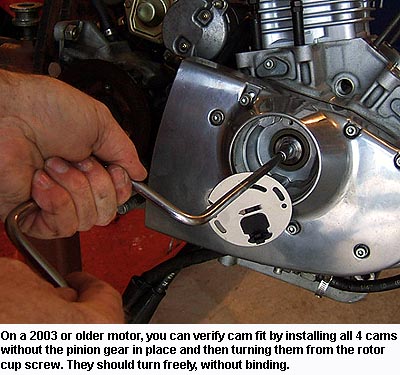 |
| Test fitting cams with the cam cover installed 25) |