This is an old revision of the document!

REF: Service Procedures 11a
1998 1200S 5-Speed Transmission Inspection
Article by Hippysmack of the XLFORUM 1)
Click on a pic to enlarge:
Going through all these steps will familiarize you with your transmission both mentally and physically (it did for me). Once removed, you should lay the tranny horizontally on a bench and physically run through the gears to make sure there is no binding and that movements are free and smooth. It will have some play since it's not installed. Move the shift forks with your hands to make the gears move and run through and back.
Later on, you'll feel the gear action and you'll know how it sounds and feels when actuated by itself with no load which may help you diagnose when things will not shift later.
- I decided to tear down my transmission due to feeling uneasy with the transmission since I bought the bike. I bought an Energy One clutch to upgrade and I figure I'll find something else as I go along.
- When I accelerate hard from standing, it lands between the gears like it's in neutral. I had adjusted the clutch a hundred times and didn't feel that was the problem. It recently started whining. It has begun clunking into 1st gear. So, I figured it can't hurt to look around in there. I lightly turned the shift shaft by hand to neutral and back to 1st and noticed that it seemed to drop and hit metal at a very light turn back to 1st. Here is a pic of the way it is as of just pulling off the primary cover. I noticed the drain plug had some burrs of metal on the end. The oil was in decent color. The detent arm appears to have been scrubbing against the back side of the starter sprocket and the teeth have a red tent.
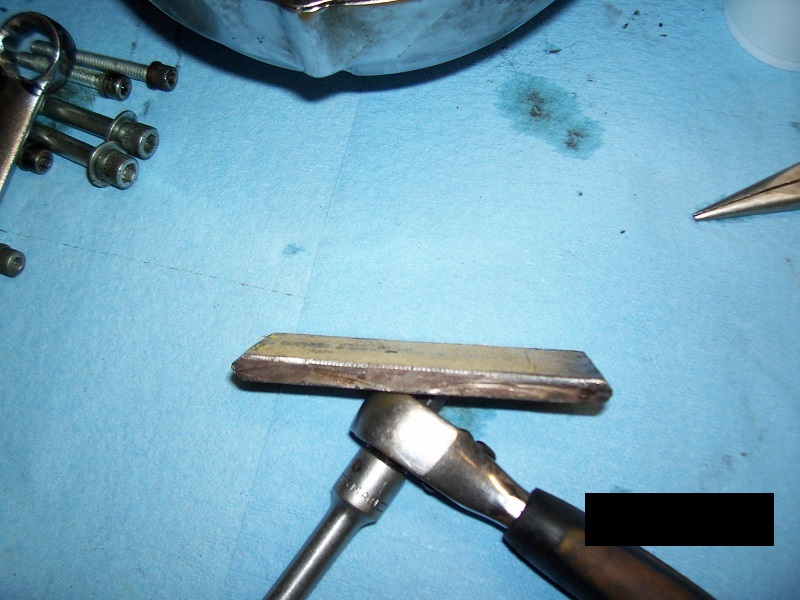
- I built a tool out of 5/16“ steel to lock the sprockets since the wood block failed and a chunk of machine-able plastic was eaten thru.
- I ended up with a 5/16” piece (just laying around) that I cut down to around 4-1/4“ x 1-1/2” and beveled the edges with a grinder.
 |
- The engine sprocket was tight to get moving off.
I pulled from the center of the chain between the sprockets and on the clutch assembly at the same time to get it all loose then it all came off rather easily.
| Both sprockets have to come off at the same time | This is why you should not beat on the engine sprocket to loosen it. Too easy to break the magnets behind |
|
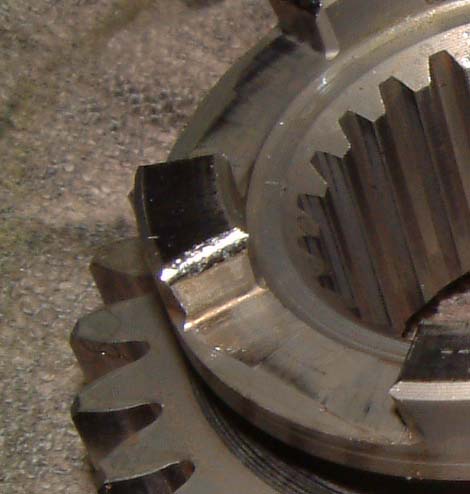
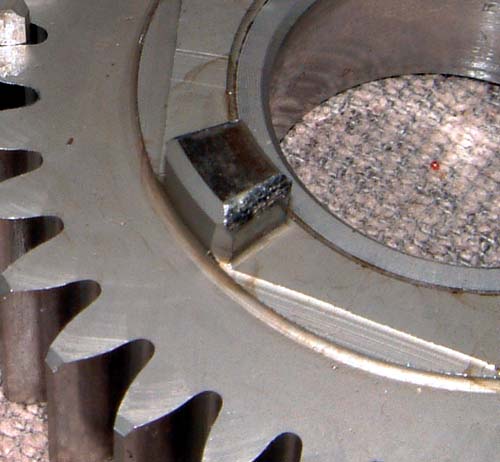
- (L) The backside of the teeth on the starter sprocket have wear where they rubbed against the shifter shaft arm.
- The rough edges on the starter sprocket can smoothed down with sandpaper.
- (R) Wear is showing on the shifter shaft arm from hitting the starter gear.
- I turned the shifter by hand and I can easily move from 1st thru 2. However, with the same small amount of pressure, I cannot shift to 3rd. I have to turn the shift shaft down to let the catch rise up to get a better grip before it will shift upwards. Then it stops on the top of the cam -before- settling into the 3rd groove. I realize there is much vibration normally to this operation but shouldn't I be able to shift thru the gears without a dance. Once in 3rd, I cannot shift it to 4th or fifth.
- Tranny out and set in a vise with soft jaws. For now, I don't see major physical damage that I assumed I would have with all the smashing in gear, toy army gun sounds it was doing. The between gears on 3rd and 4th could have been the pawl adjustment off.
- Inspected the trapdoor with a straightedge to insure no warp-age.
- With the gears off, there were no missing teeth or pits or cracks. The gear contact area on the dogs at the bevel is a bit of a rough edge while pushing a finger down in that direction. I initially decided to polish that down with some 600 grit.
- I also mic'd the inside diameter of all the gears that weren't splined on the inside and they were all 1.180“.
Gears
- Countershaft Gears:
| Countershaft 5th - 25 teeth | |
| Countershaft 4th - 26 teeth | |
| Countershaft 3rd – 29 teeth | |
| Countershaft 2nd – 34 teeth | |
| Countershaft 1st – 32 teeth | |
- Mainshaft Gears:
| Mainshaft 4th – 32 teeth |
| Mainshaft 3th – 34 teeth |
| Mainshaft 2th – 29 teeth |
| Mainshaft 1st – 20 teeth |
Associated Transmission Wear
Worn dogs:
The gear dogs can wear on the sides. 2)
They will sometimes become rounded off instead of being flat on the edges.
This can cause the gears to not sync 100% and pop out of gear.
| Worn dogs 3) | |
 |  |
- It seems all the shift forks had side wear marks (which may not be a problem but more of a symptom) but the inside contact surfaces on some have smash marks from the edges. At this point, I would replace the middle one since there is a wave of wear on the inside surface where it should contact the gears. Worn contact area equals more space between it and the gears than intended which adds to slop.
- With the 3rd/5th gear shift fork deeply scarred, I mic'd their IDs also and they were all 1.248 so I wasn't going to change all 3 but just the middle one.
| That is until I flipped them over to reveal the hole in the side that the metal dowel pin slides in. The hole is not round anymore but more oval cut by side mis-movement. | I mic'd the all 3 dowel pins at 0.579” twice and the 3rd (middle) was 0.576“ | All fork ends were 0.202” both inside and outside edges |
- This explains the abrasions on the outside edge of the shift drum. I polished that down with 600 grit wet/dry sandpaper and steel wool hoping to salvage it. The raised area for the dowel pins seemed to provide for a surface for the pins to ride on and oiling underneath the pins happens in the galley below that. That may be a problem if not enough oil can set there like it should.
- At first, I thought I'd just polish the shift drum see how it works when I get the tranny assembled until I found the pins on the end were trying to come out.
| There were a few rough spots on the outer surface of the shift drum. I slid a dowel pin down it as in normal operation and it did catch in these 2 places. It's not on the inside but just on the outer edge of the slot. That could be smoothed down with sandpaper. | The third gear position on the drum suffers from a not entirely gone but erosive raised up area in the set position. |
| All of the thrust washers were just a little different from each other but they varied from 67- 1/2 to 68 thousandths. I thought they were 70 thousandths but upon buying a new one from the MoCo, I found it was only 69 thousandths. | I put the mainshaft, countershaft and shift drum on centers on the lathe and they all were true. I ordered new trapdoor bearings, all thrust washers and clips, three new forks and shifter springs. |
- All back together.
- I cut the outer race off the old main and countershaft bearings with a Dremel to use the inner races as a press block for the new bearings. The main inner race also doubles as a stand for the mainshaft to keep the threads safe in a vise.
- Ran thru all the gears on the bench with ease.
- I installed the transmission then replaced the clutch with an Energy One with the extra plate.
- I spun the shift drum with ease through all five gears. No stops or grinds. I started getting ready to button it up with the new shifter shaft. I transferred the assembly to the new shaft and noticed the backplate on shaft crank had a lot of slop. When actuated, it pulls left or right tension against the healthy spring that's wrapped around the shift shaft. I used some pliers to pull each leg of the spring closer together for a tighter fit to the backplate and no more slop there. There is a bushing behind the shift pawl that doesn't seem to be worn side to side but does have a bit of round to the edges. There is a bit of slop there.
- With shifter shaft assembled, I set the detent cam on and noticed that it was sitting at an angle towards the top of the case. This cam I have spent a good bit of time polishing to get the burrs and rough spots….has to be replaced. The holes in the back that go onto the shift drum pins when mic'd are not the same depth on any one hole. Then I mic'd the shift drum pins. There are no two pins the same length. These could be knocked back in but with the other issues with the shift drum, I decided to replace it with a new one.
- The bike came with the original detent plate (33656-90 ) which was now obsolete with the new part being (33656-90A). The -90A is a smaller diameter plate with more radical shift curves. It seems it should be a more positive ‘lock in’ than the old one.
- I couldn't get the shift shaft to stay still long enough to set the measurement. The book says to use a #32 (0.116) drill bit. I bought one and spent half a day trying to make it work. I read in another post on shift pawl adjustments, the drill bit sets an even distance between the shift pawl forks and the shift pins. So, I took off the detent plate and set this by eyesight since when measured, there is not enough room there to put 0.116 between both sides of the pawl and the pins. I set the measurement with the bit and it would not shift right. So, I took the shift shaft off and pulled it apart to find that the spacer and the washer were backwards. The spacer was the old part so I took a 3/8“ grade 8 washer and put behind the big spring and used the washer as retainer on the outside. This beefed up the shift shaft so it didn't move or rather flex back as soon as I tighten it down. I chunked the idea of the drill bit, set the measurement by eye for the shift shaft with the cam plate off and whalla. it works. I also replaced the spacer between the shift plate and the pawl. The new one added 3 thousandth's.
- The shifting problems may have been due to the shift drum being scarred, the pins not lined up properly or just general wear. The transmission feels tighter and shifts easier. The problem of seeming to enter neutral between 3rd and 4th is now gone. There are two separate operations of #3-4 and #3-5 shift forks between these two gears. 3-5 pulls away from third and when done 3-4 runs toward fourth. There was too much resistance for this to be a smooth operation as a fast paced shift. The Energy One clutch is actually easier to pull than the OEM I took off. All in all I may have caught my tranny just in time to avoid failure due to worn out parts.