Table of Contents

IH: Oiling & Lubrication
Oil Leaks
Sub Documents
- Click Here for the article “Dr Dick on Oil Leaks”.
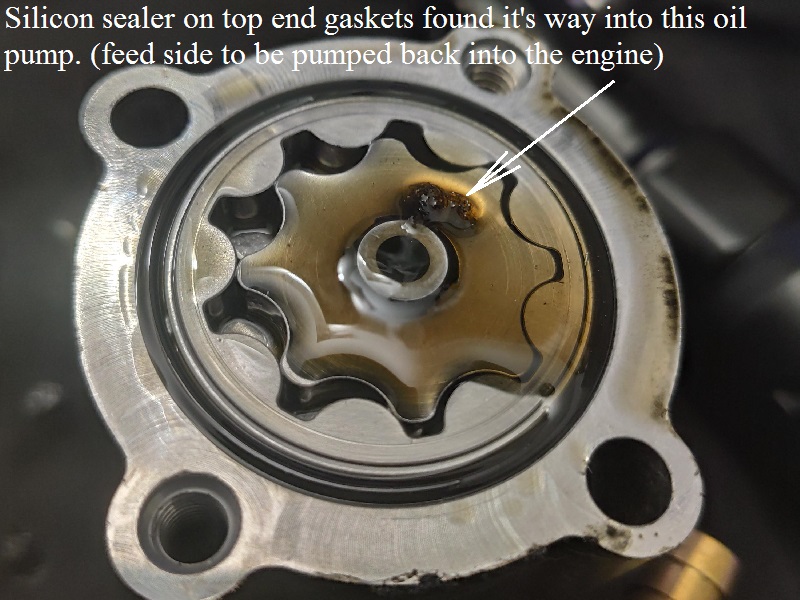
First and foremost, do not use silicone sealer on any engine, oil pump or related parts or gaskets to stop a leak.
The heat coupled with crankcase pressure pulses can break pieces of it loose and send them through the engine.
These pieces may stop up oil passages and starve the engine of oil.
What constitutes an oil leak? 1)
- Leak: Liquid oil on the outside of your rocker box, head etc.
- Weep: An oily residue that traps road dust leading to a damp, dirty build up.
- Sealed: No oil migration at all.
The gaskets / seals made for Sportsters are more than efficient for stopping leaks.
If you have continual leaks after installing new gaskets, chances are it's not the gasket's fault.
There may be manufacturing, fitting, high internal pressure pulses, warped sealing surfaces or other issues to address.
An oil leak could also be a crankcase pressure problem.
A situation where the engine is both blowing out and then pulling in air from seals and gaskets.
Silicone can break up into small film sheets and float around the oil path stopping up the small restricted passages.
Both feed and return sides of the oil pump create suction on their inlet sides as they rotate.
The feed side of the pump is gravity fed from the tank and the feed gerotors send pressure into the engine.
It is mainly dependent on gravity oil from the tank.
The scavenge side of the pump is fed by crankcase pressure pushing the oil to the scavenge port in the crankcase.
It is more dependent on the flywheels to get the oil to the scavenge port.
If there is an obstruction in the return path from the crankcase to the oil tank, it will slow the flow of oil out of the engine. This can cause weak or no oil flow.
If the scavenge side of the oil pump is not flowing oil fast enough to the tank, oil will build up in the sump.
This can result in higher crankcase pressure, more oil film spinning around the flywheels, engine drag, blowing rocker box gaskets and general oil leaks.
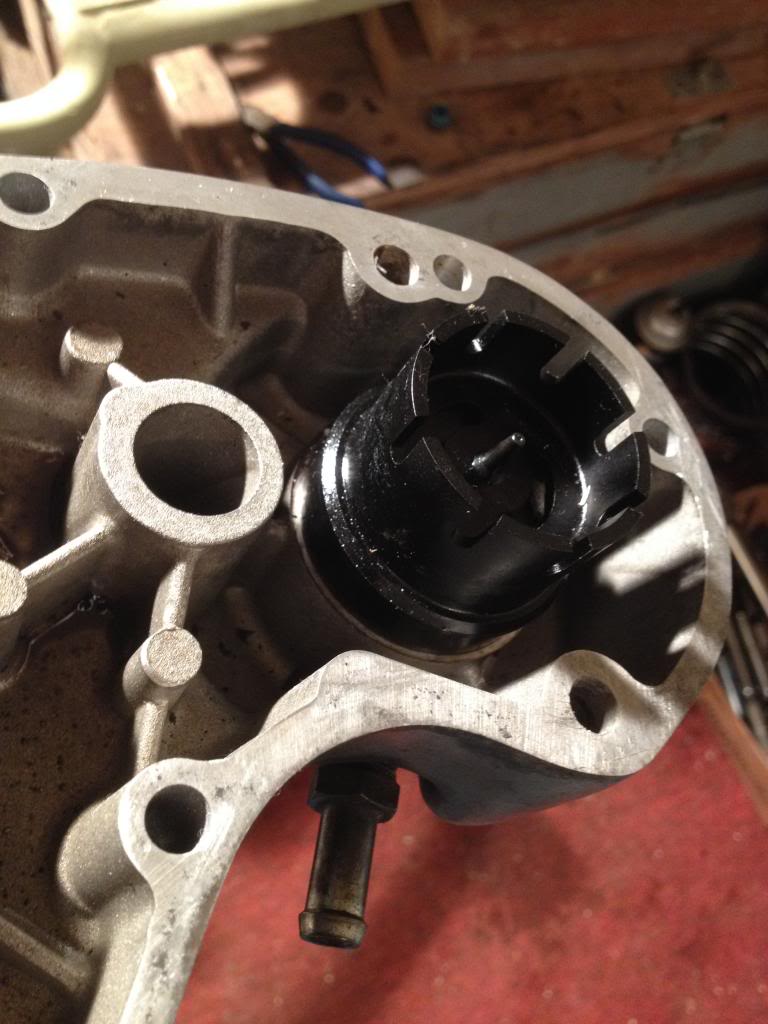
In an instance where used silicone was used to seal the gaskets, pieces of silicone (or sheets) could be sucked in, stretched and broke off into the engine.
This silicone 'gummy bear' sheet was found in the oil pump.
 2)
2)
Diagnosing Oil Consumption
- The service manuals say to use the proper grade of oil for the lowest temperature expected until the next oil change.
- The FSMs assume a lot of oil is going out thru the chain oiler. That's why some people simply plug it.
- Oil mileage usually varies from 250-500 miles per quart of oil. 3)
(depending on the nature of service, fast or moderate driving and how well the engine is kept in tune).
Be sure to check oil level often. - If engine uses too much oil;
- Check the breather valve for incorrect timing (57-76) or a plugged or non flexible condition (77-85).
- On 57-76 models with a chain oiler, turn the adjusting screw to make sure it's not over oiling or just plug it off.
- Crankcase pressure restrictions. Look for kinks / restrictions in the oil tank vent line or breather vent.
Also check for a plugged oil filter (if applicable). - Loose parts. Look for external oil leaks.
- Excess blow-by past the rings or valves.
- Look for broken rings, too much ring end gap, wrong bore surface finish for the type of ring you are using, etc. 4)
- Forged pistons (if installed) run more clearance than cast and will use more oil.
- Old / worn rings or valves allow excess blowby which could pull oil into the combustion chambers and out of the bottom end.
- Check the condition of ring and valve seal. See Performing a Compression Test and Performing a Leak-Down Test in the Sportsterpedia.
- An increase of oil consumption is normal for a motor that is breaking in.
- Neither new rings nor the cylinders are perfectly round.
The break-in process allows the rings to cut the cylinders in their own shape, and leaks stop. - You can remove the exhaust and inspect the valve areas in the heads for oil leaksge.
- Any external leaks need to be attended to.
- Internal leaks can drive you batty. Look for oil leaking;
- Past the crankshaft seal into the primary. Check the oil level.
- Out the cam cover breather vent. See Breather Vent / Tube below.
- Exhaust pipe. Possible valve problems.
Visual Inspection
Rocker Box / Gaskets
- Rocker shaft bolt heads:
- These are very short bolts. Each has an O-ring behind it which needs to be replaced if leaking. 5)
- The seals may shrink when they are cold and leak then swell back up when the bike warms up and stop leaking. 6)
- If it is leaking on the side with the nuts (left side), you might be missing the thin washer that goes on the end of the shaft. 7)
If it is leaking on the side with the slotted heads (or Allen heads), there is an O-ring at the end of the shaft to which the “screw” tightens down.
It may be that the O-ring is pinched or otherwise compromised. - Removing the screws:
- Tighten the nut on the opposite side of the rocker box before you loosen the nut on the carb side.
Unless they've been put on with red Loctite, they should just unscrew off. - You can first try a wrench on the acorn nut side to remove the screw on the other side (one wrench on the acorn nut, another in the Allen bolt). 8)
Either the screw will come out or the acorn nut will start to come off (shaft will come out of the acorn nut).
If the acorn nut wants to come off, put it back and use an impact wrench on the screw.
Only use an impact for removing the screws, not installing.
- Rocker box gaskets.
- A symptom may be a rocker cover gasket leak but the original problem may be a simple exhaust leak. 9)
These leaks are expelling very hot gas which can wreck the rocker cover gasket.
In general, rocker cover gasket leaks should not occur. They are a very simple part, between two easy to seal surfaces.
It's difficult to get a bad install. Be sure to correct the actual or original problem whatever it may be.

Rocker Oil Lines
- Leaky rocker box oil line fittings.
- You may not have to replace any parts to fix a leak at the fittings. You can un-install the fittings, clean, inspect, re-install and see what happens. 13)
- Note for re-install of the metal oil lines - The line is just long enough to be inserted a small amount at each end. 14)
So insert at the top, then the bottom ensuring that it is more or less even top and bottom. Then, while keeping it from shifting, slide the rubbers into place.
And tighten them alternately, again keeping it from shifting.
Install the rubbers an inch or more from the line ends, then slip each line-end in place, and hold it there while sliding the rubbers into final position.
Tightening the nuts will seat the rubbers. Lightly grease the rubbers will help. - Keep an eye on which style seals you buy as replacements.
- OEM is barrel shaped and some aftermarkets are a barreled with 45 degree cuts on the top and bottom. The 45's are no good. 15)
Either a different polymer is used or you really need that full barrel shape to seal the oil line properly.
| Leaky rocker box oil line fittings. 16) |
 |
Air Cleaner / Filter
- Oil puking and oil seepage out the air cleaner are different conditions.
- You'll know it if it pukes as there will be a good puddle of oil on the shop floor or gobs of oil running rearward of the A/C all over the bike.
This is a sign of too much oil added to the system or wetsumping. - Oil seepage (or the oil filter getting saturated with oil over time) may be perfectly normal.
- Air / oil mist normally is present out the engine breather(s) and if the filter isn't changed regularly, it'll get saturated and stop up from oil separating from the mist.
- See Why Oil Pukes Out the Air Cleaner in the Sportsterpedia.

Pushrod Tubes
- Verifying a pushrod tube leak and what portion.
- Make a sandwich: 18)
- Paper towel → aluminum foil → paper towel.
- Carefully install it around the pushrod tube (top to bottom) and / or between it and the cylinder head and around the tappet block.
- After it leaks you should be able to determine from which side the leak comes.
- Old / damaged / missing corks or O-rings can cause leaks.
- Rubber O-rings can have a tendency to shrink up over long periods of time. 19)
- Installation error of a pushrod tube or seals can cause a leak.
- Corks:
- You can soak new corks overnight in either brake fluid, or power steering fluid to soften them.
That allows the tube end to seat much better than using dry corks. 20) - Once the corks are in. 21)
Rotate the tube a little and take a screwdriver and give the bottom lip a small tap on 2 sides. You can visibly see it seat better. - Use 2 washers in middle if you think it's not tight enough. 2 washers over one is no different when putting in clips, so no worries.
- You can get rubber seals instead of corks JP #433639 or blue silicone seals JP # 433638 22)
- Make sure you have a cork seal between the lower tube and the spring collar. 23)
Oil drains down thru the pushrod covers and the washer protects the cork from being ruined by the metal spring.
Washer (6762B) - 11/16“ x 29/32” x 1/32“.
- O-rings:
- The ID of replacement O-rings will effect the proper fitment just as much as the thickness of the rubber.
If the O-ring is too small ID and is stretched to put on, it will in effect, lessen the rubber thickness (OD) of it. 24) - Ensure that the O-ring that seats into the bottom of the rocker cover is a fat one compared to the others. 25)
Looking in the parts book, the upper O-ring is the same as the lower ones. However, the ones that were in the James gasket kits have had a larger size as well.
It should be a tight enough fit that the pushrod tube has to be firmly pushed up into it and sticks there (flat blade screwdriver helps).
- Tubes:
- Make sure you slide the top tube back up into the rocker box before putting the locking clip in place (makes a Hell of a leak). 26)
- If the end of the pushrod cover tubes have a step in them, they are the O-ring style and will not work with corks. 27)
- The pushrod tube covers may not be the same for all years. 28)
They are all flat on the bottom, but they are not all the same at the middle where they meet the spring keeper.
Some should have cork at that spot. - If the flat lip of the push rod tube is not perfectly flat (a nick in it or it's bent) and not mating properly with the cork seal and rocker box. 29)
Remove the push rod tube and inspect the top lip / mating surface carefully.
Also when you put the pushrod covers back on, give them a bit of a turn both ways to 'set' them in place. - Also note that the schematic diagram in the parts book and in the FSM shows the tube upside down. 30)
They should be all flat on the bottom (flat flange facing down, the angled flange facing up).
- Opening pushrod tubes without cleaning away the grit that collects at tappets guides/pushrod tubes is inviting trouble. 31)
- A tiny piece of sand or grit left there can keep them from seating right. 32)
- Restricted head drain holes.
- The oil return that comes down through the barrel and into the crankcase can be blocked if the head gasket is installed wrong (flipped). 33)
Then oil is still being pumped up to the rocker boxes. But feed pressure would fill the rocker box then pushrod tubes and blow the seals.
- Restricted tappet guide drain channel.
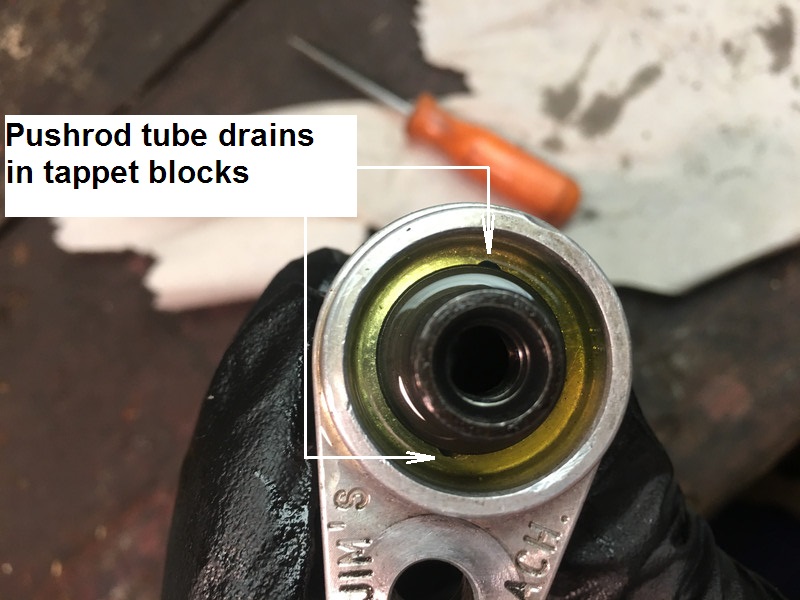
- Oil from the rocker boxes drains down the pushrod tubes and enters holes in the tappet blocks to drain down into the gearcase.
Hot oil is thin and drains faster. Oil at ambient temperatures is thicker and drains slower.
However, the drains in the lifter blocks are small.
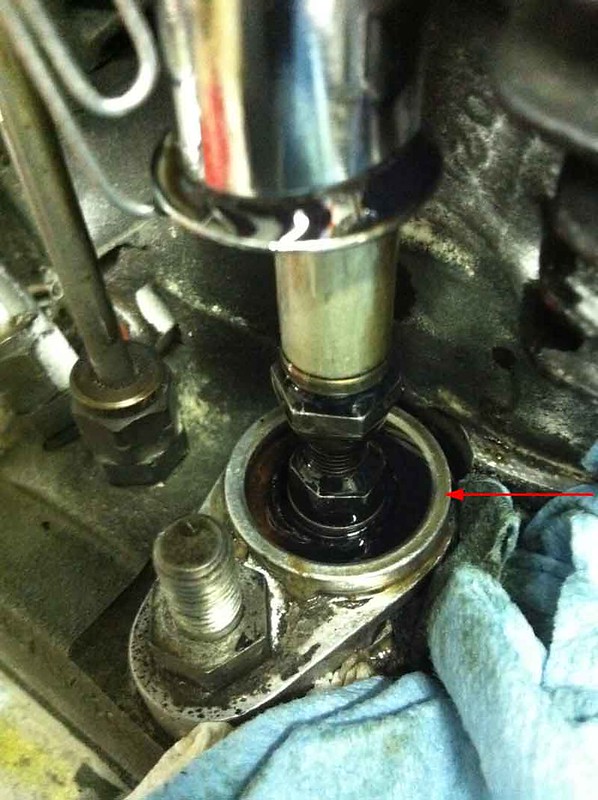
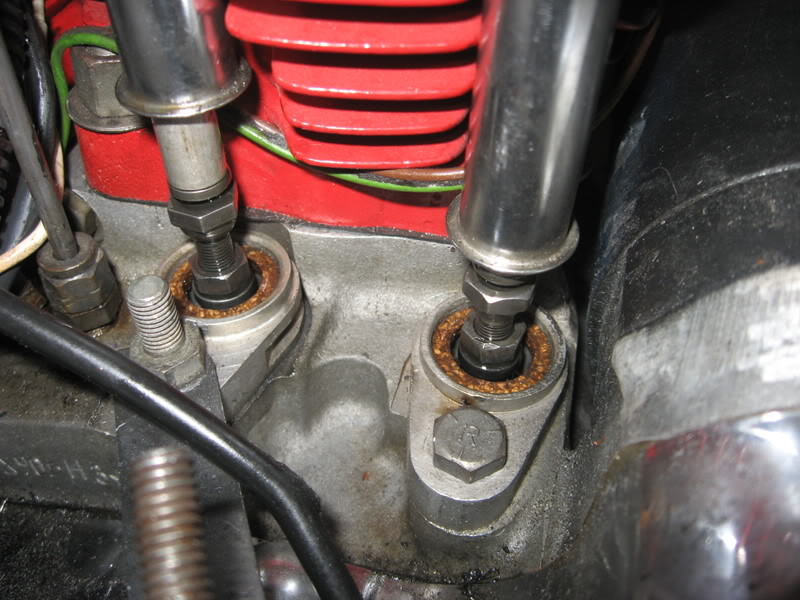
In checking the amount of oil holding in the tubes;
You may find that you'll see more oil holding just after shut down and less oil after the engine sits for a while.
And then, the drain channels can stop up sometimes. This backs up oil in the tubes and can cause a leak to form at the tube base.
It could be the gasket or sometimes particles that have lodged in the holes.
If you raise a tube and find excessive oil accumulating in the tube, the tappet block (76<) or lifter (77>) drain is not draining. - Try removing the tappet guide, clean / replace them and install new gaskets (or O-rings respectively). 34)
- A puller is needed for 1976-earlier years as those guides are a press fit into the crankcase.
1976-later years, ne puller needed, just wiggle it back and forth to get it loose, then carefully pry it up. 35)
- Sometimes just removing the lifter (from the block) may clear whatever may be lodged in there. 36)
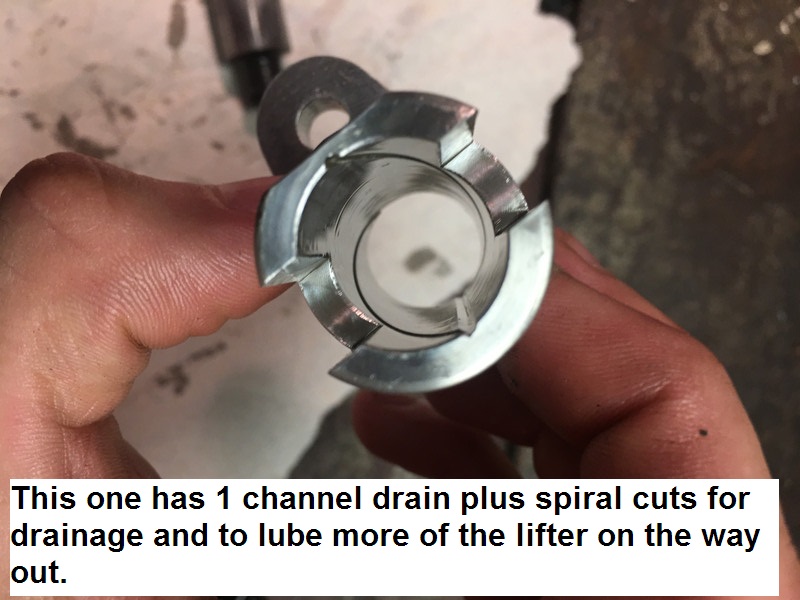
- Some guides have one channel, some two, and there are some that have a spiral.
- Over the course of the motors lifetime, there's no telling what year or type of guides they may be since one fits all.
But you do need to get it right, since the oil return thru the guide also lubricates the tappets. - To remove them, some will tap the guides gently to rotate them a little to break the hold then just pull them out by hand. 37)
It will then need a new seal or gasket under the tappet block. - Fairly common with some jugs is the tappet guide hanging up on the cylinder fins when trying to remove it. 38)
You may need to clearance the base of the jug before you remove the tappet.
Alternately, if you can lift the guide high enough, you may be able to clean the drain channel with the tappet guide still in place. 39)
Try and use compressed air to blow down the drain channel.
- Restricted lifter oil drain hole (77-up).
- 77-up engines use lifters w/ (2).125” holes in each tappet along with the slot in the guide. 40)
- Assuming the tube is installed correctly, then the lifter drain holes may not be draining back thru the lifter fast enough. 41)
And the push rod tube is backing up with oil 'til it leaks (aka the oil passage in the lifter is blocked (or partially blocked). - To test this theory,
- Open up all 4 push rod tubes & expose the lifters.
- With an oil can, (one at a time) completely fill each lifter cavity with oil.
- With a stop watch, measure how long each lifter cavity takes to drain / empty.
- Write down the time in seconds, for each.
- Repeat the process on all 4 lifters.
- Compare the results
- If any lifter deviates significantly in time from the other 3 lifters, then it's reasonable to assume that lifter has a blockage of some kind.
- If this is it, you might be able to clear the blockage with some compressed air or just remove the lifter & see what's going on.
- You can drill or ream the drain holes to a slightly larger size also.
- Caution: Make sure you remove all burrs and wash the lifters afterwards so no debris can destroy your engine. 42)
- At high RPM, the oil is flowing at a large volume, so you may notice a leak after sustained high rpm. 43)
- This where making the pushrod drains a little bigger may help.
- Non sealing pushrod tubes can be a source of or a result from an imbalance of crankcase pressure.
- Tiny oil bubbles leaking from underneath tappet blocks is one sign of too much crankcase pressure.
It's possible to be weeping in the back and traveling around to the front. 44) - See Crankcase Pressure Problems below.
- If 76-earlier tappets are installed in a motor with the 77-and later oil system, it could cause a leak.
In 77, the tappets had drain holes in them to allow for better drain down. 45)
| A restricted tappet guide drain channel holding oil in tube with engine off. 46) | Lower cork seals installed. 47) |
 |  |
| JIMS replacement tappet block with 1 straight and a couple spiral channels. 48) | |
 |  |
Head Gaskets / Bolts
- DO NOT try to simply tighten the head or rocker bolts that may be loose.
All multiple bolt fasteners are required to be torqued in a cross pattern.
Likewise, simply tightening only the bolts that are loose will change the clamp load on the ones that are tight and not touched.
If you feel it's simply a loose bolt, loosen all the bolts on the rocker box / head / etc.
Then torque them back using the correct specs and tightening sequence.
Cylinders / Rings / Base Gaskets
- Piston ring material.
- Ductile, Cast, Moly faced, etc.
- A cast oil ring causes wall wear and is terrible at oil control. The 3 piece oil rings are better. 49)
- Honing the cylinders.
- You need a 45° or 60° cross hatch pattern on the cylinder walls (400 or 600 stone).
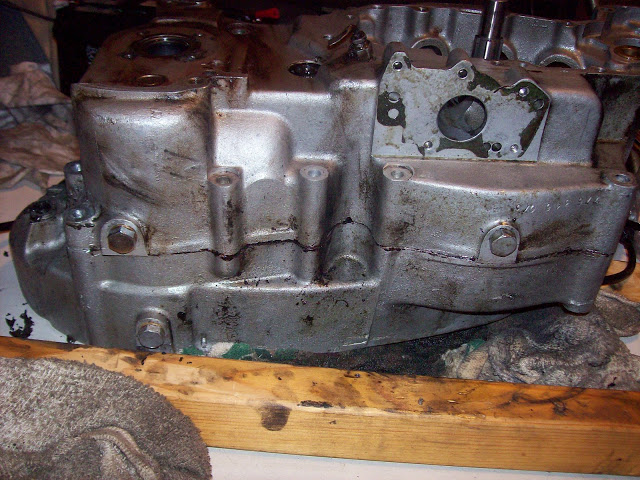
Engine Case Seam
- Installation error.
- The case halves are put together with sealant (not gaskets).
It is possible, when mating the left and right case halves, to not spread the sealant evenly and create a future leak.
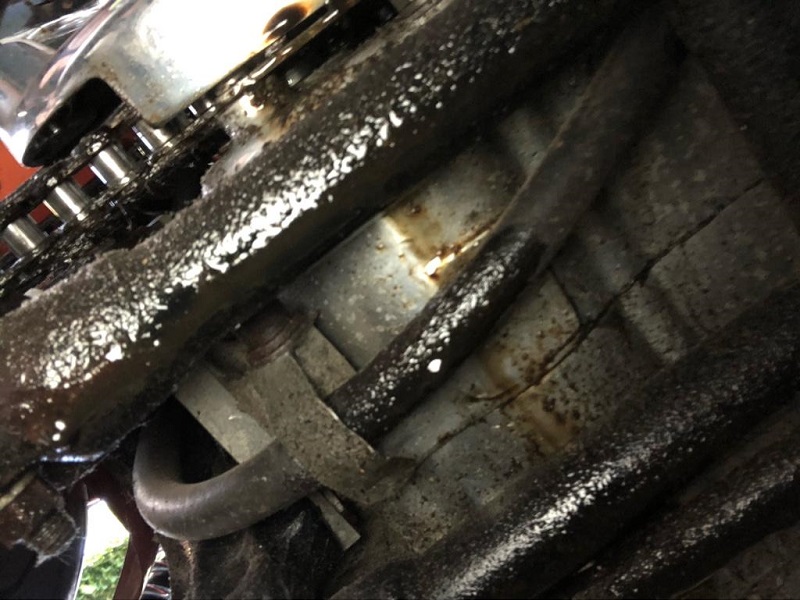
Too thin in some places and too thick in others. If the bolts are not properly torqued, this could leave gaps in the sealing surfaces. - Motor mount bolts may appear to be leaking oil when the oil is actually coming from the case seam around the bolts.
- The bolts don't actually enter the case but rather through bosses on the outside of the case.
One practice to seal up old case seam leaks at the bolt holes has been to remove the bolts, add silicone to the threads and reinstall the bolts. 50)
So if you are leaking out the bolt holes, someone may have smeared sealant on the bolt to make up for the failure of the case seam there.
This patch will not in itself cause any harm and may well hold up, but it is not right.
The alternative is to completely strip the engine and re-seal the cases.
- Officially, the cases need to be split and the joint re-sealed.
- Make sure it's the case seam leaking before making any repairs.
- The case seam is the lowest part of the engine.
Any leaks from above can seep down beside parts you can't see around and end up at the case seam, making you believe the seam is leaking.
Clean off the area thoroughly and watch to see where the leak is actually coming from. See Leaking with Engine Running (weeping gaskets) below.
Oil Pump
Oil Tank / Lines and Connections
- If you have an oil leak from anywhere, the oil tank is subject to having oil all over it.
- It is an accumulation of spills from filling, blowback from engine gaskets / seals / breathers and road grunge.
- The best way to find out if the oil tank is leaking is to clean it up (try some blue dawn and a nylon brush).
(and use some spray SOFT-N-DRI or talcum powder in the area) See Leaking with Engine Running below. - 83-93 oil tanks are prone to cracking and leaking where the oil tank and battery tray are connected.
- Fractures were due to poorly supporting the weight of the battery. 51)
Harley offered 62472-93A and 62482-93A oil tank upgrade kits for replacement (94-96 tank assembly).
However, the original oil tank can be reinforced and welded.
- Periodically inspect all oil hose connections for leaks or cracks / deteriation, especially before long rides.
- Replace any lines that are cracked.
- They have been known to have the inner rubber come loose and form a sort of flap valve inside the oil line. 52)
- Restricted oil tank vent line.
- Our bikes have 2 oil pumps. A supply pump (the skinny gear set) & a return pump (the thicker gears). 53)
The return pump has a larger flow than the supply pump. This is to make sure any oil that get pumped in definitely gets pumped back out.
If you watch the return oil as it goes back to the tank you will see it returns in “spurts”.
The oil part of the spurts matches the amount that the feed is pulling from tank.
That's why the oil level in the tank remains the same while the bike is running.
The air part of the spurts is the extra cap of the return pump over the supply.
So the return would pressurize the tank because it's pumping this extra air back.
Air pressure in the tank is relieved thru the vent line back to the camcase where it came from in the 1st place.
That's why the vent line is always the highest one on the tank so it's above the oil level.
If it was below the oil level, oil would be forced into the camcase causing wetsumping. - Oil carry over may occur while driving the vehicle at highway speeds. The amount of carry over is directly related to the amount of restriction. 54)
More restriction equals more carryover.
In most cases the restriction is minor and translates to a small amount of carry over, which if left alone creates a bothersome mess.
Start looking for pinched hoses or a restrictive oil filter.
Pull the line off at the tank and make sure you can blow through it into the cam gear case.
Then blow through the oil tank fitting with the lid off and make sure that path is clear.
Chain Oiler (57-76)
The chain oiler is a designed leak to keep the chain from rusting up.
Most will either plug the oiler fitting with a bolt / screw or remove the oiler fitting and install an 1/8“x27 NPT plug there and oil the chain by other means.
Cam Cover or Primary Cover
- Loose bolts or a worn gasket.
Caution, tightening loose bolts on the cover without using the proper torque sequence can warp the cover.
If you find loose bolts, loosen all of them and re-torque the entire set using the correct sequence and torque specs. - Remove the cover and check it for warpage.
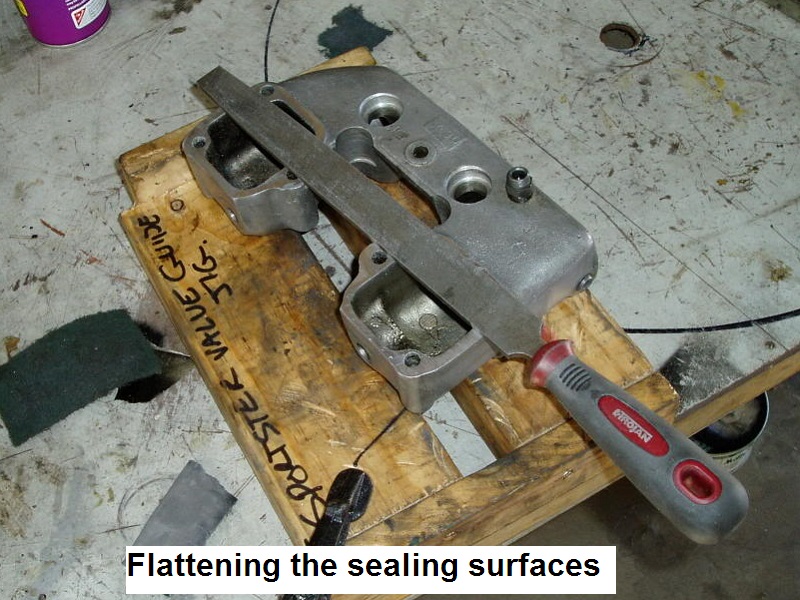
- You can lay the sealing side on a flat surface or use a straight edge placed diagonally end to end.
- Use a feeler gauge in several spots under the mating surface to measure amount (if any) of warpage.
- You may be able to file down slight warped areas. If not, you may need to replace the cover.
- Inspect the cover for hairline cracks.
- These are notorious for hairline fractures where the bolts go that can produce a leak. 55)
Even the primary chain, prior to needing adjustment, can hit those areas and create a leak.
If there is a crack evident, you may be able to fill the bolt hole with gasket maker (not silicone) or have it brazed. - If it is a top bolt, it is not sitting in oil. 56)
So it is leaking oil that has been flung on it, which means it's coming from a place that is less likely to leak.
Leaks up top are more likely to be seepage rather than dripage.
So a crack is good possibility if the bolts up top are tight and the gasket is good.
If it's not coming out of the gasket joint, but rather the bolt;
The leak is coming through the part of the gasket that wraps around the inside edge of the bolt.
(rather than the side that is visible as you look at the edge of the gasket)
Or through the bolt threads if that hole is not a blind hole but rather a hole that goes all the way into the primary.
Also, check the transmission vent (77-up) line before doing anything else. A clogged vent can force oil out of places that you wouldn't believe.
- Modifications to the cover.
- If your cam cover has been modified on the bottom, there is a rifling hole there for a drilled oil passage running vertically thru the cover.
If the cover was cut / sanded close to this factory welded up hole, it could break thru and leak.
If it was cut thru and siliconed / epoxied shut, the sealant could be leaking oil.
See also Chopping the Cam / Gearcase Cover in the Sportsterpedia.
- Cover leaks can also be caused by too much internal pressure.
- Loose cover bolts allow air to be pulled into the engine and muck up crankcase pressure.
(which could lead to wetsumping and blowing out of the breather(s) ). - A primary cover leak can also be caused by;
- A kinked or stopped up transmission vent hose.
- A bad crankshaft seal.
- Check the starter gasket.
- Oil can appear to be coming from the primary or case seam when it's actually leaking from the starter mount gasket.
- Shifter Shaft Seal.
- There is a thrust washer (35404-74) (VTwin #10-1259) on the shifter shaft (washer is .030” thick). 57)
It often gets lost (overlooked) because it oil-sticks to the primary cover and goes unnoticed.
- #2 cam seal in cover.
- There's a seal (11124) pressed into the cam cover that seals the nosecone behind the points or ignition plate.
It can seep leaving oil just in the nosecone or leak out the cover. - Look for ID leaks; a marred cam journal, seal lip not getting up on the full journal diameter or a missing dog bone thrust plate on far side of cam. 58)
Also look for a blocked drain hole (putting the seal in too far can do this). The seal goes flush to outer surface.
A new bushing too long hitting the seal lip when the seal was installed would do it also.
Same as the seal bore not concentric to the cam bushing (holds seal off center).
Look for OD leaks; the seal bore nicked, tearing the seal OD when installing it. - Seal removal / installation.
- The seal can be a bit tedious to remove. 59) The seal itself will get wrecked as you remove it.
Just need to be careful to not scratch the sealing surface as you work. - You force it out with a pointed tool, an oil seal remover tool or a flat blade screwdriver. 60)
- Look for scratches, gouges or wear marks on the cam shaft where the seal seats. If there are any, they need to be removed or the shaft changed.
Also check if there are any gouges or cracks around the outside diameter of where the seal fits in (bore).
These can be put there during seal removal and let oil seep out around the outside of the seal. They can usually be scraped or filed back flat.
You can make a scraper by grinding the teeth off the end of a three-sided file. - Lightly grease the lip that surrounds the cam. However, the seal OD should be installed rather dry or with an appropriate sealer (not RTV).
A thin layer of non hardening aviation gasket sealer etc. around the seal OD lubricates the installation. 61)
(and helps stop leaks around imperfections in roundness)
- Then you can tap a new one in with either an oil seal installation tool or a socket of appropriate diameter.
- If you decide to pull the cover to change the seal (better idea), remove the push rods FIRST. 62)
| Pulling oil seal gently with small bicycle tire iron. 63) |
 |
Breather Vent / Tube
Oil leaking out the breather vent (or oil carry-over) can happen for many reasons.
First, the air leaving the engine can carry oil mist with it which is normal. There will be a drop or two but not a lot to be concerned with.
The MoCo has done a lot of re-engineering over the years, but the problem of oily air filters and oil drips never went completely away.
There are however, different degrees of oil carry-over out the breather.
- Oil only in air cleaner and no where else.
- Oil in air cleaner, small amount in sponge, small trace on backplate.
- Oil in air cleaner, large amount in sponge, oil visibly thick on backplate, element still clean.
- Same as #3. Filter element now collecting oil.
- Same as #3, Filter element completely saturated.
- Oil exiting air cleaner from backplate.
Oil is supposed to be fed to the engine, lube the related parts and be sent back to the tank as quick as possible.
If the oil is allowed to stay in the engine too long before returning to the tank, the result is more oil 'carry-over' inside the engine than designed for.
Carry-over , where do you start? What are you looking for? First you've got to qualify the complaint.
Ask the right questions.
- When does the breather puke?
- Driving at steady highway speeds? See Click here for Wet Sumping at high RPM.
- After the bike's been sitting for a couple of days and you start it up? See Click here for Sit Sumping.
- Is the oil tank cap leaking or popping off? See Overfilling the Oil Tank and Oil Tank Pressure in the Sportsterpedia.
- Clean the affected area and ride or run the bike and reproduce the problem with the breather hose in a baby bottle (or other) test catch can as described here.
This will help you better understand the amount of carryover you're dealing with.
- Start the diagnostics and separate the systems qualifying each one as you go.
- Oil tank: see Inspecting the Oil Tank.
- Return lines:
- Venting system:
- And finally, inspecting engine internals.
Other reasons why oil leaks out the breather vent:
- Oil slinger issues:
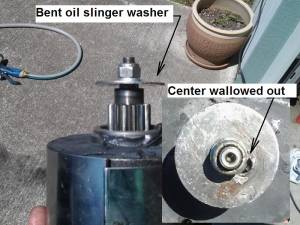
- A warped or bent oil slinger washer would fling oil into the vent. 64)
- Over-tightening the washer locknut can warp the washer and caused it to drag against the bushing in the cover.
This wouldn't classify as a crankcase pressure problem but rather a mechanical problem that can be fixed.
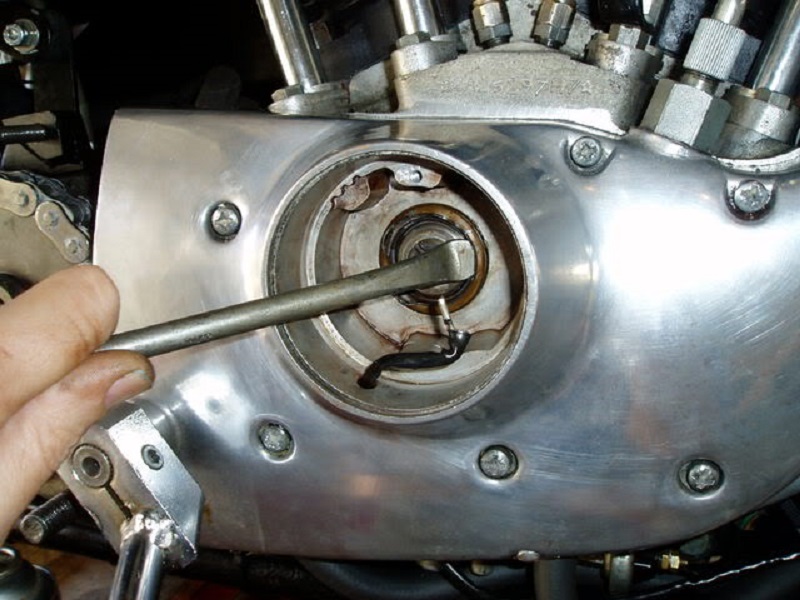
- If the oil slinger on the generator gear is loose and spinning or missing on the shaft, oil may gather in the gearcase and puke. 65)
- In theory, it spins really fast with the generator shaft and slings oil away from the breather tube so that only vapor is going out the tube.
It would be a simple check to pull off your generator and make sure the slinger washer is tight to the generator shaft.
- Sometimes people remove the oil slinger washer from the generator or never install one if they went to an alternator. 66)
This cause`s a bit more mist to exit the tube.
However, there is no good reason to leave the flat oil slinger washer off when fitting an alternator. 67)
It is an ESSENTIAL part of the breather system and doesn't affect the operation of the alternator at all.
The inner bearing deflector maybe, but not the oil slinger on the end of the shaft.
Trick to removing the generator: Lift up on the inner end and hold down on the outer end, and remove it.
 68)
68)
- Breather valve issues:
Click here to see the different configurations of breather valves per year model.- On 57-76 engines, the engine breather is a rotary breather valve on top of the oil pump. It has to be timed to open and close correctly.
If it is timed incorrectly, it can pump too much air out the breather vent, carrying oil mist with it.
You're timing the engine crankcase breather tower on top of the oil pump. It has to open on downstroke and close on upstroke.- Improper timing of the breather valve can create;
- Crankcase pressure problems (bottling up pressure), blowing out gaskets / seals and possibly creating a domino affect.
Piston downstroke provides the push to move the oil thru the oil channel.
The breather valve opens to allow both crankcase pressure and oil to get thru the oil trap and into the gearcase.
If the valve closes on downstroke, both oil and crankcase pressure back up. Some oil may spill over into the primary.
Oil scavenge back to the tank will be hindered thus less oil will be in the tank to pump back to the engine.
The engine could shut down due to sudden heat buildup trying to seize pistons or the oil churning on the wheels by wetsumping.
If the breather isn't opening properly, the oil doesn't have the ability to puke either (no external signs of a problem). - Due to this being a non adjustable valve, it's often not considered when crankcase pressure or oil leaks occur.
- On 77-85 engines, the breather is a stationary valve installed in the cam / gearcase cover.
- The only moving parts are the valve itself which moves strictly from air pressure instead of mechanical gearing.
- 77-78 reed style valves can cum up with old oil and stop working properly.
- 79-up rubber umbrella valves can get hard and stop working properly.
- Due to their construction, either needs to be periodically maintained for proper operation.
You can't just ignore these breather valves and never have a problem with them.
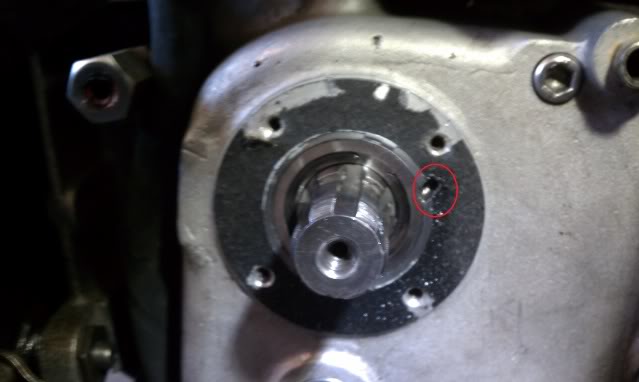
- Oil screen in the gearcase (57-76):
- Inside the timing chest there is a brass screen on the inlet to the return side of your oil pump. 69)
If this screen gets blocked (by say, pieces of cam shims), the timing chest will fill with oil which will puke out the breather tube.
Only way to check is pull the cam cover and inspect the screen.
- Scavenge side of the oil pump not working / not working properly.
- This leads to too much oil building up in the crankcase. (air leak in oil pump connections, worn gears, sheared shear pin, clogged inlet) 70)
- Check for a pinched breather hose or a stopped up tube that could cause high crankcase pressure.
If you've zip tied the hose to the frame or added a filter on the end of the breather hose, pressure will be affected. - Check the breather hose routing.
The hose should run verticle from the cover to the A/C or out and down maybe toward the chain as some do.
There should not be a bend in the line routing to allow oil to collect in the hose, accumulate and blow out in gulps. - Crankcase pressure problems can cause oil weeping or leaking from the breather tube.
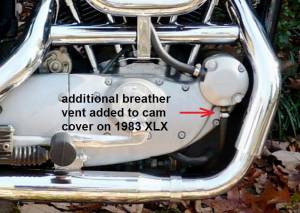
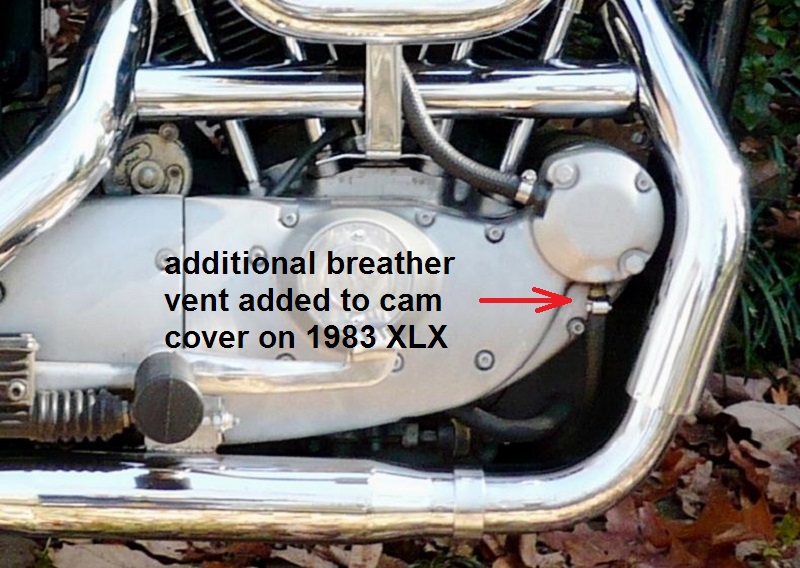
See Crankcase Pressure Problems below. - 79-85 cam covers can be modded to accept a secondary breather vent hose.
- 79-up Ironheads can benefit from removing the 6 o'clock plug from the cover and adding an additional breather hose there.
It allows the crankcase pressure to evacuate faster, which results in the motor being a little more free-revving.
A side benefit is that it will largely eliminate the “oil in the air cleaner” syndrome, assuming the original breather is left in place.
You can terminate the extra breather hose under the engine. However, it will drip a spot or two of oil there when parked.
Click here to see more about this mod.
 71)
71)

Primary / Transmission Vent
1977-up engines had a dedicated vent and hose from a fitting over the transmission housing.
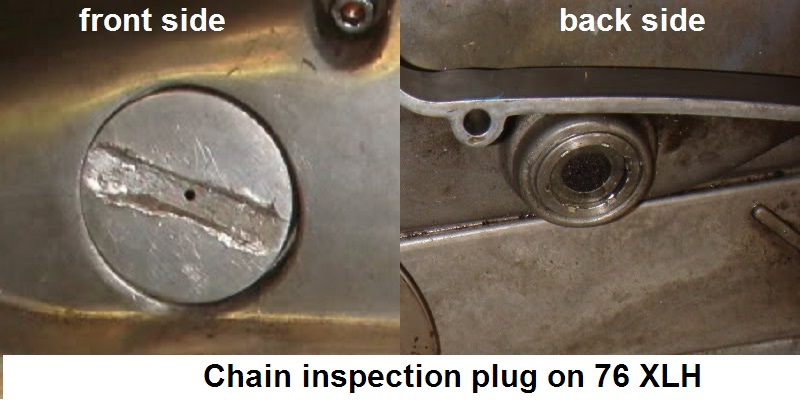
1957-1976 didn't have this. Some had a small hole in the middle of the primary filler plug.
1976-earlier:
- A plugged or missing hole in the primary filler plug / chain inspection plug may not allow the oil transfer valve to work properly.
- The transfer valve depends on a differential pressure to transfer sumped oil from the primary back into the crankcase.
On upstroke, transfer valve opens and negative crankcase pressure draws oil / air from the primary into the crankcase.
Air (at atmosphere) is pulled into the primary thru the hole in the filler plug to take the place of what the primary lost thru the transfer valve.
With the filler plug hole stopped up, crankcase vacuum can pull on the primary gasket and also the crank sprocket seal.
1977-up:
- A blocked transmission vent can blow oil out the primary cover and / or ruin the engine sprocket seal.
- Oil may leak out the clutch cable, adjuster nuts, primary gasket, stator wire grommet or the starter gasket.
- The blocked up and rising pressures in the crankcase can also blow out the sprocket seal between the primary and engine compartments.
This can mix engine and primary oils, cause crankcase pressure problems and blow oil out the breather vents.
- Check the tranny vent hose for kinks or a blockage.
- Blow on the hose end to make sure you can push air thru it. Do not used compressed air as that can damage the sprocket shaft seal.
- The hose can be blocked from gunked up oil/dirt and in some cases has been known to be blocked by creatures (think Wasps and Dirt Dobbers). 72)
- Transmission Vent Hose Routing:
- On late 1981 XLH/XLS models, the transmission vent hose routing was changed to reduce excessive oil leakage from the transmission. 73)
Click here to go to the TSB page in the Sportsterpedia and download the full TSB PDF.
Early 1981 models can be changed to the new routing. The transmission vent hose should be routed;- Under the starter, over all the oil lines and rear brake line, then down between the pivot bolt and swing arm.
- Reroute the hose if it is showing a kink in placement or replace it if you can't blow through it.
There should be no sags in the hose between the attachment to the engine and the open end of the hose.
There is also a Service Bulletin, M-1143, discussing proper vent hose routing with illustrations for rigid Evos.
Click here to go to the TSB page in the Sportsterpedia and download the full TSB PDF.
| Primary / chain inspection plug vent hole on 76 XLH | 1977-up transmission / primary vent location. 74) |
 |
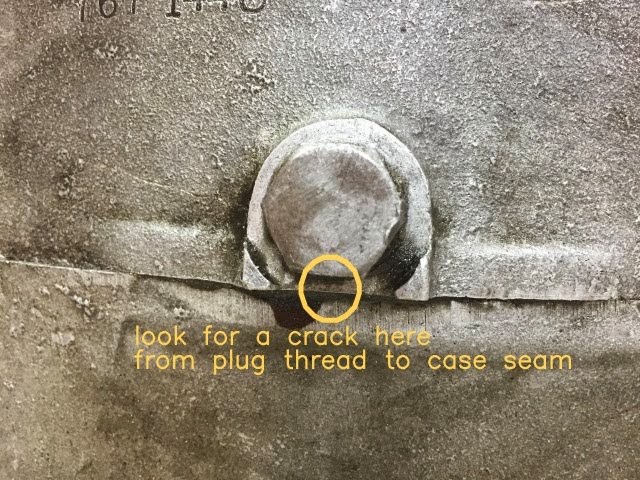
Timing Inspection Plug / Drain Plugs
- These have been common areas for an oil leaks.
- Over-torque during installation and heat / expansion during use seems to be the primary cause of distorting the threads.
- Look for stripped threads or fixes by the PO that may not have sealed properly.
- The 57-76 (only) primary drain plug is the one most will say DO NOT Touch unless ir is already leaking.
- This is due to it's location being very near the case seam.
- See Sportster Drain Plugs Explained for more information regarding drain plugs for various year models.
- Repair. (see these links in the Sportsterpedia)
Clutch Cable or Connection to the Primary Cover
Leaking with Engine Running (weeping gaskets)
See also Wet Sumping in the Sportsterpedia.
Weeping cylinder base gaskets:
Please do not jump the gun. Clean the area and ride the bike.
- Checklist for weeping gaskets:
- The first thing usually thought of with weeping gaskets is loose bolts.
- Too much vacuum in the engine caused by failing breather valves can implode or work loose gaskets.
See Crankcase Pressure Problems below. - Don't rule out a crankcase seam leak until you've cleaned and inspected it.
- Testing breather valve(s) from the outside:
- You should be able to blow in one breather bolt and get air from the other.
But there should be some resistance if you blow hard and you'll still get air from the other.
Light breath = less resistance.
Heavy breath = should be resistance.
So it's not conclusive to test the umbrella(s) like this.
- If the umbrella (L82-up) is hard and not flexing to allow air to and fro like they should, that'll cause crankcase pressure problems.
And it could easily cause weeping gaskets. - If the oil tank vent line is plugged/kinked, that'll cause pressure problems.
- If you have too much oil in the tank, that'll cause pressure problems.
- If the transmission vent line (77-up) is kinked, that could cause pressure problems.
- If you have plumbed the breather hose away from the A/C with a filter on the end, it can stop up and cause pressure problems.
- Or any combination of the above can cause pressure problems.
- Running the bike hard shouldn't be an issue.
However, running the bike hard compounds the problem if there are any issues listed above.
High RPM makes these issues worse.
- Using powder to detect a leak:
- Degrease the bike until there's no oil remaining.
Then take some Soft n Dri (women's antiperspirant spray), talcum powder etc. and spray it around the rocker gaskets (or other suspected leaking area). 77)
It will go on clear but when it gets heated will turn to a white powder. Just a light film is all it takes.
Whenever it starts leaking it'll show up exactly where the leak is.
- Clean the engine, then start it and use a bright light to see where the leak is coming from. 78)
The light should make the liquid oil shine. You may only have to run your scoot for a few seconds to start leak.
| Rocker boxes sprayed with powder antiperspirant to detected oil leaks. 79) | |
 |  |
Leaking with Engine Shut Off
Sit Sumping. See more about Sit Sumping in the Sportsterpedia.
- Clean the area thoroughly (like with rake cleaner and air blow dry). 80)
Let it sit long enough to begin leaking and blow some talcum powder over the area.
The talc will stick to the oil and pinpoint the origin.
- Take an old bike tube and cut a piece while retaining the valve stem. 81)
Use a hose clamp to tighten it over the filler neck on the oil tank.
Then put a lb are two of air pressure on it and see if that helps you locate where it's coming from.
Leaking From the Primary Chain Inspection Cover
Leaking From Primary Tensioner Bolt
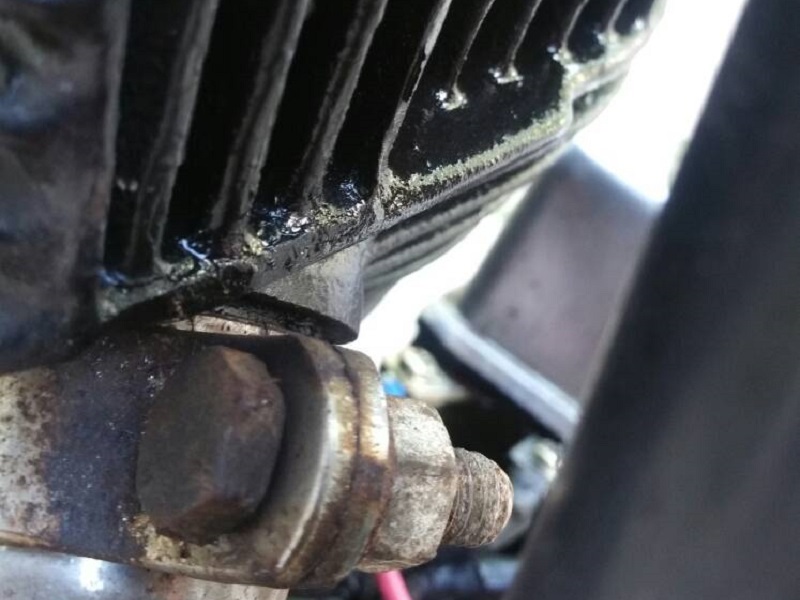
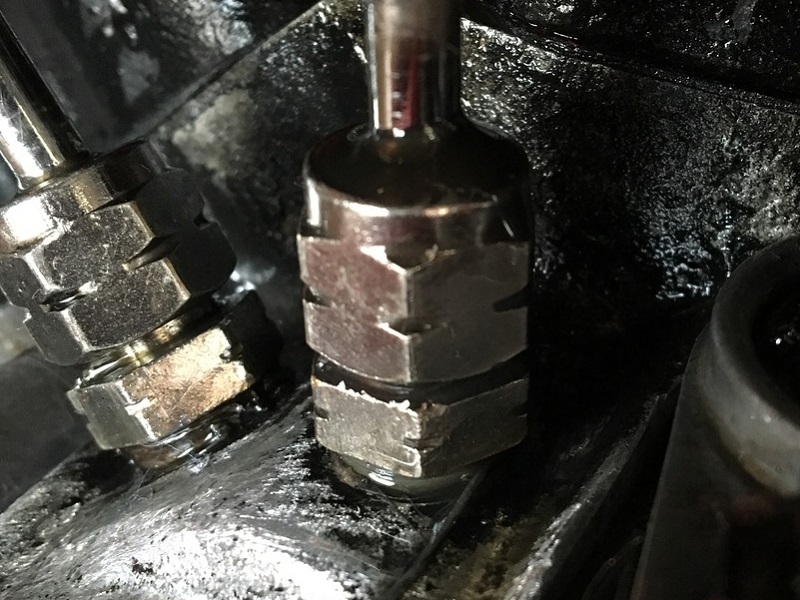
The chain adjuster is the lowest point so leaks from anywhere often end up there. 82)
There is a good chance the actual leak is elsewhere. Clean up the area, tape a paper towel over the adjuster stud, ride or let sit overnight and see what you get.
If it indeed is leaking from the stud / nut, you can try some Permatex Form-A-Gasket #2 on the threads and a skinny nut with a copper washer. 83)
(not just a flat washer, one like a spark plug washer that will conform to uneven surfaces)
If that doesn't work, start looking for a crack in the case near the hole. If the nut has been over tightened, the primary cover may be damaged.
A copper washer and a new nylock to seal the threads is usually all that is required unless you have further issues.
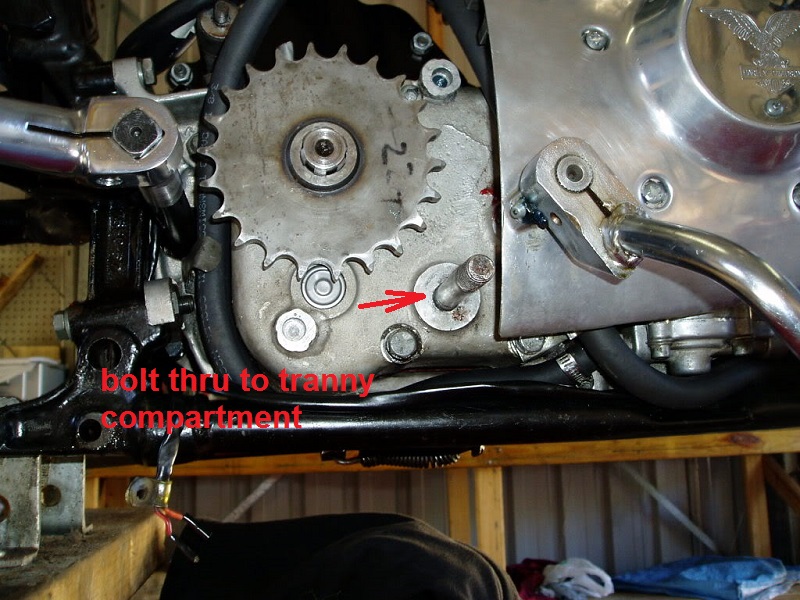
Leaking from the Sprocket Cover
'77-up models have a bolt hole drilled all the way into the tranny cavity from the bottom attaching hole in the sprocket cover. 85)
It doesn't leak if the bolt is removed while on the side stand if you have the correct amount of lube in there.
If you develop a leak there, you can use some thread sealant on the bolt to ensure no leaks once tightened.

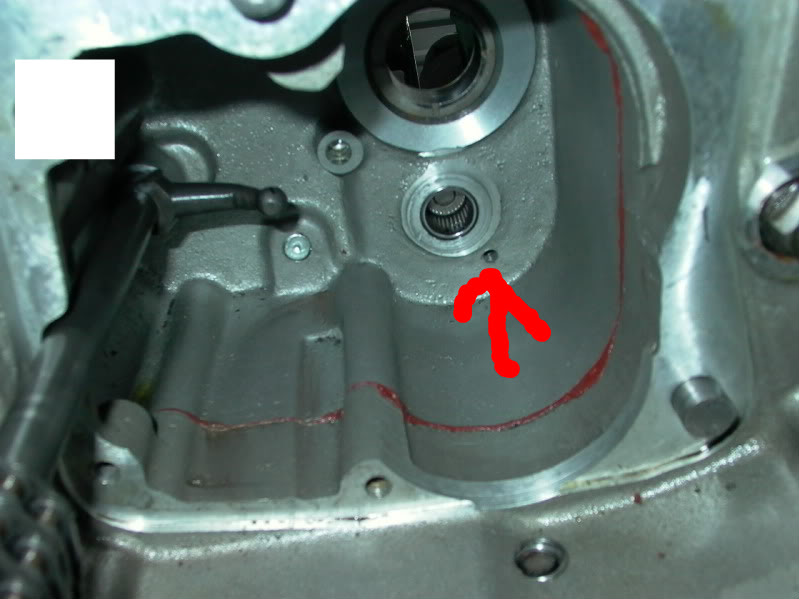
Final Drive Sprocket
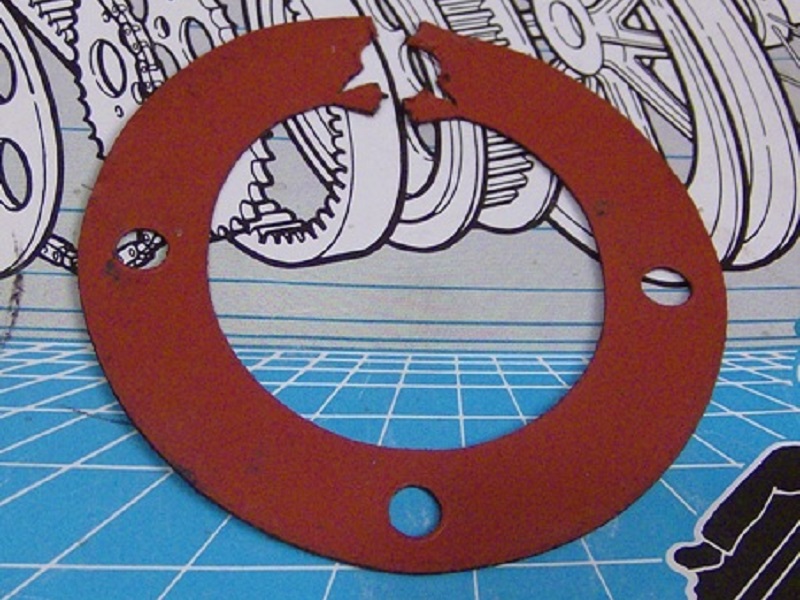
- The gasket at the mainshaft behind the sprocket cover is a common leak area. 89)
- The main ones available are a thin red material and easily torn when installing.
- It could be the main shaft seal or counter shaft bearing that's leaking also.
- Too much torque on the retainer bolts can split the gasket.
- Inside the case there is a trough along the roof of the trans compartment that catches oil to drip thru the arbitrary hole behind the seal. 90)
It's an oiler hole to let oil gravity feed to oil outer half of bearing. - Check that the surface where the seal runs on your drive sprocket isn't rough. 91) They can be rough from new and will chew a seal up in no time.
Also put a little sealant on the splines when you put the sprocket on.
- Welch plug.
- The welch plug for the shift fork shaft hole can leak. 92)
- This hole supports the outer end of the shaft that the shift forks ride on and a small plug is pressed in the hole on the outside of the case.
Very common leak, sometimes the plug is knocked out by accident during trans. assembly. Sometimes they just weep on their own.
It's located at about 4 o'clock from the mainshaft yet still hidden behind the sprocket. You can use JB Weld if the plug is still present - replace the plug if it's not present.
| Oiler hole behind seal is blocked off by the seal. 93) |
 |
Diagnosing the Cause of Oil Leaks
See also in the Sportsterpedia:
Do the detective work before you do the wrenching. 96)
Obviously you must find exactly what is leaking before you can determine what will be needed to fix it. 97)
Degrease the area in question and run the bike a little and watch the area for the beginning signs of seepage.
Check torque on the bolts on covers and parts with gasket/seals but do not tighten more than the specs in the FSM to stop a leak.
That may result in stripping the threads.
If you have a gasket / seal that has needed replacing several times, you must find the cause of the continued failure and then repair that.
In some cases, a considerable amount of the engine has to be disassembled just to get to the problem. Refer to your FSM for the proper procedures.
Always keep a close watch on oil levels if you know you have a leak.
Crankcase Pressure Problems
See also in the Sportsterpedia:
Excess oil coming from the breather vent(s) could be a symptom and the root cause can sometimes be related to an imbalance in crankcase pressure.
Fixing the imbalance can be from re-routing the vent line(s) to replacing the breather valve to replacing the piston rings.
It depends on what the problem is.
- Crankcase Pressure.
- Engine crankcase pressure is designed to have a slight vacuum with the engine running.
- That is a little confusing as it is a variable pressure measurement based on ring seal and RPM.
You'll have the most vacuum at idle. As the RPM rises, you'll have less vacuum.
Around 5000-5500 RPM, ring flutter will turn the vacuum into a positive (pushing) charge.
- Engine breather valves.
- 77-up:
- These are often thought of as being akin to auto PCV valves although the construction is different.
77-78 had a spring load disc valve, 79-E82 had a reed valve and L82-up had a rubber flap (known as an umbrella valve).
Either are installed in a contained compartment to separate oil / air mist.
The oil is directed back into the engine and the air exits the engine thru breather vent(s), (1) 86-90 and (2) 91-up. - Worn or non functioning breather valve(s) will not react to engine RPM as fast as newer one(s).
- They can cause a glob of oil to puke out the vent(s).
- They can cause a buildup of vacuum in the crankcase that pushes and pulls on gaskets and seals causing them to leak oil and blow out seals.
- Gaskets, seals, the case seam and many other leaks often are a result of high pressure swings from positive to negative pressure changes.
- In 57-76 engines, the breather gear not timed correctly or wetsumping should checked off the list.
- 77-up engines, a non functioning breather valve is usually the first suspect of these problems.
- They can cause a thicker oil condition (air and oil froth or bubbling) making oil scavenging more tiresome for the oil pump = more engine heat.
- In a perfect world, you would only have a slight oil mist coming out of the crankcase breather.
(now routed into the air cleaner, keeping the E.P.A. happy by depositing the oil back into the engine instead of dripping on the ground).- This problem has been almost eliminated with the OEM breathers venting into the A/C.
But the problem still appears on Sportsters with external vent lines added.
To clarify, oil mist is always present to some degree. It's just not as visible when the vents are connected to the air cleaner.
- Loosing the balance.
- Crankcase pressure imbalance has been the cause of many oil leaks on Sportsters.
- It has been responsible for rocker box, pushrod tube, case seam, cylinder base gasket, air cleaner, cam/primary cover leaks and others.
- Excess crankcase pressure can pull and suck on the gaskets / seals allowing oil to seep past to the outside making it appear the gasket is worn out.
And this can also wear out gaskets and seals.
Excess pressure is generated from failing crankcase breather valve(s) or a kinked/blocked transmission vent hose and others.
If you have recently replaced the gaskets and still have a seepage problem, the breather valve is suspect.
- Good crankcase pressure can also be messed up by other parts of the engine.
- Gasket leaks (extra air intake), breather vent blockages and poor piston ring seal can throw off the balance of crankcase pressure.
Once the alternate problem is fixed, crankcase pressure will return to normal.
- Worn piston rings increase blowby to the crankcase.
- Good rings can also. The rings are always moving around and sometimes the ring gaps all line up vertically inline.
They will move away from being lined up also by themselves. They don't stay in one spot.
But when they are lined up that way, they could easily allow more air thru to the crankcase which would be a temporary amount of excess blowby.
Click here to read more on ring blowby.
- A weeping condition may show itself after an oil change or a spirited ride down the highway.
- Make sure there are no kinks in the external breather vent hose that would stop or slow down the engine from breathing.
This would bottle up crankcase pressure and cause the internal pressure to implode the gaskets and create a leak.
Also make sure there are no obstructions (sludge) in any bends that may be in the lines.
However, a few drips of oil out a vent hose while parked is normal.
This does not qualify as oil 'puking' out of the vent (which is more of a sudden rush of oil).
- A stopped up / restricted air filter can back up crankcase pressure and cause an imbalance inside.
(especially with a filter on the end of a breather vent hose) - Heavy oil flow 'puking' from the breather vent(s) on cold start-up;
could be from a sit-sumping condition where oil is draining into the sump when parked.- Your motor may be filling with oil while the bike is not running and it all gets pushed out the breather when you start the bike.
- Fixing the balance.
- Repair an oil leak as soon as possible.
- Oil leaving the engine means air could be coming into the engine from the same place.
- Extra air in (especially excess air) can cause an imbalance in crankcase pressure with problems to follow.
- Check the breather valve (77-up).
- 77-E82 breather valves can get stuck (open or closed) with gunked up oil or broken and need replacement.
You can try a squirt of WD-40 into the valve to try and loosen (unstick) the disc or reed. - L82 umbrella valves are simple rubber flaps that will get hard over heat and time.
They should be inspected periodically for hardness and replaced if they are not soft.
In use, they should flex fast enough to keep up with RPM changes. Too hard and they can not.
Do not use WD-40 on these to try and unstick it. Even if it works, it'll just harden the rubber faster. - L82-90 umbrellas are now obsolete parts. You may find some NOS ones at your local dealership or online.
An alternative is to install an external reed valve inline when your OEM umbrella fails.
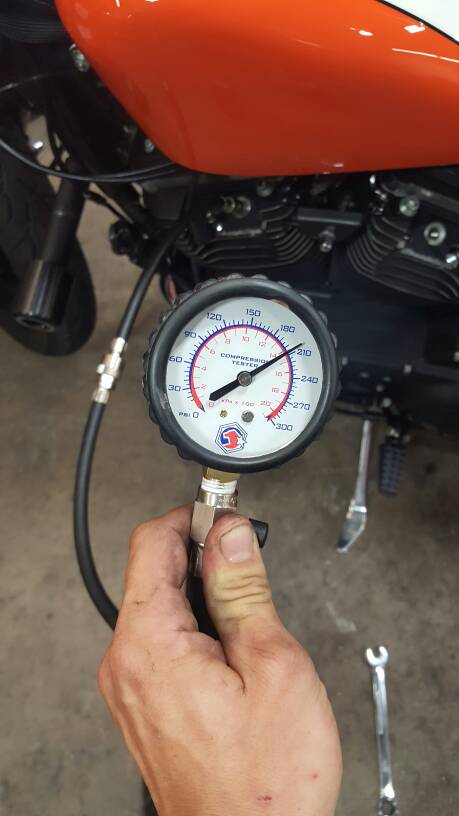
- Confirm how well the rings seal by performing a Compression Test or Leakdown Test on the cylinder.
- Make testing crankcase pressure part a normal tuneup.
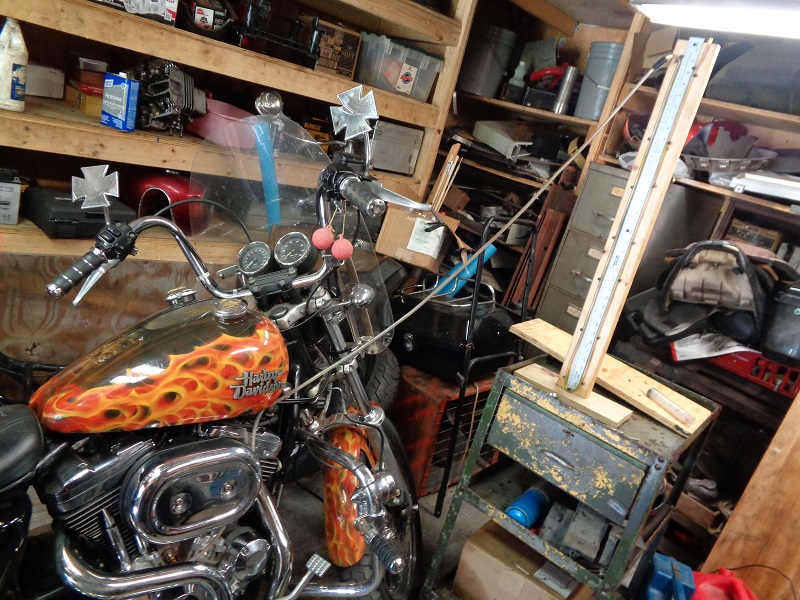
- You can buy or make your own manometer (slack tube, U-tube) for testing.
Once you have the apparatus, bolt it to wall where you normally do maintenance.
It only takes a few minutes to hook it up and get a reading and it helps to spot trouble before trouble happens.
See Using / Diagnosing with a Slack Tube (Manometer) for testing crankcase pressure.
Inspecting the Oil Tank
Overfilled Oil Tank
Read more on Overfilling the Oil Tank here in the REF section of the Sportsterpedia.
How about that oil sucking gremlin that steals half a quart every evening? You feel compelled to bring that oil level up to spec the next morning. 102)
- Before topping off the oil tank, run the engine if possible for about a 30 min. ride.
- This heats up the oil to operating temperature and suspends the solids in the oil instead of it laying on the bottom of the case.
- This also allows the oil pump to send most of the oil in the engine back to the tank before you add more so you get a more accurate account of the oil level.
- Failure to warm the engine first can result in an overfull condition in the system and you can end up blowing the cap off the oil tank and a big mess.
- Overfilling your oil tank can also result in engine drag (wetsumping) and puking oil out the air cleaner.
When the tank is slightly over filled, oil that was standing in the sump is added to the tank via the oil pump, thus raising the level in the tank.
The excess oil in the tank will either flow back into the gearcase via the tank vent or up and out of the oil cap.
Excess oil that returns to the gearcase through the tank vent is picked up with crankcase air pressure and blown out the engine breather valve(s).
So, depending on your venting setup, oil can be blown into the air cleaner or out the vent lines due to overfilling the oil tank.
It can also blow the cap off the oil tank. - The oil tank is vented to the gearcase / cam chest in the engine using a stand pipe in the oil tank.
Too much oil in the tank overcomes the vent (which is only supposed to send air from the tank to the gearcase).
The result will be oil being sent back to the gearcase and out the engine breather.
Damaged or Flooded Oil Tank Vent / Return Tube
Vehicles with oil tanks, that have all the fittings on the bottom of the tank, use a stand tube inside the tank for the vent line. 103)
- Short, damaged or tilted stand tubes:
- The top of the stand tubes should be above the oil level at all times. Check aftermarket oil tanks to be sure of this before using them.
- If the stand tube is damaged below the oil level or the level of oil is above the top of the stand tube;
Oil carry over will continue until the level of oil is below the damaged portion or the top of the stand tube. - Tilted stand tubes:
- Oil may carry over thru a tilted stand tube as long as the oil supply exists.
Diagnostics #1:
- With the oil level correct in the tank and the ignition off, pinch off the vent hose and remove it from the crankcase vent hose fitting.
- Direct the hose into a catch pan and un-pinch the hose.
- Bike should be upright.
- If oil begins to trickle out of the vent hose, allow it to run until it stops.
- Recheck oil level in the tank.
- Down a quart? Must be a short or damaged stand tube.
- Replace the oil tank.
- No oil ran out the vent hose?
- Don't give up.
- Leave the vent hose unconnected and cap off the crankcase vent fitting.
Note: If you do not cap off the vent fitting, you're going to have a real live mess. - Now start the engine and remember to keep that hose pointed into the catch pan.
- If oil begins to trickle out you have a tilted stand pipe.
- Try switching the return oil hose with the oil tank vent hose at the oil tank before you replace it.
This simple act may save both time and money by not replacing the tank. - No trickle from the vent hose?
- So the problem's not in the oil tank. Reconnect the crankcase vent hose and move on to the next step.
Diagnostics #2: Return system vs motor:
- Remove the return hose at the oil pump return fitting and plug the hose so oil doesn't run everywhere.
- Select a length of oil hose long enough to reach the oil tank filler neck when connected to the oil pumps return fitting.
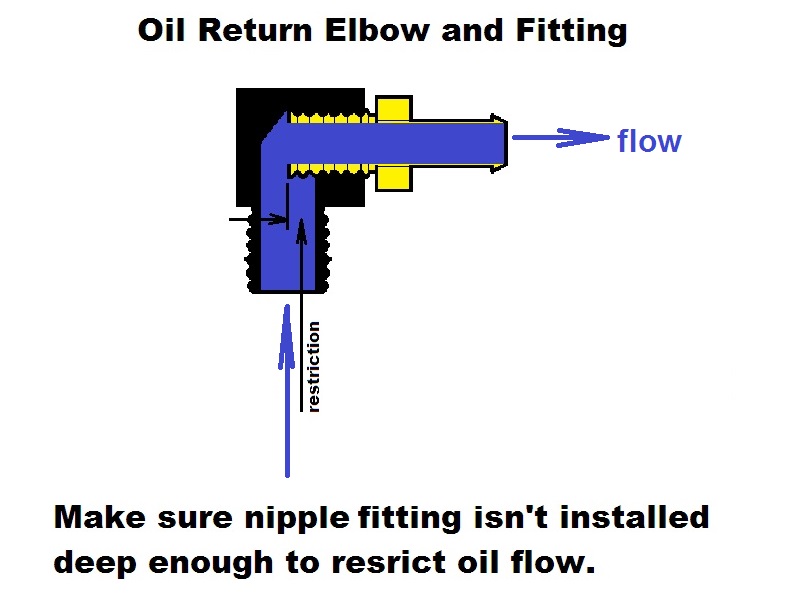
Note: Before connecting the test hose, note the number of threads exposed on the return fitting to return elbow connection. - Remove the fitting and elbow and inspect how far the fitting is screwed into the elbow.
- The fitting may be restricting the return oil flow. If so, modify the fitting as required and reinstall.
- Now connect the test hose to the return fitting and direct the open end of the hose in to the oil tank.
- Run the engine and note if the carry- over is much improved or stops.
- If it stops or improves, the problem is between the oil pump return fitting and the oil tank.
Note: In rare instances you may have to ride the bike to reproduce the same set of circumstances to be sure you've corrected the problem. - Remember, put the breather hose in a non-breakable container, secure both the bottle and hose to the frame.
- A plug must be fabricated to hold the test return hose in the oil tank filler neck and control spillage of oil from the oil tank.
- A modified oil dipstick plug may fill the bill.
Important: No restrictions in the test return hose. - The carry-over cleared up?
- Start looking for that restriction i.e., a pinched return hose, after market oil filter, oil cooler, plugged fitting or hose.
- Friends let's bow our heads and repeat after me.
I will never willingly install any fittings, probes or adapters which reduce the oil pump's ability to return oil to the oil tank as this will lead to carry over big time.
Amen!
Diagnostics #3:
- So it's still carrying over and you've performed every test including checking that return fitting.
- Oil can be getting into the engine in a number of ways.
- This carry over will occur upon start up after the vehicle has sat for a couple of days.
- If no improvement, the problem may be deeper than this.
- Continue with the following section.
- Now that your anticipation has built to a fevers pitch. Go ahead, pull off the pump, take off that earn cover.
- But know what you're looking for. Examine the following:
- Oil pump return pockets for damage, grooves, a sheared drive gear key.
- A damaged breather gear or pocket or out of time.
- Don't just look at it, pull it out.
- A damaged gasket surface between the trap area and the cam compartment.
- A cracked or porous cam cover.
- A plugged evacuator hole in the trap compartment.
- A plugged return passage to the return gears.
- If you do find it, remember during oil pump reassembly turn the seal around between the feed and return gears.
- The I.D. lip should face the feed gears.
Loosing Oil Level in the Tank
(57-85)
Oil is gravity fed to the oil pump.
Clearances in the pump or the oil check valve not seating properly will allow oil to drain past the pump into the engine especially if it sits for a while.
This condition can be expressed as “sit sumping”.
Click here to read more on Sit Sumping in the Sportsterpedia.
(57-76)
Oil can seep into the crankcase and spill into the primary compartment thru the transfer valve.
See Check the oil transfer valve below.
Inspecting the Engine Oil Return System
Restricted Oil Return Hose
- Oil carry over will occur while driving the vehicle at highway speeds. The amount of carry over is directly related to the amount of restriction. 105)
- More restriction, more carryover. In most cases the restriction is minor and translates to a small amount of carry over, which if left alone creates a bothersome mess.
- Start looking for pinched hoses or a restrictive oil filter.
Restricted Tappet Guide Drain Channel
Oil from the rocker boxes drains down the pushrod tubes and enters holes in the tappet block to drain down into the gearcase.
The drain channels can stop up sometimes. This backs up oil in the tubes and can cause a leak to form at the tube base.
It could be the gasket or sometimes particles that have lodged in the holes. Try removing the tappet guide, clean / replace them and install new gaskets. 106)
Some guides have one channel, some two, and there are some that have a spiral.
Over the course of the motors lifetime, there's no telling what year or type of guides they may be since one fits all.
But you do need to get it right, since the oil return thru the guide also lubricates the tappets.
To remove them, some will tap the guides gently to rotate them a little to break the hold then just pull them out by hand. 107)
It will then need a new seal or gasket under the tappet block.
Fairly common with some jugs is the tappet guide hanging up on the cylinder fins when trying to remove it. 108)
You may need to clearance the base of the jug before you remove the tappet.
Alternately, if you can lift the guide high enough, you may be able to clean the drain channel with the tappet guide still in place. 109)
Try and use compressed air to blow down the drain channel.
The pushrod tube below was holding oil and leaking after the engine was shut off.
110)
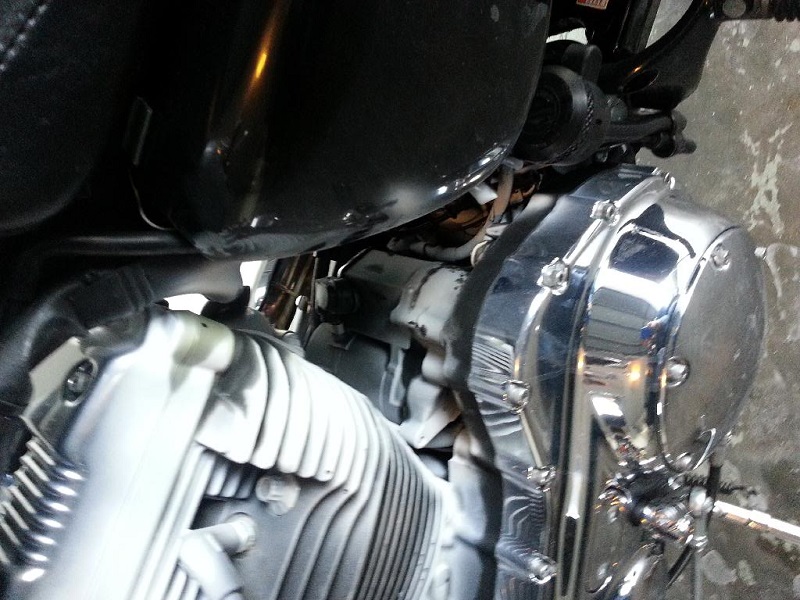
Leaking From / Near Primary
57-76:
Check the primary oil level to see if it's too high. Sumped oil from the engine can spill over into the primary compartment thru the transfer valve.
Once the engine is fired up, the transfer valve should gradually send the oil back to the crankcase for scavenging.
With the primary cover off, you may see this happening as oil spills in from the (now oil laden) crankcase.
If pressure is building and blowing out the gasket or the transfer valve isn't sending the oil back, see Check the oil transfer valve below.
Transmission Vent Hose (77-85)
Check the tranny vent hose for kinks or a blockage.
Blow on the hose end to make sure you can push air thru it. Do not used compressed air as that can damage the sprocket shaft seal.
Reroute the hose if it is showing a kink in placement or replace it if you can't blow through it.
You can also take off the primary chain inspection cap and blow air into the primary compartment.
You should hear and feel the air come out of the inspection hole and with the cap off, you are not pressurizing anything too much. 111)
There should be no sags in the hose between the attachment to the engine and the open end of the hose.
The hose should route up from the engine and loop down open ended to allow air to escape and oil to separate from the air and drop back down into the tranny compartment.
If you've verified the hose is in good order and oil is still coming out the vent hose, then the engine sprocket seal is suspect of leaking engine oil into the primary.
See Engine Sprocket Shaft Seal below.
Engine Front Sprocket Shaft Seal
Test for Excess Primary Compartment Vacuum (77-85)
You can test for too much vacuum in the primary with the engine running / transmission in neutral. 112)
You can make your own slack pretty cheap out of some 2×4 pieces, a 2-3 ft ruler and a clear tube.
Or you can adapt a clear hose to the tranny vent line and drop it into a glass of water.
1993 Sportsters got a tighter seal by flipping the seal around so the spring is on the inside.
The spec for them is one inch or more of water column in the primary points to a sprocket seal leak.
So it can be assumed that there will be a slightly higher amount of vacuum in 77-85 engines.
However, primary vacuum should not be near equal to crankcase vacuum.
If so, the sprocket shaft seal may be allowing engine crankcase pressure (air/oil mist) past it.
Testing needs to be done on a known good sprocket seal to confirm good measurements.
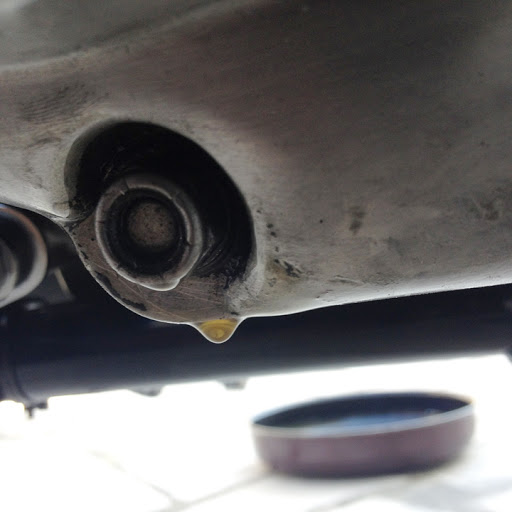
Leaking From Around the Starter
There should be a paper (or cork) gasket between the OEM starter motor and the case. 113)
They often leak from day 1 on a Sportster. When the seal is leaking, oil starts dripping from the drain hole under the starter.
Primary Oil Smell Like Gas?
Where did the gas smell come from?
See also Why Does the Oil Smell Like Gas in the Sportsterpedia.
A failed transmission sprocket seal will allow engine oil/mist mixed with fuel into the primary.
The rotation of the sprocket rotor, clutch and transmission gears, especially at high revs, has the capability of making a lot of positive (pushing) pressure.
This generated air pressure is usually vented from the tranny vent hose.
If the carb were to leak gas into the crankcase and mix with the engine oil;
Then the pressure builds in the primary due to a kinked hose;
The primary pressure could open the seal and vent into the crankcase.
The crankcase is always pulsating positive and negative pressure (push pull air motions are generated).
So while the primary opens the seal, the CC is pulsating oil/gas/mist into the primary.
There is an internal spring on the seal to hold it against the shaft.
If the spring fails, it's failed for good until it's replaced.
However, higher pressure than designed for can skeet oil past the seal.
And when that pressure subsides, the spring lays back down.
The seal still works as long as the nitrile rubber hasn't been compromised in the process.
Internal Inspection
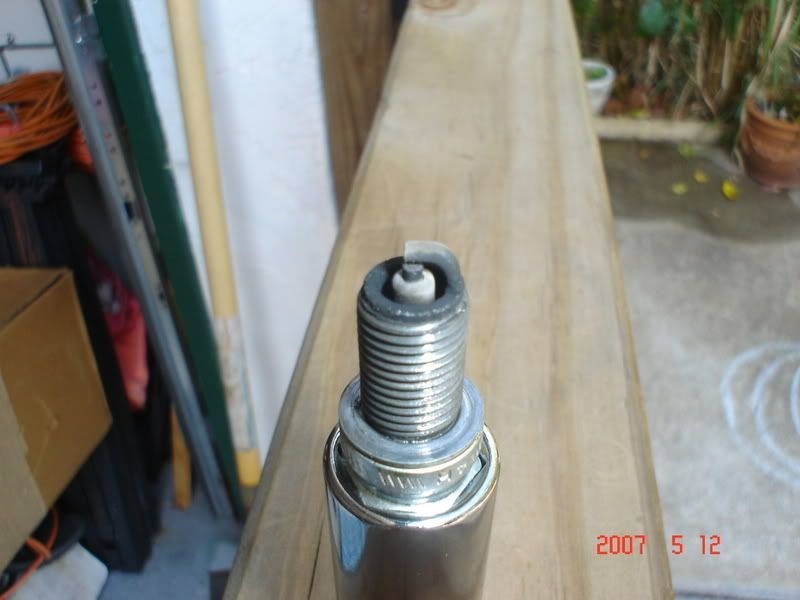
Check the spark plugs for oil fouling
Worn rings or an imbalance in crankcase pressure can send oil up into the combustion chamber and foul the plugs.
Check the plugs for wet oil saturation.

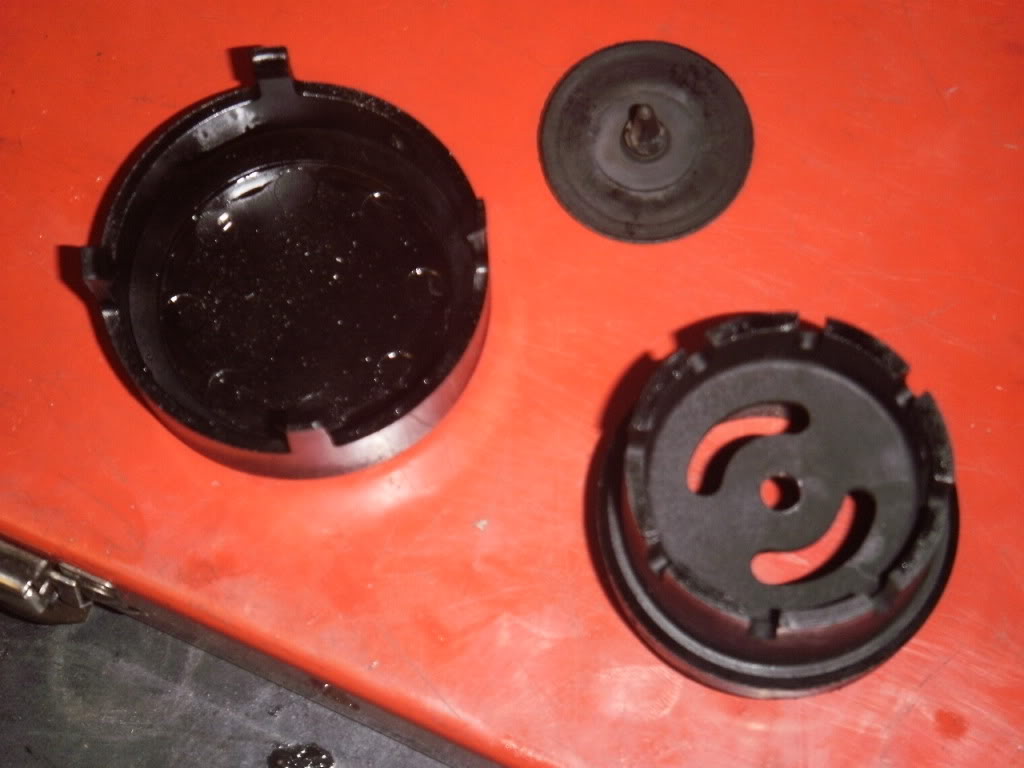
Check the oil transfer valve (57-76)
Click here to read more in detail about the transfer valve in the Sportsterpedia.
While sitting for a while, oil can drain from oil tank thru oil pump clearances into the gearcase to the crankcase.
The transfer valve is installed in the wall of the primary compartment. If enough oil fills up the crankcase, it spills over into the primary compartment.
The transfer valves' job is then to gradually send the excess oil back into the crankcase once the engine starts so it can get scavenged back to the tank.
If the transfer valve isn't working properly, the excess oil will stay in the primary on startup.
The excess oil in the primary may leak out the cover seal or any loose bolts that may be, including ones on top of the primary compartment.
Remove the primary cover, the mesh in the transfer valve and see if you can clean any dried up or loose sludge around the valves disc.
Caution:
The use of compressed air can blow out the crankshaft seal if the crankcase is still holding oil above the oil return galley.
You may need to remove the transfer valve to clean it or simply buy a new one and replace it. They aren't expensive to replace.
Or, many have weld the transfer valve shut so oil from the crankcase can't get into the primary to begin with.
| Leaky transfer valve. 116) |
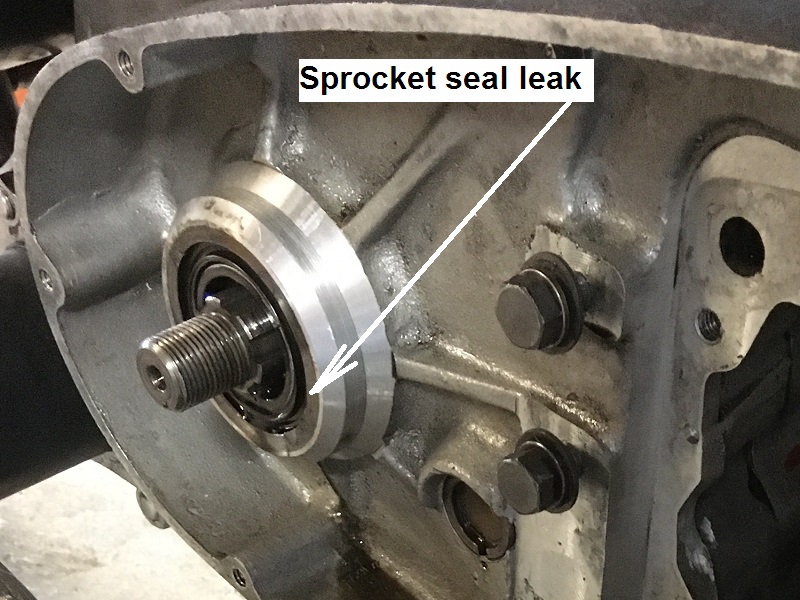
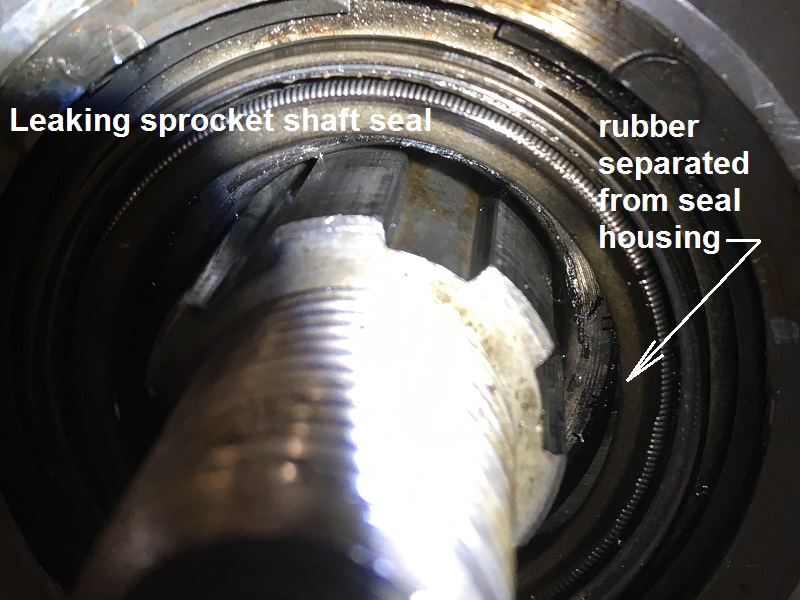
Engine Sprocket Seal
| Leak from bad sprocket seal. 117) | |
 |  |
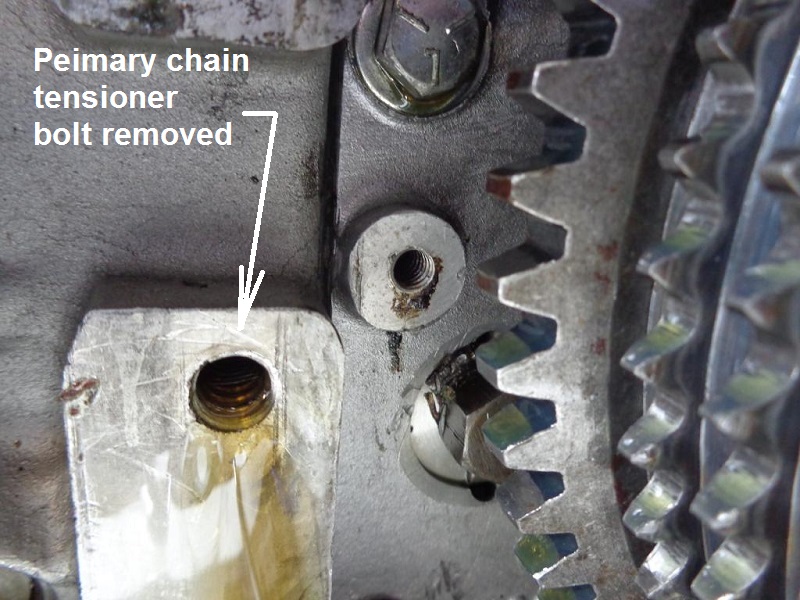
Inner Primary - Chain Tensioner Bolts
- The bolt holes for the chain tensioner go through to the crankcase.
- If the crankcase fills with oil (wetsumps), oil can weep around bolt threads and into the primary compartment.
Especially if the bolt is loose or if the threads have been worn bigger.
Check intake and exhaust ports in the heads
- You can pull your exhaust pipes and intake manifold and look at the valves to see if the oil is leaking past the valve stem seals.
Check oil smudge marks when removing the heads
When dismantling the top end (or to bring parts to your mechanic)and before cleaning the head gaskets / surfaces, check them for oil smears. 119)
Smudge marks can be a give away as to where any leaks might occur. Also take a few pics of them (no flash, direct light and a steady hand).
The gasket has been known to raise around the head oil drain and only on the inside edge of the gasket.
So no outward sign of the leak. With the head removed an experienced eye may be able to spot the problem.
Transmission Sprocket Splines
A service replacement mainshaft sprocket nut (35049-71) was made available to prevent transmission oil leakage from the sprocket splines on 1971-E1984 models.
The new sprocket nut encloses the end of the mainshaft and provides a metal to metal seal between the sprocket, lockwasher and nut.
(when tightened to 35-65 ft-lbs torque)
See TSB #M886 on the Service Bulletin page in the Sportsterpedia.
3)
1957-1959 HD FSM pg 3A-12
68)
photos by RochesterIron of the XLFORUM, edited by Hippysmack https://www.xlforum.net/forum/sportster-motorcycle-forum/sportster-motorcycle-era-specific-and-model-specific/ironhead-sportster-motorcycle-talk-1957-1985/154517-glittery-oil-continued-pulled-cam-cover-today?threadid=1659747
73)
HD TSB #M-813 dated January 30, 1981
96)
Dr Dick of the XLFORUM
104)
drawing by Hippysmack
112)
HD Tech Tip #36 dated October 1993
113)
IronMick of the XLFORUM https://www.xlforum.net/forum/sportster-motorcycle-forum/sportster-motorcycle-era-specific-and-model-specific/ironhead-sportster-motorcycle-talk-1957-1985/102268-oil-leaking-from-electric-starter-help?t=891706)
If the oil level is too high in the primary, especially if using an aftermarket starter, many of them like Tech Starters and Spyke have poor shaft seals. ((Jorgen of the XLFORUM https://www.xlforum.net/forum/sportster-motorcycle-forum/sportster-motorcycle-era-specific-and-model-specific/ironhead-sportster-motorcycle-talk-1957-1985/102268-oil-leaking-from-electric-starter-help?t=891706
If the oil level is too high in the primary, especially if using an aftermarket starter, many of them like Tech Starters and Spyke have poor shaft seals. ((Jorgen of the XLFORUM https://www.xlforum.net/forum/sportster-motorcycle-forum/sportster-motorcycle-era-specific-and-model-specific/ironhead-sportster-motorcycle-talk-1957-1985/102268-oil-leaking-from-electric-starter-help?t=891706