Table of Contents

REF: Suspension
The 7 Pages of Suspension (parts 1 and 2)
Article by XLXR of the XLFORUM 1), 2) 3)
The 7 Pages of Suspension was originally created primarily for rubber mount bikes up to the year the cartridge suspension was started. 4)
Additional note, apparently, Works Suspension went out of business in 2017. I do not know any recent information. 5)
In the discussion below, you will find information on the various elements of a good suspension. Much of the information is applicable beyond the rubbermount specific models.
Index
First 7 Pages of Suspension
──────────────────────────────
- I will start with the simple things and work into the more complex. If I mention something you don’t recognize, it is probably explained in more detail at a later point. Naturally, you can google any terms for more information. Wikepedia and the websites of the shock companies and Sport Rider have lots of good information. The information is based on experience with my 2006 Roadster. I weigh 260 lbs.
- Reading and learning about suspension is only the start. The only way to really learn about suspension is getting in the garage, make changes and test ride. In a year or two, you will be ready to buy a new bike and start all over. It is very common to think you know what the problem is. But you will never know for sure until you make the correct changes and the problem goes away.
- If you want to work on your bike, you are going to have to buy tools. A bike jack, Torx bits, fork cap socket and clamp to get the forks caps back on is just a start. Whenever I jack up my bike, I use a motorcycle tie down strap from the handle bars up to a hook in the roof rafters to prevent knocking the bike off the jack. Be sure to read the other sticky links in the suspension section.
Tire Pressure
- The very first step is to check tire pressure. My 2006 owner’s manual says 30 psi front, 36 rear and increase the rear to 40 psi for two up riding. However, everyone has a different opinion. I found the stock front tire was so bad I had to run 40 psi in it to keep it from wandering from side to side down the highway. In addition, at 30 psi I could feel the rim bottom out against square edge bumps in big pot holes or driveway transitions. At the opposite end, too much air steepens the curve of the tire resulting in a smaller contact patch in the center, and that can reduce braking effectiveness.
- Another misconception about tire pressure is what the label on the side of the tire means. Those are maximum tire pressure recommendations when carrying the maximum weight capacity of the tire. If you are not at the maximum weight capacity, you do not need to run maximum tire pressure.
- With my Avon Venum X tires I run 35 psi front, 33 rear, solo. I found these pressures to make my bike handle best overall. Don’t simply use my pressures, do your own testing and find what works best for your bike.
Shock Preload
- Setting the shock preload is the next adjustment to work with. The preload adjuster is the collar under the spring that has different notches in it. Turning the collar upward with the special spanner wrench shortens the spring and that makes it stiffer Turning the collar downward lengthens the spring to make it feel softer.
- In theory, the standard springs are for a 185 lb rider. If you weigh more than 185 lbs, you need to increase preload to stiffen the spring. If you weigh less than 185 lbs, you need to decrease preload to make the spring softer. If you add a passenger, you will probably need to move the adjuster collar to make the spring as stiff as possible.
- If the ride feels harsh and does not use all the shock travel, reduce preload. If the ride feels soft and bottoms out too much, increase preload. Some shocks may have a threaded adjuster, or have the adjuster on top of the shock.
- “Bottoming out” happens when the spring is too weak for the rider’s weight and the shock compresses through all the suspension travel when hitting big bumps in the road. If you have the preload adjuster set to max stiff, and you still bottom out, you need a stiffer spring.
- “Topping out” is opposite of bottoming out. Topping out is when the shock fully extends and hits metal to metal when the bike is thrown up into the air over bumps. Topping out can feel as rough as bottoming out. Topping out can be caused by too little rider sag due to too much spring preload and/or too little rebound dampening.
- In general, you want the shock to bottom out softly when you hit the biggest bump you ever hit. That way, you know you are using all the shock travel you available. You never want to bottom out so hard you break something or hurt your back.
- A plastic tie around the forks or shocks can be an important suspension tool. If you put a plastic tie on a fork or shock, and then observe different kinds of bumps, you can learn a lot about how your suspension reacts to different road conditions. For bikes with gaiters on the forks, you will have to figure out a way to hold them up in order to use a plastic tie on the fork.
Rider Sag and Preload of Forks and Shocks
- Setting rider sag in the forks and shocks is one of the first things you must do for proper suspension tuning. Rider sag of the shock is generally measured vertically, from the axle straight up to the fender. Rider sag of the forks is generally measured parallel to the forks, not vertically as with the shocks.
- If you jack the bike up so the tires are in the air, the suspension is fully extended. As you lower the bike and put weight on the suspension, the suspension compresses a bit. That is called bike sag. If you then sit on the bike, the suspension compresses even more. That is called rider sag.
- Rider sag is the distance the forks or shocks compress when the rider is sitting on the bike. Generally you want the forks and shocks to compress 1/3 to 1/4 total travel when you sit on the bike. Nightsters and Lows with short travel suspensions, need to have rider sag set at the minimum in order to maximize usable travel. Roadsters can usually get away with a little extra rider sag because they have more suspension travel.
- Changing spring preload changes rider sag. More preload stiffens the spring and reduces rider sag, less preload softens the spring and increases rider sag. Shock rider sag is set by turning the adjuster. Fork rider sag is set by changing the length of the preload spacer inside the forks.
- The absolute minimum fork preload you can use is whatever length is needed to take up the space between the top of the spring and bottom of the fork cap when the fork cap is screwed all the way down and the forks are fully extended. This will keep the spring from bouncing around inside the forks.
- Another consideration is after 15,000 miles or so, the springs may lose a bit of tension, which is normal. If that happens, you may have to increase the length of the preload spacer a bit to compensate and get back to the orginal sag you wanted. Eventually, the springs may get so weak, no amount of preload will help. Then you have to get new springs.
- Refer to the second 7 pages for more details on fork set up.
Fork Stiction
- Fork stiction is when the drag of the internal bushings is so high, checking rider sag becomes difficult because the forks compress to a different point every time you try to check rider sag. This is especially true for new forks.
- Sometimes you have to push down on the forks and let them extend very slowly and measure that point. Then lift up on the forks and let them compress very slowly. In both cases, end up with your weight on the bike. Then use the difference between those two points as your rider sag.
Chassis Pitch
- Chassis pitch is the relationship of the front ride height (fork rider sag) to the rear ride height (shock rider sag). Usually, lowering the front end or raising the rear end, makes the bike turn sharper, but may make the bike unstable at higher speeds. Raising the front end or lowering the rear end usually makes the bike more stable at highway speeds, but reduces its ability to handle sharp turns.
- However, I found this did not apply to my Roadster. I found that setting up the chassis of my Roadster to be as stable as possible actually improved stability and confidence while cornering.
- The easiest way to check for the correct balance between front and rear ride height is to sit on the bike and measure if the frame rails under the engine are parallel to the floor. The front can be a bit higher (rear lower), but every time the front got too low (rear higher), my bike started to get a high speed wobble. Use the frame rails parallel to the floor as a starting point. I have verified this on my Roadster, XL 50, and Nightster, but not on Customs, Lows or XR’s. It may not apply to other bikes at all.
- You must set rider sag of forks and shocks correctly before you set chassis pitch. Then move the forks up or down in the triple clamps to get the frame rails level to the floor with rider on the bike. Once you get a few test rides in, you can set the fork height to get the handling you prefer.
- Be very careful on the first test ride after making suspension adjustments. You could have set the bike up to wobble, even if it did not wobble before. On your first test ride, start off slowly, say 40 mph and give one side of the handle bar a little bump. If it wobbles, go home and fix it. If it doesn’t wobble, do 45 and give the bars an easy bump. Keep increasing speed in 5 mph increments until you can go as fast as you want without any signs of wobble. It is far better to find out you have a wobble at low speeds than high speeds. This I know from experience.
- There is a link to the famous wobble thread and a summary of things that can cause a wobble at the end of the second 7 pages thread.
- I like to set my forks in the triple clamps so the bike is very neutral around the average corner at average speeds. Once leaned over in a smooth corner, I can let go of the bars and the bike will just stay there. (I can’t totally let go of the bars because I have to keep the throttle steady).
- If you are leaned over in the “average” corner and feel like your bike is turning in too sharply, raise the triple clamps. If you feel like your bike is trying to straighten out, lower the triple clamps.
- I make no mention of shock motion ratio or fork rake and trail. If you want to change those beyond stock parameters, you are replacing major components or cutting and welding frames.
Shock Spring Rate
- Spring rate refers to how much force is needed to compress the spring a certain distance. Straight rate springs will compress the same distance under the addition of the same force at the beginning of travel as at the end of their travel. Progressive rate springs have a soft rate in the initial part of the travel, and transition to a hard rate in the final part of travel. If the rates are correct, this will provide a smooth ride over small bumps, yet resist bottoming out over big bumps.
- For example, take a 4” long straight rate spring with a rating of 100 lbs/in. The first 100 lbs will compress the spring 1”, the second 100 lbs (200 lbs total) will compress the spring 2”. It will take 400 lbs total to compress the spring all 4”.
- A progressive rate spring is normally described as 75/125 lbs/in. The 75 lbs/in is the soft initial rate, the 125 lbs/in is the hard final rate.
- Using a 4” spring rated at 75/120 lbs/in as an example, let’s assume it is wound to stay in the initial rate for the first 3” of travel. That means it will compress one additional inch for each addition of 75 lbs for the first three inches. Therefore, 225 lbs (75 +75 + 75) will compress the spring 3”. Then add 125 lbs to compress the last inch and you have 225 +125 = 350 lbs total to compress the spring all 4”.
- However, the spring may be wound to have only 1” travel at 75 lbs/in and then the final 3” will be at 125 lbs/in. In this case, it will take 75 lbs + 125lbs + 125 lbs = 325 lbs to compress the spring 3”. Then add an additional 125 lbs to compress the spring the final inch. The total becomes 325 lbs + 125 lbs = 450 lbs total to compress the spring all 4”.
- This designation of a progressive spring rate does not tell you anything about the where, or how quickly, the spring transitions from the initial to final spring rate. A progressive rate spring with the correct initial rate will provide a smooth ride over small bumps in the road. However, if the transition range is too short, or the final spring rate is too stiff, medium and larger size bumps will not compress the spring beyond the travel of the initial rate and the rider will feel a very stiff ride over those medium and larger sized bumps.
How to Select a Shock
- Start by deciding how long a shock you want, how much weight you want to carry, and how much money you want to spend. Shorter shocks and heavier riders need heavier springs.
- On Rubbermounts, shocks approaching 14 1/2” long may cause the lower run of the drive belt to drag on the linkage from the rear brake pedal near the master cylinder.
- When you take the stock shocks off for the first time, hold the Torx bit still and loosen the nut. This will help prevent stripping the Torx head.
- If the new shock bodies are much thicker than stock, you will need longer bolts and spacers to keep the shock body from hitting the belt guard.
- Go to Progressive Suspension’s web site and see what shock is recommended for your bike. The standard spring rate for 12.5” and longer shocks is 75/120 lbs/in and is for riders in the 185 lb range. The heavy duty spring rate for 12.5” and longer shocks is 90/130 lbs/in, and is for 260 lb riders and up. Whittlebeast found the springs for the longer shocks are actually “step” springs, meaning the transition zone between the initial and final rate is very abrupt. That provides a harsh ride over smaller bumps, but may resist bottoming better.
- 12” and shorter shocks use a 90/130 spring as standard, 115/155 as heavy duty. There have been plenty of riders who report shorter shocks provide a good ride. I suspect the big reason is the transition zone between initial and final rate is much longer and more travel is used over small to medium sized bumps. But shorter shocks will likely bottom out over larger bumps.
- Check the specs carefully. Just because the over all length of a shock is longer, does not mean it has more travel. Note the spring numbers, springs with the same spring rate may have different part numbers to indicate other parameters such as diameter or length. Expensive shocks are not always better, especially if the spring does not match rider weight.
My Impressions of Different Shocks
- Stock shocks on my 06 Roadster were really bad. In order to keep them from bottoming out, I had to crank up the preload. Then they rode too stiff to be comfortable, and still bottomed out. Harley changed the spring rates in 09. I haven’t tried any 09 shocks, but they seem to be a great improvement because a lot less guys are complaining about the newer shocks.
- The FXDX shocks on my Roadster were a good example how excessively short transition zone and excessively stiff final spring rate result in handling problems. I weigh 260 lbs, the initial rate of the FXDX springs matched my weight pretty good and absorbed small bumps very well. However, the transition to the final rate was so abrupt, and the final spring rate was so stiff, it felt very harsh over medium size and larger bumps. This became a serious problem when hitting a series of medium sized bumps while leaned over in a corner. There was enough weight on the spring to compress it through the initial part of the spring just fine. However, there wasn’t enough weight to compress it into the final rate and the back tire would skip over the bumps and loose contact with the road. With the FXDX shocks, I was using only the initial part of the travel, and rarely got it into the final part of the travel. I have no idea if there are different FXDX shocks from different years with different springs.
- The Whittlebeast Hybrid shocks, a Roadster shock body with a Custom spring (and spacers) were the opposite. The initial rate was pretty good, and the transition range was fairly long. Therefore, small and medium sized bumps were absorbed and provided a smooth ride.
- Be sure to understand the part of putting the spacers under the springs to keep them from rubbing on the shock body.
- The WB Hybrids prove cheap shocks with the proper spring rate and dampening curves are far better than expensive shocks with improper spring rates and bad dampening curves. Unfortunately, I was just a bit too heavy for the springs and they would bottom out every now and then. 220 lbs is about the max solo rider weight that both the WB Hybrids, and the standard 75/120 spring used on Progressive’s 12.5” and longer shocks, can handle without problems.
- Here’s an example illustrating how 30 lbs can make the difference between a particular spring riding smoothly or harshly. Doxbike weighs 230 lbs and tried Progressive 13.5” 418’s with the heavy duty 90/130 springs on his Roadster. The 418’s were always too stiff for him over small to medium sized bumps, but he kept trying to find the best compromise of rebound dampening and spring preload. I rode it, and felt it was pretty good, but I weighed 30 extra pounds. He rode my bike with the Whittlebeast Hybrids which provided a much softer ride without bottoming. However, with my 260 lbs, bottoming the WB Hybrids was fairly frequent. He switched to Whittlebeast Hybrids and sold the 418’s.
- Based on this experience, I think for the 12.5” and longer shocks, the heavy 90/130 spring works best for riders 260 lbs and up. This leaves riders between 220 to 260 lbs without a good spring choice from Progressive Suspension.
- The 13-1/2“ long 1200S shocks are getting harder to find because they originally came on a frame mount Sportster for only a few years. They have a 54/78 lbs/in spring which is very good for 140 lb riders on Rubbermount bikes. They also work very well for light weight riders on Nightsters when combined with a 1” lowering block so short legs can get their feet on the ground. They should work well with 180 lb riders on rubbermounts who do not ride two up. The 1200S shocks provided a very good ride for me on the highway because there was a lot of movement in the spring. However, I was too heavy for the spring and bottomed out too much.
- There have been questions about riders, either solo or 2 up that weigh 300 lbs. The Road King air shocks are really the best option if you have a very wide range of weights to carry. They can be found on eBay for as little as $50. The parts guy at a local dealer gave me a pair for free, they were going to be thrown away.
- There are two basic lengths, the 11 ¾” and 12 ¾”. The longer ones are far more common and probably ride much better solo because they may have softer springs than the shorter shocks. They are generally too stiff for 150 lb riders solo. But they work well enough for 180 lb and up riders. They might be able to carry more weight than the Sportster is rated for. There are several part numbers for the RK air shocks, so it is difficult to be sure what differences there are.
- My Road King 12-3/4” shocks have 54565-97A, and another pair C on the end. The oil will drain out through the port for the air fitting if it is not capped off during shipping. The only way to tell how much oil is in them is to weigh them. Mine weighed 5 lbs, 2 oz’s. It is possible to change the oil in the shocks. I changed to 5w in attempt to soften them up, it helped a bit, but not enough to say it is worth the work.
- If you add oil, you must be very careful to not overfill the shocks. That could cause a hydro lock and blow them apart. Not something I have seen, only heard about. At the very least, you should put only one shock at a time on the bike with the air fitting removed, pump it several times to bleed all the air out, and then bottom it out so it will blow out all the excessive oil. Even then this is way too much oil because you will not have an air chamber on top of the oil level.
- See also: An easy way to change RK shock oil.
- I am currently using 13.5” WP 3 Way shocks. WP is the European company, not Works Performance. 3 Way refers to having adjustable high and low speed compression dampening and rebound dampening. I had to send them back twice to get the dampening curves changed to work well. Even then, they sat on the shelf for over a year because I liked the WB Hybrids better. My 260 lbs ended up being too heavy for the 97/142 lbs/in spring, too light for the 154/228 lb/in spring.
- Then the Ricor Intiminators came along for the forks. The Intiminators softened up the 154/228 lb/in springs enough to ride smoothly enough over small to medium size bumps to be comfortable riding all day. These high end shocks really start to work well when pushing the limits of high speeds and rough roads. Far better than any other shock I have tried.
- Harley 2 up shocks for a Nightster I haven’t tried these, but rider reports seem good.
- The very first pair of shocks I bought were Progressive 440’s. The were hydro-locking and felt like a hard tail. This was before I figured out about loosening the drive belt. Maybe that was the problem. I have read one other report where an over tightened drive belt caused the 440’s to ride strange, and loosening the belt let them work better.
- I also tried the Works Performance Pro Racers. I sent them back 2 or 3 times. They had a hard hit in them and Works only moved the hit deeper into the shock travel. I gave up on them.
- The Progressive 440’s, Works Pro Racers, and the WP 3 way shocks I have now, all have some type of check ball and spring valving system. None of them worked very well. It seems the check spring and ball system was just never tuned correctly to match my weight and bike.
- The best shock I have ever ridden on was a Penske 3 Way shock on a Ducati Monster. I try hard not to laugh when someone says how good Progressive 412’s are.
Second 7 Pages of Suspension
──────────────────────────────
Fork Spring Rates
Here are some numbers I have collected over the last 2 years. I have forgotten how I got some of them. Some I measured in my garage, so they are estimates. The Works Dual Rate Spring numbers are accurate because they came directly from Works.
- Stock fork spring on 06 Roadster:
- 20 lbs/in initial rate, 40 lbs/in mid range, 90 lbs/in final rate. I thought the stock fork springs felt way too soft. I think the reason is the spring should be in a fork with 8” of travel. With only 4 ½ travel in the Roadster forks, the springs never had enough travel to transition to the harder spring rates in the mid range and end range.
- Stock Low, I think from an 06 bike:
- 25 / 40 / 70 lbs/in. If this number is correct, it is probably designed for lighter riders than the Roadster spring.
- Stock 07 Nightster:
- 25 lbs/in. This is a number I found written in my notes from working on Road Chick’s Nightster. I don’t know if the final rates get stiffer, but I do know it was way too light as set up with stock preload. Even too light for 140 lb riders.
- Progressive Suspension’s 11-1527 fork spring:
- 35/50 lbs/in. This spring is designed for the longer forks. I think it is too long for the Nightster and Low forks because they do not have enough travel to transition to the harder final rate to prevent bottoming. Unless you are a very light rider and need a softer ride.
- In these first 3 cases, adding preload will stiffen the spring. But the question becomes if you can physically get enough preload in the forks to stiffen up the springs enough to prevent bottoming.
- Race Tech has 4 straight rate springs:
- 45, 47.8, 50.6, and 53.4 lbs/ in. I tried the Race Tech emulator and 53.4 lbs/in spring. I found their recommendation to be way too stiff. I will explain in more detail when I compare the Race Tech emulator with the Ricor Intiminator.
Works Dual Rate Fork Springs
- This is the most flexible spring made for rubbermount XL’s. It can work in the long suspension of a Roadster and short suspension of a Nightster simply by changing the length of the crossover spacer. By test riding with different crossover spacer lengths, I learned more about how spring rate effects handling than anything else I have done.
-
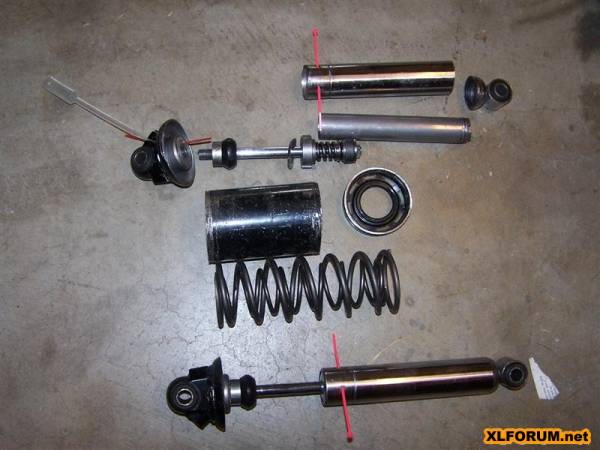
- This link has pictures of how to remove and replace fork springs, comparing stock fork spring with the Works, and showing how the crossover spacer fits in the shorter spring. You can see how the coils are wound differently at either ends of the stock spring to help you understand how reversing the spring can change oil level because more or less coils are under the oil level. It also describes how she is fine tuning the forks and suspension. It also has cbnightster's description of putting Low damper tubes in the Nightster forks to gain 3/4” travel, which is huge.
- Works gives you 3 crossover spacers of different lengths which fit inside the shorter spring. I test rode with different spacer lengths until I found I liked a 2 1/4“ length best for my Roadster. Works say you can use different length spacers in either fork to get a triple rate spring effect. But I didn't find that necessary.
- The kit is composed of two separate springs. The soft version of the kit has a short spring with an 80 lbs/in spring rate and a long spring with a 60 lbs/in spring rate. The springs are stacked on top of each other. The soft initial spring rate, which is also called the “total” spring rate, results when both springs are compressing at the same time..
- Here is the mathematical formula:
- 1/total spring rate = 1/short spring rate + 1/ long spring rate.
- 34 lbs/in = 80 lbs/in (combined with) 60 lbs/in
- The short spring has a metal tube in it which is called the crossover spacer. The length of the tube will limit how far the short spring can compress as the forks go over bumps in the road. When the short spring bottoms out against the crossover spacer, only the long spring continues to compress from that point. That provides the hard final spring rate of 60 lbs/in.
- Here is the bottom line. Nightsters need a crossover spacer between 4-1/4” long and 4-3/4” long to get the spring to transition very early in the fork travel. SportyTrace is still working on finding the optimum crossover spacer length for her Nightster, she will let us know what she finds. It seems adding the Ricor Intiminators have made readjustment of the forks necessary. The link to her thread is a few paragraphs below.
- I like a crossover spacer about 2-1/4” long for my Roadster. That will put the transition point much lower in the fork travel. You are going to have to do some test rides to find which crossover spacer length works for you because the amount of preload/rider sag in the springs will move the transition point lower in the fork travel, and I have no idea how to calculate that correctly.
- The final aspect to understand about the Works Dual Rate kit is that the two individual springs will compress different distances under a specific weight. I got myself so confused about this I had to ask Folkie for some help. The following chart does not take into account the rider sag moving the transition point lower in the fork travel, so it is more for general understanding. Here is his explanation:
- Travel of the 80 lb/in spring is 75% of the travel of the 60 lb/in spring.
- For any amount of total travel (at the crossover point), 3/7 of the total will be the travel of the 80 lb/in spring, and 4/7 of the total will be the travel of the 60 lb/in spring. This is because 3/7 (of something) is 75% of 4/7 of the same thing.
- (Total fork travel at crossover) = 80 lb spring travel + 60 lb spring travel.
- 1“ = 0.43” + 0.57“
2” = 0.86“ + 1.14”
3“ = 1.29” + 1.71“
4” = 1.71“ + 2.29”
5“ = 2.14” + 2.86“
6” = 2.57“ + 3.43”
7“ = 3.00” + 4.00“
- The 80 lb spring with the cross over spacer in it is 5” long. If you want the crossover point to be at 1” total fork travel, you subtract the .43” in the chart above from 5” of spring length.
- 5” - .43” = 4.57” which is the length of the crossover spacer needed to get the forks to transition at 1” total fork travel. This is in the area needed for Nightsters.
- For Roadsters, 5” – 1.29” = 3.71” which is the crossover spacer length close to what’s needed to get the forks to transition at 3” total fork travel.
- I have a 2-1/4” crossover spacer, my 80 lb/in spring has a travel of 23/4”, then the 60 lb/in spring has a travel of 2-3/4“ × 4 ÷ 3, = 3.667”. 2¾“ is 75% of 3.67”.
- So when the heavier spring hits the transition point, total travel is 2-3/4“ + 3.67”, = 6.42“. But my Roadster forks don’t have 6.42” of travel. The preload on the spring and rider sag, is probably creating the error between the actual transition point and the calculated transition point.
- It seems the biggest mistakes people make when setting up their forks is not understanding the correct things to measure and change. Put a plastic tie on the forks to see how much travel you are using by test riding over the biggest bumps you hit or by doing a hard stoppie. Measure the fork rider sag to see how much you have to start with. Measure chassis pitch and how far the forks stick above the triple clamp. When you take the springs out, measure the fork oil level, and total travel of the forks. Write down all your measurements.
- Just because you have the same length of spring or preload spacer sticking out of the forks before you put the caps back on, does not mean you will have the same rider sag as your buddy, (although it should be close). You must check you own rider sag.
- Do not assume the fork oil height is correct. Measure it. Make sure you pump the forks enough to get all the oil out before refilling it. Make sure you pump the forks again after you refill it to bleed out all the air. Recheck how much fork travel you are using by test riding. If you are not using all available travel, you may have too much oil in it. If you suck out 1/4 to 1/2 oz oil, and you gain travel, you had too much oil in it.
Lowering a Bike
- People like the Tamarack lowering blocks.
- An XLF link discussing Progressive's Drop In Fork Spring kit.
- Some people need to lower the bike to be able to get their feet on the ground. Others want to lower their bike to attain a certain look. Either way, lowering the bike causes 2 problems. First problem is the reduced cornering clearance. The second is limiting total travel. With limited travel, it becomes very important to set up all other aspects of suspension tuning correctly because there is little room for error.
- Lowered bikes can be dangerous, especially if the rider pushes the limits of cornering or speeds. I read one report where a guy’s kick stand caught on a manhole cover and threw him off the bike.
- Last year, I was following a $30,000 custom bike with lowered suspension. The guy was getting throw off the seat just going over normal size bumps. He hit a big bump while in a curve, almost lost control and almost ran off the road. This was at only 45 mph.
- In order to get lowered suspensions to work, you must use stiffer shock springs. Stiffer springs provide a stiffer ride. Carrying a lot of weight, such as 2 up riding, generally means using a shock spring that is so stiff, solo comfort is severely compromised. Or, if you get a spring soft enough for a solo rider, it will probably bottom out too much when 2 up.
- However, IF the spring has long transition zone, IF the initial and final spring rates match rider weight, and IF the rider goes slow enough and IF he avoids major bumpy roads, it is possible to get a reasonable ride. I guess I should add another IF. IF the rider has no clue what good suspension really is, anything is better than stock.
- Sportytrace is a 140 lb rider who needed to keep her Nightster low so she could keep her feet on the ground. We accomplished this by using the 13.5” 1200 S shocks which have a light 54/78 lb/in spring. The spring matched her weight, but in order to get her feet to the ground, we had to use 1” lowering blocks. This proved a very good combination for her.
- Combining the 12-3/4” Road King air shocks with the 1” lower block is another good combination to carry a lot of weight while keeping the bike low. Be careful to not exceed the factory weight limitations of the bike itself.
- There have been questions about how using lowering blocks affect the spring rate. The answer is it all depends on too many factors to predict accurately. I experimented with 1” lowering blocks. Some shocks smoothed out a little bit, others didn’t.
- When you lower a bike, you must verify you have enough tire clearance. If you jack the bike up and take off both shocks, and then lower it very carefully, you can see how low it can go. Measure the shortest distance between the shock mounting bolts. The shocks bottom out and that limits how low the rear of the bike can go. If you take off one shock and lower the bike to bottom out the shock, you can verify you have enough clearance left over.
- Early years of Rubbermounts had electrical wiring under the rear fender that the tire can rub on.
- Nightsters have a reflector under the fender that will hit the belt guard. Early shocks from Progressive had too much travel and broke off the reflector. The newer shocks have less travel. So be careful if you buy older shocks for a Nightster.
- If you lower the front end by lowering the triple clamps, it is possible the lower fork tubes will hit the lower triple clamp when the forks compress fully. The first 07 FI bikes had front fenders that hit the voltage regulator. Something you want to avoid.
- Lowering, or raising, a bike may make it necessary for a kick stand of a different length.
- There are 3 lowering kits for forks that I am aware of. Harley offers their own kit with a new spring and damper tube. This kit is not very common. I suppose because it is too expensive, especially if you have to pay the dealer to do the work.
- Progressive offers 2 different lowering kits. The original 10-1560 kit uses the standard 11-1527 main spring, but includes extra 1’ springs called lowering springs. Harley calls them rebound springs. Others call them top out springs. These springs ride on the damper tube in between the upper and lower fork tube. Stock forks have only one rebound spring which softens the hit when the forks fully extend and the fork tubes hit against each other. Adding 1 or 2 extra lowering/rebound/top out springs pulls the upper fork tube farther down into the lower fork tube. The big disadvantage is you have to take the damper rod out to add the extra springs.
- Progressive’s new kit is 10-200 “Drop In” kit. In this kit, the main fork spring is replaced with 2 different springs. You do not need to remove the damper tube to do this, just pull out the original spring and drop in the new springs. The long spring is the main spring which supports the bike’s weight and compresses and extends in response to road bumps. The other spring is very short and weak. It is so weak, just the weight of the bike will cause it to compress 2” until the coils hit each other. This is called coil binding. When the coils hit each other, the weak spring stops compressing and becomes a solid rod, leaving the other spring to do all the work. You can see pictures on Progressive’s web site.
- I have no experience with either lowering kit. Neither offers the adjustability of the Works Dual Rate spring kit.
Ricor Intiminators vs Race Tech Emulators
- Both are valve bodies which you install between the damper rod and fork spring. Both control oil flow and compression damping, but in dramatically different ways with dramatically different effects on the ride and handling of the bike.
- To give you better idea how forks provide damping, there is a picture of stock damper rods from a Nightster and a Low a few paragraphs below, post 289 of the Intimidator thread. The large holes to the right are the compression damping holes. As the forks compress, oil is forced through the compression holes. The holes resist the oil flow and that provides compression damping. Drill the holes larger, more oil flows and less resistance is created, and the forks can compress faster in response to road bumps.
- The rebound damping holes are on the opposite end of the damper rod. Rebound damping is created only when the forks extend and forces oil through those holes.
- The Emulators have a valve stack which control only compression damping. A valve stack is like a bunch of washers stacked on top of each other. When the forks compress, the oil pushes on the washers, bending them open and the oil flows through. A threaded rod with a spring and nut goes through the center of the washers. If you tighten the nut, the spring puts more pressure on the washers, reducing how much the washers can bend, increasing compression damping, and making the forks feel stiffer.
- This is basically the same way cartridge forks work. However, good forks have one shim stack for compression damping, and another for rebound damping. Similar to damper rods having compression holes at one end, and rebound holes at the other end.
- Race Tech’s recommendation for me was to use their 53.4 lb/in (95 kg/mm) straight rate spring, drill out the compression damping holes in the damper tube and use 20w fork oil. Trying to force 20w fork oil through the rebound holes created way too much rebound damping.
- I started to reduce the Emulator spring tension to reduce compression damping. I eventually got to the point where I took the Emulator out completely. Then I reduced fork oil viscosity from 20 to 10 to 5w. 5w provided too little damping. 10w was good. 10 w oil with the compression damping holes drilled out, but the stock rebound holes, provided the best balance. Or so I thought until the Ricor Intiminators came out.
- The Ricor Intiminator actually has 2 separate oil circuits. The first is controlled by a metal collar that floats on a spring. When the wheel is not moving up or down, the collar blocks off some oil ports. When the wheel moves up in response to a bump in the road, the collar’s position remains stationary but the ports move up with the wheel. When the ports are uncovered, massive amounts of oil can flow through. This effectively blows off (high speed) compression damping which allows the forks to compress very quickly and absorb bumps in the road.
- The second circuit is a shim stack. It provides damping to keep the chassis from falling down as the wheel moves up.
- Another big difference is the Race Tech 20w fork oil recommendation drastically increases rebound damping, but the Ricor 5w fork oil recommendation reduces rebound damping.
- This is why I constantly say the stock forks are over damped. Changing to 15w fork oil in stock forks over damps already over damped forks.
- This is the main Intiminator thread on the XLF.
From this thread:
Shock absorbers perform two important functions and, unfortunately, they are in direct conflict with each other. We rely on shocks to stabilize our vehicles during changes in direction and while accelerating or braking (chassis motion). We also depend on shocks to provide us with a comfortable ride and to allow the suspension to respond to changes in terrain so the tires can maintain traction (wheel motion). 6)
* Here is an animation of how the Intiminator works. 7) 
- However, for our bikes, the oil ports are above the moving yellow collar. If you look at the tube in the very center of the animation, near the bottom where the collar reverses direction, you can see the ports open and close as the collar moves up and down.
- Post 297 CBNightster explains how to change damper rods. He used a Low damper rod in his Nightster to get some extra travel.
- Here is a picture of XLXR's fork cap installation clamp. 8)
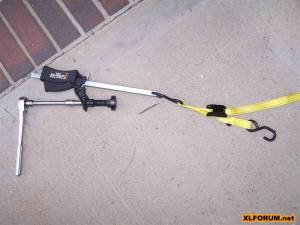
(This and a few other fork compression tools are also in the tools section of the Sportsterpedia).

Trying to compare Intiminators to Emulators is like trying to compare a Corvette to a Chevette.
Fork Oil Viscosity, Oil Height, Changing Oil
- Fork oil viscosity controls how fast the forks can move up and down in response to road bumps. Fork shaft speed is the term used to describe how fast the forks can compress and rebound. The stock fork oil viscosity is 10w. 5w reduces damping so the shaft speed increases in response to road bumps. 20w increases damping which slows the shaft speed.
- Going too far in either direction can be dangerous because the wheel may loose its ability to stay in contact with the ground. It is entirely possible you could ride many miles without a problem and then hit the wrong set of bumps at the wrong time.
- I have a 100 mile suspension test route that I use for suspension testing. It includes everything I ever encounter. High speed, low speed, mountain roads, multi lane highways, big and little bumps, and even a few dirt roads thrown in. After I took out the Emulators and reduced to 5w fork oil, I found one, and only one, set of bumps that caused the front wheel to hop and loose contact with the road surface. I switched back to 10w and the problem was gone.
- Doxbike tried Harley Screaming Eagle heavy duty fork oil. 20w. It slowed the fork shaft speed so much I could see light under his tires on concrete highways. He had the Progressive fork spring and stock damper rod holes. He tried 5w and also felt it was too under damped. He went back to 10w and the problem was gone.
- The only exception is to use 5w when you use the Ricor Intiminators.
- Never assume oil height in your stock forks is what it is supposed to be. I have seen several Harley and non-Harley bikes with improper fork oil heights from the factory. It is always a good idea to take the springs out and measure fork oil height first whenever you start making changes to the forks. This will verify your starting point.
- Oil height can be changed by changing springs, or just by turning the springs upside down. Springs with progressive rates have one end with the coils very close to each other. Putting those coils under a set oil quantity can increase the oil height when compared to a spring with fewer coils under the oil level. I like to have the loosely wound coils down to allow for more oil for a given oil height.
- Oil height controls bottoming of the forks. (Spring rate, preload, oil viscosity, and rider weight also have some effect on total fork travel.) There is an air chamber above the oil. As the forks compress, the air chamber compresses increasing air pressure, and that creates more resistance to any more fork compression. If you add way too much oil, the forks will lock up and not move at all because the liquid oil cannot compress.
- When you change the fork oil, you must pump the forks up and down to get out all the oil. Letting them just drain will end up with too much oil if you just add what the factory recommends. If you put a plastic bag around the bottom of the fork, it will catch the oil instead of squirting it 3 feet across the floor when you pump the forks.
- Be careful removing the small drain screws. They will strip very easily. It is a good idea to replace them with allen head bolts.
- The manual gives recommendations for oil quantity and how far down the oil level should be from the top of the forks. They state the oil level must be measured with the forks off the bike and held vertical, spring out and fully compressed.
- I never do it this way because I do not want to take the forks off the bike every time I change oil. And, I do not like to compress the forks when the bike is on the jack because that might knock the bike over.
- Tilt a glass full of water and see how the distance from the oil level is different to the top of the glass on the low and high side.
- When I add or change oil, I pour in an extra ½ oz. It is very important to pump the forks to get all the air out before you measure oil height. Then I use a turkey baster with a hard copper tube to put down the forks and suck out any extra. I put a plastic tie on my copper tube to set the level I want. The first time I do this, I add the factory recommended amount of oil, pump the forks, measure the distance with springs out and forks fully extended. That establishes my base level which I compare all future adjustments to. I always measure down the back side of the fork tube.
- Generally, you can add up to 2 oz’s extra oil for the long forks, 1 extra oz for the short forks. It is very important to establish total fork travel and use a plastic tie on the forks to ensure you can use all available travel. Too much oil can hydro lock the forks and cause seals to blow out or maybe worse.
Air Forks
- Adding air valves to the forks has a similiar effect as adding oil to reduce bottoming. It is just another option. If you already have the tools, it is cheap and easy. Having to buy the tools makes it more expensive.
- The fork caps are so thick, you can back drill the cap from underneath to reduce how many threads you have to cut.
- No one knows who much air pressure can cause damage. I doubt if anybody would ever need more than 5 psi. One big advantage of air forks is they are very easy to adjust for different riding conditions. Another advantage is it makes it easier to add or remove oil with a small tube.
Loosening the Drive Belt and Aligning Rear Tire
- As delivered by my dealer, the drive belt was so tight on my Roadster it would jerk the engine backwards as I rode over bumps in the road. The belt is tightest when the rear axle is in line with a line formed by the swing arm bolts and the center of the front pulley. This is because the axle is rotating on a different radius and center than the drive belt.
- 13.5” shocks on a Roadster move the swing arm through this point. Bikes with shorter shocks do not move though this point, however, the belt still gets tighter as it approaches full shock travel of the shorter shocks.
- An over tightened belt will give the bike a very strange flexy frame feeling when you hit a big enough bump. Really scary in corners.
- If you take the shocks off, move the rear tire up and down so the axle moves through the line formed by the swing arm pivot bolts and center of front pulley. You will feel the swing arm bind up if the belt is too tight. ½ turn on the adjuster will go from binding to not binding.
- You must also align the rear tire. I use a piece of aluminum 1” angle. I put a small bolt on one end and ground down the tip of the bolt to fit in the dimple in the center of the swing arm pivot bolts. I locked the bolt in place on the aluminum angle with nuts and adjusted the length to clear the foot pegs. I used a plastic tie on the opposite end to set and compare the distance on both sides. 1/64” accuracy is probably good enough.
Deciding How to Set Up Your Bike
- If you want to get the opinions of other riders about particular suspension set ups or components, be sure to ask the right questions. Start of with rider weight, length of shocks, spring rates, preload settings, chassis pitch, how aggressive a rider is he, what type of bike he has and what kind of riding he does. Slower riders don’t need fork braces and better tires. If the guy’s weight is a lot different then yours, his opinion will not help you much.
- Getting RK air shocks and adding oil and preload to the forks is by far the cheapest suspension mods. Adding air valves to the forks is next.
- Spending the money for Intiminators is a good place to start, especially if you think your shocks are a bit too stiff. With the Intiminators, you might be able to reduce shock preload enough to make the shocks you have comfortable.
- If you really want to ride aggressively, you will have to add better tires, I like the Avon Venom X’s, fork brace, Intiminators with drilled out compression damping holes, Works Dual Rate springs and high end shocks. So far Ohlins are the only shock I have not heard any complaints about. However, Ricor is still working on their inertia shocks.
The Famous Wobble Thread
- Common causes of wobble are bad tires, loose spokes, loose nuts or bolts on suspension components, warped wheels, misaligned rear wheel. over tightened drive belt, loose steering head bearings, rider has too tight a grip on the bars, windshields, no fork brace, front too low or rear too high creating too much forward chassis pitch, improper tire air pressure.
- If you have wire spoked wheels, you can tap the spokes with a small wrench. If they make a ring sound, they are tight, if they make a thud sound, they are loose. Tightening spokes improperly can warp the rim, if you don't know what you're doing, take it to somebody who does.
More Links to XLF Suspension Threads
- And the original It ain't the rubbermount and it don't have to ride stiff and handle lousy!!! thread for those who just can't get enough.