
EVO: Suspension - Sub-01B
2014 XL1200T Front Fork Testing w/ Spring Rate Charts
Article by spacetiger:
- I'm pulling the front right fork to:
- Verify working range
- Set up the forks for verifying riding envelope
- Test to determine spring rate
- Determine spacer length for front sag (25% of working range)
 | 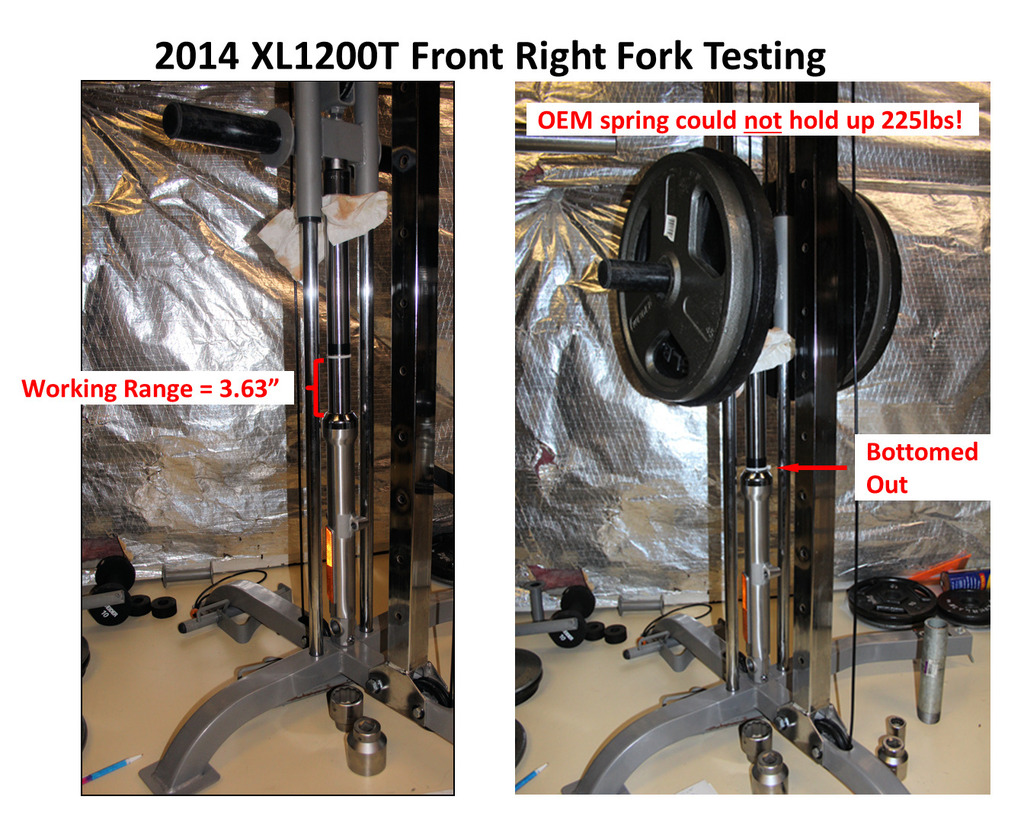 | 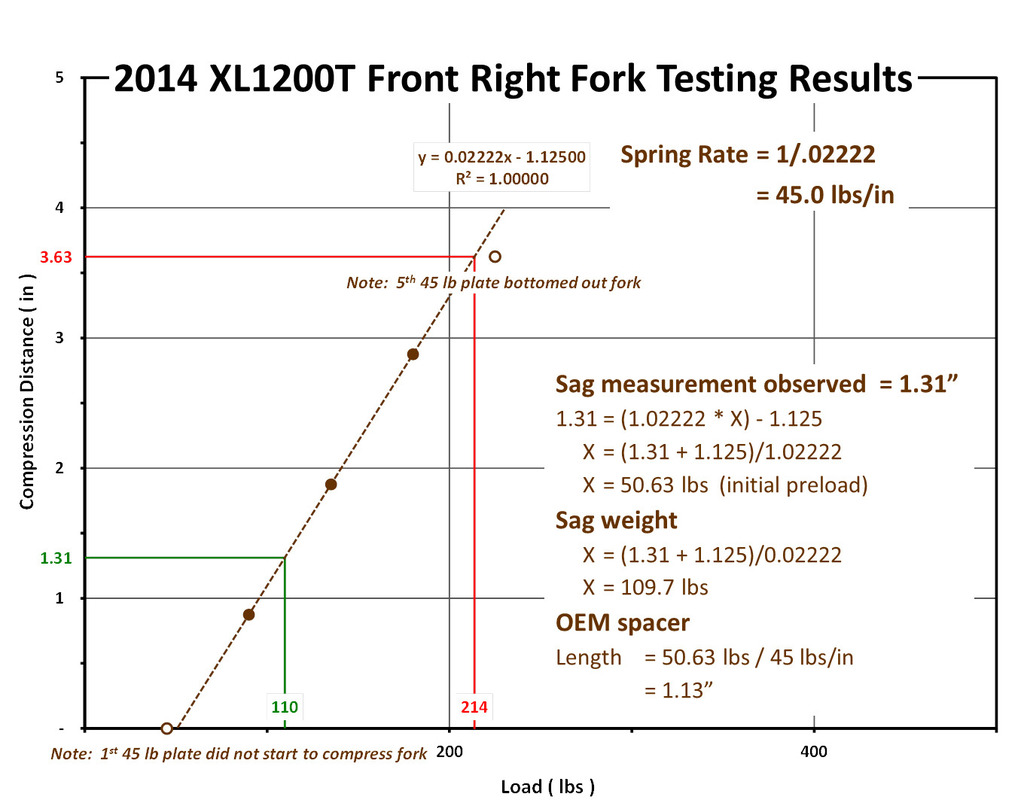 |
| Front fork off the bike. I pulled the fork cap to let the fork tube compress all the way. I added a zip tie pushing it all the way down to the fork lower; then added black electrical tape to mark the max working range of the fork (3.63“) 1) → | I drained all the oil because I do not want to have any trapped air acting as another “spring” during the testing, then add the cap back on. I then took the fork downstairs to place it in the gym equipment testing rig and start loading up weight while recording the compressed distance. The spring is another weak one! 225 lbs, and the spring is more than done… 2) → | Test results, a spring rate of 45.0 lbs/in!!! By knowing the equation of the line (I use microsoft excel to do a curve fit and tell me the equation of the line) and the observed sag measurement of 1.31”, I can figure out the load running through the spring; 110 lbs. I can also figure out the oem spacer length (1.13“) 3) ✔ |
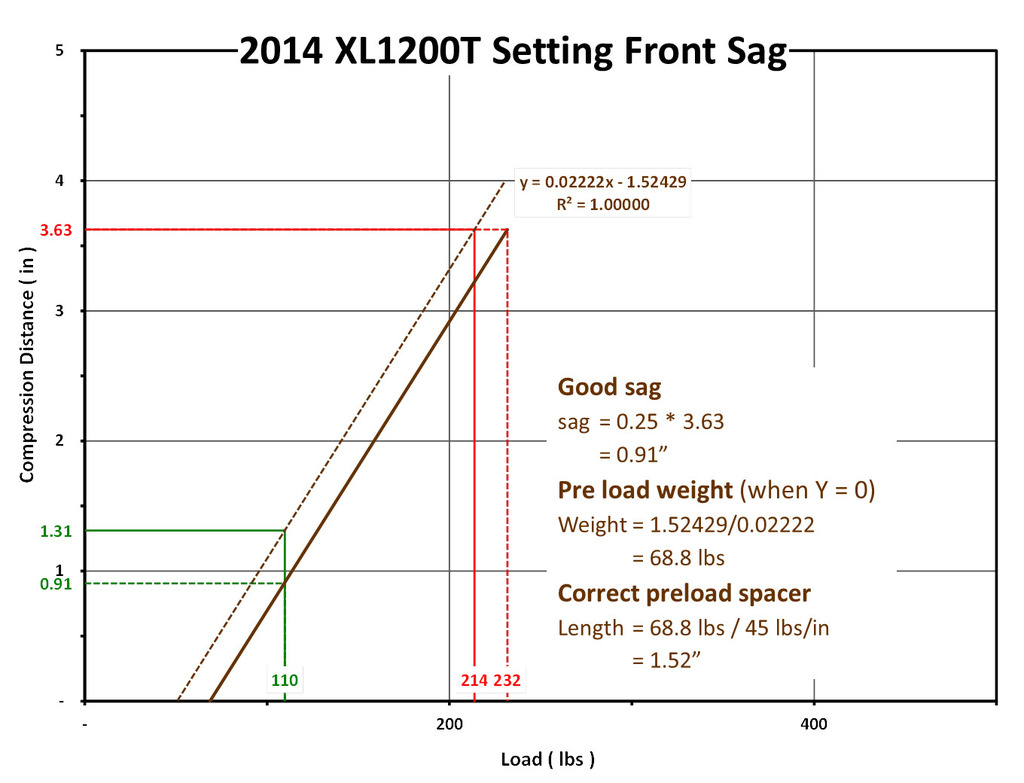 |
| At 1.31”, I am using up too much of the fork working range of 3.63“. At 0.25% of 3.63” = 0.91“. I need to cut a longer spacer of 1.52”. to shift the dotted line to the right. The OEM spacer is longer than 1.52“. That is because the spring does not come up close to the cap so the OEM spacer has to close that gap then add an additional ~1.13” to compress the spring. My new spacer (PVC pipe cut to length) to set a good front preload (at 25%) is going to be 1.52“ - 1.13” = 0.4“ longer than the current OEM spacer. 4) → |
- I'm will experiment a little on the front fork with some water to account for the “air spring”. This will help me when riding to not bottom out and figure out what what rate spring to get.
- I'm going to fill the fork with water to determine the total volume of the fork. Then, I will empty, then refill to spec volume with water to experiment which volume of water gets me additional help with overall spring rate (steel and air spring).
- Some people have added Schrader valves to the fork caps to have an adjustable air spring with additional air pressure, (generally 3 to 5 psi is considered safe). 7) The fork is a sealed chamber with a number of things inside. All the metal things have a fixed volume. That leaves air and oil volumes as the only things to play with. By adding more oil, there is less air and vice versa. Your choice to add air via a Schrader valve allows you to make adjustments easier. You can do the same thing by adding more oil. Since I am testing and want to avoid the expense of adding a Schrader valve, I'm going to use water as a substitute for oil. 8)
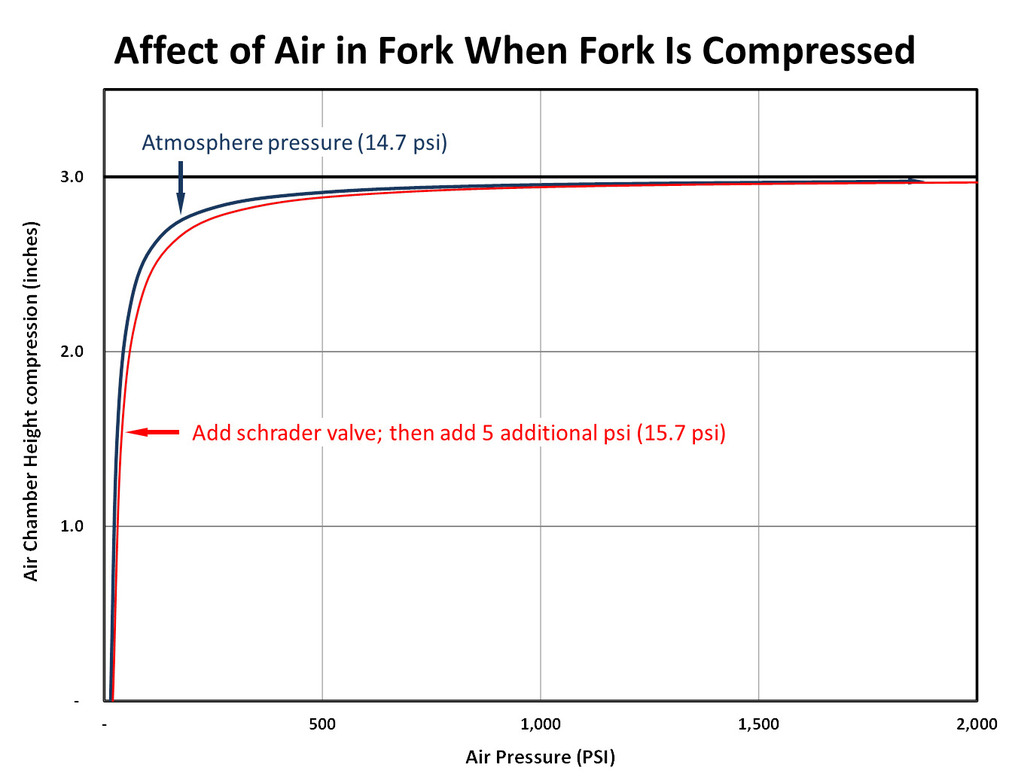 | 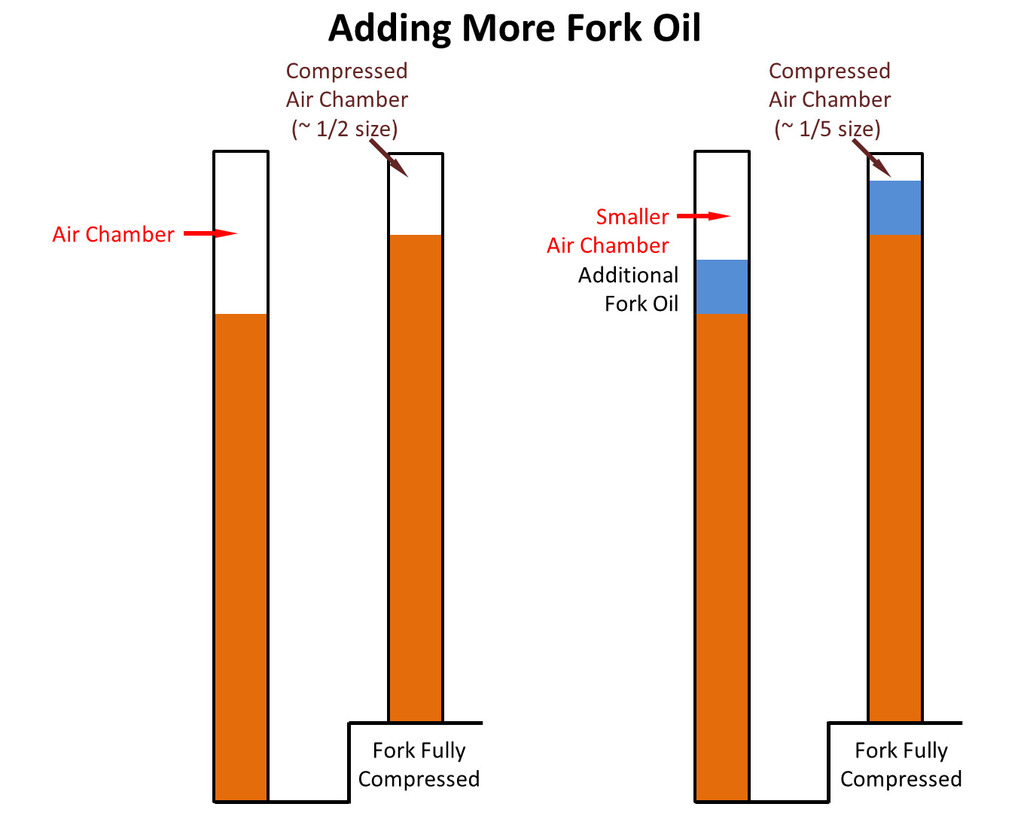 | 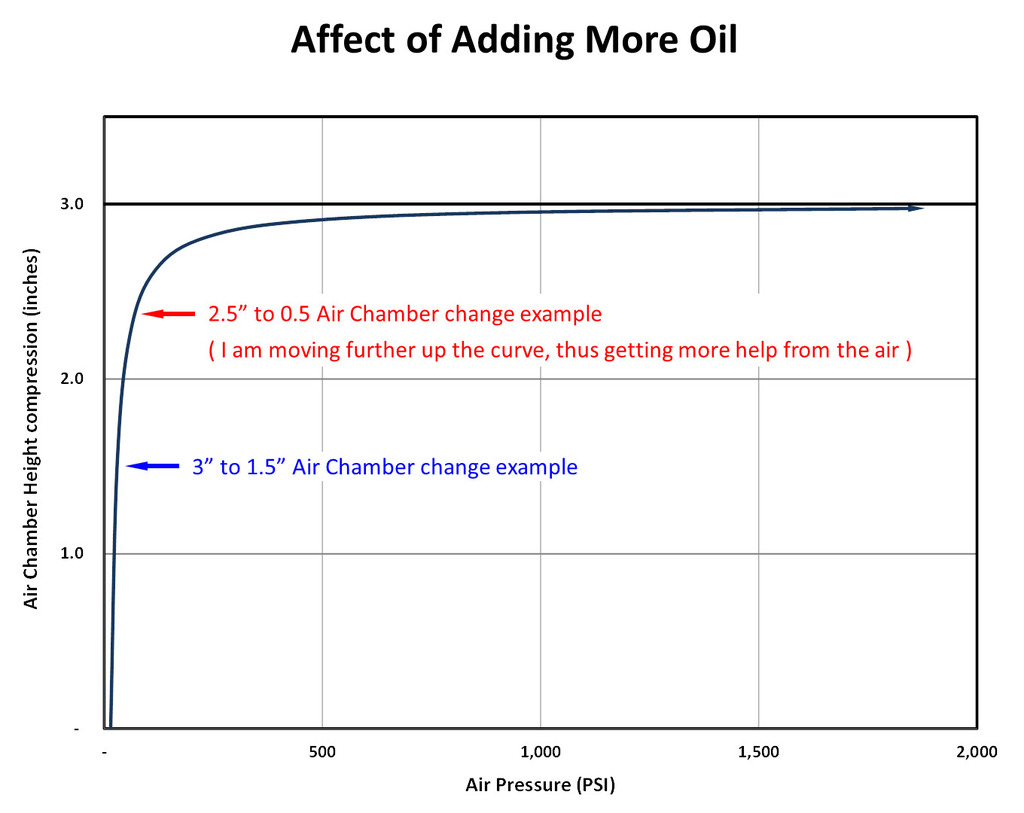 |
| This shows the affect of “compressing the air chamber”. If I had a 3” air column (at atmospheric pressure of 14.7 psi) and compressed it in half, the pressure would double to 29.4 psi. If I kept cutting the distance in half (next would be to 0.75“), the pressure keeps doubling. You can see what happens to the pressure. If you add a Schrader valve and add 5 more psi, you get the red line on the graph. 9) → | A fork example: On the left you see the fork with oil and air chamber. Next pic over is that fork compressed. The air chamber is now 1/2 the volume it was. Third pic is the same fork with some extra oil in it. 4th figure is the compressed fork with the extra oil in it. You can see the air chamber is now only 1/5th the air volume. 10) → | The affect of the changing air chamber can be seen in this graph. I am in effect moving up further on the psi curve. The additional air pressure acts as a spring, hence, why I call it the air spring. This air spring affect is additive to the steel OEM spring to help me keep from bottoming out. Its the cheap way of finding the spring rate I need for the bike. 11) → |
- As far as the psi scale up to 2,000 psi, what I posted was math extrapolations. I did not set up something, then measured it. I suspect the fork seals would not hold anything close to that pressure. Perhaps a few hundred psi max? If you had too much oil in, I suspect you would see weeping of oil on the fork tubes as well as experiencing the “hydro locking” condition. BTW, you are not adding 2,000 psi but just starting at atmospheric pressure and squeezing the air volume from 3” tall to 0.03“ tall which makes the pressure go to ~2,000 psi…
- I loaded up the right fork with water (after the oil was all out; drained overnight for last bit). It held 17 ounces of water (by weight). That converts to 16.3 fluid ounces. I then drained the water.
- Then I pulled the spacer, washer, and spring; then lowered the fork tube; then filled the fork with water to spec limit of 4.49”. Once done, I poured this volume of water out and weighed it, then converted that into fluid ounces. I repeated these steps for several other points to include (1 extra fluid ounce).
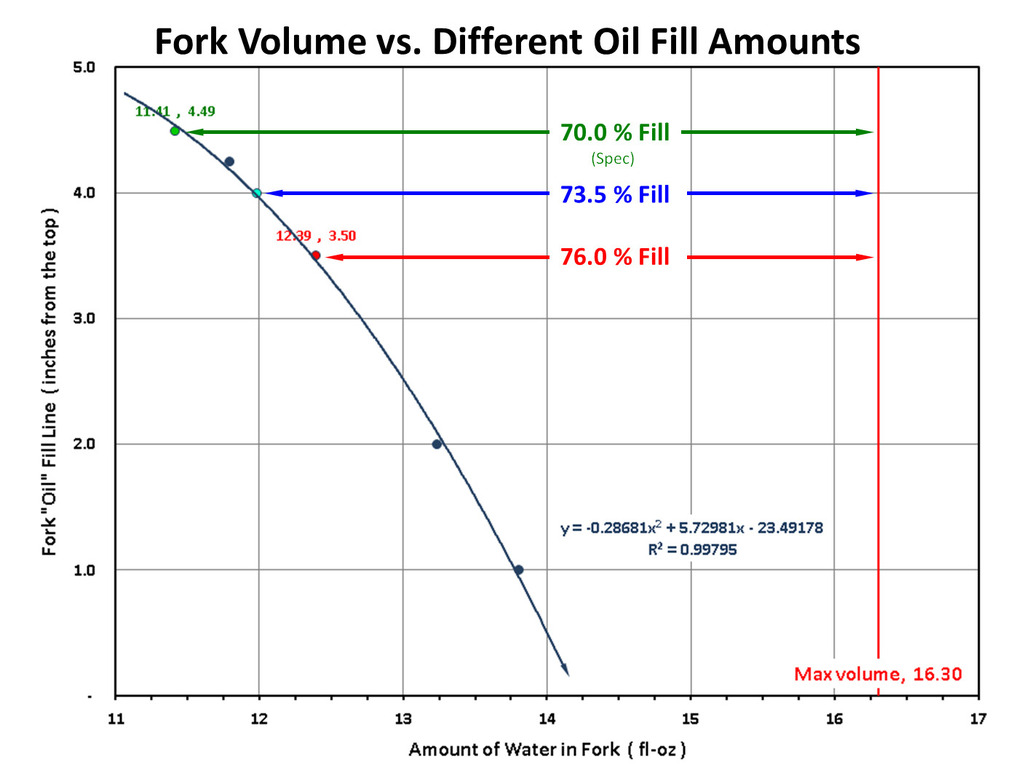 | 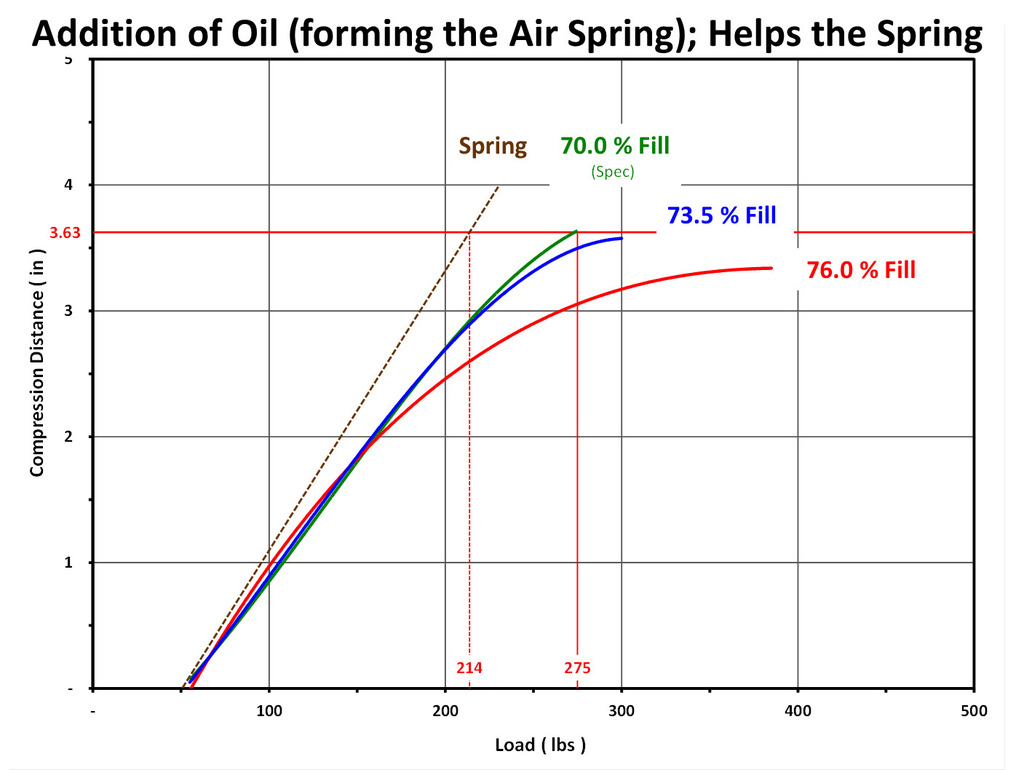 |
| By having the volume of water for each point, I can see the curve of options vs max fill 12) → | The true test of what the oil does comes from the weight testing. Here you can see what the spring alone does. As the weights are piled in increasing amounts, you can see the fork can hold up more weight for a given load - that is because of the help from the “air spring”. At a 70% oil fill, the fork can hold up an extra 61 lbs (214 to 275) before bottoming out. I next tested the “add an extra ounce” option taking the fork to a 76 % fill. You can see from the red line, the fork doesn't bottom out even with 385 lbs on it. I test one more point, a 73.5 % fill, and it looks to be the one to go riding with. It looks like it would come very close to bottoming out but only after it adds another ~ 100 lbs (~320 vs 214) of capacity. Hopefully this will be enough to keep me from bottoming out tomorrow. But, for short forks, maybe only add a half ounce. 13) → |
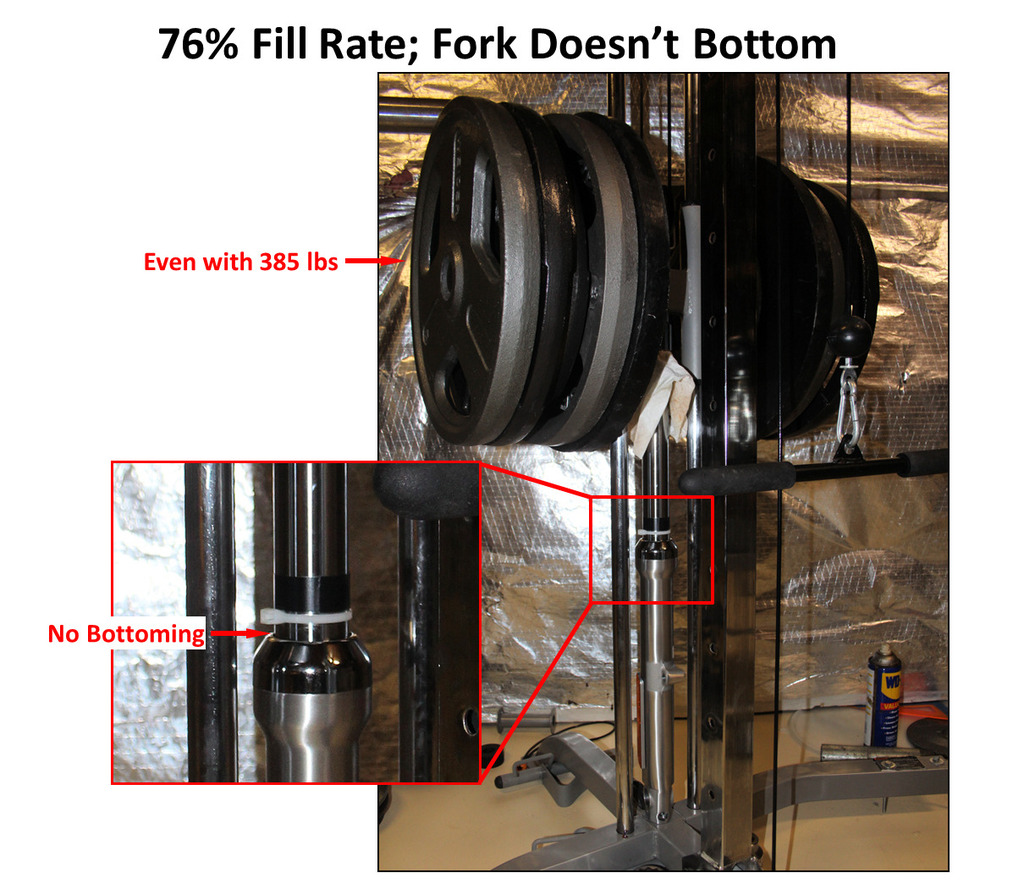 | 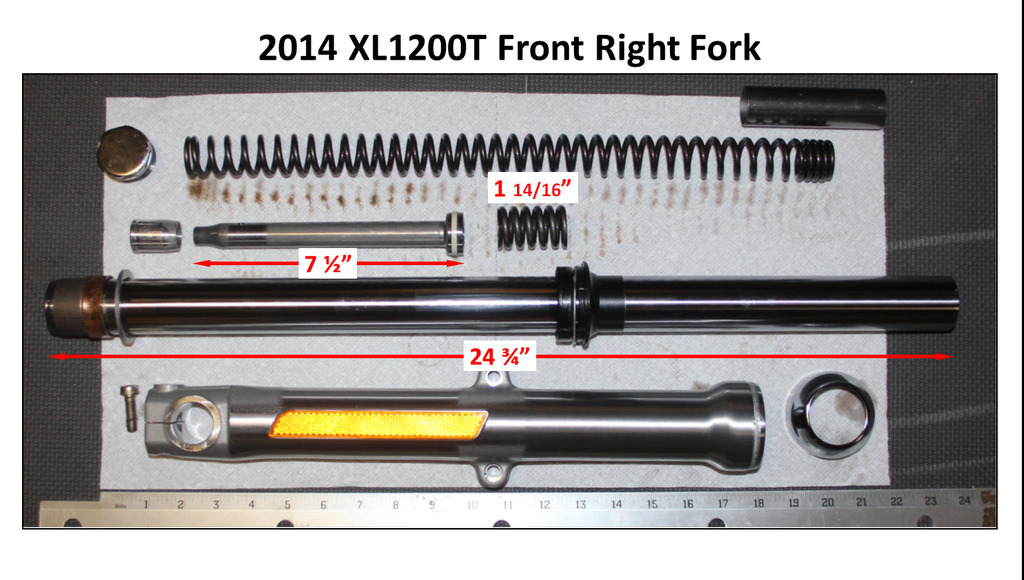 |
| 76% fill is too much; it can hold up a lot, but it not a useful suspension range as its all in the last fraction of an inch. 14) → | Fork is cleaned up and air dried overnight. This pic shows the critical dimensions. 15) → |
- After riding the bike a fair amount, I have collected a lot of info on the upper loads I am seeing in the rear and front suspension. Based on that data, I have experimented a bit to see how I could best setup the rear suspension for my riding weight. That may also help other “T” riders.
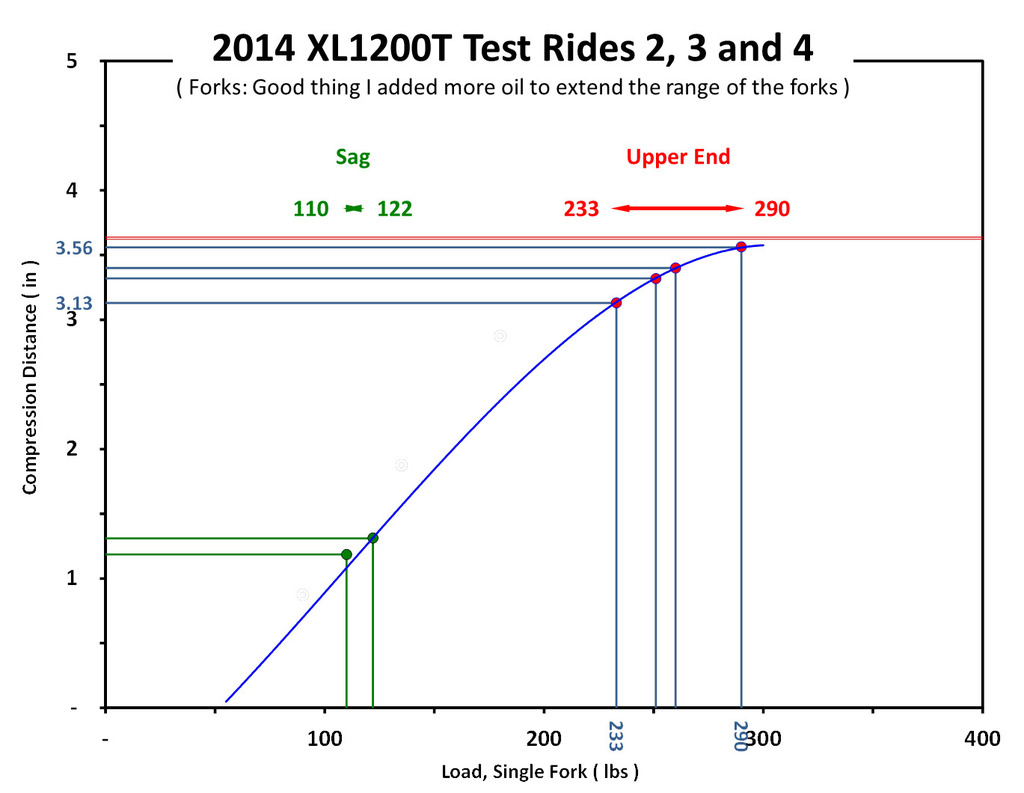 | 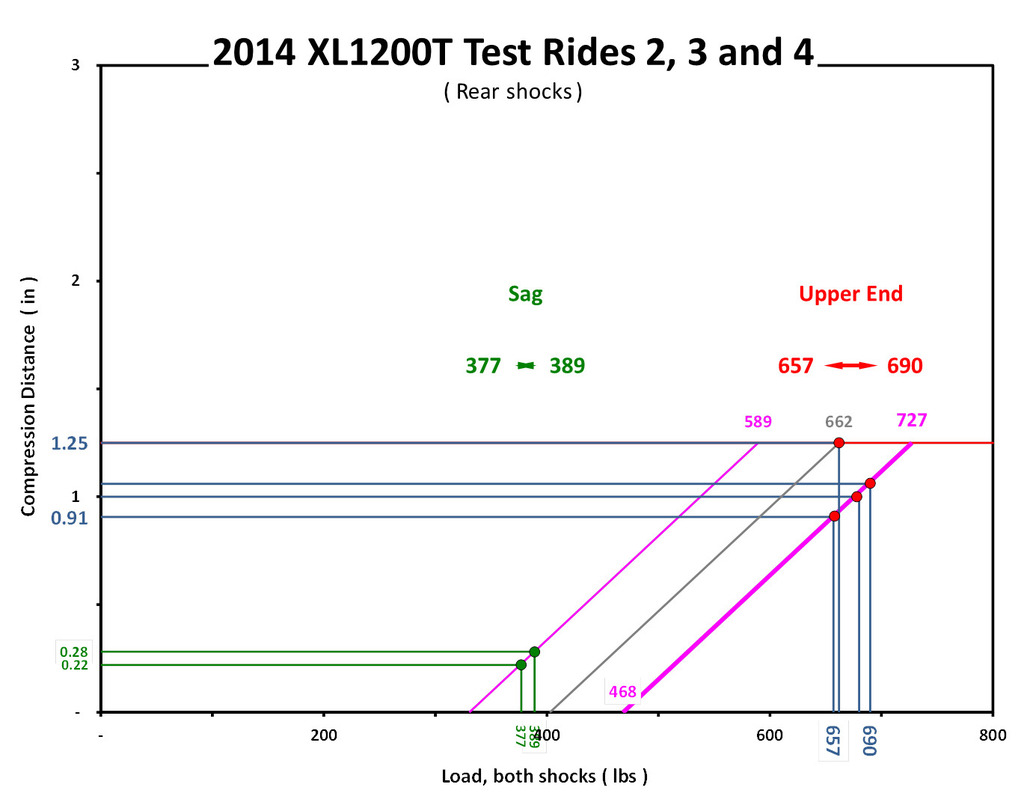 | 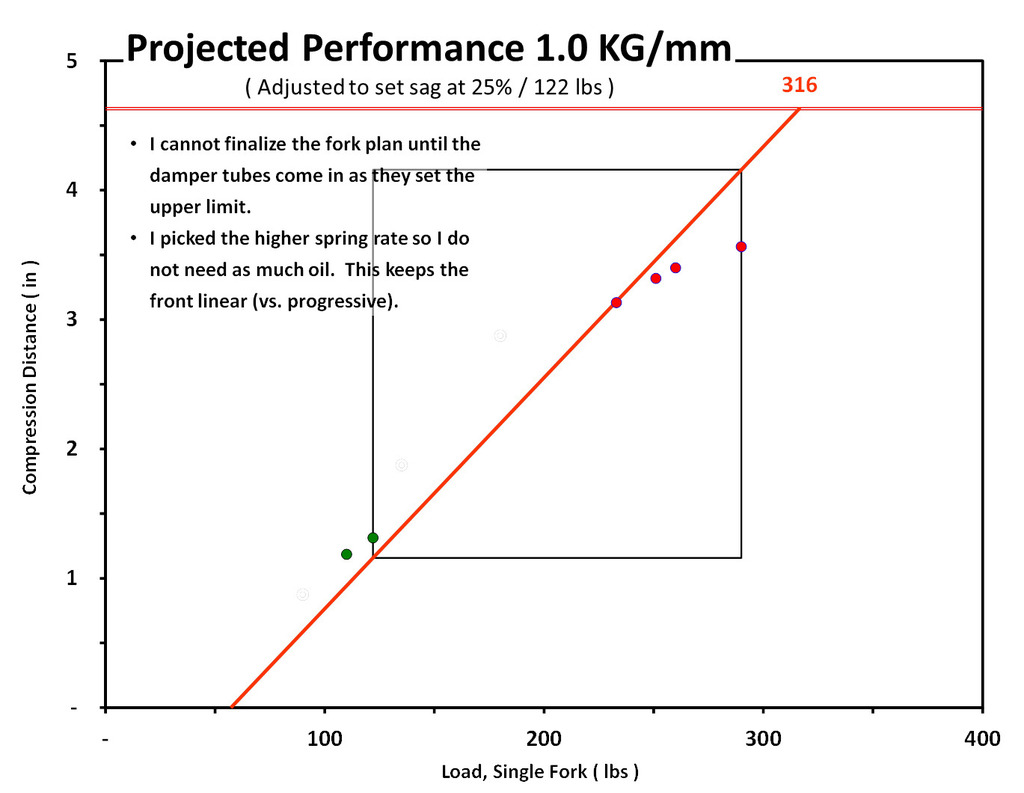 |
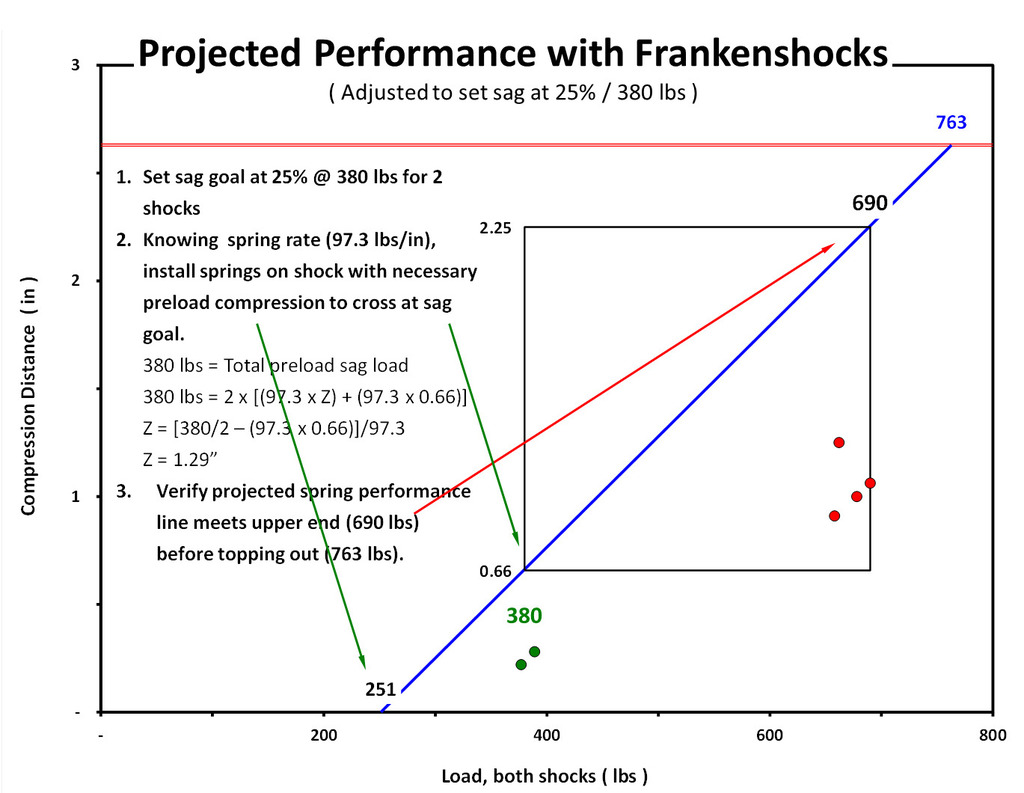
| This shows the max range from the front suspension; it varied between 233 and 290. Based on the sag numbers, I can determine the riding envelope and can pick a suitable spring and longer damper rod to extend the length of the fork 16) → | This shows the max range of the rear suspension; it varied between 657 and 690. Again, based on the sag numbers, I can determine the riding envelope and can project how the Frankenshocks will perform. 17) → | For the front suspension, I have ordered the front race tech springs. They are linear rate springs. I went with linear rate springs because the addition of oil will make the upper range progressive, so there was no need to get a progressive rate spring. 18) → |
- I also ordered the longer damper rods:
- Damper rods from 1200N, shortest one=47313-0719)
- Damper rods from 1200L, medium=45938-92: These are on the XL1200T 20)
- Damper rods from 1200R, longest=45925-04: I ordered these.21)
- I also ordered a set of front end preload adjusters and I have a 2000 XL1200C right fork coming in. It will be the tool I use to characterize the race tech emulator so I know what setting I will go with. I’ll probably test with 10, 15, 20 and 30 weight fork oil to figure out which gives me the performance I’m looking for. I want more rebound and less compression damping and with the race tech emulators, the rebound damping is set by the oil (heavier weight = more rebound damping). I will make the test jig next weekend and get some testing in.
 | 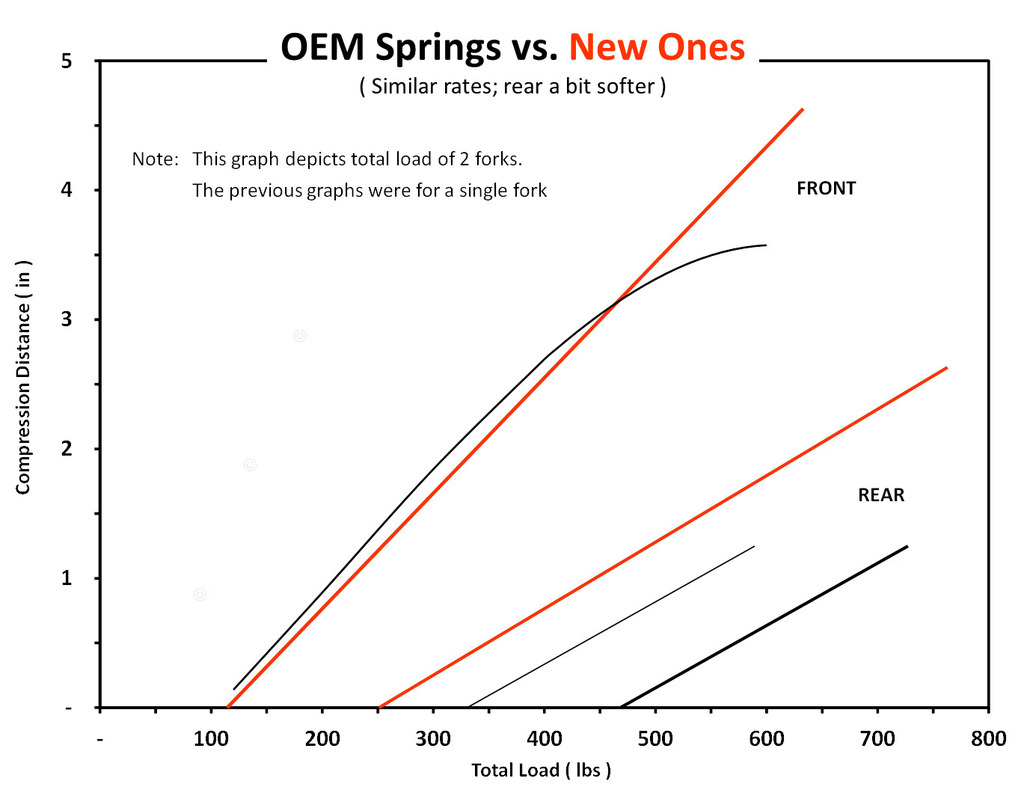 |
| The rear shocks are ready to go on. This will let me see how to finish packaging the front suspension based on the taller rear to get the rake and trail numbers I was hoping for. I also need to see how the 1200S shocks work with the bags… or not. 22) → | The new spring rates are very similar to what came OEM. Perhaps the rear are about 6% softer. I’ll play with the geometry during the week just to take a closer look at the rates. But so far no show stoppers, I just have a bit more work to go. Perhaps a couple more weekends and the suspension work should be done. 23) → |