Table of Contents

REF: Wheels, Brakes & Tires
Bleeding the Brake Lines
This page consists of many different means and methods to bleed the brake system and perspective advice.
All will work some of the time and none will work some of the time. And what works for one person doesn't work for the next either.
The right way is the way that works for you!
One way seems to work for some but not for others and having several options gives a person versatility.
However, your main tool when bleeding brakes is patience.
Bleeding The Brake System By The Book
Note on potential brake fluid leaks:
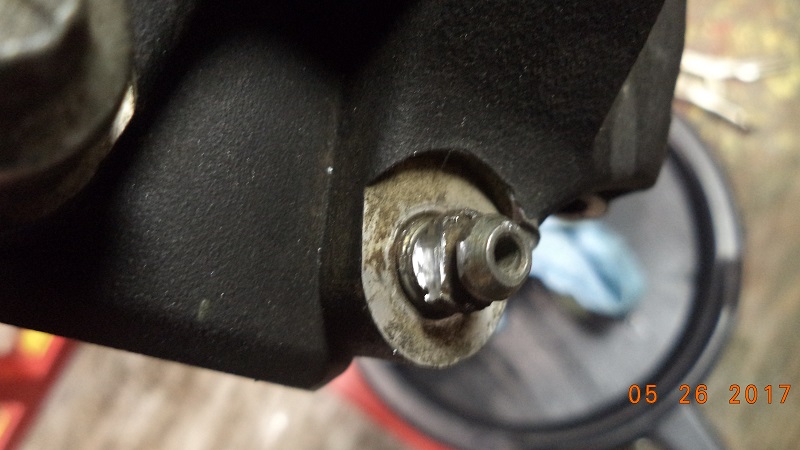
2000 model brake bleeder screws can retain fluid on the threads and in the bleeder bore which can seep out giving the impression there is a brake fluid leak. 1)
This residual fluid is only a cosmetic issue and you should clean the area around the bleeders anytime a brake caliper service is performed.
Fluid is most often seen at the bleeder valve, around the mounting bolts and pad support pins, or at the seam where the inner and outer caliper housings mate. 2)
This is often residual brake fluid from the bleeder screw bore.
Normal caliper flexing can also allow assembly fluid to seep from the caliper seam and from around the mounting bolts.
This is most often a temporary condition associated with initial exercise of the caliper on new vehicles and should be considered normal.
Residual fluid will be removed during normal washings. If brake fluid re-appears, diagnose the cause.
If fluid re-appears at the caliper seam or mounting bolts, it may indicate the crossover seals are leaking.
Disassemble and repair the caliper using the procedures in the appropriate FSM.
Notes:
- When checking the relief port operation:
- Spilling brake fluid on brake pads:
- The MoCo recommendation is “Caution should be used when bleeding because any brake fluid on the pad will contaminate the pad material and reduce brake effectiveness.
The fluid absorbed by the pads cannot be removed satisfactorily with any solvent or by operating the brakes”. 5)
When You Should Bleed The System
- Bleed the hydraulic brake system anytime a brake line, M/C or caliper has been opened.
- Whenever the brake pedal or lever operation feels spongy.
Before Bleeding
Arrange for the master cylinder to be in a level position by standing the bike upright (off the kickstand).
Manually Bleeding
- Install the end of a length of plastic tubing over the caliper bleeder valve. Place the free end of the tube in a clean container.
- Add new brake fluid to M/C until the fluid level is 1/8” (3.2mm) from the top.
- Depress and hold the brake lever / pedal to build up pressure.
- Open bleeder valve about 1/2 turn.
Brake fluid will flow from the bleeder valve through the tubing.
Close the bleeder valve when the lever / pedal has moved 1/2 - 3/4 of it’s full travel range.
Allow lever / pedal to return slowly to its original position. - Repeat steps 2-4 until air bubbles are purged.
- Add fluid and with the cover removed, actuate the lever to check the relief port.
Make sure there is a slight spurt of fluid upward verifying all the internal components are working properly. - Torque the bleeder valve to 80-100 in lbs. (9.0-11.3 Nm).
- Install the cap on the bleeder valve.
- Fill the M/C with new brake fluid to 1/8” (3.2mm) from the top.
- Torque the M/C cover screws:
- Turn ignition on and pump the brake pedal / lever to verify operation of the brake lamp.
- Do a test ride at low speed. Repeat the above procedure if the brakes feel spongy.
Bleeding ABS Brake System
The trick with ABS is when bleeding the fluid, a scan tool is needed to activate the ABS pumps to bleed properly. 9)
Daytona Twin Tec Twin Scan II and III can be used for that.
When changing the pads, only compress the pistons enough for the new pads.
Remove some fluid before doing that.
Also careful with the ABS wheel sensors / wires when removing the calipers.
Bleeding Methods from XLFORUM Members
Reverse Bleeding Thru the Calipers
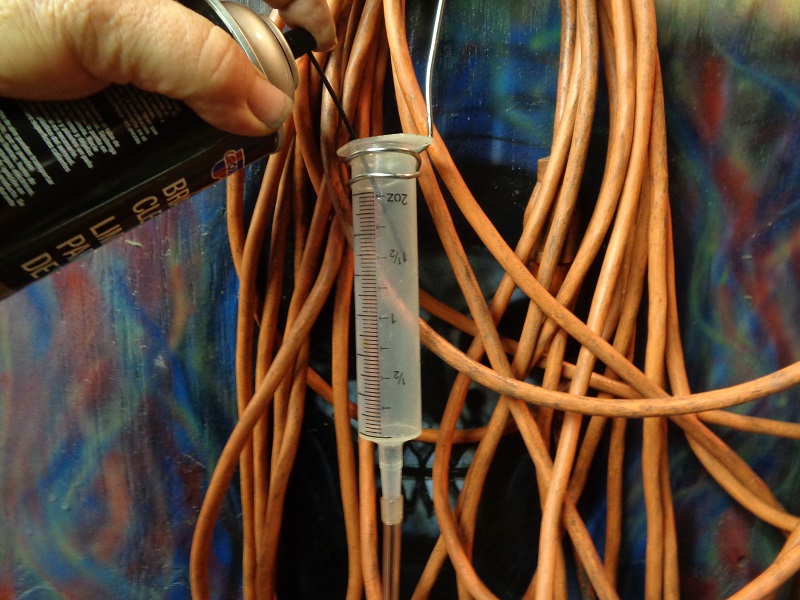
Using a Syringe
The key to this method is a slow push from the caliper to the master cylinder.
Too fast and you spit brake fluid all over the bike and the floor due to exerting higher pressure into the line.
It may be hard to push the syringe plunger especially if pushing hard. 10)
The hole in the MC is smaller than the hose and you'll be pushing fluid uphill from the bleeder screw thru the small orifice in the master cylinder.
This creates back pressure on the line down to the syringe from that hole.
And that is where the pressure comes from (back pressure due to the smaller outlet ID.
The faster / harder you push, the harder it's going to be to move the syringe. But it will work as many people do use this method.
Likewise, the slower you push, the easier it should be to move the fluid (not to say it will be easy though, depending on hand strength).
The handle end of the master cylinder must be higher than the hose end so the air bubbles will move to the relief port of the master cylinder. 11)
You can also use a squirt type oil can with some rubber tubing on the spout slipped over the cracked-open bleeder. 12)
Or, you can use a turkey basting syringe and a foot of rubber hose.
- Discard the needle from the syringe, remove lid from master cylinder and re-set it on top.
It must be off of course, but the master cylinder must be covered to prevent the fluid from squirting 10' across the shop. 13) - Attach a short clear plastic tube to the end of the syringe.
Best to use a tube that is “too small” in diameter.
This is important to get a really tight seal on the bleeder to the point you have to force it onto the bleeder with needle nose pliers. 14) - Use the syringe to empty the master cylinder and discard this fluid. 15)
- Fill the syringe with new brake fluid and let stand for 5 minutes or so for the bubbles to rise out of the syringe / tube. 16)
- Attach to bleeder, hold it upright and fiddle with the tube until air has risen into syringe. 17)
- Loosen the bleeder and slowly squeeze the fluid through.
Do not release pressure on the syringe without tightening the bleeder.
Or some fluid and possibly some air may get drawn back. 18)
Using 30ML syringes (or anything smaller than 60ML),
You'll have to push fluid at least two separate times to get new fluid / air from the bottom to the M/C. 19)
- Draw in a 30 ML's of brake fluid into the syringe and cover the master cylinder with a rag.
- Attach the syringe to the rubber hose and gently push the fluid into the system.
- Once you have pushed about half the syringe (15 - 20 ML's) up the system, shut the bleed valve.
(without removing your hose and syringe)
You should have a little fluid in the master cylinder. - Fill it to the fill line or 1/4“ from top.
- Lightly pump the M/C a few times and hold.
- Open the bleed valve and repeat until you feel a good strong push.
Using a Vacuum Pump
- You can use a vacuum pump to reverse bleed fluid from a jar, up the brake line and into caliper. 20)
Force Bleeding Thru the Bleeder Screw
Using a Hose and a Jar
- Get a small rubber hose like for the windshield washer on your car about a foot long.
You may need to heat it to get it over bleeder valve tip.
Put it on the bleeder valve and place the other end in a jar submerged in brake fluid.
You can use a jar with a lid and punch a hole the size of the hose in the lid.
This keeps the hose from coming out the fluid in the jar.
As you pump the brake and let off, the only thing it can pull back is brake fluid.
The air goes out the fluid in the jar.
Do this awhile and you'll see no more air bubbles coming from the jar.
Close bleeder and your good to go.
Make sure to not let the master cylinder go dry while doing this. 21)
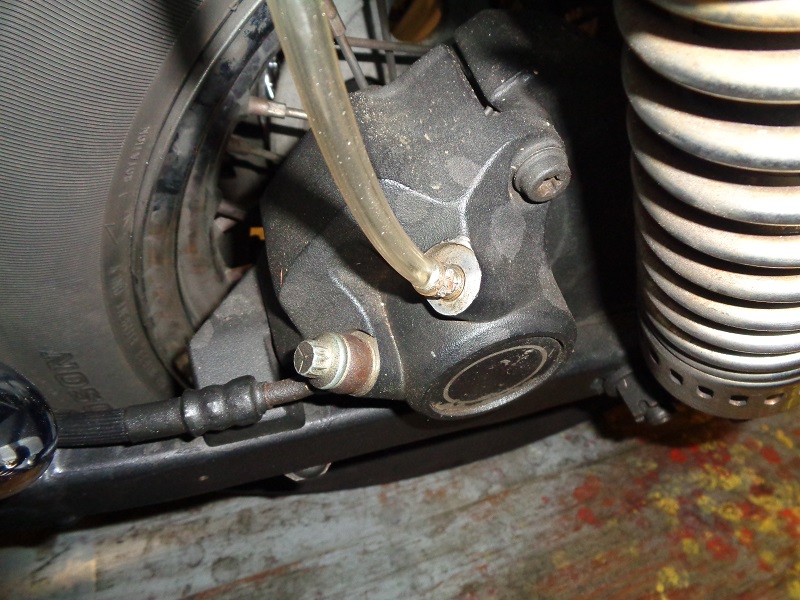
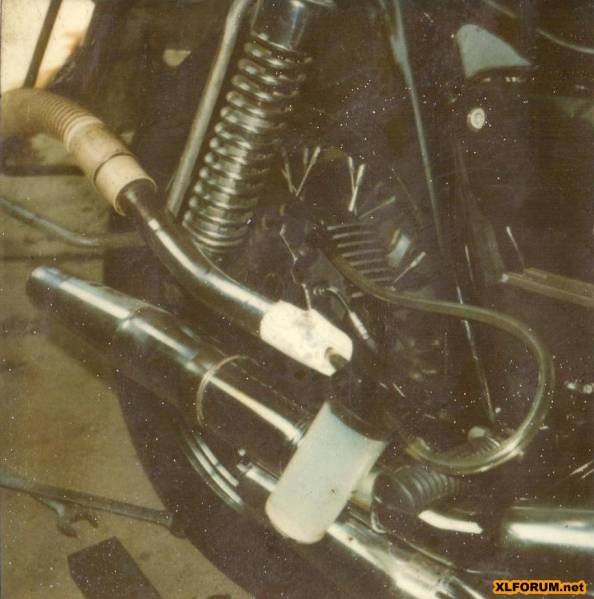
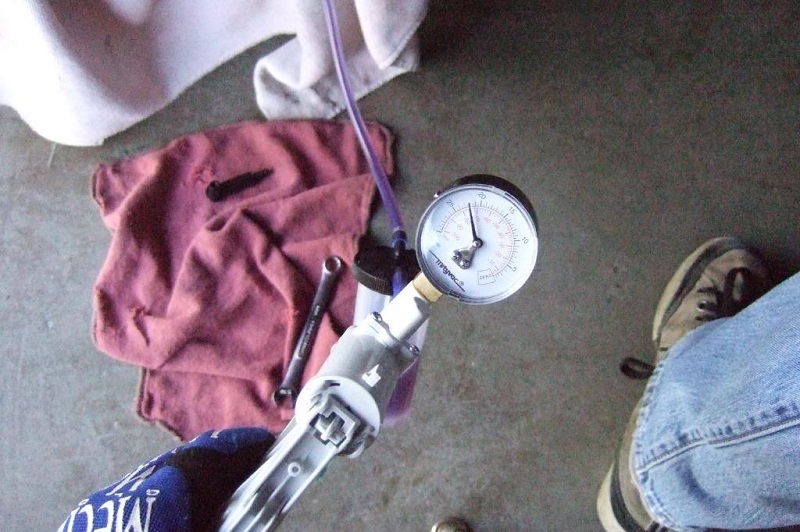
Below, the tube is an automotive shop one-way bleeder set up, but it goes inside the plastic bottle with a small hole in the lid. 22)
So when the lid is screwed on, even if you knock the bottle over, brake fluid stays inside.
The wire hook is to hang the bottle on the fender etc. and it stays out of harm's way.
The clothes peg and tag on the bleed hose is to put the hose in the upwards position from the bleed nipple for good air bleed-out.
| Milk jug and a hose. 23) |
 |
Using Gravity Assist
If you're bleeding air; 24)
You can use a clear hose on the end of the bleeder screw (hung high) and you can see exactly what's coming out the brake system.
This gives confirmation of the presence of air / debris as well as positive reinforcement that the air is being expelled.
You can watch the air move which helps in understanding how to remove it.
Below is an example of merely bleeding the air off.
If you're changing fluid;
You can bring the hose up from the bleeder valve, tie it loosely somewhere on the side of the bike and then bring it back down into a catch can.
This will allow you to purge fluid out the hose and still control air.
The downstroke (pushing the pedal / lever), forces only what's in the lines already into the hose.
Releasing the pedal \ lever (at rest) is what adds fluid into the lines from the M/C.
- Install a clear tube (from the hardware store) on top of the bleeder screw.
- About 3-4 feet is used in the pics below.
- You just need it to be taller than the caliper and where you can hang one end and see it while pumping the pedal / lever.
- Install the opposite end on a syringe (with the plunger removed) or small funnel.
If simply bleeding off air, see step 3.
If replacing fluid, skip to step 4. - Add enough fluid thru the syringe / funnel so you can see it in the hose from where you'll be working.
- Usually about 2 feet up from the bleeder screw on the rear, front will need to be a little higher with fluid.
- The fluid will creep on down toward the bleeder.
- Hang the open end of the line (with the funnel or syringe) overhead via clothes hanger wire hooked on both ends or use what you have.
- Crack the bleeder screw open.
- Open the M/C top.
- Verify that there is a small bubble in the center when you push the pedal / lever to make sure the M/C is working.
- With the top off, operate the pedal / lever to force air / fluid into the hose.
- A fast push sends air / fluid out of the clear hose.
- A slow release allows fluid to flow back into the caliper while the air pulls back slower than the fluid.
- The air will also creep up the hose when the pedal / lever is held down or fully released.
- You'll understand how the air moves out better when you see it.
- Don't let the M/C get low on fluid during this process.
- Repeat until you feel the pedal is getting a slight back pressure and no air is coming out into the hose.
- Top off the M/C, install the cover and take a slow ride to make sure the brakes are not spongy.
- Repeat the procedure if so.
Adding brake fluid to the hose uses gravity to pull fluid into the screw while air rises up the hose.
Don't add fluid to the hose if you're planning on flushing the old fluid from the M/C side.
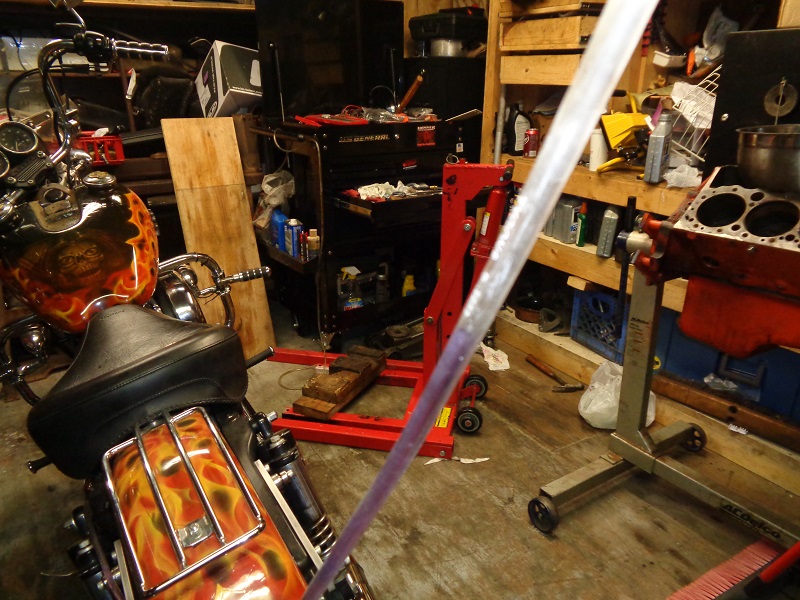
| Setting up the clear tube. It just takes elevation. Don't stretch the hose or it will come off the bleeder screw. 25) | ||
 | 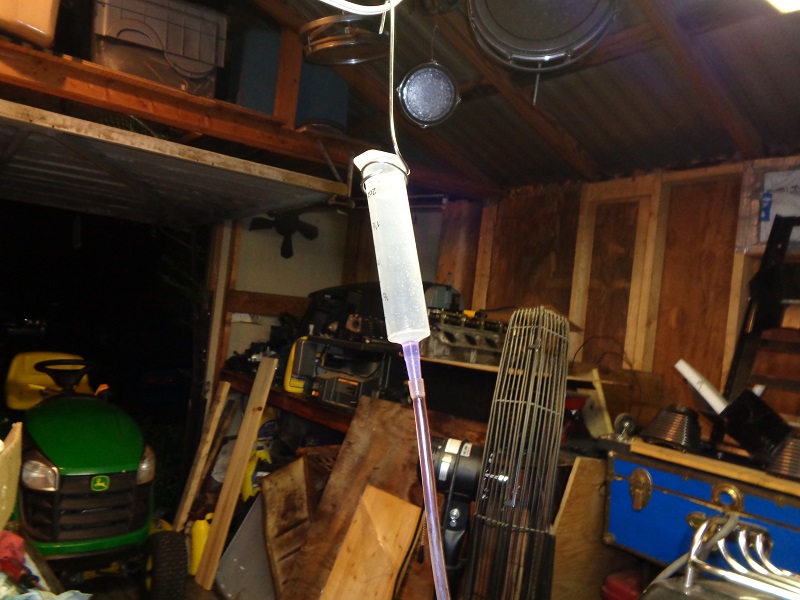 | 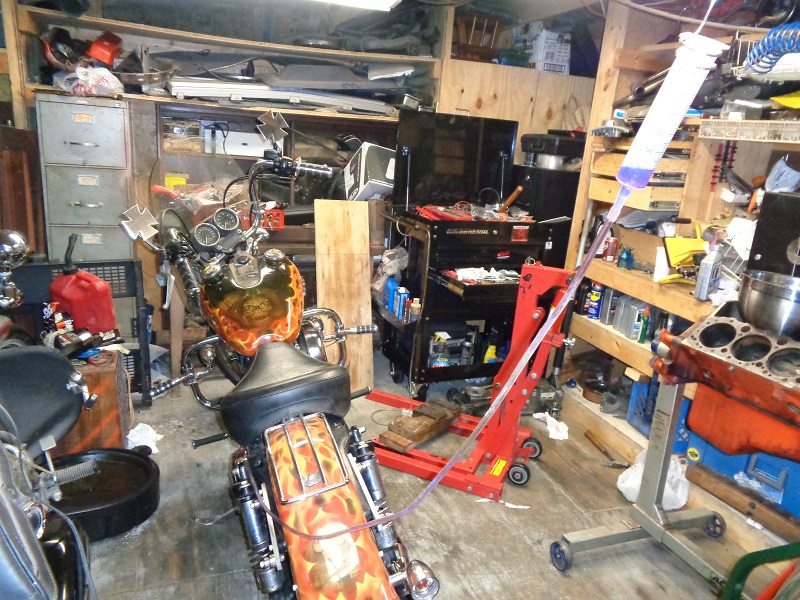 |
Any fluid in the hose will fall to the bleeder screw.
Remove the M/C cover. You can leave it off for this procedure.
Operate the pedal / lever as described above. Fast push, slow pull.
Wait for air bubbles to appear and / or rise in the hose before releasing the brake.
| If you find sludge / goop in the M/C, Do Not operate the pedal / lever until you clean it out (this junk will be sent thru the system next). Use a paper towel to soak up the fluid and then wipe down the inside of the unit. 26) |
||
 |  |  |
Notice the black particles in the pic below moved into the tubing from a fast push.
You can tie off the lever / pedal and watch the air move up past the fluid (that was pushed out only) but this is slow.
And it will not remove the air inside the system. Then you just have to do it again anyway.
When done, pinch the tubing, pull it off, tighten the bleeder and remove all the fixings.
 |  |  |
Install the M/C cap and check for brake pressure. If still spongy, repeat the above.
You can also use a small funnel on the open end of the tubing if you can find one small enough for the hose.
| The tubing below was cleaned afterwards with brake cleaner shot into it while stretched vertically. |
||
 |  |  |
Using the Finger Method
- First, top off the master cylinder and then remove the bleed screw completely. 27)
- Plug the bleed screw hole with your finger tightly.
- Have a friend or you can do it yourself, one at a time.
- Squeeze the brake while holding tightly over the bleed hole.
- The fluid and air will push past your finger and seal immediately when the brake is released.
- Your finger will let pressure spray out, but will not let air get sucked back in. 28)
- It's a lot easier and faster than the opening and closing a bleed screw.
- You can do dual calipers at once this way if you have a helper.
- Once you have a solid stream of fluid, you are fine. 29)
- This is exactly what Speed Bleeders do. They take the place of and act the same as your finger would. 30)
Using Speed Bleeders
- Simply clean the area around the old bleeder screw so that no dirt or contaminants can get into the brake system.
- Remove the old bleeder screw and discard.
- Screw in the Speed Bleeder into the wheel cylinder or caliper until it seats.
- Unscrew the Speed Bleeder 1/4 to 1/2 turn.
- Slowly pump the brake pedal approximately 4-5 times. (You do not have to close the bleeder screw between pumps.)
A one way check valve lets the air and fluid out when the pedal is pressed.
Then it immediately closes between pumps preventing new air from re-entering the system between pumps.
- After bubble-free fluid comes out of the Speed Bleeder screw, close the bleeder until it seats.
- Proceed to the next caliper until all are bled.
- The Speed Bleeder screw has a check valve inside so it can't suck air at the bottom. They're cheap too! 32)
Speed bleeder part numbers by manufacturer. 33)
| Brand | Material | Size | Part# | Length | Notes |
| Russell Brand Speed Bleeders | Stainless Steel | 1/4-28 | R40525 | ? | HD (44179-58) |
| 3/8-24 | R40526 | ? | HD (44146-77) HD (44146-82) HD (44048-83) |
||
| 8mmX1.25mm | R40527 | ? | |||
| Steel | 1/4-28 | 639540 | 1” | ||
| 3/8-24 | 639590 | 1“ | |||
| 3/8-24 | 639600 | 1.5” | |||
| 8mmX1.25 | 639520 | 24mm | |||
| 8mmX1.25 | 639620 | 39mm | |||
| Goodridge | Stainless Steel | 1/4-28 | SB1428 | 1“ | XL Up to'77 Frt/Rr HD (44179-58) |
| 3/8-24 | SB3824 | 1.29” | XL '78-'03 Frt/Rr HD (44146-77) HD (44146-82) HD (44048-83) |
||
| 8mmX1.25mm | SB8125LL | 38mm | XL '04+ Frt/Rr | ||
| 8mmX1.25mm | SB8125L | 33mm | XL '04+ Frt | ||
| Dorman | Steel | 1/4-28 | 12703 | 1“ | |
| 3/8-24 | 12701 | 1.19” | |||
| 8mmX1.25 | 12705 | 28mm |
Using Motion Pro's "Easy Bleeder" (08-0143)
This is a billet aluminum one-way inline check valve (internal check) using 3/16“ hose from and to the check unit. 34)
It does the same as speed bleeders except it doesn't use an alternate bleeder valve.
It allows air and brake fluid to escape, but will not allow air to re-enter the system.
Note: This tool will not bleed air from a dry system.
- Attach a piece of 3/16” I.D. clear plastic tube to each end of the tool.
The internal check valve allows fluid to flow in the direction of the arrow.
So the arrow should always point from the caliper to the brake fluid catch can. - Clean the brake calipers, caliper bleeder valves and master cylinder.
- Position the proper size wrench onto the caliper bleeder valve.
Next, secure the inlet hose of the tool onto the caliper bleeder valve.
(you may also want to removethe bleeder, add a little grease to the threads ands re-install it to keep air from entering through the threads) - Remove the brake master cylinder cap. To avoid brake fluid spillage, leave the cap resting loosely on top of the reservoir.
- To ensure proper operation of this tool, it is necessary to prime it.
To do this, position the tool vertically and begin to depress the lever/pedal.
Make sure to close the bleeder screw when pressure is not applied.
Repeat until brake fluid is seen in the outlet hose.
Position the outlet hose of the tool into a brake fluid catch can. - Open the bleeder valve approximately one-half turn.
CAUTION: If the brake fluid level in the master cylinder becomes too low, air will be introduced into the system.
Depress and release the brake pedal or lever several times to bleed air out of the brake system.
Replenish the reservoir with clean brake fluid as needed.
Repeat this procedure until all air has been removed from the brake system (no air bubbles appear in the inlet hose). - Tighten the bleeder valve, top off the master cylinder, clean and re-install the master cylinder cap.
Motion Pro's Mini Bleeder
This tool is a combination bleeder valve wrench and check valve. 35)
The wrench goes over the original bleeder as usual so you can loosen it.
There is a rubber seal inside the socket that seals off leaks from the nipple.
And an internal check valve lets fluid / air out but not in.
It comes in 8mm, 10mm, 11mm and 3/8” sizes at a cost of about $30.
- Complete brake bleeding system.
- Internal check valve for fast easy bleeding.
- Anodized billet aluminum handle with chromoly steel body.
- Compact size for tight spaces.
- Internal seal.
- Multi position handle.
Vacuum Bleeding
You can get an inexpensive vacuum bleeder at most auto parts stores. 36)
Basically, you suck the fluid out of the system's hoses, calipers, and master cylinder using a small hand held vacuum pump (known brand: Mighty Vac). 37)
You draw all the air out with the brake fluid.
But it doesn't always work when tiny air bubbles are trapped in crevices etc. inside the internals of the master cylinder.
As in the case when using DOT 5 brake fluid. 38)
DOT 5 is silicon based and it requires patients when using a vacuum bleeder.
It may frustrate you more than anything if it sucks too hard (creating air bubbles).
In speaking of too much vacuum, here is a homemade bleeding system using a vacuum cleaner and a canister. 39)
Mighty Vac
The Mighty-Vac's big point is assisting in clearing brakes lines of air bubbles, in lines that have high spots which air migrates to. 40)
If the system is void of those problem areas, a Mighty-Vac is not likely to work any better.
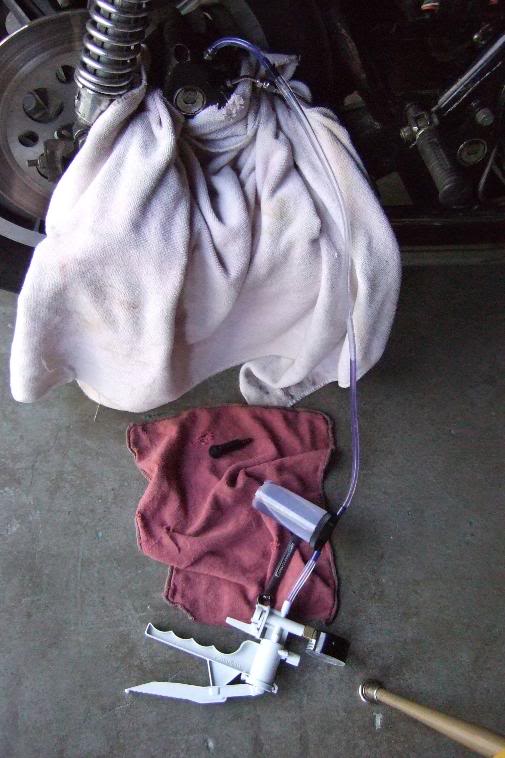
- Setup:
- Attached to the bleeder is the smaller diameter clear hose (its a very tight fit).
- To that, you have a black adapter to go from the smaller line to the 1/4“ line.
- This goes to one side of the cap for the recover cup.
- Inside the cap you will attach a section of the 1/4” line about four inches that goes into the cup.
- Put cap on cup and then run another section of 1/4“ to the mightyvac pump.
- Make sure you hook up the pump correctly so you are pulling vacuum and not creating pressure.
(front of the pump gun not the top port) - Fill master cylinder.
- Pull the bleeder, add some grease (not Teflon tape) on the threads and reinstall it snug by hand.
(the grease is to keep air from getting past the threads while using the vac) - Hook the vacuum line to the bleed screw. The line goes to a collector jar that has an additional port that goes to the vacuum pump.
- Apply vacuum.
- It should only take about 8 to 10 pumps or so to get up to over 20 psi and hold.
- Low vacuum is best. Too much and you pull air past the seals and it just looks like the air is never going to quit (because it isn't). 41)
- Open the bleeder (1/4 turn or so) and the air and fluid will pull right through. 42)
- This will still take several tries until you get fluid.
Make sure you keep an eye on the bowl and don't let the fluid get too low or you will start to suck air.
Keep repeating until you on longer see any bubbles in the fluid line into the mightvac.
- Once you get fluid, close bleeder, top off the master cylinder, put cover the back on and try to pump the brake pedal.
- When you get pedal, then bleed manually to ensure that all air has escaped. 45)
- If you apply vacuum and can not build it, then you have a leak somewhere in the system that must be repaired.
| Mighty Vac for sucking brake fluid from the master cylinder and out the bleeder screw. 46) | |
 |  |
Aquarium Pump
You can hook up one of the cheapo aquarium pumps to the brake bleeder. 47)
Setup is pretty straight forward.
The lower volume pump is all you need and they are usually between $10 and 15$ at Walmart or others.
- Install the inlet hose to the bleeder valve.
- Install the outlet hose in a container.
- Remove the M/C top.
- Open the bleeder screw and power on the pump.
- Keep an eye on the fluid level in the master cylinder and don't let it go low.
Binding the Pedal / Lever
- This method relies on time under pressure where the microscopic bubbles migrate up the line to the reservoir.
The master cylinder has to be higher then the caliper and lines to and fro.
This is critical to getting the air up and out of the system.
Then while applying normal light to medium braking pressure on the pedal / lever;
Wrap some tape or rope around it to keep pressure on the system when you let go.
Let it stay like that at least overnight. The next day remove the binding and work the pedal / lever. It will feel firmer than it has ever felt.
By keeping the fluid under extreme pressure over an extended period of time;
It forces the microscopic bubbles to migrate together into large enough bubbles to slowly work it's way up to the master cylinder.
However, this still traps air between the plunger and the master cylinder.
When you remove the binding the next day;
The pedal / lever relaxes the plunger to open the path into the master and allow the trapped air to float into the top of the reservoir.
If you've already tried another method, have brakes but they are soft and don't want to open the bleeder again, this might finish the job.
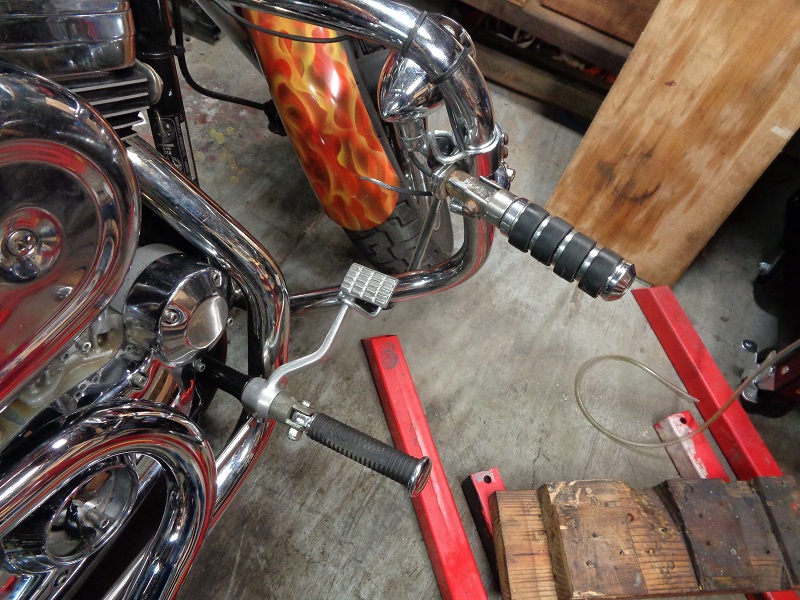
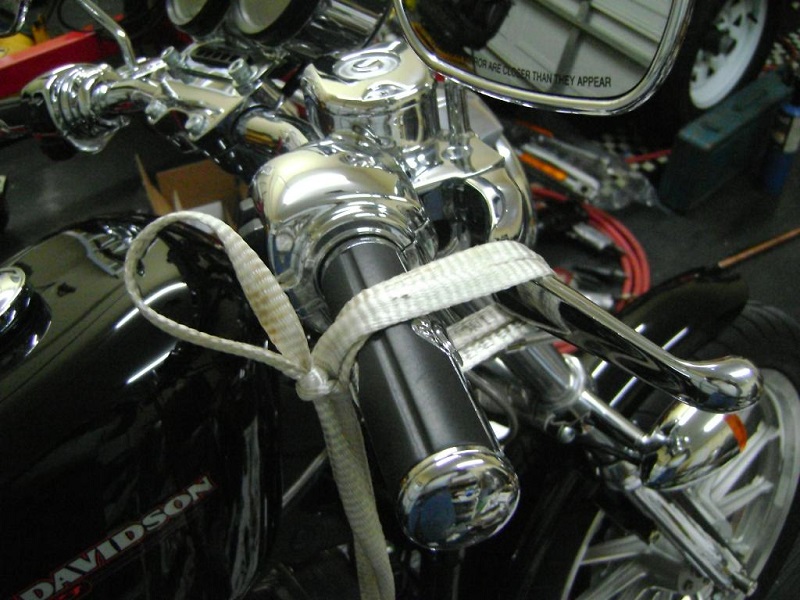
- For the front, tie the brake lever to the grips with tape, a rope, or a zip tie. 48)
- With the bike on the side stand turn the bars so the master is positioned with the banjo bolt head pointing slightly downward. 49)
This puts the tiny feed hole in the master uphill of everything.
- For the rear, the front tire needs to be elevated enough to set the rear master cylinder higher than the caliper / brake lines.
- Either you'll have a firm lever / pedal in the morning or you'll see leaking in the assembly, lines, banjos.etc.
- Or course, if it's still spongy, try it again.
 |
The Tickle and Tap Method
With this method, you leave the bleeder screw closed. 50)
You'd think this wouldn't work as well for the rear with the M/C lower than the caliper. But it is said to work. 51)
Take take the cap off of the master cylinder and flutter the lever.
You barely have to move it back and forth. Just continuously tap it from the front with your hand and you will see air bubbles coming up.
Air should rise through liquid.
Stop every once and a while and tap the line with the handle of a screwdriver to free any stuck air bubbles.
- With the bike on a lift or the jiffy stand, turn the front wheel to the LEFT until the front master cylinder is as close to level as possible. 52)
Squeeze the brake lever as far as you can and note how the brakes feel and how far the lever moves. - Clean the area around the reservoir cap, remove the cap and top off the brake fluid.
Leave the cap off. - Starting at the front caliper, gently rap the brake line with a screwdriver handle or similar tool, working your way up the brake line.
- Now tickle your brake lever. Move it no more that 1/8” or so. 53)
Looking into the reservoir, you will notice a particular point when the air comes up.
(not everytime, but always in the same place in the lever movement)
Sometimes it comes out in very small bubbles. You may have to use a flashlight at first. - When air stops coming out, quickly release the brake lever letting it “snap” against the mechanical stop.
(you should see small bubbles coming out of the small port in the piston bore) - Repeat steps 3 through 5 several times.
The size and quantity of bubbles should decrease. - Slowly squeeze the brake handle as far as you can.
Note brake feel and lever travel and then quickly release the brake lever. - Repeat steps 3 through 7 as necessary.
Repeat this for quite a while until you have 'some' lever.
Then you may need to proceed to bleed as usual afterwards (depending on results). 54) - Top off the master cylinder and install the cover.
Gravity Bleeding
- This takes a while, but it works. Open the bleeders and wait for a steady leak and close the bleed screw. Should be good. 55)
- Try leaving the top off of the master cylinder overnight. Sometimes the air will work itself out over a few hours. 56)
- Tap the line lightly to help move bubbles that may be stuck somewhere in the system. 57)
XLFORUM Bleeding Advice
Patience
- Don't give up
Before bleeding
Before attempting to bleed the lines
- Remove the M/C top, actuate the pedal / lever and make sure you can see a small squirt of fluid in the center to make sure the M/C is working.
- The small squirt of fluid is just a visual that tells you the piston is retracting home as it should when released.
The small fluid (not air) squirt only shows up on initial single push of the lever/pedal, not upon release.
The hole through from the reservoir to the entire brake fluid path is JUST in front of the rubber on the piston.
From that hole, lever/pedal at rest, the entire brake line/fluid path is open to the reservoir up top.
Brake system is now an (open system). - When you press the lever/pedal, the piston in the master is pushed past the hole and the front rubber piston seal closes off the hole to the reservoir.
The entire brake line/fluid path is now closed to the reservoir up top.
Brake system is now a (closed system). - You should be able to see the piston/seal pass back and forth thru the hole in the bottom of the reservoir by actuating the lever/pedal.
- The caliper piston(s) continuously expand/contract in their bore when the pressure from the master cylinder pushes and releases on them.
And when the pads wear, the caliper pistons do not retract as much as when the pads are new.
They gradually take up the space that the now thinner pads leave behind.
So when the caliper doesn't retract it's piston(s) fully, that leaves less fluid in the lines when the master's piston does retract.
The hole in the bottom of the master reservoir adds fluid to the system after it's piston retracts. - If the master cylinder piston is fully retracting (as it should) at rest, you should get a slight spurt of fluid on the next single push of the lever/pedal.
(and only until the rubber seal gets forward of the hole to the reservoir)
If you actuate the lever/pedal repeatedly then you may not be giving the M/C piston time to retract enough to get the squirt. - If the M/C piston doesn't retract home (and past the hole to the reservoir), you will not get the squirt of fluid.
Either you are actuating the lever/pedal too quickly to get the squirt or there is something wrong with the piston/seals.
And you'll need to remove the guts and inspect which usually means to install a new kit.
No disturbance or squirt would result in a dragging brake, decreased pad life and gradual brake energization due to heat buildup. 60)
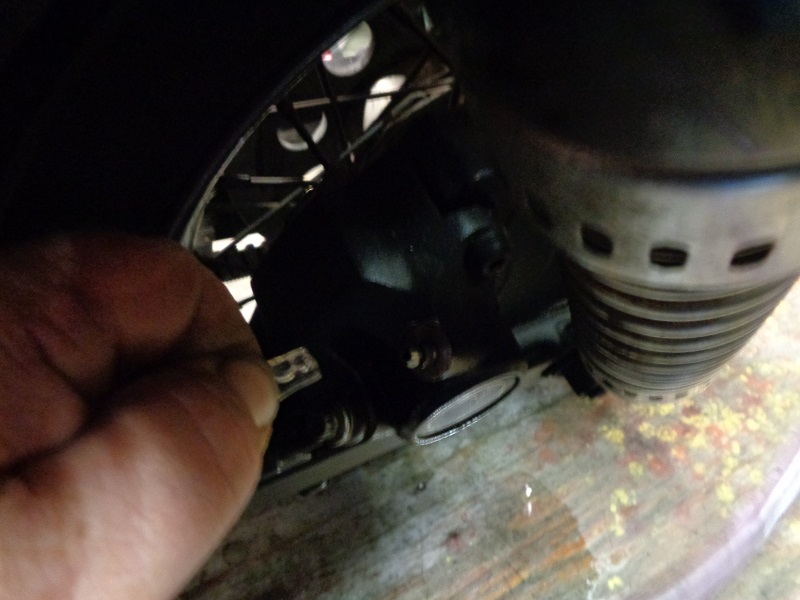
You can verify whether the piston is retracted by carefully running a thin wire (.020“) into the small hole from the reservoir into the cylinder bore.
An interference with the wire would indicate that the cup was covering the hole and inspection of the cause should be made. - Recap:
- Push the lever/pedal and release….once and let go. You should see a small squirt of fluid on the push action.
- You should NOT see a squirt when releasing the lever/pedal, only initial single push instead.
- If you see a geyser of fluid, the rubber cup busted at the piston in the master cylinder and you'll need to install a repair kit. 61)
(to avoid this in the future: open the bleeder when pushing your caliper piston in) - If you don't have a geyser shooting up when pushing the lever, the rubber is doing it's job.
- An occasional air bubble of any size from the squirt indicates air in the brake system and has got to be removed.
- Bleed until there are NO air bubbles.
- Make sure that the system has been thoroughly cleaned/flushed of all old fluid and any debris.
- Fill the system/brake cylinder bowl with the correct fluid.
- Ensure that the relief port is clear of debris.
- Make sure the brake cylinder piston is fully retracted. 62)
- Check the brake pads to ensure they are within spec.
- When you crack the bleeder valve, only turn it a 1/4 turn or so. 63)
Any more and you will get air from around the threads.
Also if you're using a vac, make sure it's not leaking where you attach it to the bleeder nipple.
How the master cylinder transfers fluid
- The downstroke, pushing the pedal / pulling the lever, forces (only) what's in the lines already into the hose. 64)
Releasing the pedal (pedal at rest) is what adds fluid into the lines from the M/C reservoir. - The compensation port (from the reservoir) sits just in front of the main plunger seal.
The lever has to fully retract or the port get's blocked off by the seal. - This is also why you can leave the M/C cap off during bleeding.
The brake lines are shielded from air infiltration from the reservoir with the plunger engaged. - When the plunger is depressed, the system pressurizes and the easiest route out is the compensation port to the reservoir.
(until the plunger pushes past the port)
This is why their is a small spurt in the cup when you press the lever or pedal.
If this turns out to be a gusher, the plunger seals need to be replaced. - Bypassing: a term meaning the seals are old, fluid is bypassing the seal and not pushing the fluid down to the caliper. 65)
Just get a rebuild kit if this is happening.
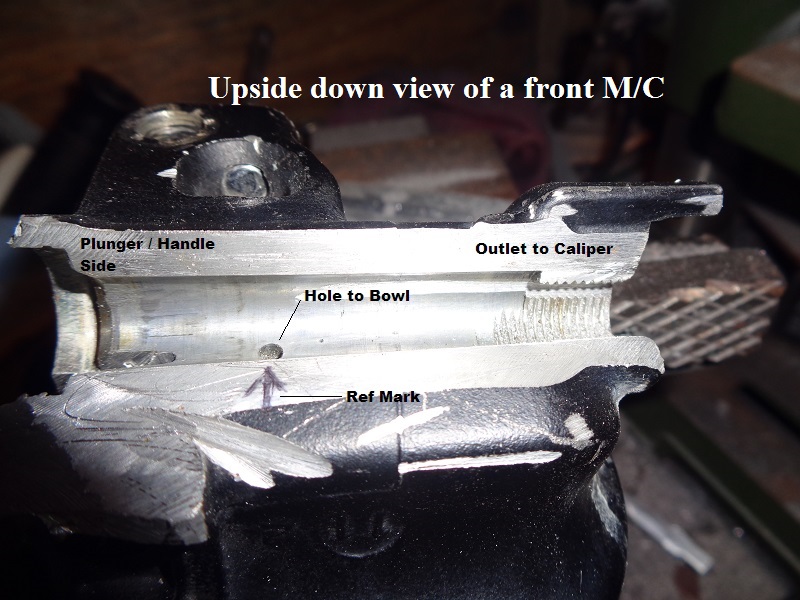
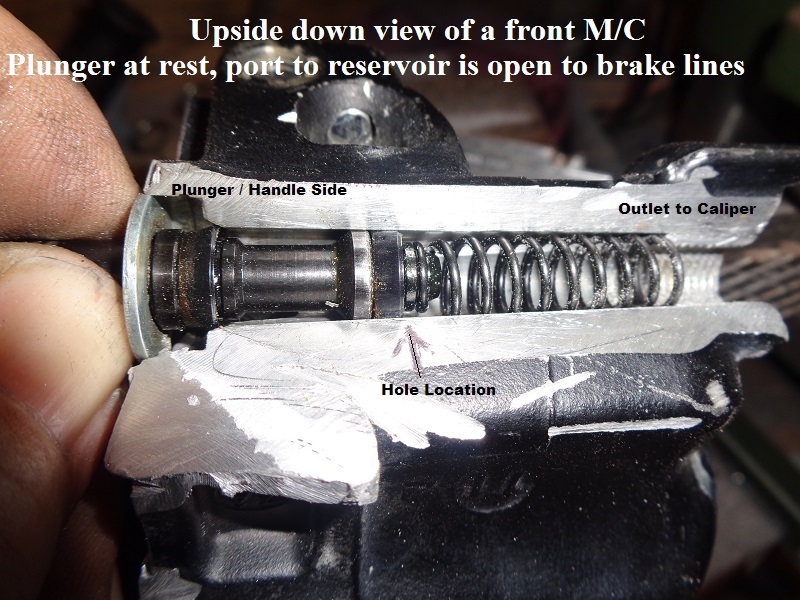
Cutaway showing how the compensation port gives fluid into the system. 66)
Front M/C shown but both front and rear operate the same.
| Plunger removed, port to bowl exposed. | Plunger at rest, brake system is open to M/C | Plunger engaged, brake system is closed to M/C |
 |  |  |
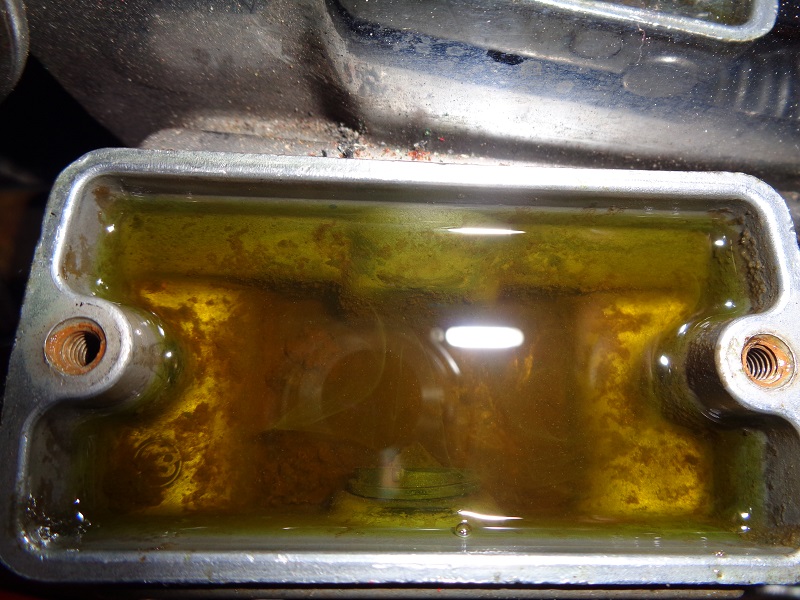
Notes regarding brake fluid
Also reference the Brake Fluid article in the REF section of the Sportsterpedia for type per year model, specs, mixing fluids etc.
- Make sure you do regular brake fluid changes according to the FSM change intervals.
If the bike has sat for a long period of time, it's best to go ahead and plan on changing both front and rear. - Paint peel-ability of different fluids:
- DOT 3,4 & 5.1 can peel the paint on frame and other painted parts.
DOT 5 is silicon based and will not peel the paint.
You can spill DOT 5 brake fluid virtually anywhere and harm nothing. 67)
- Caution:
- Do not mix DOT 5 with (DOT 3,4 or 5.1)
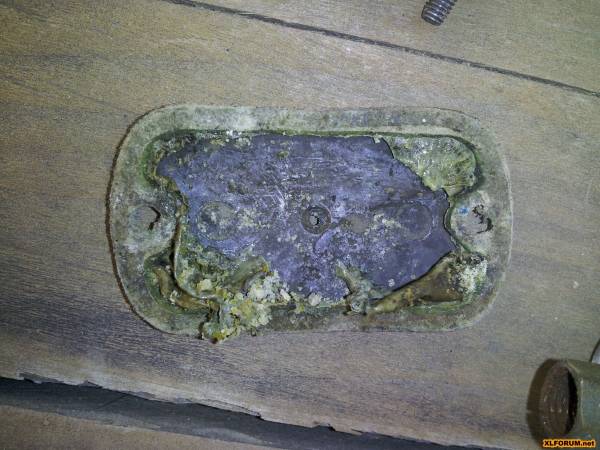
| Note the gooey mess from mixing Dot 5 and Dot 3 fluids. 68) | |
 |  |
- DOT 3,4,and 5.1 can dry up over time:
- Any type brake fluid can break down over time, solids fall out of suspension and clog up orifices.
- However, DOT 3, 4 and 5.1 will mix with water and they will dry up as water does over time.
- Look for corrosion in the aluminum in addition to the goo.
It's caused by the fluid absorbing water when the bikes sit for a long time and or the fluid is not changed for a long time.
Too long and you may find pits in the body of the MC and / or bore pitted beyond being cleanable with a hone. 69)
| Affects of dried up DOT 3 brake fluid. 70) | |
 |  |
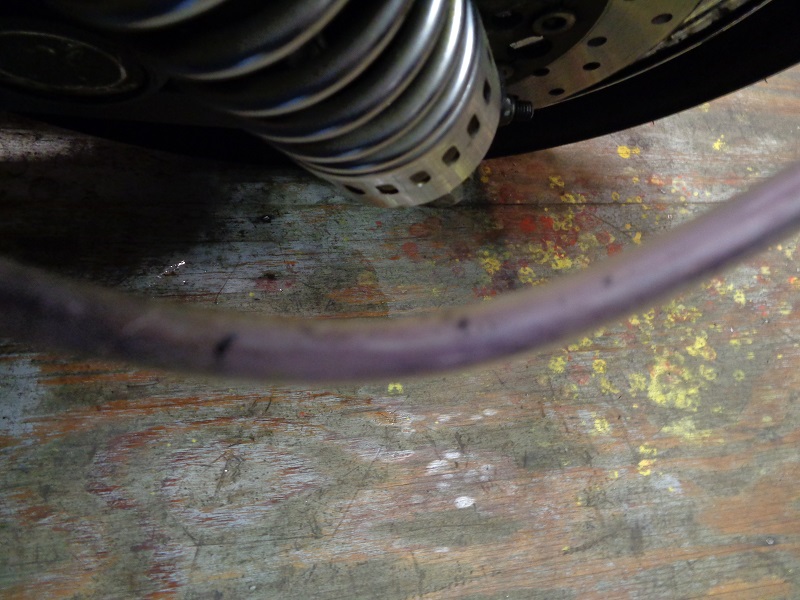
Notes regarding brake lines
- Take the trash out.
Check the M/C, calipers and lines to make sure they are free from debris or sludge.
Old brake fluid will break down and solids will fall out of suspension and block passage ways. - Old rubber brake lines may get weak from the inside.
This can cause them to bulge at the weak spot and not send pressure to the caliper.
It's sort of like a baloon being inflated. 71)
It doesn't do it normally enough to be noticed (but enough to drive you crazy trying to track the problem down).
Just keep an eye on them while actuating the lever / pedal.
Lever / Pedal
- Make sure the piece that hooks up to the actual lever that controls the brake is adjusted correctly.
It makes a considerable difference in the function of the M/C. 72)
Check for leaks
- If you pull the cap off the M/C and the reservoir is very low or dry, that usually points to a leak somewhere. 73)
Possible, even if you could bleed it, there is still a problem that you should take care of.
Before you can build pressure, the system has to be leak free.
(this is especially important when changing lines / components)
Gussers will be obvious. But weeping leaks may be harder to detect in a fast visual scan. - There is no reason to use Teflon tape on any brake connections.
If you want to seal the threads on the bleeder screw (normally unnecessary with conventional bleeding) try greasing the threads first.
Teflon tape can get sucked into and stop up the orifices (especially on flared fittings).
Trapped air
Trapped air that refuses to leave will drive you crazy trying to find it.
- Brake fluid:
- When DOT 3, 4 or 5.1 fluids trap air, the smaller bubbles can migrate and come together to form bigger bubbles that are fairly easy to remove. 74)
- When DOT 5 fluid traps air, the bubbles have some difficulty migrating, so the bubbles tend to be smaller and there are more of them.
Also, when you pressurize a DOT 5 brake system that has trapped air and then let the pressure off;
The DOT 5 fluid tends to break the original bubbles into even smaller and smaller bubbles.
What you end up with is a brake fluid that has lots of microscopic air bubbles and your brakes feel spongy.
DOT 5 holds stupid amounts of air and you'll get no lever until its out (or at least most of it). 75)
You may find that re-bleeding the caliper every couple of days will eventually get you a hard pedal for awhile. 76)
- Calipers.
Sometimes small air bubbles get stuck in the caliper.- Try removing the caliper (M/C cap off) and pressing in the piston which will force fluid / air up into the master. 77)
- You can also reduce the volume needed to fill the system, temporarily, by chocking the pads in the retracted position. 78)
It takes less fluid with no movement of the pads and will take out any surge issues.
Once you get a hard feel, unblock the pads and then pump out while keeping the master full.
It may help if you vacuum the fluid up from the caliper.
Another way is to just let it sit overnight since the fluid will seek its own level.
- Brake lines.
- Master cylinder.
Bleeder Screw Issues
Before you strip the bleeder screw head:
Helpful wrench advice:
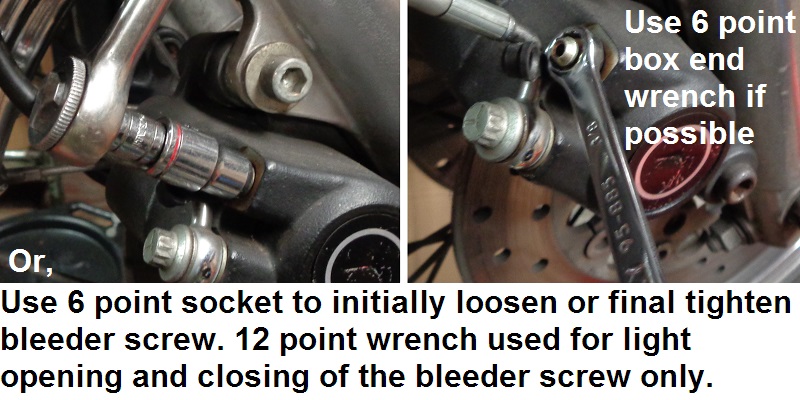
- Do not use an open ended wrench on the bleeder nipple 79) (unless it has already been stripped).
Use a 6 pointed box end or socket to match the 6 pointed head, 12 point wrench to 12 point head.
A 12 point wrench slips too easy and will most likely end up rounding off the corners.
That tiny bleed nipple will shear off real easy.- Tap the nipple straight on a few times with a flat punch to jar it loose.
- If you have can't access a 6 point wrench, use a 6 point socket to break the screw loose and lightly snug it back with the wrench.
Then you can open and close the bleeder as you need to with the wrench.- On small bolts and nipples like bleed nipples, ALWAYS, ALWAYS, ALWAYS open them by hitting the wrench with a small hammer or like tool.
Metal to metal tapping, too - not a deadblow plastic mallet. You need that sharp impact to break loose the small bolt or fitting; Us gorilla wrenchers can shear a fitting thru constant pressure right quick. 80)
- A stripped bleeder screw can happen when the wrong size / type wrench is used on the bleeder screw and / or too much torque was applied.
Next to come out of the toolbox is usually the vise-grip pliers.
This works sometimes but, when it doesn't, it will round off the rest of the hex head or break the screw in half. - You can also use a flare nut wrench. 81)
It looks just like a standard box end wrench except the box is slotted so you can get the wrench on brake fitting flare nuts. - You can keep a junk ratchet in the box for just such an occasion. Sure - you can get a little breaker bar.
But on delicate, often tight space work, a chinese disposable ratchet comes in handy! 82) - Once you're done, tighten the bleeder with the socket to 80-100 in/lbs.
The FSM reads 80-100 ft/lbs….. this is wrong.
After you strip the head.
Removing a stripped or worn down hex head on the bleeder valve:
- You can use a Dremil tool with the metal cutting blade or even a small file and cut / form a flat on two opposite sides of the screw.
The heat generated will help and you can then use an open end wrench to remove the bleeder screw.
Then, of course, replace the bleeder with a new one. - You can also remove the caliper and carefully placed it in my bench vice to get a better grip on the bleeder screw. 83)
Then use vice grips on the bleeder or cut 2 flats on it to remove the bleeder.
Clean the hole out with a brush / canned air and replace with a new bleeder screw.
Broken off Bleeder Valve:
Brake fluid holds some moisture and can cause the screw to rust. 86)
Before doing any type removal of a broken off bleeder valve, it's best to remove the caliper.
That way, you don't introduce contaminates into the brake system.
Some come easy, some take a few tries. If it's a steel screw completely seized by corrosion to an aluminum caliper, it's not coming out without the aluminum threads too. 87)
- Possible fixes without removing the caliper:
- The valve already has a hole in it so you can try inserting an Easy-Out thread extractor to remove it.
Careful as it takes no force at all to snap them off and they are hard to drill. 88)
Otherwise drill the hole a little bigger and try a bigger Easy-Out. - Leave the bleeder alone. 89)
You can bleed fluid and air by slackening off the pipe fitting nut where the brake line screws into the caliper.
Loosen it as you squeeze the lever, tighten it before letting the lever go.
It's messy, but Harleys using DOT 5 fluid won't strip the paint.
Do it over the lawn or over an old newspaper and then wash down with soapy water when done.
The old broken nipple is not going to come loose . That is why it broke in the first place.
And all the air comes out the brake line connection as long as it's the highest point on the caliper.
And, you wont have to rebuild the caliper that way.
- Possible fixes by removing the caliper (and afterwards, replacing the seals):
Heat and / or lubricants (especially WD-40) can destroy the seals.- Spray the remains of the valve with penetrating lube, let it set a bit, then use an Easy-Out to remove the remaining piece. 90)
- Stop if it slips, and go back to soaking. 91)
Don't make your mission to get it out in one day.
Use a straight penetrating fluid, not penetrating fluid/lubricant. The lubricant will help the removal tool slip, as well.
- Remove the caliper, strip it completely and drill to the largest diameter possible without getting into the threads. 92)
Be careful not to drill through the seat. Lightly tap an easy out into the drilling, remove the easy out (don't try to remove the piece just yet).
Put heat directly on the bleeder until it just starts to glow red (the heat will travel quickly into the aluminum).
Invert a can of air and spray to quickly cool the bleeder (the heat will remain in the aluminum so you have to do the next part quickly).
Insert the easy out, give it a “light tap” and turn out the piece. - You could drill it and use 2 small picks to pick out the old bleeder threads. 93)
- After drilling to the maximum size without getting into the threads, install a 1/32” bur on a Dremel tool. 94)
Take the remainder down to the threads in two spots 180 degrees from each other.
Use a pick to remove the leftover pieces of the bleeder (this is very tedious and time consuming).
- You could also try a left handed drill bit. 95) The heat generated and the (unthreading) motion may loosen it.
However, if you drill it, you'll need to completely disassemble the caliper to remove the swarf. 96)
If you ruin the threads, they make an 1/8“ pipe thread adapter which has a bleeder screw in it. - Heat the caliper with a propane torch and try to unscrew the nipple with vice grips or drill it out with a left handed drill bit. 97)
The caliper is aluminum so it will expand and loosen the grip on the nipple. - If you've got a wire feed welder, dismantle the M/C, get a thin jam nut and plug weld it to what's left of the bleeder. 98)
Let it cool a bit and unscrew the nut (and bleeder). Install a caliper rebuild kit and a new bleeder.- Per Maxeffort, the heat and then cooling help. The heat is localized and quick, it won't hurt the caliper.
That's part of why it works, the broke bolt gets hot, expands, then contracts against the cooler casting. (One might protect the rubber from weld splatter). 99)
So whether to rebuild the caliper depends on the one doing the work. And as always, if it works, it works.
- Or you can just search for a new or used caliper.
Stripped bleeder threads:
- You can use a “Brake bleeder repair kit” if the actual threads in the caliper are bad. 100)
You can get the kit at most auto parts stores.
Try a search for Dorman (13915) Bleeder Screw Repair Kit for 1/4" to 7/16" or 7mm to 10mm Screws
You will need to drill out the hole and tap for the new threads. - Here is another link: Harley FX FXE SPORTY front brake caliper bleeder repair kit
1/8” clearance in the caliper wall is all that's required.
Drill out bleeder hole to 25/64“ diameter and 3/4” deep.
Tap with a bottoming tap 7/16“x20 (at least 10 threads).
Remove the chips.
Damaged Bleeder Screw Seat:

- The torque for the bleeder screw is only 80-110 in/lbs.
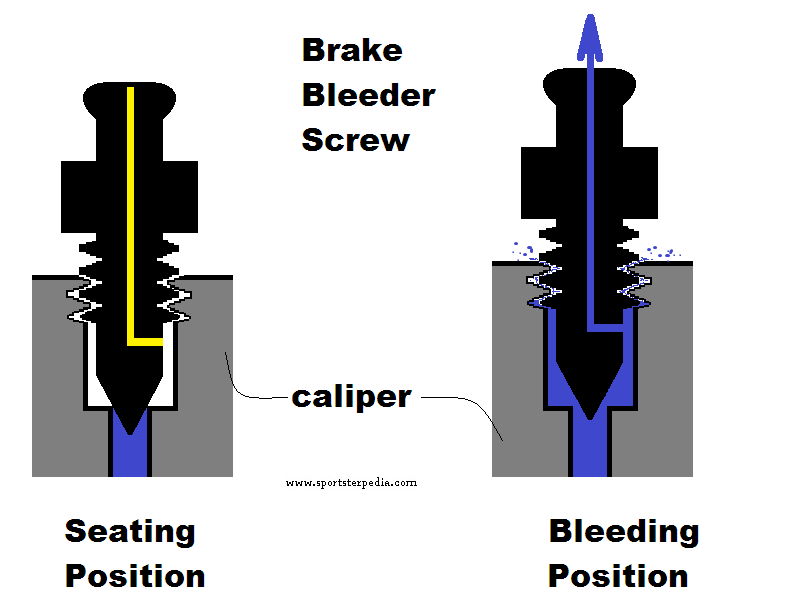
The bleeder screw has a tapered end that sits down into the fluid passage hole to stop the flow.
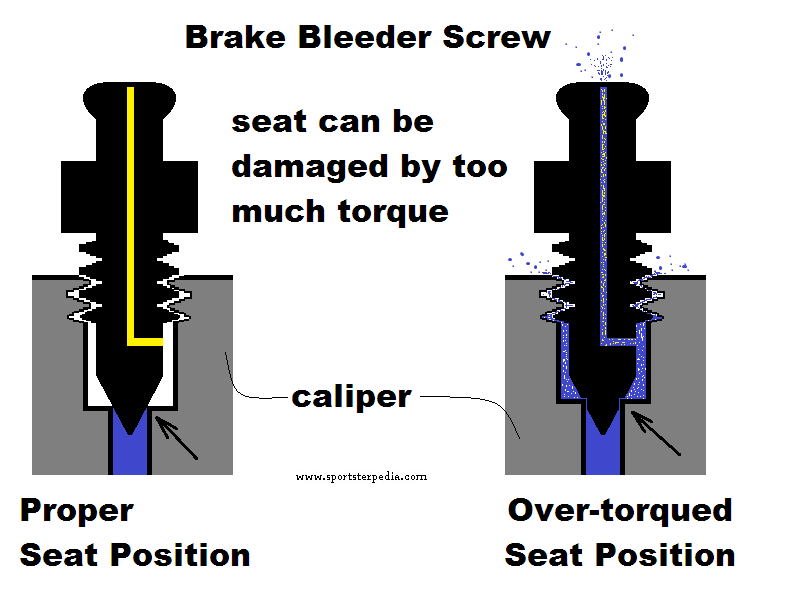
If too much force is used to tighten the screw, the taper is forced harder against the hole seat.
This will mash the sides of the taper, forming a circle indention into it (cutting a circle pattern in the taper).
Then, the screw will no longer go past the circle indention when tightening and future bleeding will distort the end even more.
The indention will now act like a washer that is not perfectly flush all the way around.
(and quite possibly show up as a high pressure leak).
So you can bleed the system completely of air, then feel them get spongy going down the road as you put more pressure on the now deformed screw taper. - If the taper is deformed, you can try to simply replace the bleeder screw.
However, the hole the screw sits in can also be damaged/deformed with too much torque applied to the screw.
If a new bleeder screw doesn't work;- You can try honing the hole end in the caliper with a spare bleeder screw with a good taper.
First you'll need to grind the threads off so you can insert the screw in the hole.
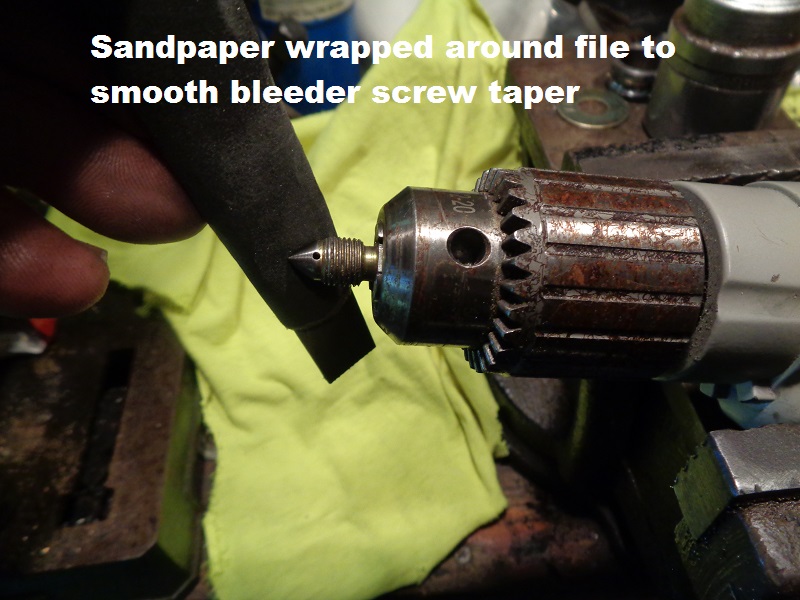
Attach the screw to a drill and spin the taper into the hole to hone the edges and recondition it for a new bleeder screw. - Or, you can put the old screw in a drill, hold the drill in a bench vise and re-cut the angle of the taper.
This changes the taper seat point in the hole and doesn't require messing with the caliper.
This works best with a drill motor with a lock that allows you to turn on the drill and take your hands off of it.
(giving you two hands to work with the screw)
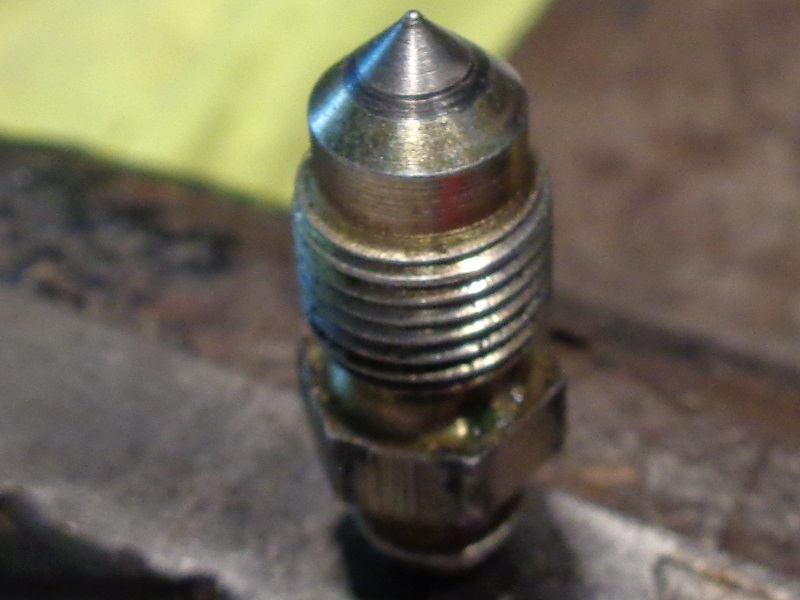
Use a file to reshape the taper with the drill running working from just below the fluid inlet hole toward the tip.
Once you get the shape right (with the bad circle area removed in the taper), use app. 400 grit sandpaper to smooth where you have cut.
Clean it up with solvent, brake cleaner etc. and install it.
The taper on the bleeder screw below was reshaped with a file and smoothed with 220 grit sandpaper wrapped around a file.


Attaching a hose to the bleeder valve
- Sizes:
- The I.D. needs to be smaller than the mouth of the bleeder screw so you can install it tight on the bleeder.
- A 5/16” hose will work but 1/4“ works better.
1/4” is harder to get on but it won't slip off (as easily). 108) - Tygon R-3603 PVC tubing (3/16“ I.D.) works good also but it may be harder to come by.
The wall is thick and it holds tight. - All else fails, take your bleeder screw off and take it with you to a hardware store to size the hose to fit.
- Color:
- Clear PVC hose works good (available at most hardware stores) and with it, you can see debris and air bubbles escaping.
Although any color will do. - In watching the air bubbles through a clear tube while pumping the brakes with the bleeder valve opened;
You will see force both push and pull the air.
General rule of thumb should be to push hard, release slow.
You push more air farther towards the outlet point when the force is faster.
When bleeding at the calipers, the tubing installed on the bleeder screw should be higher than the caliper to allow air to 'want' to go there.
Releasing the force (lever or pedal) fast will allow the air to suck back towards the master cylinder at the same speed it was forced out.
Releasing at a slow rate will allow more fluid than air to return by the time the lever / pedal stops home. 109)
- Attachment:
- The hose I.D. should be smaller than the O.D. of the bleeder screw head so it fits tight once installed.
Pressed on with your fingers, it should not easily come off.
However, unless it is fastened on, any hose will come off when pulled on. - You can also put a zip tie over the hose / bleeder just tight enough to keep it on the bleeder if needed. 110)
- When attaching a piece of hose to the bleed valve on the caliper, place a box wrench on the bleeder first.
Then put the hose over it on the valve. 111)
- Length:
- About 3-4 feet should do. You just need it to be taller than the caliper and where you can see it while pumping the pedal / lever. 112)
- You may find the more length you have, the more versatility you have when using several bleeding methods.
It wouldn't hurt to buy a 10 feet or more roll of tubing. It gives you more options.
- Considerations:
- The hose can easily slip off the bleeder if it's not tight enough or if it's pulled on.
- Bleeding into a cup can waste more fluid than gravity bleeding.
- The threads between the bleeder and caliper can allow atmosphere to enter them which can be sucked up into the hose.
You can actually close the bleeder, then add a little fluid in the hose near the bleeder, apply suction on the hose and watch bubbles appear in the hose.
This can trick you into thinking the air is coming from the brake system.
You can hold the bleeder tight against the threads and shut off air infiltration from the atmosphere.
You can remove the bleeder screw and apply a little grease around the threads to help stop outside air infiltration.
Some have used plumber's thread tape to seal the threads and keep out air.
However, if not done properly, small fragments of the tape can break off and enter the caliper/brake system and stop up orifices.
Some have also used pipe thread dressing (pipe dope) to seal the threads.
Use this sparingly as pipe dope will stay solid to milky thick if it is allowed to fall into the caliper.

Where to buy syringes
A syringe can be used to reverse bleed from the bleeder valve to the caliper.
The syringes needed are the big ones (not an injection syringe as you'd normally see used in medical applications).
A 60 ml (2 oz) syringe is just the right size. That is about the amount that will fill the master cylinder and the line. 114)
- Sources for syringes:
- You can buy the 60 ml irrigation syringe at any drug store, especially one specializing in home medical products. 115)
- An irrigation syringe from your local pharmacy. 116)
- A mustard or ketchup squirt bottle. 117)
- A big ole horse syringe from a veterinarian supply store. 118)
- Bird supply shops sell a variety of syringes that are used for hand feeding newborns. 119)
- Tractor Supply (or other farm implement stores). 120)
Leave the calipers on
- Rumor has it to take the calipers off to bleed the brakes.
There is no reason to do this unless you have a defective master cylinder.
Bleeding the lines with the calipers on is the best way to accomplish the chore and to keep from inducing more air or damage to the brake system.
Below are some good examples of this.
Bench bleeding a new master cylinder
- On a new master cylinder (or one that has been removed from the bike);
You can bench bleed it to purge the air out of the master cylinder before installing it onto your brake system. 121)- Hook up a short temporary line to it and leave the other end open.
- That open end is routed (must be clean) into the fluid in the master cylinder reservoir (in the fluid, not above).
- Then actuate the master cylinder until fluid starts pumping, and no more bubbles appear.
- Once this process is done, install the M/C, hook up your actual brake lines and continue bleeding at the caliper bleed screw.
Master cylinder issues
- Note:
- Bleeding air out of a Sporty master cylinder can be a frustrating task.
- Before suspecting the master cylinder, make sure you've exhausted your bleeding options before rebuilding the M/C for no reason.
- While fresh seals is never a bad idea;
- There has been a number of unnecessary rebuilds.
(when the rebuild simply allowed time or convenience for the air to be expelled).
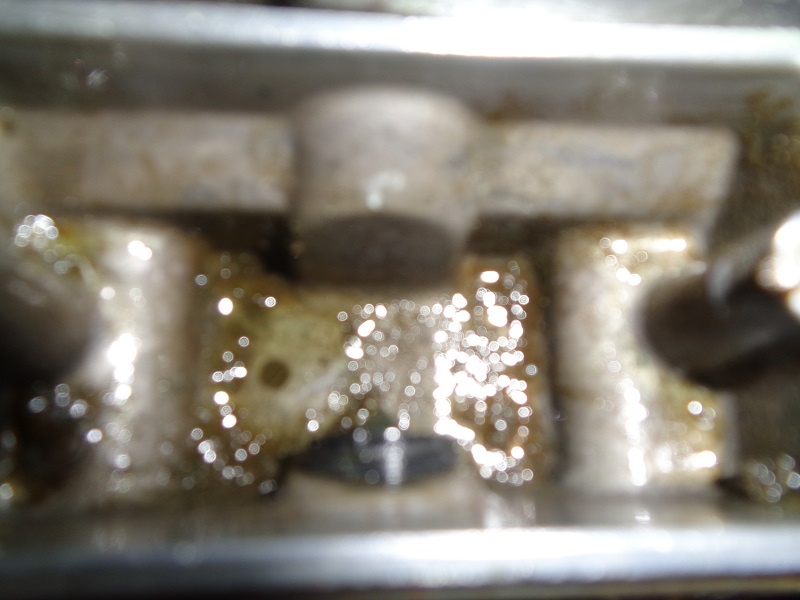
- Clean the hole(s) in the bottom of the master cylinder:
- The transfer hole(s) can get clogged from debris or solids that drop out of suspension in the fluid itself.
Clear them with a pin, a bristle from a wire brush, welding tip cleaner or other or the master cylinder will not transfer fluid properly. - The holes can be plugged up solid yet still look like there is nothing in them. 122)
- If none of the methods below work for you;
You may either have a leaking compression fitting,
The cup in the master cylinder is blown out,
Or the big O-ring in the caliper is not sealing against the piston.
Those are the only three places for air to enter the system. 123) - If it is a brand new master cylinder and it is not squirting hard when you have the hose disconnected,
You might have a faulty Taiwan Trash master cylinder. 124)
If none of the bleeding suggestions below work, try putting your old master cylinder back on.
Sometimes, you'll end up with a new aftermarket master cylinder that doesn't work.
The seals have been known to be jammed in cockeyed from the manufacturer. - A plugged or covered relief port can cause brake drag or locking of the brakes.
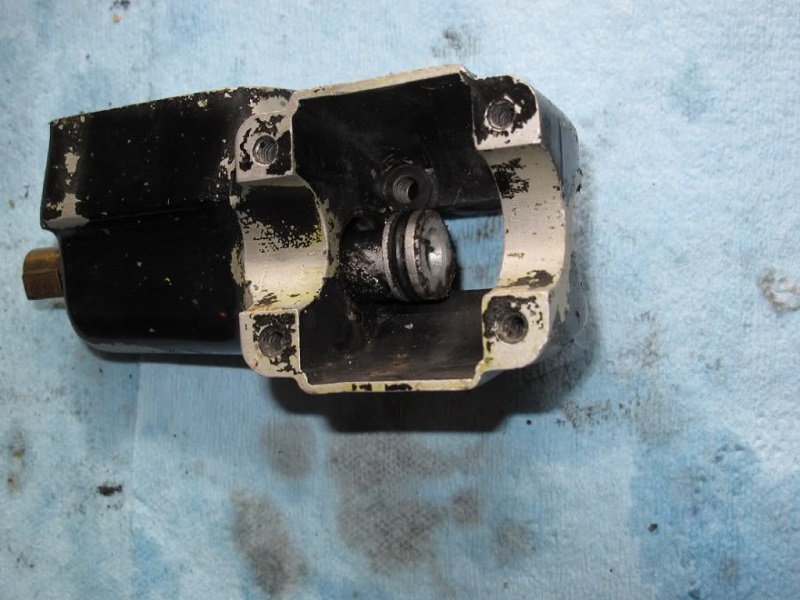
- The 04-up rear master cylinder is well noted for a split primary cup. 125)
- It seems to regularly rear it's ugly head when you replace the rear tire or compressing the rear caliper piston, but there is no connection. 126) 127)
- What seems to happen is that the primary cup gets torn in the center and it manages to still work as long as the MC is not disturbed much.
(since it is backed up with that flat metal plunger which helps it seal even though broken) - Symptoms include:
- Loss of brake pressure and then it's regained as you ride. 128)
Or, you may 'feel' something different with the brake pedal but the brakes may still function just fine. 129)
Another account:
“Felt like there was air in the system, but a few pumps on the pedal and I could ride for a day or two until the pedal got low again”. 130) - Spongy brake pedal. 131)
- Complete loss of brake pressure not to be regained.
- Can not bleed the system no matter which method used.
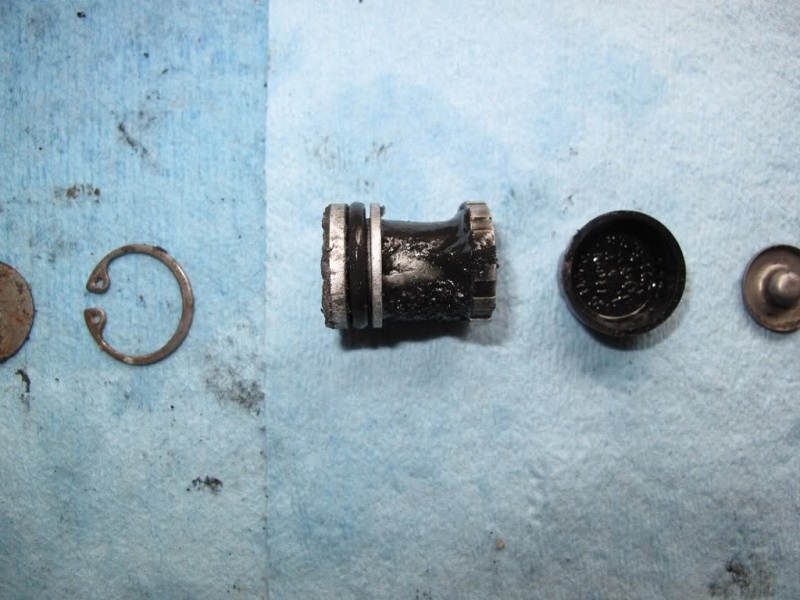
- The new cup has a tit on it that goes into the center hole of the washer that is welded to the end of that spring.
When the parts are new the problem doesn't seem evident.
But if you take the broken cup and the spring/washer and hold them together on the bench,
You will see that the washer can slide sideways quite a bit within the center of the primary cup.
The tapered spring may try to cock some every time the pedal is pressed causing it to work against that tit until it breaks it off.
(and leaves a split across the cup)
The better cure may be to put a larger washer on the end of the spring so that it will not keep fighting the tit for centering. - Then they are a bit of a pain to bleed, but with a broken cup they won't bleed anyway.
Bleeding is the other problem, and the big loop in the brake line is a possible cause for this (trap for air).
Also, some have said that the return hole in the MC is too small.
But, enlarging it is risky unless you can make sure that there is no burr left to hurt the new cup. - If, after tying back the rear brake lever (and everything else you are trying), the brakes do not pump up correctly,
then just get the rebuild kit and follow the instructions. - It's quick, simple, easy, and if that cup is split you will never get it to bleed correctly regardless which method you try.
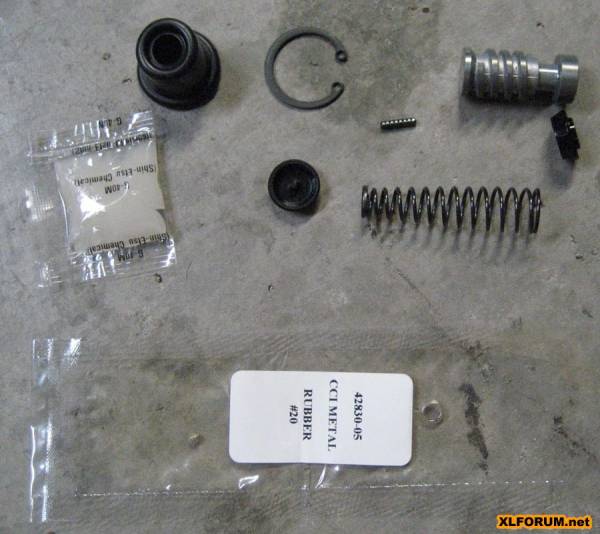
- The rebuild is an extremely easy job as long as you have a good set of retaining ring pliers.
If you loose the retaining ring that holds the master cylinder plunger to the bell crank, it is a 1/4”. 132)

| More pics of the 04+ split primary cup issue. 135) | ||
 |  |  |