Table of Contents
This is an old revision of the document!

EVO: Oiling & Lubrication
Trans/Primary Oiling
Click here for primary oil change intervals and capacities in the REF section of the Sportsterpedia.
Checking Primary Oil Level
If the motorcycle has been operated recently, wait app. 10 minutes before checking the primary oil to allow the oil to settle in the case.
Park the motorcycle on a level surface and stand it upright (use an assistant, a lift etc.)
…Do not check primary oil level with the bike on it's side stand…
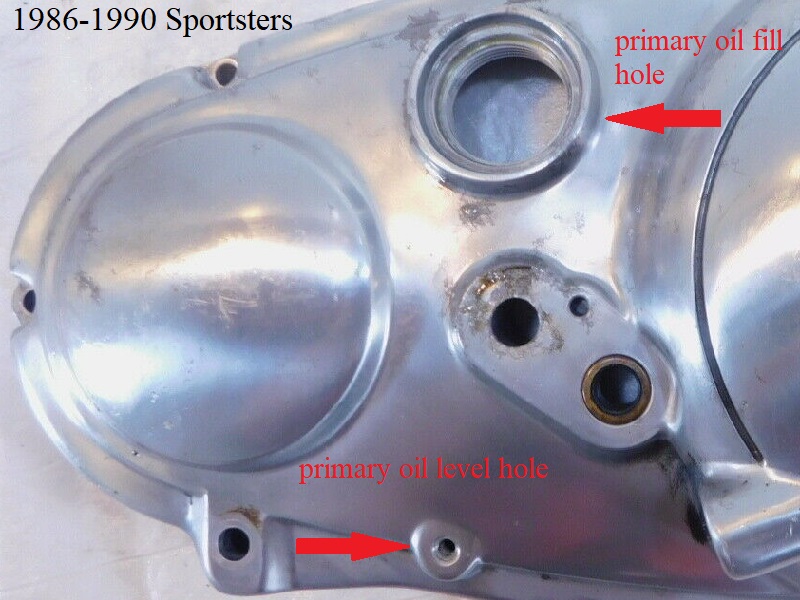
- On the 1986-1990 models, the oil level screw (stock is Philips-head) is located on the side of the primary cover, forward from the clutch cable mount and below the shifter lever. Oil should seep (not pour) from the hole, bike upright, with the oil level screw removed. If not, proper oil level is achieved by removing the primary chain inspection cover and slowly filling the primary with oil until it pours out the oil level hole. When it's just seeping from that hole, replace the oil level screw and the inspection cover. The Oil Drain Plug is located on the lower/rear of the left-side engine case.
- Torque Specs:
Inspection cover screws (9-14 ft/lbs)
Oil level screw (snug plus a nudge since there is no spec in the FSM)
Drain plug (14-21 ft/lbs) or (19-28 Nm)
- On the 1991-1993 models, the oil level bolt is located at the rear of left engine case, rearward of the oil drain plug. Oil should seep (not pour) from the hole with the oil level screw removed. If not, proper oil level is achieved by removing the primary chain inspection cover and slowly filling the primary with oil until it pours out the oil level hole. When it's just seeping from there, replace the screw and the inspection cover. The Oil Drain Plug is located on the lower/rear of the engine case.
- Torque Specs:
Oil level screw (90-110 in/lbs)
Inspection cover screws: (40-60 in/lbs) or (4.5-6.8 Nm)
Drain plug (14-21 ft/lbs) or (19-28 Nm)
- On the 1994-2003 models, there is no oil level site hole and the clutch inspection cover (Derby Cover) is removed to check primary oil level. The proper level of oil, is when the oil level is just at the bottom edge of the clutch diaphragm spring. The Oil Drain Plug is located on the lower/rear of the left-side engine case.
- Note that for 1994-later, the manual says “Verify that lubricant level is even with bottom of clutch diaphragm spring.” Not higher or lower, but even with the diaphragm spring. It also includes this warning: “Do not overill the primary chaincase with lubricant. Overfilling may cause rough clutch engagement and incomplete disengagement (or clutch drag).”
- Torque Specs:
Inspection cover screw, torque in a crosswise pattern (7-9 ft/lbs)
Drain plug (14-21 ft/lbs) or (19-28 Nm)
- On the 2004-2017 models, the clutch inspection cover (Derby Cover) is removed. The proper level of oil, when the bike is upright, NOT ON THE SIDE STAND (you'll need a helper or a lift), is when the oil level is just at the bottom edge of the clutch diaphragm spring. The Oil Drain Plug was moved to the lower/rear of the Primary Cover. If the oil level is too low, you may add oil through the clutch inspection cover to raise it to the specified level. Oil quantity needed for a typical oil change (after the bike is warmed to operating temperature and then allowed to slightly cool) is between 28oz and 32oz.
Pics
Click on a pic to enlarge:
| 1986-1990 Sportster primary/transmission oil site level and fill holes 1) | 1986-1990 primary drain plug 2) |
 |  |

Primary / Transmission Vent
Click here to diagnose leaks from the vent hose.
The transmission vent line vents windage from the primary/trans compartment generated by the motor sprocket and transmission gears.
Both the primary and transmission compartments share the same oil and air space. So venting from either areas vents both compartments.
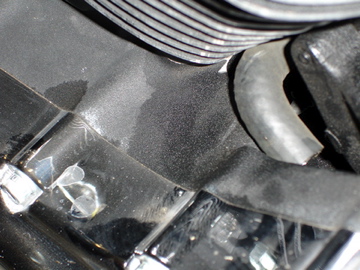
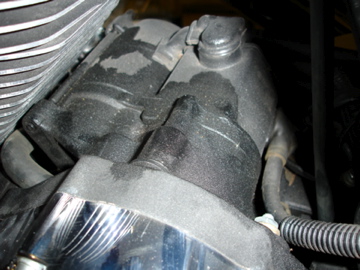
There is a hose fitting on the back of the motor behind the rear cylinder (horizontal fitting under the starter on 2000-2003 only models).
A rubber hose is attached to the fitting on the motor and the other end is not attached to anything (open ended).
Normally it just vents air. However, there may be condensation from the primary misting into and out of the hose.
It may have a little fine oil mist mixed with it but shouldn't be much if any.
The oil level in the primary should never get high enough to be purged out the vent hose.
If it does, the main concern is usually a bad main sprocket shaft seal. That seal is between the engine oil and primary oil behind the engine sprocket.
If it fails, engine oil mist and crankcase pressure can enter the primary compartment and mix with primary oil.
This raises the oil level in the primary (lowers oil level in the oil tank) and shoots higher oil concentration out the trans vent.
In routing the trans vent, make sure there are no tight loops or kinks in the line, else the primary can't breath as it should.
In general, the higher you can get the hose to run from the fitting on the motor, the more any oil mist / droplets have a chance to separate from air.
If the oil separates on the vertical run BEFORE the hose loops down, it will fall back into the tranny/primary compartment.
If the oil separates (or not) AFTER the hose loops back down, you'll end up with an apparent leak or drip from the hose.
1986-1990 Vent
Hose and fitting:
Both the primary and tranny compartments vent through the one fitting on the top rear of engine behind the rear cylinder.
The fitting (63547-86) for the vent hose is a 1/8“-27 NPT x 1/4” hose barb 75° elbow.
That's to say it's a 90° fitting that has been factory heated and “skewed” to 70°.
An unspecified length of 1/4“ reinforced rubber hose is attached to the fitting with a hose clamp.
Vent hose routing:
The vent line is run out “open ended” and not attached to anything on the other side.
It appears there was a change in routing of the transmission vent line between 1986 and 1988.
The 1986 FSM has an oil hose routing illustration showing the vent hose running slightly upward from engine and looping down behind the seat posts.
The 1988 and 1990 FSMs show a change in routing with the hose running up from the engine, over the top of and looping down the back of oil tank.
The design change adds a longer vertical run between the motor and the loop in the hose where it heads back down.
| 1986-1990 Transmission Vent Fitting 7) |
1991-1999 Vent
Vent hose and fitting:
Both the primary and tranny compartments vent through the one fitting on the top rear of engine behind the rear cylinder.
The fitting (63547-89) for the vent hose is a 3/8” tube pressed into the case with a hose bibb on the outside end.
An unspecified length of 3/8“ reinforced rubber hose is attached to the fitting with a hose clamp.
Vent hose routing:
The vent line is run out “open ended” and not attached to anything on the other side.
There is no mention of the transmission vent in the 1991-1999 FSMs. Furthermore, there is no illustration showing routing of the vent hose.
However, there is an accepted method of running the hose from the XLForum that serves the purpose well.
With the object being a fully open path without kinking the hose;
The vent hose is raised up high under the seat, behind the battery box with a wide loop down toward the center of the seat downtubes.
Make sure the you manage a wide loop that will not eventually close the ID of the hose.
The hose is then left hanging low (tied off). Some run the hose end down behind the swingarm.
Some run the hose out past the center of the seat tubes, wedging it between the center rear tube and an adjacent L or R outside tube as in the pic below.
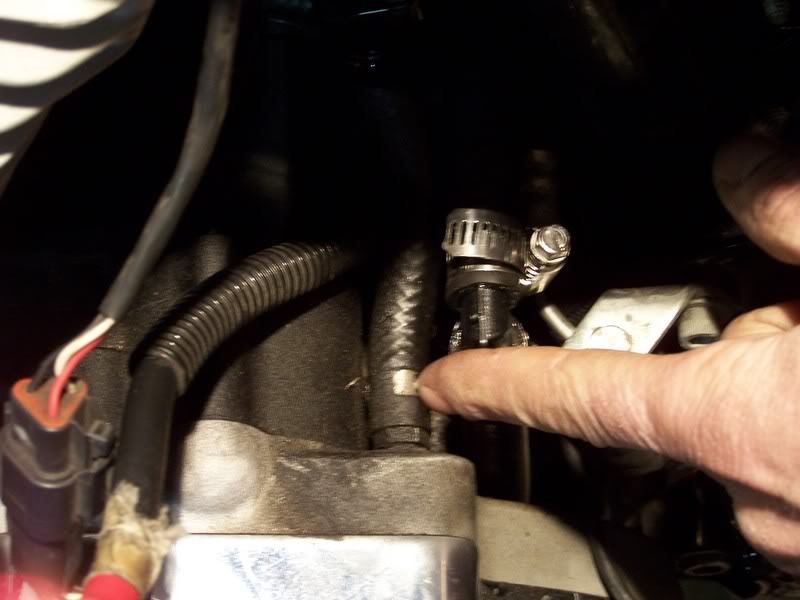
| 1991-1999 Transmission Vent Fitting 8) |
| 1998 transmission vent hose. 9) | ||
2000-2003 Vent
Routing the vent hose:
Click Here to download Service Bulletin M-1103, issued on 7-28-2000, regarding a change to the trans vent hose routing.
Route the vent hose behind the front battery bracket, then up and outboard of the frame tube.
| 2000-2003 Primary Vent Fitting 10) |
| 2000 transmission vent hose. 11) | |
 |  |