Table of Contents
This is an old revision of the document!

REF: General-MSR 02
Reading Spark Plugs
This article is a compilation of threads on the Xlforum.
As such, there are several different methods to the same end listed.
As you read up on the various methods, you will find that some are geared to drag racing and are only concerned with idle and WOT. 1)
After filtering through all the methods, consider the riding style of the bike you're tuning.
As a daily driver, tuning geared to circle track or road racing for your primary method may be best if you want your bike to work through all RPM ranges.
And circle track methods do not skimp on reading WOT.
It takes some time and experience before you will be confident reading spark plugs. 2)
But once you master any plug reading method, it is a window into the engine that is invaluable in tuning.
Note that for a Sportster, it is quite normal for the front plug to look lighter/leaner than the rear.
When tuning, aim for the tuning that gives as close to the ideal base ring color / coverage possible for both plugs.
The difference is due to variations in the air cooling, turbulence in the manifold and differences in exhaust lengths. 3)
The plugs are read the same way regardless of which throttle position / fuel circuit provided the reading. 4)
Any carb must be jetted properly at full throttle.
But the secret to getting a carb Sporty to run well is getting all 3 throttle positions / fuel circuits correct.
And then fine tune the transitions between them so the engine runs smooth everywhere in the throttle / rpm range.
- Start with new, or extremely clean recently new plugs.
- The best readings are taken by running the vehicle at sustained speeds in the range that you are checking.
(I.E., “Wide Open”, Mid Range”, “At or near Idle”)
Then disengaging the clutch, killing the engine cleanly, and coasting to a stop. - Overall readings can still be taken without a clean kill and stop, even without new plugs.
This is still very accurate, and one of the best tune up tools you have.
Just make sure that you have good plugs and by keeping an eye on them as you make changes you can read the effect that the changes made.
This just requires a mental track record or a written one.
Where to read them
- Heat range and timing:
- The porcelain is used for reading plug heat range, and timing only.
- Never try to read fuel mixture off the porcelain.
- Air / fuel mixture:
- The inner wall of the metal shell extending down to where that meets the porcelain is where you read the mixture.
Engine problems such as oil consumption, etc. are read by going back to your manual.
We are only concerned with a good sound engine for fine tuning purposes.
How to Read Them
Reading Ignition Timing
Using the porcelain
- Timing that has too much advance will show as black flecks on the porcelain. 5)
- These are flecks of aluminum off the piston due to detonation.
- Even a good running engine will show signs of minor detonation, but keep an eye on those flecks.
- If they get bigger and more of them, it’s time to look seriously at the timing.
Using the Ground Strap
Ignition timing is directly responsible for the heat in the combustion chamber. 6)
(and therefore the color of the plug’s ground strap and the color of the first few threads on the outside of the plug).
The ignition timing can be checked by looking at the color of the plug’s ground strap and the position of the “blue line” on the strap.
The blue line really indicates the point at which the strap has reached annealing temperature of the metal.
To help to understand this, think of a bar of steel (ground strap) on a table that is being super heated with a acetylene torch at one of the tip ends.
As the end heats up and the heat starts moving down the bar you will see a blue line across the bar at some point down the bar away from tip with the torch.
This blue line reflects the temperature that is the annealing point of the metal.
As the temperature increases the blue line moves further down the bar away from the torch.
Similarly, the blue line moves down the spark plug ground strap as you put more heat in the engine.
If you are using a gold colored ground strap like with an NGK spark plug; 7)
Then not enough timing will show the ground strap as still gold or going light gray maybe with a few bubbles on it after a run.
As you advance the ignition and put heat in the engine the plug ground strap will turn darker gray as well as the metal at the end of the threaded area.
As the metal turns medium to dark gray you should start looking for the blue line (band) around the ground strap.
Ideally, you want this blue line to be just below where the ground strap makes the sharp bend and above the weld.
If you advance the ignition too far the blue will disappear off the strap and the strap will pick up rainbow colors (blues and greens).
The next step beyond that is to start melting the strap from the tip end and detonation.
When you are close to the correct timing then only change the timing by one degree at a time.
First, adjust the basic timing to get both plugs to have the blue line just at the sharp bend in the strap.
Then you can advance the ignition a little at a time to put the blue line just above the weld on the strap or whatever point gives you the best performance.
Reading Air / Fuel Mixture
Using the metal inner wall
- The upper ring around the electrode area (as you hold the plug electrode up facing you) is where you read the idle mixture. 8)
- Correct reading is MEDIUM GRAY. Light gray to whitish gray is lean, dark gray to black is rich (with powdery black being richer yet).
- Then after that it starts to get wet and the black gets flushed off like it was rinsed with gas.
(You will see some of this on the intake valve side of the plug and that is not a concern if the color is correct otherwise).
- The lower ring where it meets the porcelain way down inside is where you read wide open throttle.
(you need a magnifying glass and good lighting to see clearly down to the bottom)
- Color readings are the same for all ranges except that the wet flushed off look is only going to be showing at the idle portion of the plug.
- The mid range is everywhere in between that top ring and the bottom ring. Color is again read the same.
Using the plug base ring
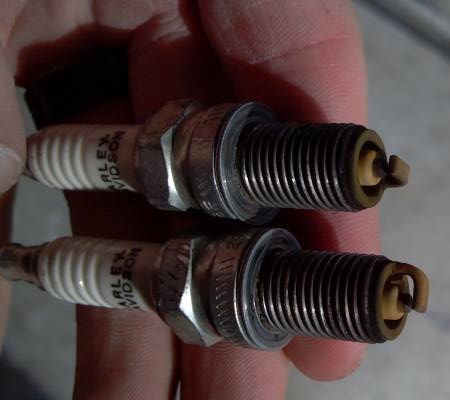
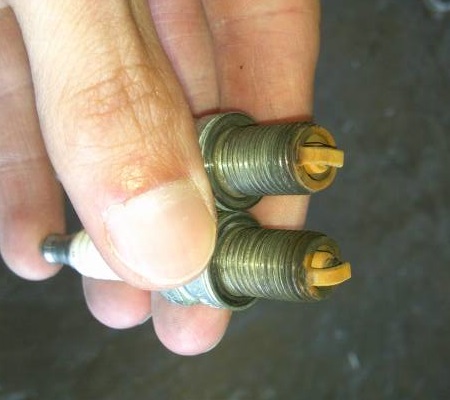
The base ring of the plug is the ring with the ground strap welded to it. 9)
For a good AFR you want a light soot color on the entire circumference of the base ring. Ignore the porcelain/insulator and ground strap to read the jetting.
- If you would like to tune for good power with a nod towards economy, then you want 3/4 to 7/8 of the circumference of the base ring a light soot color.
- If you want to play safe and be sure you aren't running lean or if you are having lean problems such as carb farts then aim for a full turn of light soot color.
(full turn meaning the circumference of the base ring i.e. what you see when you look straight down on the base ring and ground strap) - If the base ring has a full turn of color but you have areas of heavy buildup of dry soot on top of the color then the jetting is too rich.
Reading Plug Heat Range
- Stock heat range of a plug should be good through stage 1 and possibly stage 2. 10)
- If the compression gets raised too much, then you may need to drop to a colder plug.
- That will become evident if the porcelain gets dark tan to black and blistered.

The porcelain around the plug’s center electrode can be divided into three areas for reading. 11)
- The area that is closest to the tip is affected by the idle and transition circuits carburetor circuits.
If this area is gray then you rode too far before shutting down and you cannot correctly read the plugs. - The middle area is only colored when you ride down the road at around a steady 30-40 mph.
It is normally affected by the primary circuit jetting.
- The third area is all the way up inside the plug where the sun don't shine.
This area is colored when all is wide open under full power because the combustion chamber heat totally cleans off the other two areas.
It may take a special plug reading flashlight with the magnifying glass to view it correctly.
Plugs cannot be correctly read by just quickly looking at them with the naked eye.
You're looking at the fat end of the porcelain insulator, not at the tip. It's very difficult to see, and a light only makes it marginally easier. 12)
If you did not perform a plug chop, you're wasting your time looking for it in the first place.
The ring will be indicative of the jetting in all the circuits you rode in, not any one particular circuit.
Normally aspirated engines should have a light gray or tan hydrocarbon ring or as some call it a “fuel ring” all the way up inside around the third area. 13)
(closest to the point where the porcelain is attached to the metal jacket of the plug)
The actual color may depend on type of fuel you use. This fuel ring should appear like a light shadow.
Most VP C-15, C-16 or C23+ fuels will show as a light gray when correct.
This fuel ring starts to color on the porcelain side that is below the ground strap and works its way around either side of the center electrode until it completely joins.
Sometimes it may take two or three runs to see a good coloring.
Note: New engines or engines that pump a little oil may show a thin oily line way down inside on the porcelain where the porcelain meets the metal wall of the plug.
This oil line has nothing to do with the air/fuel mixture but may be confused with the fuel ring you are looking for.
If you are having a hard time figuring out if what you are reading is correct or because you are not sure if the plug heat range is correct;
You can remove the pipes and look inside them.
If they are black then you are too rich.
If they are light gray or white then you are too lean.
The pipes should be a medium to dark gray or tan color.
Normally the white area of the porcelain has a chalky appearance. 14)
If you see the porcelain take on a shine then it is time to change the plugs because the glass that is in the porcelain has been melted and has glazed the surface.
If the engine has been running rich (due to lots of idling or incorrect fuel mixture) then it is possible to glaze the plugs and short them out during a run because of the sudden heating of the plug with the soot on the porcelain.
This glazing appears to be a glossy coating on the porcelain with a splotches of color of greenish yellow or brown.
These two different glazes will cause the plug to short out and misfire and raise ring lands or make a popping through the exhaust when going down the road.
- To determine heat range of your plugs look at the porcelain as it starts to take color. 15)
- If the porcelain is white to a light tan, the heat range of the plug is right.
- Remember we are talking a couple of laps so it doesn’t have much time to take color which is why white is acceptable.
- If it starts looking gray or black (possibly even a bit wet looking), the plug is too cold.
- The more black it is and the more it is wet, the further to the cold side it is.
- If the plug is dark tan, or worse yet, getting a burnt black look to it with blisters on the porcelain, then it is too hot of a plug.
- Note the difference between a cold black and a burnt black at the two extremes.
- They are not the same black by any means. Fuel deposits on older plugs flake off, so don’t confuse that with blistering.
If you keep on adding timing until your finish MPH falls off but you still have no color on the plug’s ground strap but the porcelain has good color then your plug is too cold. 16)
If you have lots of color on the ground strap but the porcelain is clean and white then the plug heat range is too hot. The heat from the plug is cleaning of the fuel ring from the porcelain.
The Plug Chop Method
You will get only a vague idea of the state of your AFR by just pulling your plugs and reading them. 17)
This is because the color of them will likely have been set in the last part of your last ride as you rode through town and pulled up at your garage before shutting off.
If you are tuning your carb then you need a slightly more rigorous approach.
The chop method is simple to do and gives good results:
- Mark up your throttle grip with a turn of masking tape around the grip next to the switch housing.
Also put a piece on the switch housing with a single line.
On the grip's tape mark a zero throttle mark opposite the one on the switch housing.
Now open the throttle fully and mark this on the grip tape.
There will be about 1“ around the grip between the two marks, mark up 1/8, 1/4 and 1/2 throttle too. - Have a spark plug wrench handy in your pocket or tool roll. Also have a scrap of paper and a pencil.
- Find a long, straight, lightly-used section of road where its easy to ride at high speed but you can safely pull over and stop.
Finding this road is the hardest bit to the chop method. - With the engine up to temp (this is very important), ride at a steady 1/8 throttle for 1/2 mile or so, the further the better.
With the throttle still open hit the kill switch, pull in the clutch and stop. - Pull the plugs, read the color and write this down, don't rely on your memory.
- Repeat the above for 1/4, 1/2 and wide open throttle (WOT).
You now have a pretty good idea of the state of your plugs at the important throttle openings.
Tuning
To bring this into perspective for the Sportster; 18)
- Stock timing will be acceptable unless it’s broken. Some over advance seems normal, just keep an eye on it over time looking for changes.
- Idle reading will be a function of the mixture screw, and the pilot jet.
- If that upper ring is light tan or whitish, then open up the idle screw until the engine sounds right (about 3 to 3-1/4 turns out for stage 1).
- Only consider upping the pilot jet if you can not get it right with the mixture screw.
- Mid range will be a function of the needle, the needle position, and close to idle the pilot jet will effect it too.
- The Main jet will also effect the mid range, but at the same time it will effect the wide open throttle setting too.
- Wide Open Throttle is mostly the Main jet.
You can work on idle and WOT first. Once you get those in range, take it for a good ride and pull the plugs to double check those two extremes.
Then start working on the mid range which takes more patience.
To fine tune it in any range, do the clean kill in the range in question, then read that section of the plug.
As long as the plugs are reading nice in all the ranges then you can periodically look at them and see that everything is still good.
It's good to take a compression test and read the plugs every time you do a tune up and change the plugs every tune up to (5000 miles).
You can't tell anything about the jetting by looking at the outside of the plug, especially when a plug chop was not done with a new set of plugs. 19)
You can't just ride the bike around for a while (week, day, hour, whatever) and then pull the plugs and expect to be able to tell something about the jetting.
- Newer HDs come jetted lean on the idle circuit and mid-range, and rich on the main.
- When changing jetting, start at the lowest circuit first (idle) and move your way up (mid-range then main).
- Your bike needs to be at operating temperature, with the enrichener off, and no intake leaks before doing any jetting checks.
- If your bike starts and idles well without the enrichener, the idle circuit is probably too rich.
- If performance feels flat, either the RPMs are too low for the throttle you're trying to give it, or the jetting is too rich.
- If you're blowing black smoke, you're probably too rich.
- If your gas mileage is extremely low, there can be other problems, but all else being equal, you might be jetted too rich.
- If your bike runs better when it's cold out, rather than when it's hot out, it might be too rich.
- If your bike surges or spits back through the carburetor when trying to maintain a steady throttle, that circuit is probably too lean.
- If your bike gets really exceptional gas mileage, you might be too lean