Table of Contents

REF: Tools & Fasteners
Torque Wrench Care and Usage, Related Charts and Information
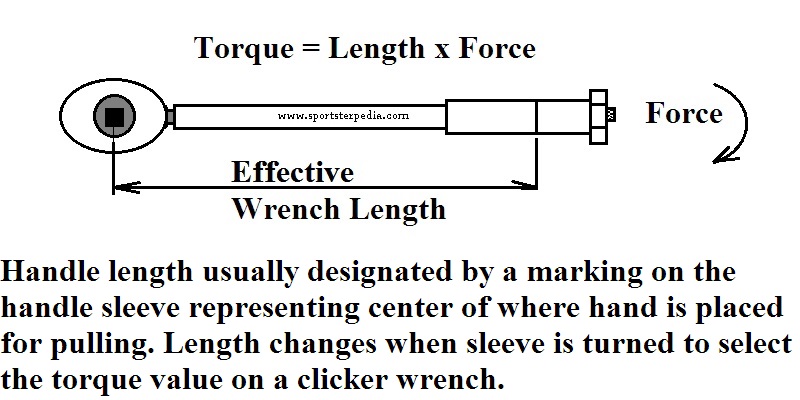
What Is Torque?
Torque is defined as a twisting force that tends to cause rotation. 2)
We call the point where the object rotates the axis of rotation.
You use torque every day without realizing it.
You apply torque three times when you simply open a locked door.
Turning the key, turning the door knob, and pushing the door open so it swings on its hinges are all methods of applying a torque.
Bolts are often tightened by applying torque to the head or nut which causes the bolt to stretch.
The stretching results in bolt tension or preload, which is the force that holds things together.
Torque is measured as effective wrench length times turning force applied.
Is a Torque Wrench Really Necessary?
- Best answer is, if there is a torque spec written in the manual, it's best to use a torque wrench on that fastener.
The torque values are written so you don't break parts while installing things.
Arrogance when wrenching can end up with broken bolts and parts.
Some have the gift of 'feel' and claim to have never broken or stripped a bolt.
That's fine. But not everyone that has a Sportster has the gift of 'feel'.
Getting your education from a broken engine case is expensive and counter-productive. - Some people strip threads with torque wrenches. It depends on the person using the wrench. 4)
Some people use torque wrenches properly to avoid either under or over-tightening fasteners and other threaded devices.
A torque wrench allows you to know rather than estimate how tight you've gone.
Is it necessary to use a torque wrench on spark plugs?
Not absolutely. It's just a very good method to avoid over-tightening and possibly pulling the threads in an aluminum head. - Sometimes 'hand tight plus a nudge' is good enough for non-critical fasteners.
However, parts like heads and sprockets need a certain clamp load or they will not perform well or even break loose while riding. - A torque wrench allows you to get near the same clamp load on all the fasteners to a piece (evenly distributing the load).
Without a torque wrench, it's easy to tighten some fasteners tighter than others.
(like on a cam cover which will end up warping the cover)
Heat plays it's own roll on clamp load after you've put the torque wrench up and ride away.
The designed clamp load spec takes these things into account.
Torque Wrench Maintenance
The more often a torque wrench is used the faster it will wear or go out of calibration.
Monitoring the number of cycles per day or total hours that a tool is used is the most accurate way to establish proper maintenance intervals. 5)
- Any torque wrench should be regarded as a precision instrument.
- You are 'trusting' this tool to work properly whether tightening low torque cover bolts or a high torque engine sprocket nut.
- Do not leave your torque wrench laying around on the floor or chunked in a tool box unprotected.
- This will result in it not working properly when you need it to.
- Do not use a torque wrench as a cheater/breaker bar.
- Breaking tension/removing bolts should be done with appropriate tools for the job.
- This practice can throw a torque wrench out of calibration or damage the wrench.
- There are other means of leverage tools that can be better used to remove stubborn bolts instead of using a torque wrench.
See Cheater Bar, Breaker Bar and General Leverage Assistance in the Sportsterpedia.
- Keep it in a case when not using it.
- If it comes with a case when you buy it, keep it in the case when your not using it.
If it didn't come with a case, make or buy one.
- Clean your wrench on the outside with a dry cloth before putting away.
- External cleaning fluid or other chemical solvents can corrode the internal lubrication of the tool, causing premature failure.
- Store it in a dry place.
- Condensation can ruin the wrench internals and rust the outside.
- Disassembling a torque wrench:
- If it is necessary to disassemble the wrench follow properly documented instructions provided by the manufacturer or send to a competent technician.
- Clicker Type Wrench:
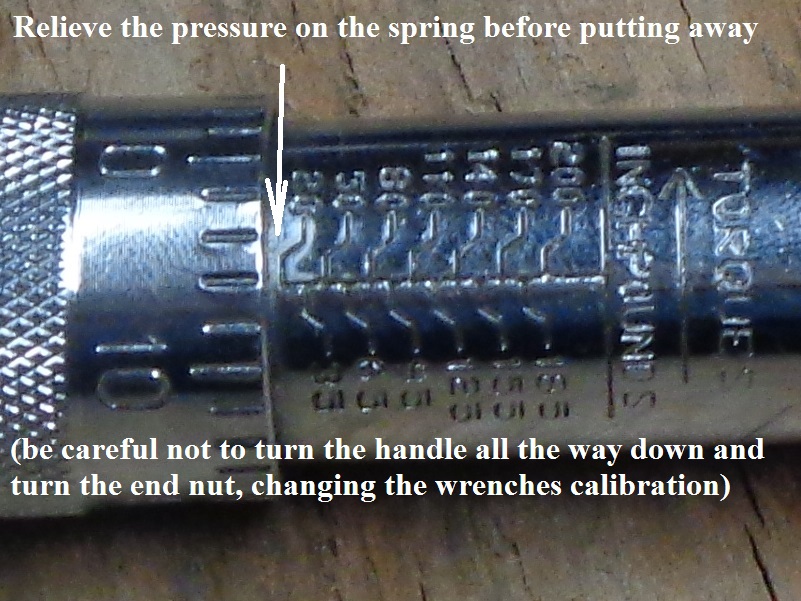
- Always reduce the dial to a low setting when not in use. (detailed in the instructions that should have came with it).
Most click wrenches are built with an internal spring mechanism that is compressed to against a lever.
Adjustable wrenches use springs that must meet a known length test.
After use, the wrench should be turned back to minimum scale value to help preserve the length of the spring and calibration thereof.
It is thought (and has been proven) that leaving a calibrated wrench at one setting impacts spring length, disallowing accurate use at other settings.
It does not happen every time, but over time linearity can be impacted causing error.
This is the reason for the recommendation to turn a wrench back to its minimum setting when not in use.
If you use the wrench at only one setting, you might consider a “preset” version that is set at one setting (no scale and is set by a torque tester).
It requires no adjustment to minimum and can stay set at one torque setting without issue to linearity. 6) - The ratchet of a wrench should be inspected for wear, cleaned and lubricated.
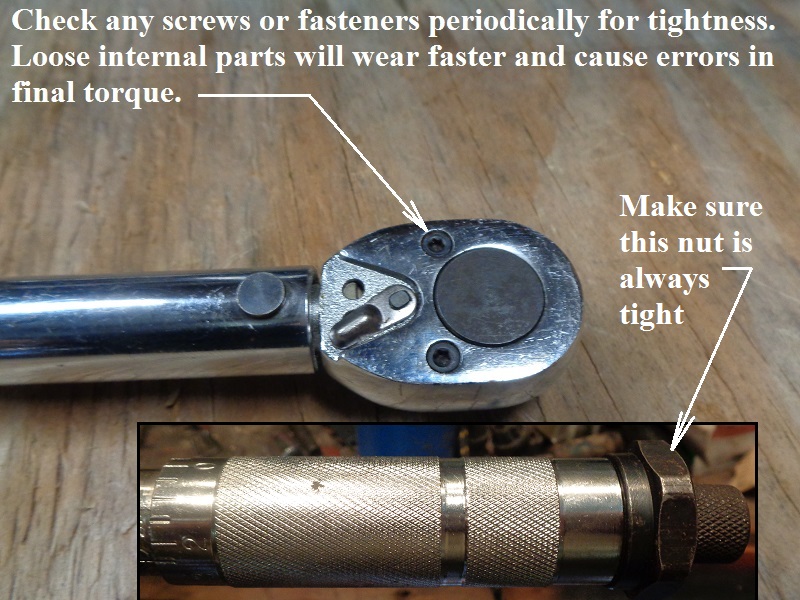
- The wrench handle should not be loose and it should be free of corrosion or lubricants when used.
- Never wrench the tool past the clicking sound.
- Check any screws or fasteners on the wrench before using it for tightness and that the ratchet spins freely when turned.
- If you drop it, it's best to check calibration before using it next.
- Beam Type Wrench:
- If using the beam type wrench, always check and 'zero' the dial if needed before each use.
- If you drop a beam-style torque wrench and bend the pointer or scale, it obviously won’t read accurately.
You can try to bend things back to their original position and check calibration.
But you may or may not succeed in restoring it's accuracy.
- Torque wrenches are really misunderstood, and if used with blind faith, can be the source of many problems. 7)
Related videos:
- Clicker type torque wrench repair (includes disassembly)
Torque Wrench and Accuracy
Accuracy across multiple bolts across a piece;
Parts with multiple bolts to accomplish clamp force across the entire part (covers, head etc.) require all bolts to end up the same torque.
If everything is done right during the tightening process, you still have wrench accuracy variance on multiple bolts.
So no matter how hard you try, the wrench itself will make it so you won't get the exact amount of torque on all bolts.
They will end with an average amount of clamp force each within a small range from each other based off the certain wrench you are using.
See also this YouTube video on Snap-on - VS - Harbor Freight ( ICON ) 1/2" Torque Wrenches
In this comparison, the ICON wrench outperformed the Snap-On wrench.
There are many methods for measuring preload.
However, one of the least expensive techniques that provides a reasonable level of accuracy versus cost is by measuring torque.
The table below is from the Industrial Fasteners Institute.
Torque-Measuring Method Comparison.
| Preload Measuring Method | Accuracy Percent | Relative Cost |
| Feel (operator’s judgement) | ± 35 | 1 |
| Torque wrench | ± 25 | 1.5 |
| Turn of the nut | ± 15 | 3 |
| Load-indicating washers | ± 10 | 7 |
| Fastener elongation | ± 3-5 | 15 |
| Strain gauges | ± 1 | 20 |
Technique plays a part in torque wrench accuracy.
Torque wrenches are only as accurate as your ability to use them. Too many people focus just on the factory calibration. 10)
There’s no doubt that proper calibration is important, but, in reality, your own technique often has a bigger effect on accuracy.
Focusing solely on factory calibration is a bit like worrying only whether your fishing line can hold a 30 pound trout.
The equipment isn’t often the limiting factor.
Wrench accuracy matters also.
The accuracy for a torque wrench can be stated in terms of Full Scale (FS) or Indicated Value (IV). 11)
There is a big difference in result as full scale accuracy indicates the allowable error over the full-scale range of the tool.
Indicated value accuracy indicates allowable error at the set point on the wrench.
Indicated value stated wrenches are more accurate, especially on the lower end of the range.
It is important to determine if the accuracy needed for an application can be obtained with the torque wrench selected.
Example using ± 4% accuracy calibrated wrench: 12)
Fastener torque is 100 ft/lbs
The torque wrench will click to indicate a proper torque somewhere between 96-104 ft/lb.
This accuracy is typical of high-quality torque wrenches and is more than sufficient for normal uses.
The manufacturers of torque wrenches (good quality ones anyway) publish the calibration specs on their wrenches.
So you see, one wrench of the same type can yield different end results depending on wrench accuracy alone.
The table below shows that Full Scale accuracy is less accurate than Indicated Value.
As the tolerance against the scale varies from 5% to 50%, whereas the Indicated Value Accuracy is 5% at each value.
| Full Scale (± 5% throughout range) | Percent of Scale (torque) | Indicated Value (± 5% at each value) |
| 95-105 | 100 | 95-105 |
| 45-55 | 50 | 47.5-52.5 |
| 25-35 | 30 | 28.5-31.5 |
| 5-15 | 10 | 9.5-10.5 |
Tips for Maximizing Accuracy:
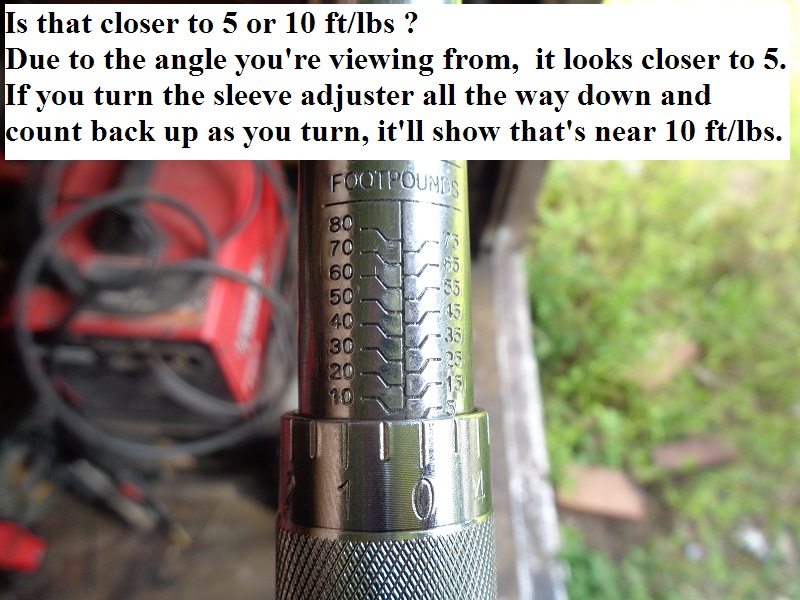
- Look carefully. You have to set the torque wrench with your own eyes.
If you accidentally set the dial at 98 or 102 when you mean to set it at 100, you have introduced extra error.
This can happen if you are looking at the scale at an angle. 13) - Turn the torque wrench smoothly.
You have to turn the torque wrench slowly and steadily, stopping when you hear or feel the click (when using a click-type torque wrench, that is).
Turning the fastener past the click means you have applied extra, unintended clamping load.
Swinging the torque wrench rapidly means you might swing right past the click. 14) - Pay attention to the conditions under which torque is measured.
If the specs are 120 ft/lb on a dry fastener, don’t expect to achieve highly precise measurements when your fastener is greasy or unusually hot.
Depending on the conditions, you might still get quite close. You will have to judge whether close is adequate for your purposes.
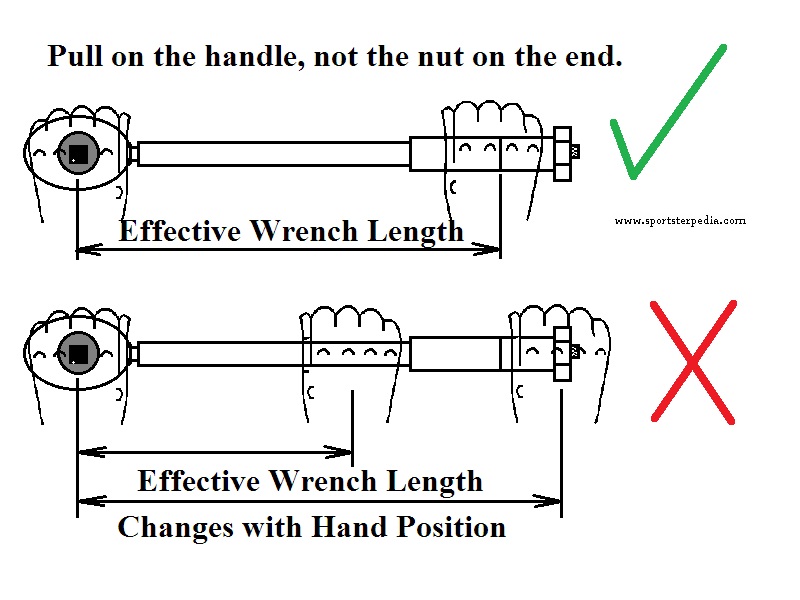
Over-torquing can result in broken parts and early deterioration. Under-torquing can result in loose parts, which can fail or come apart unexpectedly. 15) - Push on the handle, not anywhere on the wrench body. The torque wrench measures force at the pivot point just below its head.
It has been calibrated so that this force accurately corresponds to the amount of torque shown on its scale.
(only when you apply force on the handle and nowhere else) 16)
Torque Wrench Calibration
Click here for picks and instructions on Field Calibrating a Torque Wrench in the Sportsterpedia.
Calibration intervals set by national and international standards are either one year or 5000 cycles, whichever comes first.
Or when a visual inspection reveals old or dry grease, parts that show signs of excessive wear, loose or unstable components.
Calibrating a tool involves adjusting the standard readings of the tool by comparison with a standard. 18)
The field method in the link above allows for checking the accuracy of the tool.
To have it done right, a torque wrench needs to be recalibrated by professionals.
There are several companies that will recalibrate torque wrenches.
However, sometimes you have to weigh the monetary figures of re-calibration against buying a new one.
Custom-Cal provides this service but they have select brands in which they will calibrate. Fee currently ($40). 19)
If you can buy a new one between $25-$50, you'll spend more than that in total cost of recalibrating your old one.
However, if you have an expensive torque wrench and want it calibrated, this service is well worth the $40.
How often should you calibrate your torque wrench? Some factors are below for determining the frequency of calibration. 20)
Generally speaking, the simpler the mechanism, the less frequently it needs to be calibrated. 21)
- How often is it used? Higher frequency of use = more frequent calibration intervals.
- How are you treating the torque wrench? Dropping it or heavy field use = more frequent calibration intervals.
- What conditions is it is used under? Hot, cold, wet or humid conditions may require earlier calibration intervals.
- Is it subjected to overload? If overload is equal to more than 25% of the max it, it may require more frequent calibration intervals.
- Note the readings and know when they change. If readings have a tendency to jump at a certain repetitive point, calibrate sooner.
Selecting the Right Torque Wrench
See Torque Wrenches and Attachments in the tools section of the Sportsterpedia.
Using a Torque Wrench
Proper torque procedures were used to initially build your bike. Skipping any of the advice below should be done at your own risk.
Many engine tear-downs are the result of too much torque (or hunkering down) on a nut or bolt. Don't let it be you.
These are things you must take into account while using a torque wrench:
- Torque is relatively easy to measure using a torque wrench so it is the most frequently used indicator of bolt tension. 22)
- Unfortunately, a torque wrench does not measure bolt tension accurately, mainly because it does not take friction into account.
- The friction depends;
- Bolt, nut, and washer material.
- Surface smoothness.
- Machining accuracy.
- Degree of lubrication.
- Number of times a bolt has been installed.
Set up the torque wrench:
- Zero the wrench before beginning.
- If using the beam type wrench, always check and 'zero' the needle if needed before each use.
- If using a clicker, always release the pressure on the spring before putting it away.
When you get ready to use it, it will already be fully released to the lowest value on the wrench.
Double check that before selecting the desired torque value.
Technique:
- Let the torque wrench do the work.
- Your entire body does not need to be involved when tightening most bolts on a Sportster.
An exception would be something like the engine sprocket (or high torque fasteners).
- Pull from the handle, not the middle or the end nut.
- The drive end doesn't know when to click. It is pre-calculated force from the handle working to build force at the drive end.
Pulling from the nut on the end adds more length but creates the same force on the drive end (fooling the wrench to click prematurely). - You can also turn the nut by accident which will change the wrench calibration throughout it's torque scale.
- Always slowly pull (never push on the handle) the tool toward you in a clockwise manner..
- You lose control of the torque applied when you push on the handle.
- If the wrench slips off the bolt/nut, busted knuckles or worse injury to follow.
- Hand placement and the angle of the wrench is important.
- It's common practice to cup the end of the tool with one hand and use a slight pressure against and centered to the bolt/nut.
Then move the wrench handle with the other hand at 90° from the fastener. - The wrench needs to stay 90° to the fastener during operation.
- Any deviation from 90° will lower the amount of torque applied to the fastener to a small degree.
Some say it's not enough of a change to matter, but it is worth noting. - Any angle other than 90° puts the load on only one side of the fastener.
That sets you up to possible strip the corners on hex bolts or strip the center of Allen head / Torx head bolts.
- While applying torque, always use slow even motions.
Applying torque too fast leads to fooling the torque wrench (and / or your eyes) before torque is actually reached.
Establish a pattern to follow every time to condition yourself not to make a mistake when it's counted.- The 1/4“ clicker will go way beyond torque when used too fast.
By the time you hear the click, your still turning which could result in damaged bolts, bolt heads and even cracking the piece your working on.
Pre-torque tightening:
- Start all of the fasteners in a component before you tighten any of them…not even hand tight. Any misalignment of the part can side load the last fastener enough to prevent it starting or promote cross threading. 25)
- By hand, all dry bolts should run in rather easily. If not, there may be trash/ debris caught up in the threading (which can alter you reaching proper torque values). Turn all bolts in sequence by hand until snugged.
- If you're using thread dressing (oil, loctite / anti seize, etc.), these will induce drag on the bolt(s). You can use a socket, without the wrench, to turn the bolts to snug by hand. You will also need to reduce the final torque on your fasteners since thread dressings will add pre-load to the threads. This pre-load is added on top of your final torque. You can use the wet charts below as a guide to decide how to adjust your final torque. This will vary on how much and what type dressing is used on the threads as well as proper use of the torque wrench.
- Align each bolt chamfer with it's corresponding threaded hole and counter rotate the fastener to the tightening direction a few degrees until you feel the threads “jump”, that indicates the threads are aligned to start in sync.
- Tighten (to snug) all of the bolts the same way around your piece in a cross pattern to ensure evenness throughout.
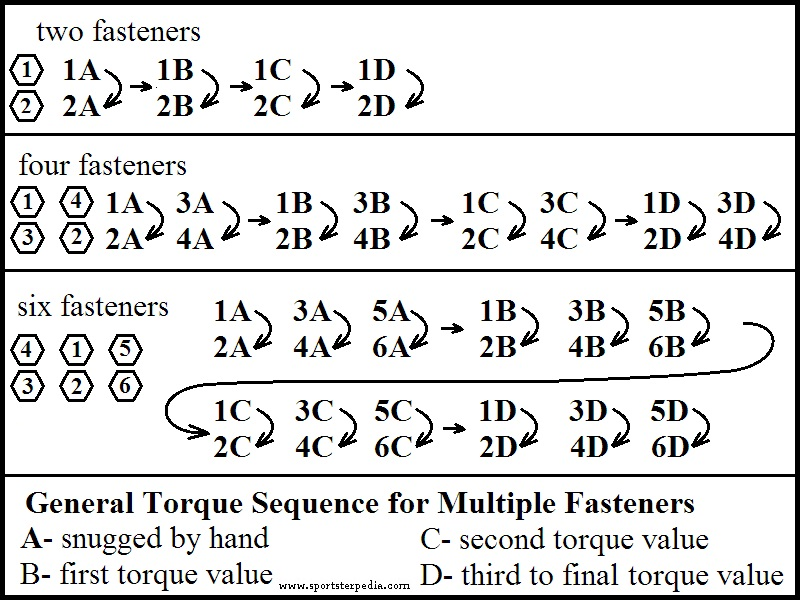
Torque the fastener in steps.
- Find the torque specs for your application and divide that number by three.
- You now have three different torque values:
Unless instructed otherwise by the FSM, start your cross pattern in the center and then move towards the left and then towards the right.
- First number (lowest number) w / cross pattern over the entire number of fasteners on the piece.
- Second number repeat the same cross pattern starting with the same bolt you began with on the first pass (all bolts).
- Final pass (target torque value) repeat the same cross pattern starting with the same bolt you began with on the first pass (all bolts).
- Lastly, go back around with the final torque to make sure everything is relatively even.
- There is no reason to re-torque heads. If you made it to final torque and everything went Ok, you can do more harm than good on re-torque.
- At this point, your mainly insuring that you didn't miss a bolt when making the rounds. It's better to know now rather when your on the road.
Wrench type specifics:
- Beam wrench:
- As you pull tighter, you will notice the handle bend slightly.
This calibrated bending is the result of applied torque. Watch the end of the needle located just above the handle.
As the beam bends, the needle points to the amount of torque being applied. - Continue to turn the fastener, and allow the handle to rotate so that the pivot is the only thing contacting the beam.
Some handles have a pivot piece that you actually are holding.
Arrange it so the handle 'floats' with you instead of cocking sideways against the bending beam. - Keep your eyes looking straight at the center bar end and the torque scale.
It's hard to impossible to judge when the pointer is on the right value looking from the side.
Using "Feel" While Tightening
See also, Strengths Of Various Fasteners in the Sportsterpedia.
You may hear people say that they don't need a torque wrench because they can 'feel' when a bolt/nut is tight enough.
The 'feel' can't be taught. It comes with experience (and many previously broken bolts in the past).
That's right, people that say that have broken many bolts in order to get the 'feel' when enough is enough.
If you don't possess the 'feel', please, use a torque wrench on your Sportster until you develop a feel for tightening.
- Most of this applies to any wrench. 28)
- First, you can't feel anything by swinging a torque wrench or any other kind of wrench too fast.
- The best way to approach tightening a fastener is to snug it up by hand (in a cross pattern on multiple bolt fastening).
- Then use slow pulls while tightening.
- If you turn the wrench slow and consistent enough, sometimes you can feel changes in the pull.
- While tightening, the whole affair will get tighter consistently. The pull will be will get progressively tighter.
Then, there comes a point where the nut / bolt seems to hold tighter than before.
That plus a nudge is usually good enough for most fasteners.
If it doesn't FEEL right, it probably isn't. - If using a beam type torque wrench, you've already checked the spec and know where to stop.
That's where you start paying more attention to the numbers on the beam torque wrench. - If you have a clicker type torque wrench, that's the point where you wonder when it's going to click.
If, turning just past that point, it doesn't click, then it's probably good enough. - The 1/4” clicker clicks softly on the lower end of it's scale. The 3/8“ clicker will at times also.
It may be only slightly audible. Sometimes you can feel the vibration when it clicks but can't hear it. - The 3/8” and 1/2“ clickers are used with more torque and spring pressure and will usually click harder / louder.
But again, if used on the low end of their scale, they can fool you with only a slight audible click or not at all.
Anticipate the vibration when it clicks. - Some have the need to keep pulling until it clicks.
If the wrench is not accurate for whatever reason, the click won't happen, damage to follow.
- The last pull needs to slowly come to a stop on the correct value.
- If you get close but not quite there and stop, it takes more torque to make the bolt turn from that spot.
- That could end in over-torque due to the force needed to move the bolt from there.
- If you're pulling and all of a sudden you realize it's not getting tighter, but you are still turning;
- Sometimes you can stop there, back out the bolt and replace it.
That usually means the head is spinning but not tightening, or about to spin off. - A bolt will stretch. They are made to stretch.
But there comes a point where the stretch gets more than the bolt is built to handle.
That's the yield point. Over that and the threads strip or the head will break off.
You can actually feel this happening. That doesn't mean it won't, but you can feel it.
Remember that “feel” on the next bolt and be cautious not to let it happen again. - If it was a auto V-8, usually the worst to happen is drilling the bolt to use an easy out to extract what broke off in the part.
If on a Sportster engine, the worst comes down to splitting the cases to weld it back.
It's that simple.
- Longer bolts (I.E, Evo head bolts) are prone to twisting in the middle. You can tell when this happens and before it's too late.
- If you are pulling with a beam and notice the more you pull, the dial doesn't get any higher;
Then let the wrench come to rest and watch the bolt head twist back on you.
The bolt has stretched beyond yield but hasn't snapped yet.
It flexes back to it's resting position.
If you are pulling with a clicker, and don't pay attention to the feel;
It won't click since the clamp force will not reach that high as the bolt is twisting….
Snap goes the bolt.
- Thread dressings (oil, Loctite, anti-sieze etc.)
- If you have thread dressing applied to the threads and pull to the specified torque value, then you have over-torqued the bolt.
All thread dressings lock into the valley between the threads and preload the torque.
Check out the wet charts below. They are surprising. - With grease on the threads, the fastener will slip more easily against the material in which it is turning. 29)
It won’t feel tight enough even as it is clamping down with greater and greater load as it turns.
- Torque Wrench Size:
- Quote from Toejam503 of the XLFORUM:
- I've always found that the lower end of the scale on a foot pound torque wrench isn't accurate enough for something rated in inch pounds.
100-120 in/lbs has a lighter pull than 10 ft/lbs on a 150 foot lb torque wrench. 30)
- You bet it does.
Ever notice an in/lb wrench is smaller, especially shorter, than a ft/lb wrench?
There is a leverage difference in the size of a wrench.
This goes to the concept of 'feel' as well. - A smaller torque wrench will allow you to feel more than a larger one.
Flipping back and forth between beefy and wimpy wrenches of the same fastener size can confuse the sense of feel.
Ask yourself which 9/16” open/box end wrench you prefer, the short one or the longer thicker one?
The beefier ones give you more power for the pull and helps keep from bruising your hands more on high torque.
But the smaller ones allow you to feel more of the pull.
So it's a balance based off your strength and resilience as to which is the best to use when practicing “feel”.
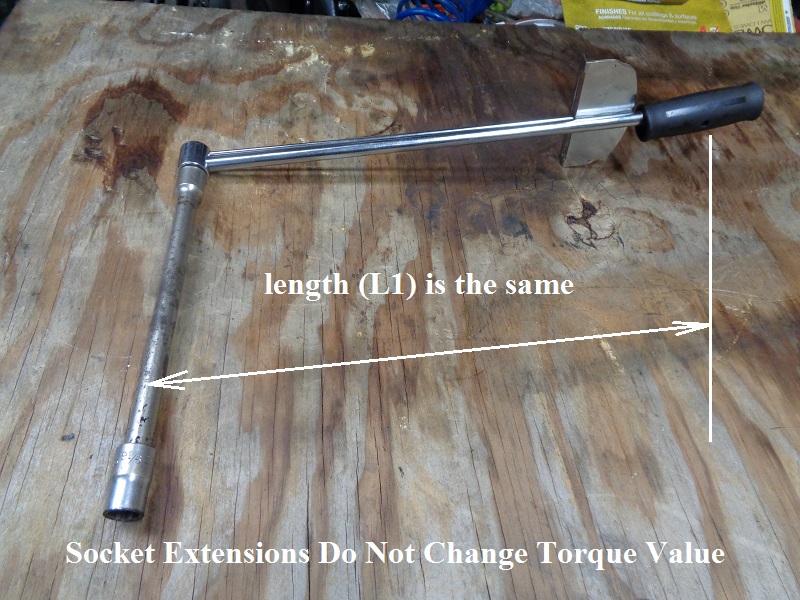
Will Using Extension / Adapters Change Torque Applied?
- Socket extensions to lengthen the distance vertically from the drive end to the socket do not affect the accuracy of final torque.
That is if they’re used properly, and you’re using your torque wrench correctly. 31)
- You're applying a torque at one end, and the bolt is applying a counter-torque at the other end.
If the extension is not in the process of being twisted to a greater extent then it already has been,
then the torques at both ends must be the same in magnitude but opposite in direction.
(If the torques were not equal, the extension would be twisting more.)
Then by Newton's third law (more or less),
the torque being applied by the socket to the bolt is the same as (but opposite) as the counter-torque being applied by the bolt to the socket. 32) - However, extending the length of the drive end will affect final torque if not kept at 90°.
- To get an accurate reading from a torque wrench, you must:
- Place your hand in the correct spot.
- Maintain the torque wrench parallel to the fastener at all times.
- Avoid any wobble or universal (swivel) sockets.
- Use a quality torque wrench that has been calibrated recently.
See further explanations on using extensions below.
Drive Extensions (horizontal to the wrench)
- An extension that increases the length of the wrench at the drive end will change the final torque applied.
- These are usually considered methods to extend the length of the wrench (in a linear plane).
- There are some spots where a torque wrench head is too big or awkward to go.
- It may be necessary to extend the drive center to get into confined spaces.
- Extending the drive end adds extra leverage (torque) on the nut / bolt.
- So you'll have to lower the setting on the wrench to compensate.
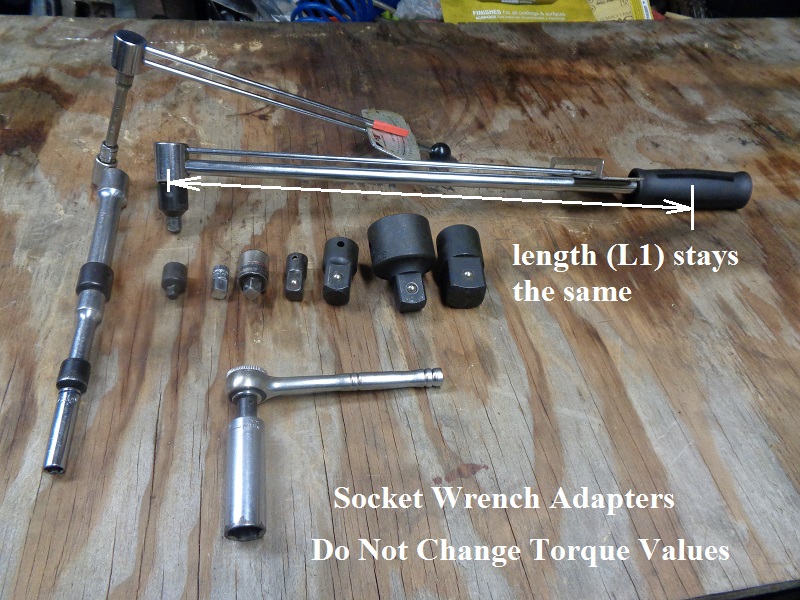
- An extension used at 90° from the drive center does not change the length of the wrench or the final torque applied.
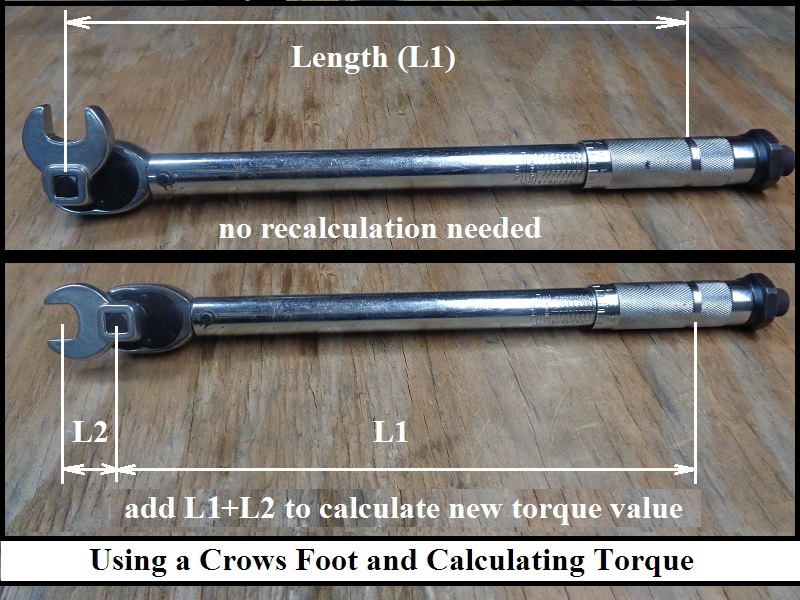
It does not matter how long your extension is as long as it's kept at a 90° angle and the length of the torque wrench, length (L1) below, isn’t changed.- A crows foot, for example, used straight out from the wrench does change the final torque.
- A crows foot used (and kept) at 90° from the wrench does not change the final torque.
Calculation for Length Extensions
- Measurements:
- Torque is measured at the socket (drive center) axis.
It does not depend on the length of the wrench handle.
That only affects the amount of pressure you have to exert to achieve a particular torque. - The extension is measured from drive (center) axis of the torque wrench to the socket (center) axis of the torque wrench. 33)
- Calculations:
- The calculation is the same for all types of torque wrenches (whether clicker or beam type, etc).
- You can search online calculators to find the value to set your torque wrench to achieve actual torque at the fastener.
- Norbar’s torque wrench extension calculator is now available as an app to download free on iPhone and Android.
The torque extension app calculates the exact torque wrench setting value for required level of torque to be applied. - When you put an extension on a torque wrench drive end (e.g. a crow foot or a dog bone) the torque applied to the fastener increases as the lever arm extends.
The calculator will work out what value you should set into the wrench to achieve the required fastener torque.
- The following formula has been used:
M1 = M2 x L1 / L2- M1 is the torque setting of the wrench.
- M2 is the actual torque applied to the nut.
- L1 is the normal length of the wrench (Total Effective Length).
- L2 is the extended length of the wrench (Total Effective Length).
Example: 34)
M1 = ?
M2=80 ft/lbs
L1=18“
L2=22”
Calculate: 80 x 18 / 22 = 65.45.
Therefore if you want to torque a fastener to 80 ft/lbs using an 18“ torque wrench with a 4” torque extender, you will set the wrench to 65.45 ft/lbs.
Socket Extensions / Adapters (vertical to the wrench)
- Socket extensions or adapters do not change the length of the drive (center) axis or the final torque.
- Socket extensions come in a variety of drive sizes and lengths.
- You can use them connected together for extra long extensions and they will not affect final torque.
- However, if you add a swivel on the end of the extension, the final torque may end up slightly lower than the preset value on the wrench.
- Step-Down Drive Adapter.
- Torque wrenches come with a variety of drive point sizes. Of course, so do sockets.
Unless you have a full shop of tools, it can be cost effective to use drive adapters.
These give you the flexibility in using the same sockets with different drive wrenches. - It's also important at times to be able to get to certain spots with smaller O.D. wrenches with the help from adapters as a (1/4“ drive) 1/2” socket will probably be a smaller outside diameter than 3/8“ or 1/2” drive in the same bolt size.
- Sometimes, it just all depends on what you have on hand and, if you can adapt to it, that saves you money.
- In addition certain drive bits (hex / torx etc.), within a kit of them, will have different drive requirements (usually 1/4“ and 3/8” drive internal squares).
- But, true tool nuts will want to have them all and still need more.
- You can also use two adapters back to back to go from 1/2“ to 3/8” and then from 3/8“ to a 1/4” drive socket.
There are other combinations as well. - If you plan on using a torque wrench, below are some basic size adapters that you'll probably want on hand.
So, go ahead and buy them just to have them. You'll appreciate them all eventually…. and probably want more too. - When buying a torque wrench, these are some suggested adapters to have on hand or buy with it:
- 1/4“ drive torque wrench may be required for the lower torque bolts (primary, gearcase, derby covers, etc.) which you can buy hex (allen) and star sockets for. However, some are 1/4” and others are 3/8“ drive socket ends. So, you'll need a 1/4” to 3/8“ drive adapter to be able to swap back and forth with these sockets and still use the torque wrench to tighten them properly.
- 3/8” drive torque wrench (in some instances) may be useful for both 1/4“ and 1/2” drive sockets so you'll need an adapter up and one down for versatility.
- 1/2“ drive torque wrench will probably be too strong to use 1/4” sockets but you'll definitely want to get a 3/8“ adapter in case you need to swap back and forth with 1/2” and 3/8“ drive sockets.
- 3/4” drive torque wrench is usually only used in high torque applications and you should only need a 1/2“ drive adapter in it's use.
Swivel or Universal Joint (off center by default)
- A swivel, used with a torque wrench, can be detrimental to achieving even accurate torque.
- A swivel is a great little tool for getting into areas where a straight run at a nut / bolt is hindered by obstacles near it (whether by the frame, wheels etc).
- Whether that is a concern to you or your project, you'll have to make that decision. This is just an informative on the subject.
- The sole reason for using a swivel is to get at a bolt/nut from an angle.
- With the entire purpose of using a torque wrench being to evenly distribute clamping force throughout the clamped piece,
and the purpose of a swivel is to allow you get to angled areas of your work piece,
these two tools seem to cancel each other (in theory). - How much the swivel will change the actual torque on a fastener depends entirely on the angle at which it is used.
- Any angle different than 90° from the wrench will shorten the distance from the bolt to the wrench.
- This shorter distance will decrease the amount of actual torque applied the bolt.
- You wouldn't think that the length of a socket extension between the swivel and the torque wrench would affect actual torque.
But the truth is that the longer the extension you use, the more angle you can put on the swivel which does change actual torque at the fastener. - A swivel adapter will transmit different amounts of torque and rotation depending on where the two pins are relative to the angle.
You can see this for yourself by sticking two extensions into the adapter, bending it about 70 degrees, and slowly rotating the two extensions.
With a small angle the error is not too large but as the angle increases the errors increase. 37)
- With these conditions in mind, swivels have been used with torque wrenches for a very long time.
Of course, results will vary and some will say the amount of change in actual torque value at the fastener will be negligible.
This is ultimately left up to the end user to decide what is best for them.
Crows Foot
Any force that is applied that isn’t at a 90° angle will change the applied torque to the fastener. 38)
When you put a crows foot on a torque wrench and use it long-ways, the torque applied to the fastener increases.
If you turn the crows foot at a 90° angle, there is no increase in torque to the fastener from the preset scale.
A Torque Wrench Does Not Break Bolts
See also Common Causes of Stripped or Damaged Plug Threads in the Sportsterpedia.
There is always a hand pulling that wrench.
The invent of the clicker type torque wrench took the focus away from 'feeling' what you are doing while tightening.
Try and develop a 'feel' for when enough is enough especially if using a clicker type wrench.
If the wrench fails to click, and many of them do on the low end of their scale especially, you can break something simply waiting for the click.
Clamp Force
The first 5 threads of a bolt does all of the work with the first 3 doing about 80% of the holding. All other threads are just along for the ride. 40)
Look at the length of a standard nut. 41)
A bolt will hold the same clamp force if you use a nut on the end or if the bolt is sunk down into 2” of a threaded hole.
(given the nut and the hole are the same material and thread pitch)
When you tighten a bolt, the threads on the bolt and the threads in the hole will pull against each other.
The bolt will deflect or stretch and this stretch is the clamping force that holds the parts together. 42)
If you over torque the fastener, it can deform and will lock the threads together so it can not be removed.
And it may break the threads in the hole, destroying them. You may not realize this until you have a leak or the next time you remove the bolt.
| Normal way a bolt tightens up 43) | ||
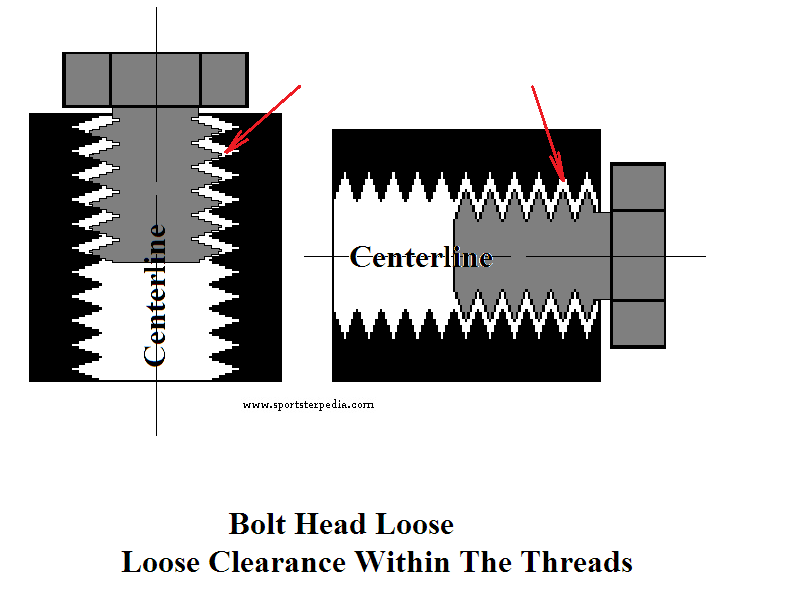 | 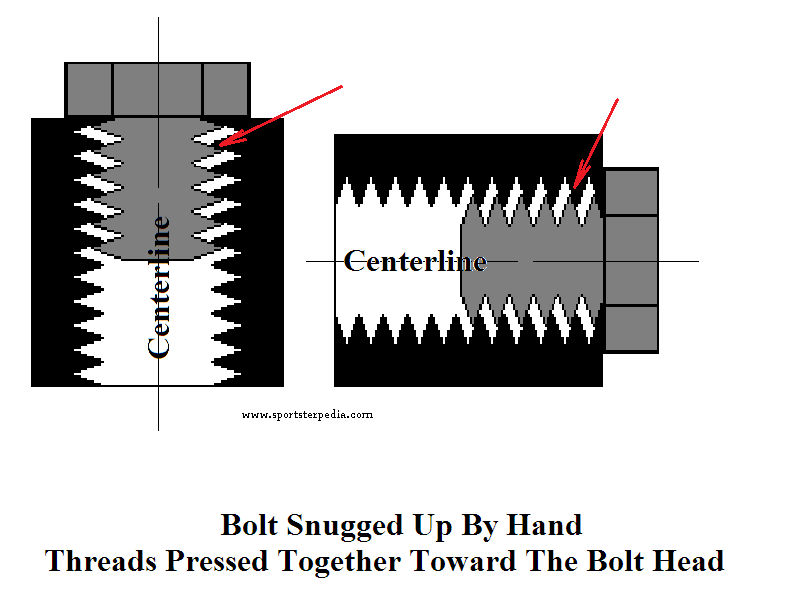 |  |
A Word on Torque and Re-using Bolts
- There are many bolts on a Sportster that the MoCo writes in the FSM to discard and replace them with new ones.
- How many of those bolts get reused? How many of those have been tightened too much before, that now seem to be breaking?
- Every time you tighten a bolt/screw, it stretches to some degree. It's job is to stretch back when removed.
If stretched beyond it's intended range, it may not flex back to it's original resting position or it may be weakened from prior use.
Then the next time it's tightened, it may not be able to be tightened to intended torque values before breaking.
- There are times when threads are known to be warped / damaged but will be used anyway for different reasons.
- It is a good idea to reduce the torque used on fasteners in this instance in an effort to save the threads until a proper repair can be made.
- Thread dressings (anti-seize, Loctite etc.) may help to keep the fastener from walking out due to vibration.
- Don't make the mistake of over-tightening just to say you are at factory torque spec.
- You'll have to use your own judgment for how tight is too tight.
Read more about Using "Feel" While Tightening above. - Sometimes (snug up to “firm plus a little more”) 44) goes a long way.
One of these bolts was broken off in a rocker box. The others were damaged but not broken.
These bolts were damaged due to a clicker wrench not operating properly.
The person using the torque wrench felt it happening yet kept pulling awaiting the click.
“I did notice before it snapped that it kind of spun for a second, then broke. One of the other bolts did the same thing and I stopped immediately.” 45)
Any time you have any amount of thread damage or bolt stretch, replace the bolts.
 46)
46)
Torque Range
Torque specifications are normally stated within a range and not a specific number. The range is given to accommodate these factors.
- When the nut on a bolt is tightened; 47)
- An initial tensile load is placed on the bolt that must be taken into account in determining it's safe working strength or external load-carrying capacity.
- The total load on the bolt theoretically varies from a maximum equal to the sum of the initial and external loads.
(from when the bolt is absolutely rigid and the parts held together are elastic) to a minimum equal to either the initial or external loads, whichever is the greater.
(where the bolt is elastic and the parts held together are absolutely rigid). - No material is absolutely rigid, so in practice the total load values fall somewhere between these maximum and minimum limits.
(depending upon the relative, elasticity of the bolt and joint members)
- So the torque range takes into account two things.
- The strength of the fastener.
- The strength of the material being fastened.
- If you change bolt type (swap a grade 8 bolt for a stainless bolt), you have effectively changed the torque range.
- If that is a problem or not (structurally speaking) depends on the clamp load needed to fasten the piece.
- Some fasteners are intentionally used in lower strength (i.e, grade 5 on motor mounts) due to elasticity of the fastener.
Conversion Charts
Here is an online conversion chart from Mountz
Below are some conversion charts from Applifast 48)
| TORQUE CONVERSION FACTORS | ||
|---|---|---|
| TO CONVERT | INTO | MULTIPLY BY |
| Inch Pounds | Foot Pounds | 0.0835 |
| Inch Pounds | Newton Meters | 0.1130 |
| Inch Pounds | Kg Meters | 0.0115 |
| Inch Pounds | Kg Centimeters | 1.1519 |
| Foot Pounds | Inch Pounds | 12.000 |
| Foot Pounds | Newton Meters | 1.3560 |
| Foot Pounds | Kg Meters | 0.1382 |
| Foot Pounds | Kg Centimeters | 13.8240 |
| Newton Meters | Inch Pounds | 8.8440 |
| Newton Meters | Foot Pounds | 0.7370 |
| Newton Meters | Kg Meters 0.1020 | |
| Newton Meters | Kg Centimeters | 10.2000 |
| Kg Meters | Inch Pounds | 86.8100 |
| Kg Meters | Foot Pounds | 7.2340 |
| Kg Meters | Newton Meters | 9.8040 |
| Kg Centimeters | Inch Pounds | 0.8681 |
| Kg Centimeters | Foot Pounds | 0.0723 |
| Kg Centimeters | Newton Meters | 0.0980 |
| TORQUE CONVERSION - In/Lbs to (Nm) | |||||||||
|---|---|---|---|---|---|---|---|---|---|
| In/Lbs | Nm | In/Lbs | Nm | In/Lbs | Nm | In/Lbs | Nm | In/Lbs | Nm |
| 5 | 0.6 | 30 | 3.4 | 60 | 6.8 | 110 | 12.4 | 160 | 18.1 |
| 10 | 1.1 | 35 | 4.0 | 70 | 7.9 | 120 | 13.6 | 170 | 19.2 |
| 15 | 1.7 | 40 | 4.5 | 80 | 9.0 | 130 | 14.7 | 180 | 20.3 |
| 20 | 2.3 | 45 | 5.1 | 90 | 10.2 | 140 | 15.8 | 190 | 21.5 |
| 25 | 2.8 | 50 | 5.7 | 100 | 11.3 | 150 | 17.0 | 200 | 22.6 |
| TORQUE CONVERSION - Ft/Lbs to (Nm) | |||||||||||
|---|---|---|---|---|---|---|---|---|---|---|---|
| Ft\Lbs | Nm | Ft\Lbs | Nm | Ft\Lbs | Nm | Ft\Lbs | Nm | Ft\Lbs | Nm | Ft\Lbs | Nm |
| 1 | 1.36 | 24 | 32.5 | 47 | 63.7 | 70 | 94.9 | 93 | 126.1 | 185 | 251.0 |
| 2 | 2.7 | 25 | 33.9 | 48 | 65.1 | 71 | 96.3 | 94 | 127.5 | 190 | 258.0 |
| 3 | 4.1 | 26 | 35.3 | 49 | 66.4 | 72 | 97.6 | 95 | 129.0 | 195 | 264.4 |
| 4 | 5.4 | 27 | 36.6 | 50 | 67.8 | 73 | 99.0 | 96 | 130.2 | 200 | 271.2 |
| 5 | 6.8 | 28 | 38.0 | 51 | 69.2 | 74 | 100.3 | 97 | 131.5 | 225 | 305.1 |
| 6 | 81 | 29 | 39.3 | 52 | 70.5 | 75 | 102.0 | 98 | 133.0 | 250 | 339.0 |
| 7 | 9.5 | 30 | 40.7 | 53 | 71.9 | 76 | 103.1 | 99 | 134.2 | 275 | 373.0 |
| 8 | 10.9 | 31 | 42.0 | 54 | 73.2 | 77 | 104.4 | 100 | 135.6 | 300 | 407.0 |
| 9 | 12.2 | 32 | 43.4 | 55 | 74.6 | 78 | 105.8 | 110 | 149.2 | 350 | 475.0 |
| 10 | 13.6 | 33 | 44.8 | 56 | 75.9 | 79 | 107.1 | 115 | 156.0 | 400 | 542.4 |
| 11 | 14.9 | 34 | 46.1 | 57 | 77.3 | 80 | 108.5 | 120 | 163.0 | ||
| 12 | 16.3 | 35 | 47.5 | 58 | 78.7 | 81 | 110.0 | 125 | 170.0 | ||
| 13 | 17.6 | 36 | 48.8 | 59 | 800 | 82 | 111.2 | 130 | 176.3 | ||
| 14 | 19.0 | 37 | 50.2 | 60 | 81.4 | 83 | 112.6 | 135 | 183.1 | ||
| 15 | 20.3 | 38 | 52.0 | 61 | 82.7 | 84 | 114.0 | 140 | 190.0 | ||
| 16 | 21.7 | 39 | 52.9 | 62 | 84.1 | 85 | 115.3 | 145 | 197.0 | ||
| 17 | 23.1 | 40 | 54.2 | 63 | 85.4 | 86 | 117.0 | 150 | 203.4 | ||
| 18 | 24.4 | 41 | 55.6 | 64 | 86.8 | 87 | 118.0 | 155 | 210.2 | ||
| 19 | 25.8 | 42 | 57.0 | 65 | 88.1 | 88 | 119.3 | 160 | 217.0 | ||
| 20 | 27.1 | 43 | 58.3 | 66 | 90.0 | 89 | 121.0 | 165 | 224.0 | ||
| 21 | 28.5 | 44 | 60.0 | 67 | 90.9 | 90 | 122.0 | 170 | 231.0 | ||
| 22 | 29.8 | 45 | 61.0 | 68 | 92.2 | 91 | 123.4 | 175 | 237.3 | ||
| 23 | 31.2 | 46 | 62.4 | 69 | 93.6 | 92 | 125.0 | 180 | 244.1 | ||
General Torque Specs
- In lieu of having torque specs at hand, below are general torque specs for different fasteners. However, nothing takes place of manufacturer torque specs for your specific applications. The torque numbers reflect pressures the bolts can take which doesn't take into account the amount of clamp force for the piece(s) you are clamping (or an aluminum engine). So, it's hard to trust the charts that give a torque values for bolts of a certain size, and then do not specify if the bolt is going into steel or aluminum. With steel bolts going into aluminum (engines), 'ya gotta be careful. 49)
- Good engineering books, covering fasteners, will describe the situation in full (bolt diameter, thread pitch, bolt coatings, lubrication used etc.). A lot more information than most of us ever use. Also, in the back of some motorcycle manuals you sometimes will find charts listing common bolts and torque settings. Best to take them with a grain of salt, however. 50)
- In fact, there are no torque specs for the motor mount bolts in the 57-78 FSMs.
And there is only value in the 79-85 FSM (rear motor mounting bolt-nut: 16 to 24 ft lbs).
For the rest, there is a “General Fastener Tightening Specifications” chart in the 70-78 and 79-85 FSMs. 51)
It lists general torque values for bolt types but not specific mounting bolts.
It also says to torque to these values given in the table unless specified otherwise.
However, these are steel to steel fasteners.
According to the chart, a 1/4“ grade 8 bolt is listed as taking a torque of 14 ft/lbs.
1/4” bolts are also used on cam covers and primary covers (90-110 in/lbs (9 ft/lbs) on the 1/4“ oil pump bolts)
14 ft/lbs is too much torque, not for the bolts, but for the aluminum threads in the case.
- When using oiled fasteners, you should take into account the added pre-load from the oil before applying advertised torque to avoid shearing off the bolt head or cracking/ breaking the piece your working on. You can use the Wet Chart below to calculate a torque value with the added pre-load.
Dry Torque Specs ft/lb
- Convert ft/lb to N*m by multiplying by 1.3558 52)
- Fastener strength of SAE bolts can be determined by the bolt head grade markings. Unmarked bolt heads are usually mild steel. More grade markings indicate higher strength fasteners. For instance, grade 5 may have three hash marks from the center out to the edge, grade 7 may have five hash marks and grade 8 should have 6 hash marks.53)
- These are only generalized specs that do not take into account the difference in steel and aluminum threading. See your FSM or instruction manual for specific torque values per application.
| Steel Fasteners | ||||||||||
| Size/Grade | 1/4” | 5/16“ | 3/8” | 7/16“ | 1/2” | 9/16“ | 5/8” | 3/4“ | 7/8” | 1“ |
|---|---|---|---|---|---|---|---|---|---|---|
| SAE 2 | 6 | 12 | 20 | 32 | 47 | 69 | 96 | 155 | 206 | 31054) |
| SAE 5 | 10 | 19 | 33 | 54 | 78 | 114 | 154 | 257 | 382 | 58755) |
| SAE 7 | 13 | 25 | 44 | 71 | 110 | 154 | 215 | 360 | 570 | 84056) |
| SAE 8 | 14 | 29 | 47 | 78 | 119 | 169 | 230 | 380 | 600 | 70057) |
The following torque values (from engineersedge.com) are suggested maximums based upon actual lab testing on clean and dry or near dry fasteners. 58)
For other friction conditions, significant modifications may be required.
The following chart is a reprint from this site.
| Torque Values for Stainless Steel and Nonferrous Fasteners (inch series) | ||||||
| Bolt Size | 18-8 Stainless Steel Torque in-lbs | 316 Stainless Steel Torque in-lbs | Silicon Bronze Torque in-lbs | Monel Torque in-lbs | Brass Torque in-lbs | 2024-T4 Aluminum Torque in-lbs |
|---|---|---|---|---|---|---|
| 4-40 | 5.2 | 5.5 | 4.8 | 5.3 | 4.3 | 2.9 |
| 4-48 | 6.6 | 6.9 | 6.1 | 6.7 | 5.4 | 3.6 |
| 5-40 | 7.7 | 8.1 | 7.1 | 7.8 | 6.3 | 4.2 |
| 5-44 | 9.4 | 9.8 | 8.7 | 9.6 | 7.7 | 5.1 |
| 6-32 | 9.6 | 10.1 | 8.9 | 9.8 | 7.9 | 5.3 |
| 6-40 | 12.1 | 12.7 | 11.2 | 12.3 | 9.9 | 6.6 |
| 8-32 | 19.8 | 20.7 | 18.4 | 20.2 | 16.2 | 10.8 |
| 8-36 | 22 | 23 | 20.4 | 22.4 | 18.0 | 12.0 |
| 10-24 | 22.8 | 23.8 | 21.2 | 25.9 | 18.6 | 13.8 |
| 10-32 | 31.7 | 33.1 | 29.3 | 34.9 | 25.9 | 19.2 |
| 1/4-20 | 75.2 | 78.8 | 68.8 | 85.3 | 61.5 | 45.6 |
| 1/4-28 | 94 | 99 | 87 | 106 | 77 | 57 |
| 5/16-18 | 132 | 138 | 123 | 149 | 107 | 80 |
| 5/16-24 | 142 | 147 | 131 | 160 | 116 | 86 |
| 3/8-16 | 236 | 247 | 219 | 266 | 192 | 143 |
| 3/8-24 | 259 | 271 | 240 | 294 | 212 | 157 |
| 7/16-14 | 376 | 393 | 349 | 427 | 317 | 228 |
| 7/16-20 | 400 | 418 | 371 | 451 | 327 | 242 |
| Bolt Size | 18-8 Stainless Steel Torque ft-lbs | 316 Stainless Steel Torque ft-lbs | Silicon Bronze Torque ft-lbs | Monel Torque ft-lbs | Brass Torque ft-lbs | 2024-T4 Aluminum Torque ft-lbs |
| 1/2-13 | 43 | 45 | 40 | 48.7 | 35.2 | 26 |
| 1/2-20 | 45 | 47 | 42 | 51 | 37 | 27 |
| 9/16-12 | 56 | 59 | 53 | 65 | 47 | 34 |
| 9/16-18 | 62 | 65 | 58 | 71 | 51 | 38 |
| 5/8-11 | 92 | 96 | 86 | 111 | 76 | 60 |
| 5/8-18 | 103 | 108 | 96 | 123 | 85 | 67 |
| 3/4-10 | 127 | 131 | 118 | 153 | 104 | 82 |
| 3/4-16 | 124 | 129 | 115 | 149 | 102 | 80 |
| 7/8-9 | 194 | 202 | 178 | 231 | 159 | 124 |
| 7/8-14 | 193 | 201 | 177 | 230 | 158 | 124 |
| 1 - 8 | 286 | 299 | 265 | 344 | 235 | 184 |
| 1 - 14 | 259 | 270 | 240 | 311 | 212 | 166 |
Wet Torque Value Chart for Lubed Threads From Allied Systems
If bolt threads are lubricated with light oil or anti-seize compound, the torque required to achieve the proper bolt tension is reduced. Below are charts with the proper “wet” torque values for type of bolt used: All charts property of and used by permission from Allied Systems Company.


Wet/Dry Charts from Applifast
| INCH BOLT TORQUE TABLE (SAE J429 and ASME 574) | METRIC BOLT TORQUE TABLE (ISO 898) | |||||||||||||
|---|---|---|---|---|---|---|---|---|---|---|---|---|---|---|
| Steel Grade | SAE 5 | SAE 8 | Socket Head Cap Screw | Property Class | 8.8 | 10.9 | 12.9 Socket Head Cap Screw |
|||||||
| Nom Dia-Pitch | Torque in ft/lbs or (in/lbs) | Nom Size x Pitch | Torque in Newton Meter - Nm | |||||||||||
| Dry | Lubed | Dry | Lubed | Dry | Lubed | Dry | Lubed | Dry | Lubed | Dry | Lubed | |||
| 1/4-20 | (101) | (76) | (143) | (107) | (168) | (120) | M5 x 0.80 | 6.1 | 4.6 | 8.8 | 6.7 | 10.3 | 7.7 | |
| 1/4-28 | (116) | (87) | (147) | (123) | (192) | (144) | M6 x 1.00 | 10.4 | 7.8 | 15 | 11.2 | 17.6 | 13.1 | |
| 5/16-18 | (209) | (157) | (295) | (221) | (348) | (264) | M7 x 1.00 | 17.6 | 13.1 | 25.1 | 18.9 | 29.4 | 22 | |
| 5/16-24 | (231) | (174) | (327) | (245) | (384) | (288) | M8 x 1.25 | 25.4 | 19.1 | 37.6 | 27.3 | 42.6 | 32.1 | |
| 3/8-16 | (372) | (276) | 44 | 33 | 51 | 38 | M10 x 1.50 | 50 | 38 | 72 | 54 | 84 | 64 | |
| 3/8-24 | (420) | (312) | 49 | 37 | 58 | 43 | M12 x 1.75 | 88 | 66 | 126 | 94 | 146 | 110 | |
| 7/16-14 | 49 | 37 | 70 | 52 | 81 | 61 | M14 x 2.00 | 141 | 106 | 201 | 150 | 235 | 176 | |
| 7/16-20 | 55 | 41 | 78 | 58 | 91 | 68 | M16 x 2.00 | 218 | 164 | 312 | 233 | 365 | 274 | |
| 1/2-13 | 75 | 57 | 106 | 80 | 124 | 93 | M18 x 2.50 | 301 | 226 | 431 | 323 | 504 | 378 | |
| 1/2-20 | 85 | 64 | 120 | 90 | 140 | 105 | M20 x 2.50 | 426 | 319 | 609 | 457 | 712 | 534 | |
| 5/8-11 | 150 | 113 | 212 | 159 | 238 | 179 | M22 x 2.50 | 580 | 435 | 831 | 624 | 971 | 728 | |
| 5/8-18 | 170 | 127 | 240 | 180 | 27 | 202 | M24 x 3.00 | 736 | 552 | 1052 | 789 | 1231 | 923 | |
| 3/4-10 | 267 | 200 | 376 | 282 | 423 | 317 | M27 x 3.00 | 1079 | 809 | 1544 | 1158 | 1805 | 1353 | |
| 3/4-16 | 297 | 223 | 420 | 315 | 472 | 354 | M30 x 3.50 | 1463 | 1097 | 2092 | 1570 | 2446 | 1834 | |
| 7/8-9 | 429 | 322 | 606 | 455 | 682 | 511 | M33 x 3.50 | 1990 | 1493 | 2849 | 2137 | 3328 | 2497 | |
| 7/8-14 | 474 | 355 | 69 | 502 | 752 | 564 | M36 x 4.00 | 2557 | 1918 | 3659 | 2744 | 4276 | 3208 | |
| 1-8 | 644 | 483 | 909 | 681 | 1022 | 767 | ||||||||
| 1-12 | 722 | 542 | 1020 | 765 | 1147 | 860 | ||||||||