Table of Contents

REF: Tools - 123
Torque Wrenches and Attachments
Selecting the Right Torque Wrench
See also in the Sportsterpedia:
- First criteria is to find a torque wrench that is calibrated for the torque value you'll be needing, no brainer.
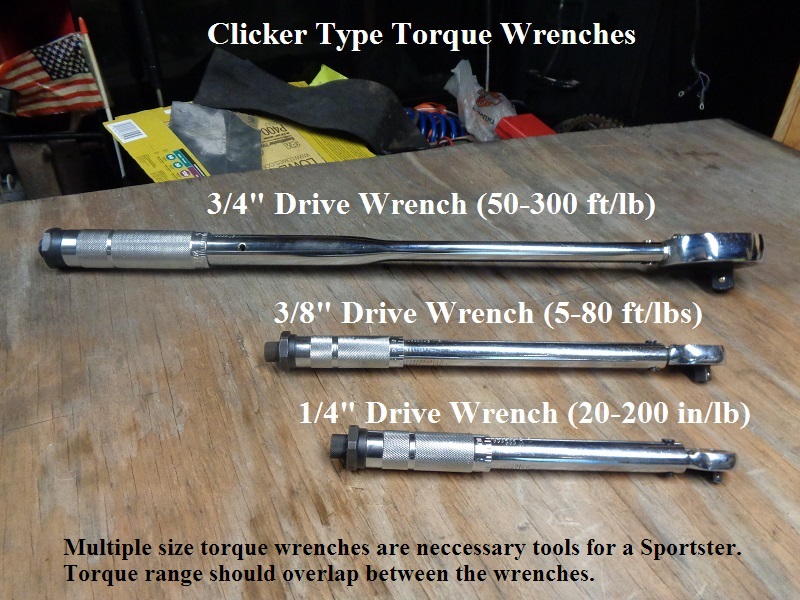
Check the torque specs for what you'll be working on and buy a wrench that works in that range. - Torque range and accuracy to cover all fasteners on a Sportster: It's safe to say you'll need at least three torque wrenches minimal.
1/4“ drive for inch pound wrench for small bolts.
3/8” drive foot/pound for general bolts.
1/2“ drive foot/pound wrench for larger torque applications.
3/4” drive foot/pound wrench is very help on the sprocket shaft.
Most torque wrenches that measure in ft/lbs don't go down low enough for small fasteners like primary/cam cover bolts etc. 1)
And most torque wrenches aren't accurate at the very bottom of their range.
The accuracy increases as you get up past from 20% or so of the scale on the wrench.
It's not so much a matter of getting a torque wrench that measures in inch lbs for small fasteners.
But rather getting one that measures as low as you need. Most, if not all, that go that low are going to be calibrated in inch lbs.
You do not just have to have a click type torque wrench. There are beam type torque wrenches out there as well.
Types of Torque Wrenches
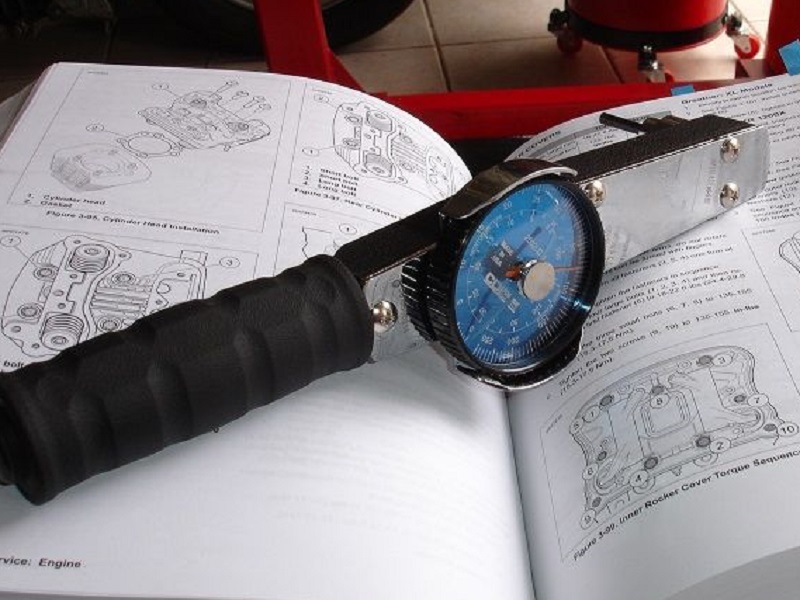
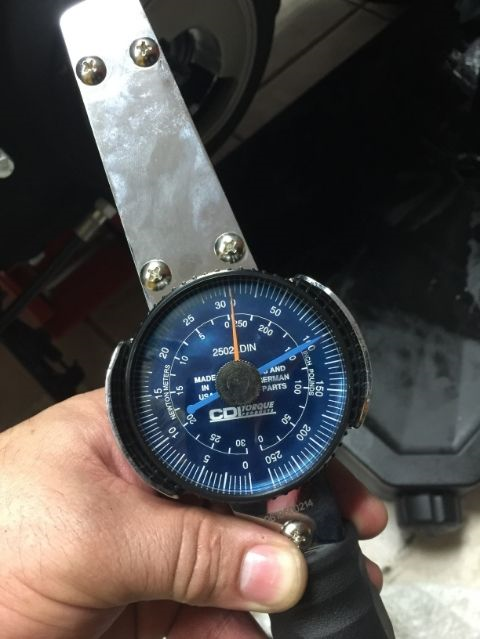
Dial Type Wrench
The dial torque wrench is designed for quick calibration. 2)
To use the wrench, set the inside dial to zero and the outside dial to the desired torque value.
The turn the wrench until the two dials line up.
Clicker Type Wrench
- As its name suggests, the clicking torque wrench clicks when the desired torque is reached.
Before turning the wrench, you set the handle to a specific torque.
When a clicker wrench is pulled to the point of the torque setting, the lever inside the wrench rolls over a cam and hits the inside of the wrench handle wall.
This effect makes the “click” sound, and tells the operator that they have reached the desired torque value. - The typical click-type torque wrench comes with a manual adjustable setting on the handle and typically have a ratchet head just like a socket wrench.
- Some clickers operate in the normal right hand turn position only, others operate both in forward or reverse.
A good thing to check before you buy if you left hand threads to tighten (like a clutch sprocket nut) - It allows the user to be more nimble in the process and to wait to hear it 'click' when the set torque value is achieved.
There are no graduations so you can see when you are at the correct torque level. - It gives you piece of mind after hearing the click that you did it right.
However, it can also deceive you if the calibration is off, if the value you set on the wrench is wrong or if the spring has been damaged or compromised.
- The 1/4“ clicker type torque wrenches are touch and go as far as accuracy.
- The spring tension is too slight to be accurate every time.
They don't work well when used upside down.
The click is inaudible or a very light sounding on the lower end of the scale (where you need it most).
They are not consistent to click every time before you strip a head or break a bolt.
- The 3/8” torque wrenches are not as accurate below 30-40 or so ft/lbs.
- The lower end of their scale is not as accurate as the upper end.
- It's also important to make sure the clicker wrench is set to the correct torque.
- The lines are small on the handle and you have to be sure you line them up on the right numbered line.
Turn the dial all the way down and count the lines as you turn the dial up to the value you're trying to set.
If you change the value, you should also turn the dial down past the lowest graduation and turn it back to the value you want next.
That relaxes the spring to let it charge up again. If you turn too far trying to set the value, don't turn back to a lower value.
Relax the spring all the way out and start over.
The dial should always be turned down around the lowest value before putting it away.
If you leave the spring charged, it will stay that way when you next use it.
At that point, the value you set next will be wrong.
- With these concerns in mind, a lot of fastener torque values fall in the gray area while using clicker type wrenches.
(between where the 1/4“ clicker and the 3/8” clicker will either fail to work or be too inconsistent to work)
While tightening any fastener, if it don't 'feel' right, it probably isn't.
Whichever type torque wrench you have or use, you must trust it. If you don't trust it, don't use it.
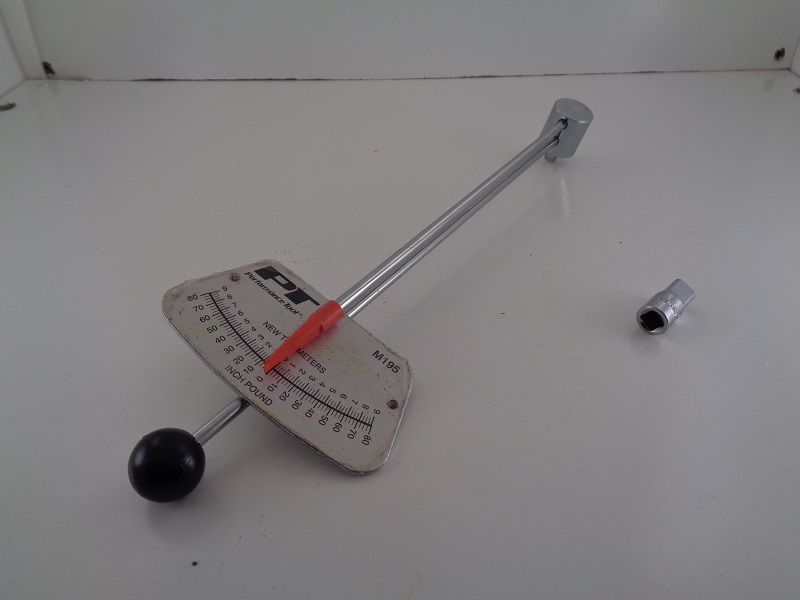
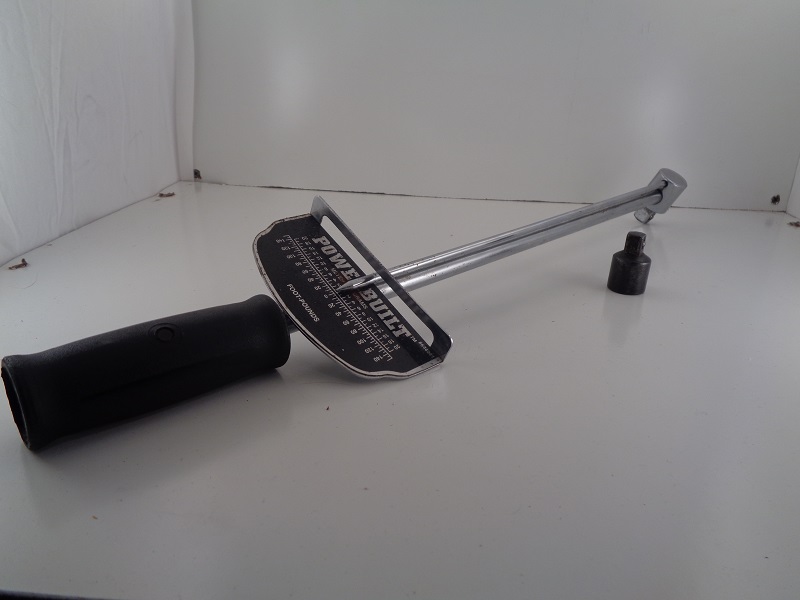
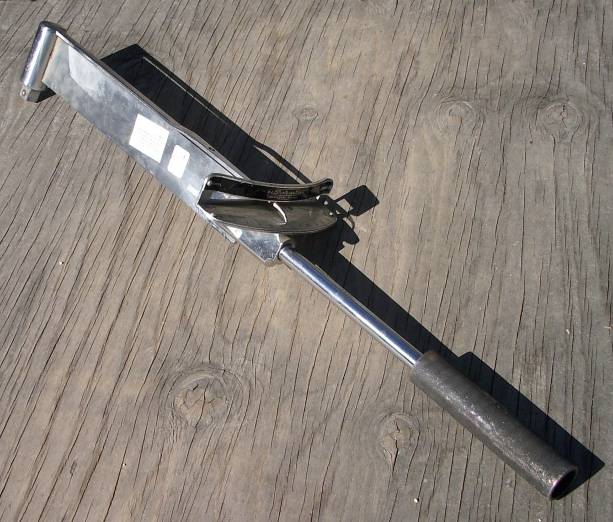
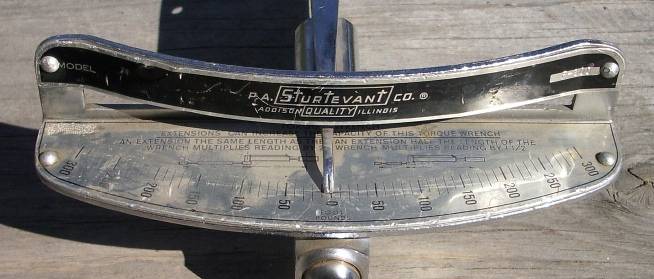
Beam Type Wrench
- Beam style torque wrenches contain a floating handle, with allows the handle to pivot as you turn the wrench.
- The bar bends at a controlled rate with added pressure.
The point moves along a graduated gauge to indicate the amount of torque applied.
When the gauge reaches the required torque, you stop turning the wrench. - There are no more moving parts than the beam itself.
- Your eyes alone tell you when you have reached the correct torque value.
- No waiting for a click that may or may not come from a clicker type wrench.
Beam wrenches come in a variety of calibrations. Check the specs before purchasing.
| 1/4“ Drive - Beam Torque Wrench 6) Range: 0-80 in/lbs | 1/4” Drive - Beam Torque Wrench 7) 0-120 in/lbs |
 |  |
| 1/2“ Drive - Beam Torque Wrench 8) Range: 0-150 ft/lbs |
 |
| 3/4” Drive - Beam Torque Wrench 9) Range: 0-300 ft/lbs |
|
 |  |
Digital (electronic) Type Wrench
- An electronic torque wrench displays a torque value on a digital screen. 10)
- Electronic (indicating) torque wrenches, have a strain gauge attached to the torsion rod.
- It sends a signal to the transducer and is then converted to a torque value.
Torque Screwdrivers
- For very small torques, it is common to use a torque screwdriver rather than a torque wrench.
What's the Best Type Torque Wrench to Use on a Sportster?
That's a loaded question. The best answer is whichever one works.
- Beam, Dial or even Digital torque wrenches are more consistent in their designed use than Clicker type torque wrenches.
- Reason being most people equate the 'click' with a finished job.
- Clicker wrenches are notorious for varying degrees of the clicking sound.
They do not click loud on the lower end of their scale or won't click at all.
You can feel the tumbler hit with your hand (slight knock) however the 'knock' is not as hard at low scale torque either. - See 'using feel' and practice it while using any wrench to turn a nut / bolt and that'll help keep you from breaking them.
- Clickers have been and continue to be used in all type applications with great results.
But as with any wrench, the user is responsible for making sure it's working properly and knowing how to use it. - However, clickers have been responsible for a lot of broken / stripped bolts, nuts and parts due to user error.
- Not re-calibrating = User error
- Waiting to hear the click and you'll keep pulling forever until it does = User error.
Expect the click but also keep it in your mind that it may not click. - Using it to remove bolts (as a breaker bar) = Misuse = User error.
The list goes on.
- Frequent calibration tests will also help you gain confidence in the wrench you choose and will tell you when it's not good to use it.
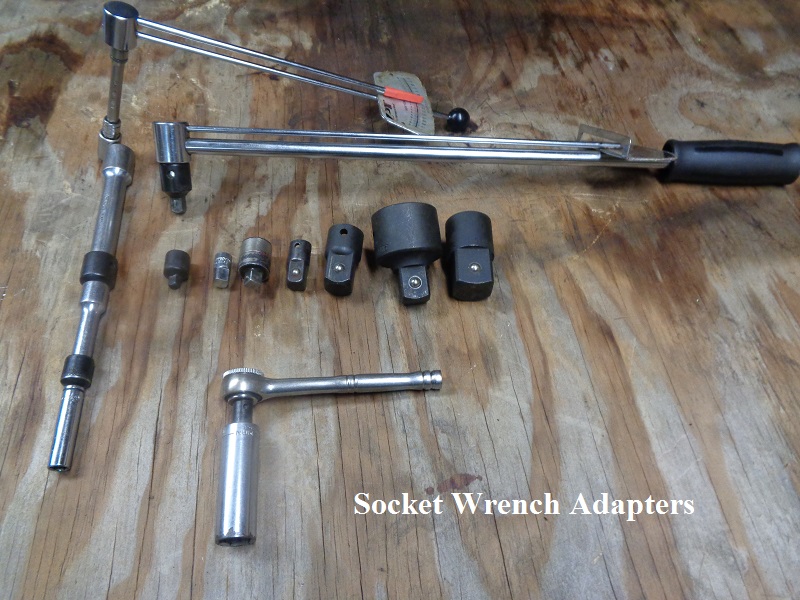
Attachments / Adapters
Drive Adapters
- Torque wrenches come with a variety of drive point sizes. Of course, so do sockets. Unless you have a full shop of tools, it can be cost effective to use adapters to give you the flexibility in using the same sockets with different drive wrenches.
- It's also important at times to be able to get to certain spots with smaller O.D. wrenches with the help from adapters as a (1/4“ drive) 1/2” socket will probably be a smaller outside diameter than 3/8“ or 1/2” drive in the same bolt size.
- Sometimes, it just all depends on what you have on hand and, if you can adapt to it, that saves you money.
- In addition certain drive bits (hex / torx etc.), within a kit of them, will have different drive requirements (usually 1/4“ and 3/8” drive internal squares).
- But, true tool nuts will want to have them all and still need more.
- You can also 2 adapters back to back to go from 1/2“ to 3/8” and then from 3/8“ to a 1/4” drive socket. There are other combinations as well.
- If you plan on using a torque wrench, below are some basic size adapters that you'll probably want on hand. So, go ahead and buy them just to have them. You'll appreciate them all eventually…. and probably want more too.
- The use of drive adapters does not change the torque value on the fastener.
When buying a torque wrench, these are some suggested adapters to have on hand or buy with it:
- A 1/4“ drive torque wrench may be required for the lower torque bolts (primary, gearcase, derby covers, etc.) which you can buy hex (allen) and star sockets for. However, some are 1/4” and others are 3/8“ drive socket ends. So, you'll need a 1/4” to 3/8“ drive adapter to be able to swap back and forth with these sockets and still use the torque wrench to tighten them properly.
- A 3/8” drive torque wrench (in some instances) may be useful for both 1/4“ and 1/2” drive sockets so you'll need an adapter up and one down for versatility.
- A 1/2“ drive torque wrench will probably be too strong to use 1/4” sockets but you'll definitely want to get a 3/8“ adapter in case you need to swap back and forth with 1/2” and 3/8“ drive sockets.
- A 3/4” drive torque wrench is usually only used in high torque applications and you should only need a 1/2“ drive adapter in it's use.
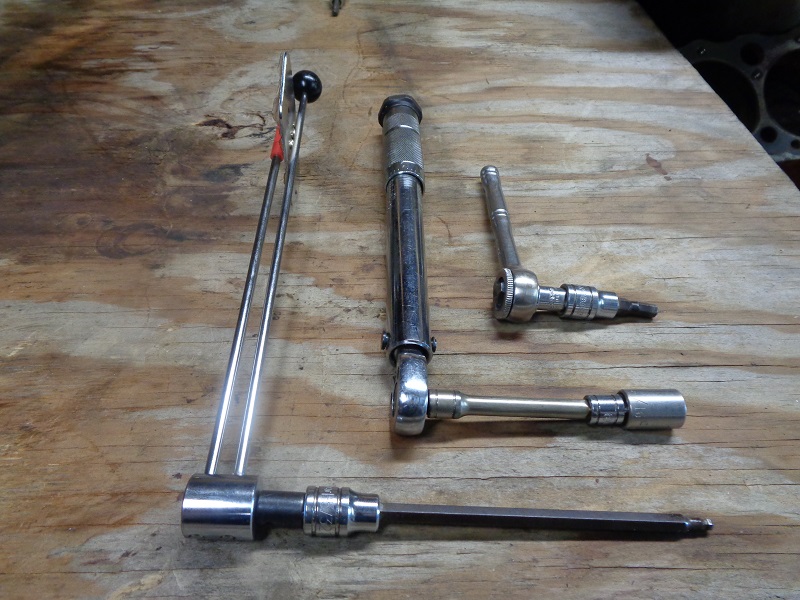
Socket Extensions
Drive End Extensions (horizontal with the wrench)
- These are usually considered methods to extend the length of the wrench (longways from the drive end).
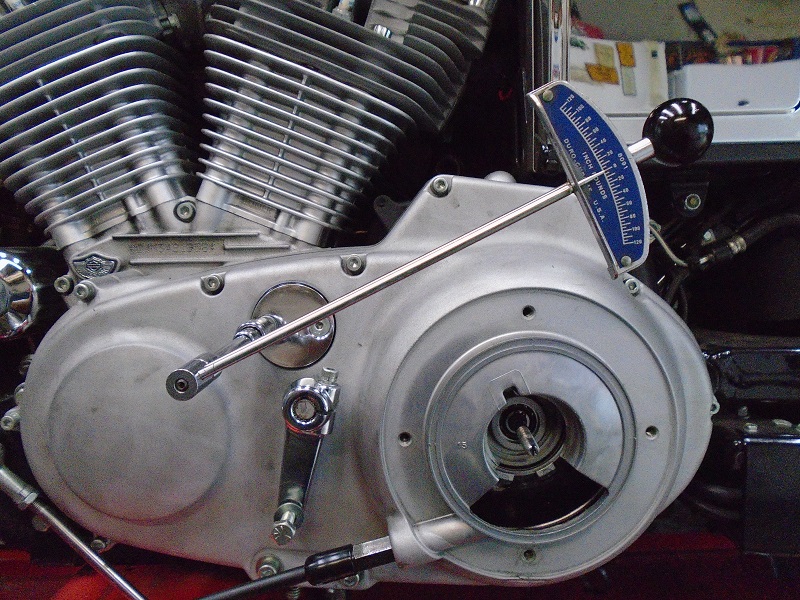
It allows you to get into confined spaces that the wrench head (or socket) is too big or awkward for. - If you use it longways (straight out from the handle, you'll need to re-calculate the torque setting on the wrench.
Extending the drive end of the wrench will add extra leverage (torque) on the nut / bolt. - If you use it at a 90° angle from the drive end, you will not need to recalculate the torque setting.
- Torque is measured at the socket axis.
It does not depend on the length of the wrench handle. That only affects the amount of pressure you have to exert to achieve a particular torque. - The extension is measured from center axis 13) to the drive (shaft) axis of the torque wrench.
- The calculation is the same for all types of torque wrenches (whether clicker or beam type, etc).
The torque wrench scale tells you how hard you are pulling at the handle.
The formula tells you how much torque is actually applied on the fastener. 14) - Or you can click here for more information on calculating the correct torque in the Sportsterpedia.
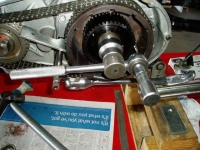
| This homemade extension is nice. You will need to recalculate torque if used this way. | ||
 |  |  |
| Homemade Wrench Extension for in-frame applications 15) | ||
|---|---|---|
| This setup also extends the drive end of the wrench and you'll have to calculate for the correct torque. 1/2 torque wrench (L) inside a pull handle wrench (minus the handle). 3/4” drive torque wrench (R) with 1/2“ adapter and a socket to fit the square shank of the 1/2” wrench. You can torque to about 140 foot pounds with this contraption but you have to keep straight alignment with the 2 wrenches or actual torque on the nut will change. This is Not a proper tool setup but it will work with lower torque values. 16) |
|
 17) 17) |  |
| This application is used to adapt a 1/2“ drive socket for use with a 3/4” drive torque wrench. Really! 18) | |
|---|---|
| Here is another way to make a drive end extension. This also needs to be calculated before using. | ||
 |  |  |
| Dial type torque wrench with box end wrench extension. 19) | ||
|---|---|---|
Swivels (or universal joint)
A swivel (or universal joint) is a great little tool for getting into areas where a straight run at a nut / bolt is hindered by obstacles near it (whether by the frame, wheels etc.).
However, a swivel used at an angle will lower the applied torque slightly.
But without using it at angle, there is no point to use a swivel.
See more here on using a swivel on a torque wrench in the Sportsterpedia.

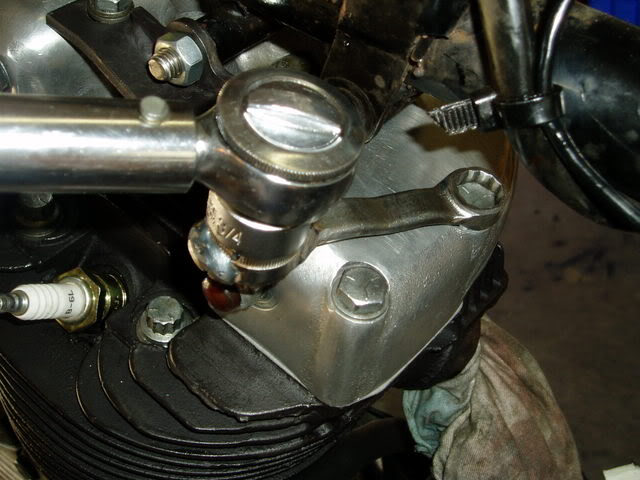
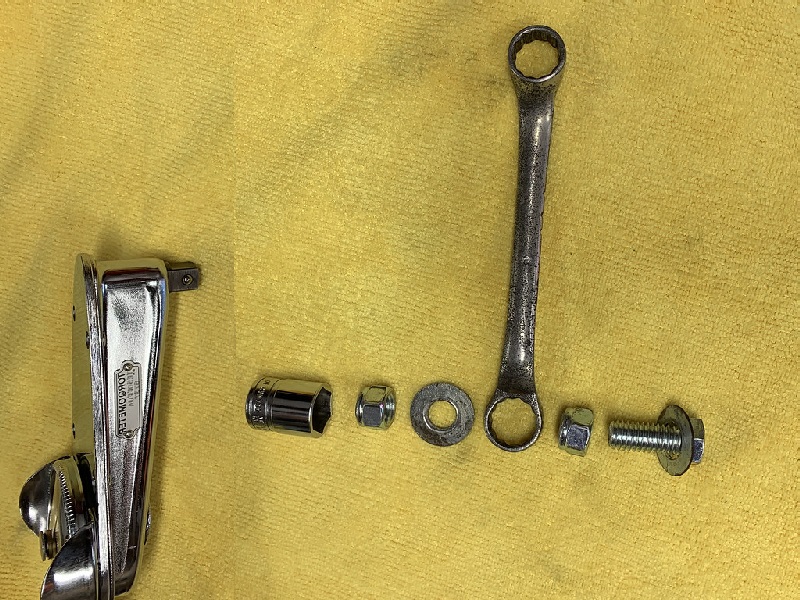
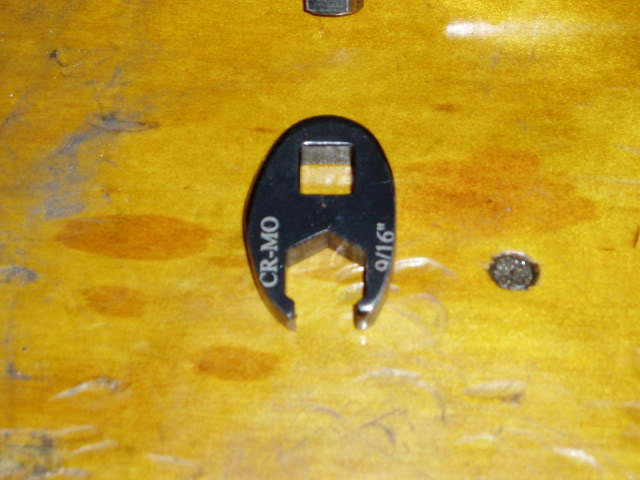
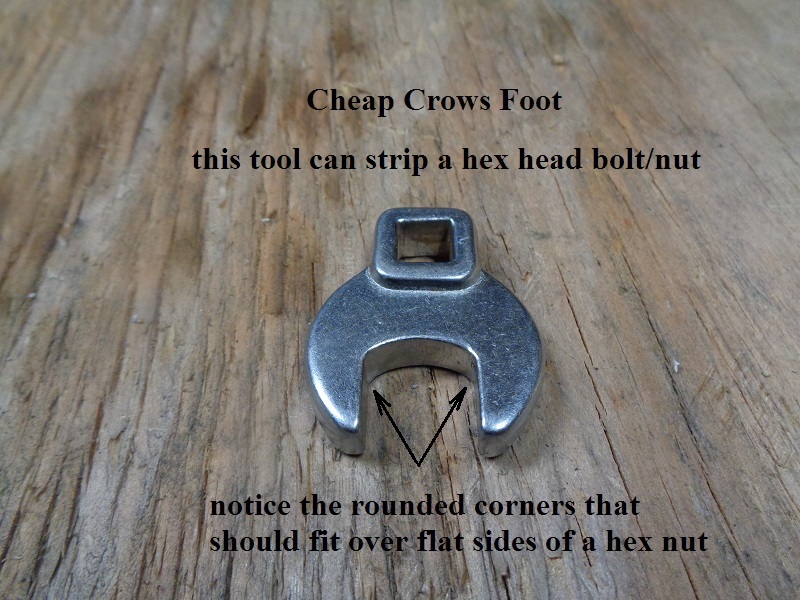
Crows Foot
A crows foot is another tool to help you get into tight places the wrench head don't want to go.
It's very useful IF it is built right and if you don't slip off the nut / bolt head while using it.
Cheap crows feet made of shiny chrome and costing less than pack of gum 'sometimes' is wider than it should be (I.D.)
A 3/8“ crows foot should be s good slip fit over the bolt head.
Some are made with more tolerance and be more loose around the nut or made with softer metal.
These can warp / break or strip the bolt corners especially when used for high torque applications.
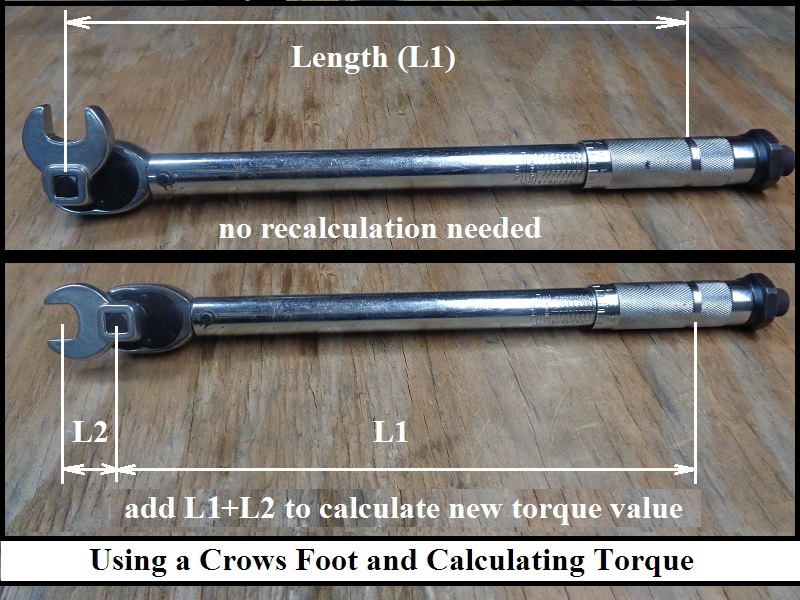
Any force that is applied that isn’t at a 90° angle will change the applied torque to the fastener. 21)
When you put a crows foot on a torque wrench and use it long-ways, the torque applied to the fastener increases.
If you turn the crows foot at a 90° angle, there is no increase in torque to the fastener from the preset scale.
Click here for more information on calculating the correct torque if not using a crows foot at 90° in the Sportsterpedia.
| Flare nut crows foot. Tight corners for non-slip function. 22) | Cheap crows foot. Rounded corners can slip. 23) | Using a crows foot on a torque wrench 24) |
 |  |  |