Table of Contents
This is an old revision of the document!

REF: Wheels, Brakes & Tires
Brake System
- Brake caliper mounting bolt O-rings- Dow Corning 44 grease (“Pin Lube” in parts kit) 1)
- O.D. of brake caliper piston (including chamfer), caliper piston bore and I.D. of the installed piston seal - Novaguard silicon grease.
- I.D. of upper caliper (threaded) bushing bore, O.D. of threaded bushing, I.D. of upper and lower caliper mounting pin bores - Dow Corning 44 grease (“Pin Lube” in parts kit) 2)
Aftermarket Brake Parts
Aftermarket brakes vs OEM brakes Check fitment of aftermarket brakes before using them. Just because they are published as 'will fit your vehicle' doesn't make it so. The pics below are a comparison of OEM brakes and an aftermarket brand:

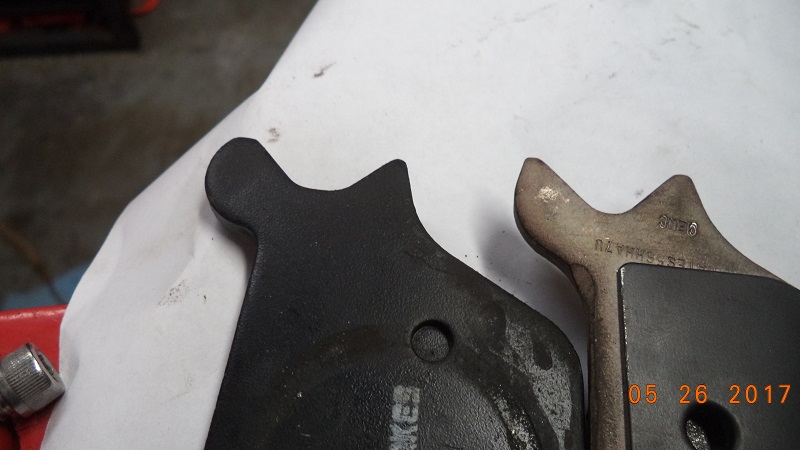
The light colored OEM brake has sharper contours to match up to the screw mounting bracket shims it rides against. The aftermarket brand is slightly shorter in length than OEM which allows it to wiggle around a bit since it doesn't fit tight against the screw shims which can allow it to drop below the disc resulting in poor pad wear and possible disc wear or disc drag as in the pic below:

Be sure your brakes can not wiggle around before installing the caliper.
Brake Fluid
HD Recommendations
When to Check or Change Brake Fluid
| Year Model | Check | Change |
|---|---|---|
| 1959-1969 | ||
| 1970-197810) | Every 2,000 miles | Every 5,000 miles |
| 1979-198511) | Initial 500, then every 2,500 miles | Every 2 years |
| 1986-199012) | Check at initial 500 then every 5,000 miles, prior to storage or annually | Change/ Replace as needed |
| 1991 to 200313) | Every 300 til and including initial 1,000 miles, then every 5,000 miles | Replace as needed |
What Type Brake Fluid Do You Have
When in doubt,
- 1st check your bikes service manual to see what should go in it.
- Next, get a few drops of brake fluid from your brake reservoir and put them in a small container. Add a few drops of water and mix it all together.
- If the water mixes with the brake fluid, it is DOT 3, 4 or (5.1).
- If the water does not mix with the brake fluid it is DOT 5. 14)
The Color Check
- DOT 3 is available in Clear, Pale Yellow, Blue & Crimson Red.
- DOT 4 is available in Clear, Pale Yellow & Crimson Red.
- DOT 5.1 is available Clear, Pale Yellow & Blue.
- DOT 5 is available in Purple & Violet. 15)
The presence or absence of color is not a safe criteria to distinguish between the different types of brake fluids. The color is added in brake fluid to detect leaks and color does not effect the quality of brake fluid. Since blue and purple sometimes can seem the same color depending on lighting, you could be mixing Dot 5 and DOT (5.1).
Mixing Brake Fluids
- Mixing different colors of the same type typically won't hurt the system as long as what you are adding to has not been compromised previously if your just topping off your existing fluid.
- You can typically mix DOT 3,4 and 5.1 fluids without damaging your braking system or compromising your existing braking performance. But as nearly every brake fluid manufacturer will state: doing so is not recommended. Why? Mixing good new fluid and old bad fluid means you will retain the bad fluid's performance and change the temperature ratings of your residual fluid. You can't mix any others with Dot 5 fluids. Mixing the others into Dot 5 would cause a meltdown of the rubber parts and/ or a break down of the silicone and possibly clog up the brake lines causing brake failure. Dot 5 into the others may release clogs into the brake lines also leading to brake failure.
- If silicone is introduced into an older brake system, the silicone will latch onto the sludge generated by gradual component deterioration and create a gelatin like goop which will attract more crud and eventually plug up metering orifices or cause pistons to stick. If you have already changed to DOT 5, don't compound the problem and change back. You will never get all of the silicone out of your system. Just change the fluid regularly. For those who race using silicone fluid, crack the bleed screws before each racing session to insure that there is no water in the calipers. 16)
DOT 3, DOT 4, DOT 5.1
- DOT 3 brake fluids are mixtures of glycols and glycol ethers. DOT 4 contains borate esters in addition to what is in DOT 3. These brake fluids are somewhat similar to automotive anti-freeze (ethylene glycol) and are not a petroleum fluid. Both DOT 3-4 and DOT 5 fluids are compatible with most brake system materials except in the case of some silicone rubber external components such as caliper piston boots 17)
- The problem with DOT 3-4 fluids is water absorption. DOT 3-4 glycol based fluids, just like ethylene glycol antifreezes, are readily miscible with water. Long term brake system water content tends to reach a maximum of about 3%, which is readily handled by the corrosion inhibitors in the brake fluid formulation. Since the inhibitors are gradually depleted as they do their job, glycol brake fluid, just like anti-freeze, needs to be changed periodically. 18)
- Fluid boiling point DOT 4 glycol based fluid has a higher boiling point (446F) than DOT 3 (401F), and both fluids will exhibit a reduced boiling point as water content increases.19)
- DOT 5.1 is also glycol-based and it's major difference to Dot 3 and 4 is it's dry boiling point (minimum 518F).
DOT 5
- Dot 5 is of silicone chemistry and not being water miscible, it must rely on the silicone (with some corrosion inhibitors) as a barrier film to control corrosion. Water is not absorbed by silicone as in the case of DOT 3-4-5.1 fluids, and will remain as a separate globule sinking to the lowest point in the brake system, since it is more dense. 20)
- Dot 5 in its pure state offers a higher boiling point (500F) however if water got into the system, and a big globule found its way into a caliper, the water would start to boil at 212F causing a vapor lock condition (possible brake failure). DOT 3 fluid with 3% water content would still exhibit a boiling point of 300F. Silicone fluids also exhibit a 3 times greater propensity to dissolve air and other gasses which can lead to a “spongy pedal” and reduced braking at high altitudes. 21)
Brake Fluid Boiling Points
- Dry Boiling Point: This is the temperature that your brake fluid will boil when its straight out of the sealed bottle. When there has been effectively no time for it to absorb any moisture. If you are racing on a track, you are most concerned with this value, since the fluid in your lines is likely to be freshly added. 22)
- Wet Boiling Point: This is the temperature that your brake fluid will boil when its been inside your braking system for a reasonably long time. How long it takes to get to this saturation point will vary by fluid type, but a good rule of thumb is the higher the dry boiling point, the faster the fluid will saturate (an informal sort of standard is…not always - used by fluid manufacturers: the wet boiling point is the reading taken after fluid has been sitting for one year in your brake lines). If you are riding mainly on the street the wet boiling point is going to be the one you want to pay attention to since the fluid will typically stay in your brake lines for an extended period of time. 23)
SAE Testing Brake Fluid Lubricity
- SAE is currently working on modernizing testing and standards for automotive brake fluids. Below are the standards that relate to brake fluid and their corresponding standard number.
- J1703- Motor Vehicle Brake Fluid Jul 20, 2015
- J1704- Motor Vehicle Brake Fluid Based Upon Glycols, Glycol Ethers and the Corresponding Borates Jul 20, 2015
- J1705- Low Water Tolerant Brake Fluids Apr 21, 2014
- J1707- Service Maintenance of SAE J1703 and J1704 Brake Fluids in Motor Vehicle Brake Systems
Links to Brake Fluid Comparison Charts on the Web
- Interesting amateur test on mixing brake fluids http://www.buckeyetriumphs.org/technical/Brakes/Fluid/Fluid.htm
Bleeding Brake Lines
Reverse Bleeding Your Brake Your Fluid Lines
- You can buy the 60 ml irrigation syringe [not an injection syringe] at any drug store, especially one specializing in home medical products. 27)
- Discard the needle from the syringe, remove lid from master cylinder and re-set it on top. It must be off of course, but the master cylinder must be covered to prevent the fluid from squirting 10' across the shop. 28)
- Attach a short clear plastic tube to the end of the syringe. Best to use a tube that is “too small” in diameter - this is important to get a really tight seal on the bleeder to the point you have to force it onto the bleeder with needle nose pliers. 29)
- Use the syringe to empty the master cylinder and discard this fluid. 30)
- Fill the syringe with new brake fluid and let stand for 5 minutes or so for the bubbles to rise out of the syringe / tube. 31)
- Attach to bleeder, hold it upright and fiddle with the tube until air has risen into syringe. 32)
- Loosen the bleeder and slowly squeeze the fluid thru, do not release pressure on the syringe without tightening the bleeder - some fluid and possibly some air may get drawn back. 33)
- I bought a mustard / ketchup squirt bottle set from the dollar store. Filled it with brake fluid hooked it to the bleeder with some tubing and filled the reservoir that way. 34)
Force Bleeding Brakes thru the Bleeder Screw
In watching the air bubbles through a clear tube while pumping the brakes, you will see force both push and pull the air. General rule of thumb should be to push hard, release slow. You push more air farther towards the outlet point when the force is faster. When bleeding the rear caliper, the tubing installed on the bleeder screw should be higher than the caliper to allow air to 'want' to go there. Releasing the force (lever or pedal) fast will allow the air to suck back towards the master cylinder.
- One way to bleed the caliper or wheel cylinder is to first top off the master cylinder and then remove the bleed screw completely. 35)
- Plug the bleed screw hole with your finger tightly. Have a friend or you can do it yourself, one at a time, squeeze the brake while holding tightly over the bleed hole. The fluid and air will push past your finger and seal immediately when the brake is released. It's a hell of a lot easier and faster than the opening and closing a bleed screw. You can do both calipers at once this way if you have a helper. Once you have a solid stream of fluid, you are fine. 36)
- You can gravity bleed too…takes a while, but it works. Open the bleeders and wait for a steady leak and close the bleed screw. Should be good. 37)
2FSyringe))