Table of Contents
This is an old revision of the document!

REF: Wheels, Brakes & Tires
Brake System
See also Bleeding the Brake Lines In the REF section of the Sportsterpedia.
- Brake caliper mounting bolt O-rings- Dow Corning 44 grease (“Pin Lube” in parts kit) 1)
- O.D. of brake caliper piston (including chamfer), caliper piston bore and I.D. of the installed piston seal - Novaguard silicon grease.
- I.D. of upper caliper (threaded) bushing bore, O.D. of threaded bushing, I.D. of upper and lower caliper mounting pin bores - Dow Corning 44 grease (“Pin Lube” in parts kit) 2)
Aftermarket Brake Parts
Aftermarket brakes vs OEM brakes Check fitment of aftermarket brakes before using them. Just because they are published as 'will fit your vehicle' doesn't make it so. The pics below are a comparison of OEM brakes and an aftermarket brand:

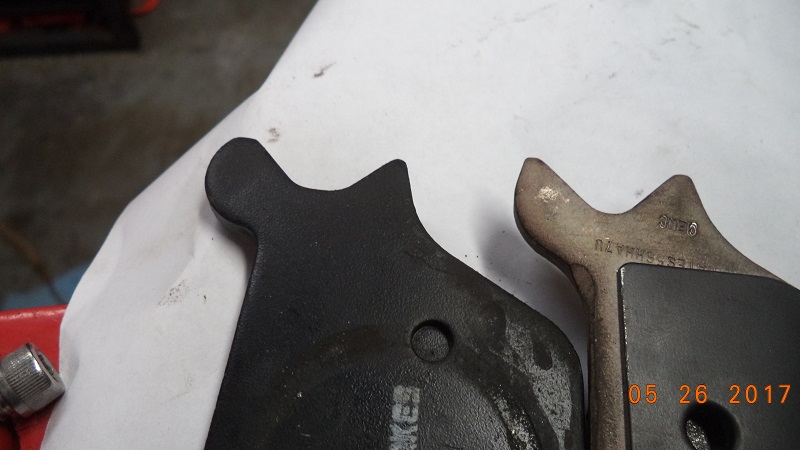
The light colored OEM brake has sharper contours to match up to the screw mounting bracket shims it rides against. The aftermarket brand is slightly shorter in length than OEM which allows it to wiggle around a bit since it doesn't fit tight against the screw shims which can allow it to drop below the disc resulting in poor pad wear and possible disc wear or disc drag as in the pic below:

Be sure your brakes can not wiggle around before installing the caliper.
Brake Fluid
HD Recommendations
When to Check or Change Brake Fluid
Copper content is the most destructive aspect of brake fluid breakdown.
So even without moisture being present in the fluid, it is still a good idea to change the fluid when it is suppose to be changed. 10)
| Year Model | Check | Change |
|---|---|---|
| 1959-1969 | ||
| 1970-197811) | Every 2,000 miles | Every 5,000 miles |
| 1979-198512) | Initial 500, then every 2,500 miles | Every 2 years |
| 1986-199013) | Check at initial 500 then every 5,000 miles, prior to storage or annually | Change/ Replace as needed |
| 1991 to 200314) | Every 300 til and including initial 1,000 miles, then every 5,000 miles | Replace as needed |
Testing Your Brake Fluid
- Check water solubility
- What Type Brake Fluid Do You Have?
- 1st check your bikes service manual to see what should go in it.
- Next, get a few drops of brake fluid from your brake reservoir and put them in a small container. Add a few drops of water and mix it all together.
- If the water mixes with the brake fluid, it is DOT 3, 4 or (5.1).
- If the water does not mix with the brake fluid it is DOT 5. 15)
- The Color Check
- The presence or absence of color is not a safe criteria to distinguish between the different types of brake fluids.
The color is added in brake fluid to detect leaks and color does not effect the quality of brake fluid.
Since blue and purple sometimes can seem the same color depending on lighting, you could be mixing Dot 5 and DOT (5.1).
(not to mention DOT 5 turning clear and making you think someone changed to a different type than OEM for your year model…. this does happen.) - Test for moisture content:
This test is a result of an SAE paper showing a distinct relationship between moisture content and the voltage measured. 18) - Brake fluid (3,4 & 5.1) is hygroscopic (able to draw in moisture like a sponge).
It is no wonder, then, that the brake fluid in the master cylinder is often dark, almost black in appearance.
But does that mean it has to be changed? Not always.
Glycol based fluid absorbs moisture and disperses it throughout the system.
Silicone based (5) fluid does not allow moisture to enter the system. So this test may not work for DOT 5 fluid. 19)
(since it's the moisture inside the fluid that makes the reaction)
And while there are test strips to test the moisture content,
Here is a method that works just as well.
Use your DMM (Digital Multimeter) to test the fluid. - The procedure is easy enough.
- Hook up your negative meter lead to the negative battery post.
- Insert your positive meter lead into the brake fluid while avoiding contact with the reservoir itself.
- Any reading over 0.30 volts is too much, and the fluid should be flushed.
Mixing Brake Fluids
- Mixing different colors of the same type typically won't hurt the system.
(as long as what you are adding to has not been compromised previously if your just topping off your existing fluid) - You can typically mix DOT 3,4 and 5.1 fluids without damaging your braking system or compromising your existing braking performance.
But as nearly every brake fluid manufacturer will state: doing so is not recommended.
Mixing good new fluid and old bad fluid means you will retain the bad fluid's performance.
(and change the temperature ratings of your residual fluid)
You can't mix any others with Dot 5 fluids.
Mixing the others into Dot 5 would cause a meltdown of the rubber parts and / or a break down of the silicone
(and possibly clog up the brake lines causing brake failure)
Dot 5 into the others may release clogs into the brake lines also leading to brake failure. - If silicone is introduced into an older brake system;
The silicone will latch onto the sludge generated by gradual component deterioration and create a gelatin like goop.
(which will attract more crud and eventually plug up metering orifices or cause pistons to stick)
If you have already changed to DOT 5, don't compound the problem and change back.
You will never get all of the silicone out of your system. Just change the fluid regularly.
For those who race using silicone fluid;
Crack the bleed screws before each racing session to insure that there is no water in the calipers. 20)
Replacing Brake Fluid (Dot 3 to Dot 5)
The following is found in HD Technical Service Bulletin M-712 dated June 16,1977.
When changing from D.O.T. 3 to D.O.T. 5 fluid or when flushing the brake system, it is important that D.O.T. 3 fluid be removed completely.
Old fluid could be contaminated with water and if mixed with the new D.O.T.-5 fluid, it would detract from it's effectiveness.
The old fluid could also cause varnish deposits if the system is operated above the boiling point of D.O.T. 3.
Caution should be used when bleeding because any brake fluid on the pad will contaminate the pad material and reduce brake effectiveness.
The fluid absorbed by the pads cannot be removed satisfactorily with any solvent nor by operating the brakes.
Procedure:
- Disconnect the brake lines from the master cylinder and wheel calipers (wheel cylinders if drum brakes).
Catch old fluid in container and discard. - Remove master cylinder and brake calipers from motorcycle.
- Disconnect brake hoses from the metal brake lines (if applicable).
- Flush the metal brake lines several times with silicone brake fluid (D.O.T. 5) fluid to remove all the old fluid.
Solvent flushing is not recommended. - Replace the brake hoses with new ones.
- Disassemble the master cylinder and wheel calipers or cylinders.
- Drain and remove any residual D.O.T. 3 brake fluid with a dry, clean cloth that will not leave lint or grit on the master cylinder or caliper parts.
- Replace master cylinder and wheel caliper rubber seals, piston cups and 0-rings with new parts.
- Coat pistons, piston bores and rubber parts with silicone brake fluid and reassemble.
- Install master cylinder and calipers on motorcycle.
- Reassemble brake lines to master cylinder and calipers.
- Fill brake system with D.O.T.-5 silicone brake fluid and bleed air from system following procedure in Service Manual.
Fluid leakage from the rear master cylinder boot after bleeding is often caused by excessive piston travel due to air in the system.
The boot should be wiped clean of any brake fluid to avoid contaminating the cylinder with road dust.
DOT 3, DOT 4, DOT 5.1
- DOT 3 brake fluids are mixtures of glycols and glycol ethers. DOT 4 contains borate esters in addition to what is in DOT 3. These brake fluids are somewhat similar to automotive anti-freeze (ethylene glycol) and are not a petroleum fluid. Both DOT 3-4 and DOT 5 fluids are compatible with most brake system materials except in the case of some silicone rubber external components such as caliper piston boots 21)
- The problem with DOT 3-4 fluids is water absorption. DOT 3-4 glycol based fluids, just like ethylene glycol antifreezes, are readily miscible with water. Long term brake system water content tends to reach a maximum of about 3%, which is readily handled by the corrosion inhibitors in the brake fluid formulation. Since the inhibitors are gradually depleted as they do their job, glycol brake fluid, just like anti-freeze, needs to be changed periodically. 22)
- Fluid boiling point DOT 4 glycol based fluid has a higher boiling point (446F) than DOT 3 (401F), and both fluids will exhibit a reduced boiling point as water content increases.23)
- DOT 5.1 is also glycol-based and it's major difference to Dot 3 and 4 is it's dry boiling point (minimum 518F).
DOT 5
- The change to Dot 5 brake fluid was made with HD production motorcycles in September of 1976 24). It is of silicone chemistry and not being water miscible, it must rely on the silicone (with some corrosion inhibitors) as a barrier film to control corrosion. Water is not absorbed by silicone as in the case of DOT 3-4-5.1 fluids, and will remain as a separate globule sinking to the lowest point in the brake system, since it is more dense. 25)
- When using Dot 3 brake fluid, the brake system should be drained, flushed, and refilled with new brake fluid every year to eliminate any contamination such as sludge. This yearly service was eliminated when D.O.T.-5 silicone fluid was used instead and with improved performance. 26)
- HD changed to DOT 5 brake fluid in production models in September of 1976.
Silicone brake fluid reduces corrosion, will not degrade the “rubber” components, and sludge will not form in the system. It will not absorb water, does not attack painted parts, and has a higher boiling point than conventional brake fluid. When stored under normal conditions it has unlimited shelf life. However, it is somewhat harder to bleed brakes with Dot 5 because of its viscosity. 27) - Dot 5 in its pure state offers a higher boiling point (500F) however if water got into the system, and a big globule found its way into a caliper, the water would start to boil at 212F causing a vapor lock condition (possible brake failure). DOT 3 fluid with 3% water content would still exhibit a boiling point of 300F. Silicone fluids also exhibit a 3 times greater propensity to dissolve air and other gasses which can lead to a “spongy pedal” and reduced braking at high altitudes. 28)
Brake Fluid Boiling Points
- Dry Boiling Point: This is the temperature that your brake fluid will boil when its straight out of the sealed bottle. When there has been effectively no time for it to absorb any moisture. If you are racing on a track, you are most concerned with this value, since the fluid in your lines is likely to be freshly added. 29)
- Wet Boiling Point: This is the temperature that your brake fluid will boil when its been inside your braking system for a reasonably long time. How long it takes to get to this saturation point will vary by fluid type, but a good rule of thumb is the higher the dry boiling point, the faster the fluid will saturate (an informal sort of standard is…not always - used by fluid manufacturers: the wet boiling point is the reading taken after fluid has been sitting for one year in your brake lines). If you are riding mainly on the street the wet boiling point is going to be the one you want to pay attention to since the fluid will typically stay in your brake lines for an extended period of time. 30)
SAE Testing Brake Fluid Lubricity
- SAE is currently working on modernizing testing and standards for automotive brake fluids. Below are the standards that relate to brake fluid and their corresponding standard number.
- J1703- Motor Vehicle Brake Fluid Jul 20, 2015
- J1704- Motor Vehicle Brake Fluid Based Upon Glycols, Glycol Ethers and the Corresponding Borates Jul 20, 2015
- J1705- Low Water Tolerant Brake Fluids Apr 21, 2014
- J1707- Service Maintenance of SAE J1703 and J1704 Brake Fluids in Motor Vehicle Brake Systems
Links to Brake Fluid Comparison Charts on the Web
- Interesting amateur test on mixing brake fluids http://www.buckeyetriumphs.org/technical/Brakes/Fluid/Fluid.htm
Front Master Cylinder to Wheel Cylinder Ratio Chart
This is a reprint from vintagebrake.com.
34)
While attending Vintage Days West, and thoroughly enjoying it, I was reminded that many of the people I had occasion to talk to, lacked an understanding of the importance of master cylinder to wheel cylinder ratios. This critical ratio is of paramount importance in determining “feel”. It has been my experience that there is a “sweet spot” in the range. I like ratios in the 27:1 range-2 finger power brakes, feeling some line and/or caliper flex. 23:1 is at the other end of the spectrum-firm. Ratios lower than 20:1 can result a feel so “wooden” as to have a toggle switch effect: nothing happens until the wheel locks. Disc and wheel diameters must be taken into consideration. A 10 inch disc working against an 19“ wheel just doesn't have the leverage ratio that a 13 inch disc working a 17” wheel does. The hand lever ratio counts too: witness the adjustable master cylinders from Lockheed and Brembo.
A case in point: I had a complaint from a racer about Ferodo CP901- a compound renown for its great feel. His comment was that they worked poorly until the wheel locked. He had been thrown on the ground twice. Intrigued, I inquired as to the application. “Yamaha RD350” he replied. A red flag went up. CP901 was not available for the 48mm Yamaha caliper. I asked “How that could that be?” He had up-graded his braking system with the 41mm Lockheed unit, but was unaware that a master cylinder change was in order. A stock RD 350 has an already poor ratio of 18.3 :1, and with Lockheed, became an unhealthy 13.3 :1. The “sweet spot” formula said a change to a 11 or 12mm master cylinder was in order: my personal preference and recommendation would have been an 11mm. He was able to switch to a 1/2“ , and although not ideal, he was keeping the rubber side down.
For 2 piston opposed calipers, I like ratios in the 27:1 range, feeling some line and caliper flex. For a firmer lever, use 23:1. I think ratios lower than 23:1 produce a lever feel so “wooden” as to have little, if any feel. Combine “low” leverage ratios with sticky pads, and unpredictable lockup is the result. The high effort required at the lever also results in undesired input to the bars. Single piston calipers are much happier in the 14:1 to 12:1 range. Disc and wheel diameters, as well as hand lever ratios, must be considered.
( ) = Number of active pistons. 35)
| Diameter | M/C → | 10mm | 11mm | 12mm | 1/2” | 13mm | 14mm | 15mm | 5/8“ | 16mm | 11/16” | 19mm |
| Caliper ↓ | Area-MM² | 78.54 | 95.03 | 113.10 | 126.68 | 132.73 | 153.94 | 176.72 | 197.93 | 201.06 | 239.60 | 283.63 |
| 28mm | 615.75 | 7.84 | 6.48 | 5.44 | 4.86 | 4.64 | 4.00 | 3.48 | 3.11 | 3.06 | 2.57 | 2.17 |
| 28mm (2) | 1231.51 | 15.68 | 12.96 | 10.89 | 9.72 | 9.28 | 8.00 | 6.97 | 6.22 | 6.13 | 5.14 | 4.34 |
| 28mm (4) | 2463.01 | 31.36 | 25.92 | 21.78 | 19.44 | 18.56 | 16.00 | 13.94 | 12.44 | 12.25 | 10.28 | 8.69 |
| 30mm | 706.86 | 9.00 | 7.44 | 6.25 | 5.58 | 5.33 | 4.59 | 4.00 | 3.57 | 3.52 | 2.95 | 2.49 |
| 30mm (2) | 1413.72 | 18.00 | 14.88 | 12.50 | 11.16 | 10.65 | 9.18 | 8.00 | 7.14 | 7.03 | 5.90 | 4.99 |
| 30mm (4) | 2827.44 | 36.00 | 29.75 | 25.00 | 22.32 | 21.30 | 18.37 | 16.00 | 14.28 | 14.06 | 11.81 | 9.97 |
| 32mm | 804.25 | 10.24 | 8.46 | 7.11 | 6.35 | 6.06 | 5.22 | 4.55 | 4.06 | 4.00 | 3.36 | 2.84 |
| 32mm (2) | 1608.50 | 20.48 | 16.93 | 14.22 | 12.70 | 12.12 | 10.45 | 9.10 | 8.13 | 8.00 | 6.72 | 5.67 |
| 32mm (4) | 3217.00 | 40.96 | 33.85 | 28.44 | 25.39 | 24.24 | 20.90 | 18.20 | 16.25 | 16.00 | 13.43 | 11.35 |
| 35mm | 962.12 | 12.25 | 10.12 | 8.51 | 7.59 | 7.25 | 6.25 | 5.44 | 4.86 | 4.79 | 4.02 | 3.39 |
| 35mm (2) | 1924.23 | 24.50 | 20.25 | 17.01 | 15.19 | 14.50 | 12.50 | 10.89 | 9.72 | 9.57 | 8.03 | 6.79 |
| 38mm | 1134.12 | 14.44 | 11.93 | 10.03 | 8.95 | 8.54 | 7.37 | 6.42 | 5.73 | 5.64 | 4.74 | 4.00 |
| 38mm (2) | 2268.24 | 28.88 | 23.87 | 20.06 | 17.91 | 17.09 | 14.73 | 12.84 | 11.46 | 11.28 | 9.47 | |
| 38mm (4) | 4536.47 | 57.76 | 47.74 | 40.11 | 35.81 | 34.18 | 29.47 | 25.67 | 22.92 | 22.56 | 18.94 | 16.00 |
| 41mm | 1320.26 | 16.81 | 13.89 | 11.67 | 10.42 | 9.95 | 8.58 | 7.47 | 6.67 | 6.57 | 5.51 | 4.66 |
| 41mm (2) | 2640.51 | 33.62 | 27.79 | 23.35 | 20.84 | 19.89 | 17.15 | 14.94 | 13.34 | 13.13 | 11.03 | 9.31 |
| 41mm (4) | 5281.03 | 67.24 | 55.57 | 46.69 | 41.69 | 39.79 | 34.31 | 29.88 | 26.68 | 26.27 | 22.05 | 18.63 |
| 44mm (2) | 3041.07 | 38.72 | 32.00 | 26.89 | 24.01 | 22.91 | 19.76 | 17.21 | 15.36 | 15.13 | 12.70 | 10.73 |
| 48mm | 1809.56 | 23.04 | 19.04 | 16.00 | 14.28 | 13.63 | 11.76 | 10.24 | 9.14 | 9.00 | 7.56 | 6.38 |
| 48mm (2) | 3619.12 | 46.08 | 38.08 | 32.00 | 28.57 | 27.27 | 23.51 | 20.48 | 18.28 | 18.00 | 15.11 | 12.76 |
| 48mm (4) | 7238.25 | 92.16 | 76.17 | 64.00 | 57.14 | 54.53 | 47.02 | 40.96 | 36.57 | 36.00 | 30.22 | 25.53 |
| 50mm | 1963.50 | 25.00 | 20.66 | 17.36 | 15.50 | 14.79 | 12.76 | 11.11 | 9.92 | 9.77 | 8.20 | 6.93 |
| 50mm (2) | 3927.00 | 50.00 | 41.32 | 34.72 | 31.00 | 29.59 | 25.51 | 22.22 | 19.84 | 19.53 | 16.40 | 13.85 |
| 50mm (4) | 7854.00 | 100.00 | 82.64 | 69.44 | 62.00 | 59.17 | 51.02 | 44.44 | 39.68 | 39.06 | 32.79 | 27.70 |