Table of Contents

EVO: Engine Mechanicals - Sub-04B
Rocker Box / Rocker Arm Inspection and Servicing
See also in the Sportsterpedia.
The forgoing is a compilation of maintenance and clearancing advice from the XLFORUM.
Most of these aren't mandatory unless you notice a problem upon inspection.
If problems are found, below are some examples of how those have been addressed.
Clearancing the Rocker Boxes
Rocker shaft to Rocker box clearance for all XL’s is 0.0007” to 0.0022”. 1)
High lift cams or changes in the valve springs can cause contact in the rocker box. 2)
When you have high lift cams, as the rockers push your valves open they are also putting a sideways pressure on the valve stems. 3)
Even if you haven't installed performance parts or have acquired a bike that you're unfamiliar with;
Inspecting the rocker boxes can clue you in to possible problems from wear before it's too late.
If something were to wear down or overheat or come lose for instance. 4)
Worn valve guides can also offset the spring travel and let them hit the covers. 5) 6)
When using bronze valve guides, they are cut shorter to allow for valve clearancing.
That causes the valve guides to wear out in an hour glass shape.
When the valve retainers hit the rocker boxes it pushes the valves sideways and wears out the inside of the valve guides faster than usual.
Adding clearance in the rocker box is not described in the FSMs since the factory took care of that when they built it. 7) 8)
But it's incredibly important with OEM modifications or a performance build to check clearances in the rocker box.
Anytime you deviate from factory setups, it's not optional to overlook this step.
Unfortunately, it's also one of the hardest steps to get people to pay attention to.
Professional mechanics will sometimes skip this step (or take it lightly) more than non-professionals do.
Take this seriously.
Upper Rocker Box / Cover (All)
Check the clearance between the rocker arm and the underside of the rocker box cover. 9)
With high lift cams, the rocker arm will often make contact with the rocker box top.
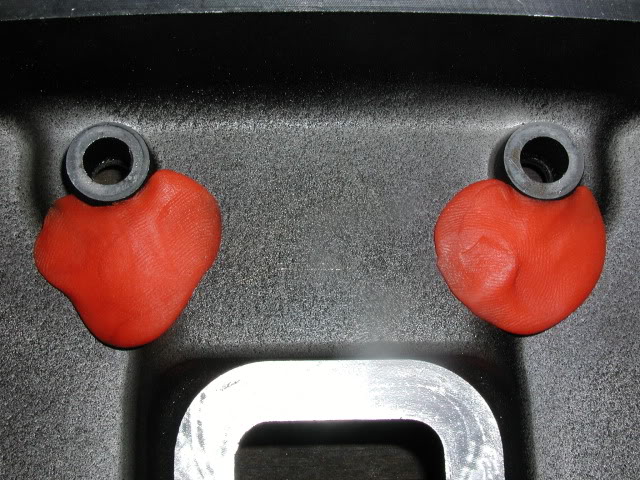
You can use a little play-dough or modeling clay to check this clearance.
Place it in the areas as in the pic below, install it and turn the engine over.
Then remove the cover and see if anything got up intp the clay and where.
Pull the tops and look for little marks on the inside. 10)
There shouldn't be any outside of factory casting marks.
Rocker or pushrod contact will appear as marks that shouldn't be there.
If any are found, a little strategically located grinding cleans it right up.
Occasionally, 536 cams can cause the rocker arms to hit the rocker box tops (on the pushrod side).
This is rare, but it can happen.
Contact here should cause any damage, but it'll cause noise and leaks. 11)
A lot of rocker box top leaks have been traced to this.
Lower Rocker Box / Cover (All)
Check for Warpage
When you have the lower rocker boxes removed, be sure to check their flatness on pane of glass or other extremely flat surface. 14)
Spring Clearance
The most critical clearance in the rocker box is the clearance between the valve springs and all areas of the rocker box around it. 15)
If the valve spring or retainer is allowed to touch the rocker box, it forces the valve to land sideways on the seat.
This causes seat recession and the resultant loss of seal, which of course saps power among other things.
Performance springs are larger in diameter than the factory springs and they will generally want to touch the rocker box.
You absolutely must provide a minimum of .025“ of clearance all around the valve spring and retainer.
Grind or file on the rocker box as needed to achieve this clearance.
Note that with a beehive spring pack, this probably won't be an issue, but check it anyway.
With a conventional straight wound performance spring pack, it will almost certainly be an issue.
Check for clearance issues between the valve spring / collar and the rocker box. 16)
When running big springs and cams, the additional lift can run the springs into the inside edge of the rocker.
In that case, the rockers should be clearance for the bigger springs.
This is more than just a nuisance noise. It will cause valve seat recession.
This means pulling the heads and changing seats, an expensive proposition.
That's one of the nice things about the 7mm valves with beehive springs in the late heads, it eliminates this problem.
| Lower rocker damage from valve spring impact 17) | ||
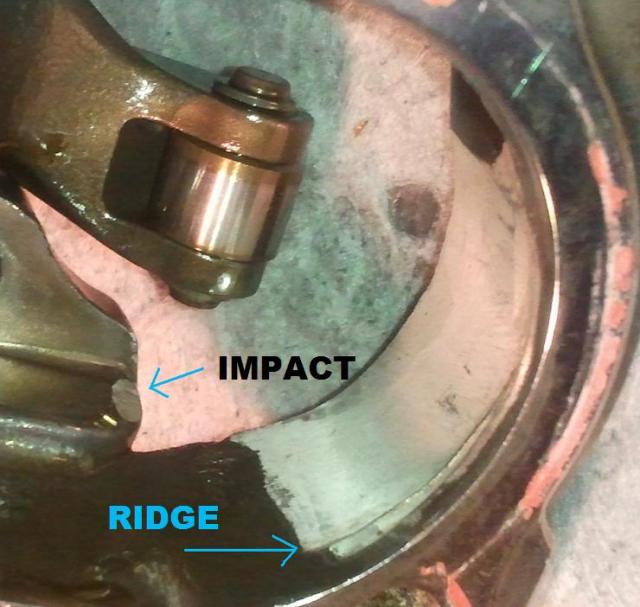 | 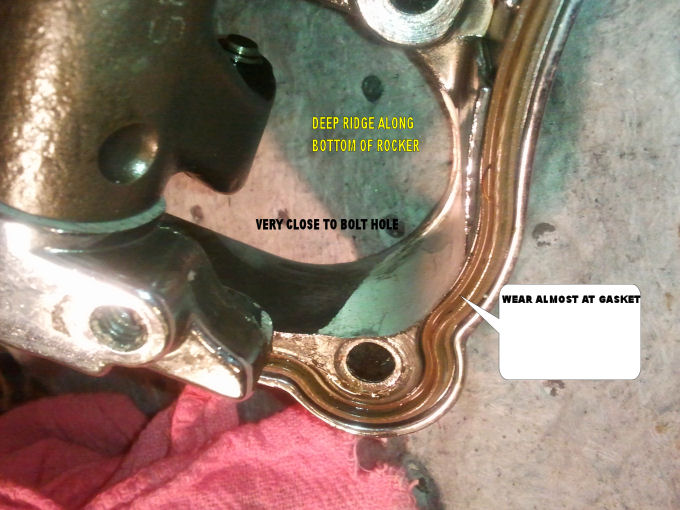 | 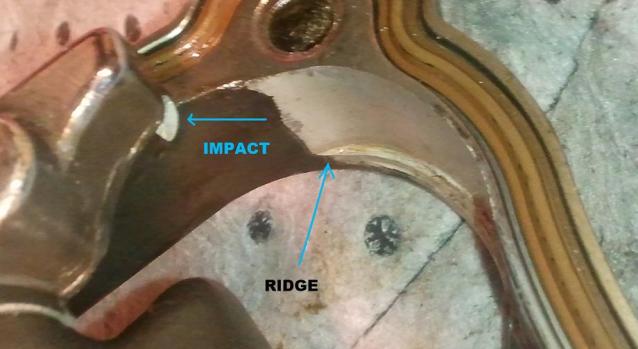 |
Valve spring clearance is a very common issue with high performance straight wound springs. 18)
Back before we went to beehive springs, this was a major headache for us.
People would lose valve seal and swear up and down they clearanced their rocker boxes adequately.
But later on, we'd get their rocker boxes and find spring/retainer gouge marks in them.
No matter what we did, we just couldn't get people to take it seriously.
If those springs hit the insides of the rocker boxes, you WILL get recessed valve seats, not maybe.
This issue went away when we migrated to beehives, thankfully.
It was a major motivating factor behind finding beehives that would work.
But they're not really suitable for all applications in HD motors.
Of course, now we're moving beyond beehives to the next great thing.
What you're looking for is to make sure the spring cannot contact the side of the box.
The clearancing can be done with a drum sander on a dremel type rotary tool 19) or a die grinder.
| Big springs can cause this issue. 20) | The clearancing job doesn't have to be pretty. You're just creating space for the springs to miss the rocker. 21) |
You can use a Sharpie marking pen or other to mark where the springs are too close so you'll know where to relieve the rocker box.
| Another rocker clearancing project. 26) | ||
Arm Clearance
This condition was noticed when using S&S roller rocker arms and big cams.
But these areas can be checked while using stock or other rocker arms also.
Symptoms were a ticking noise on the top end on cold starts. 27)
The roller rockers were just grazing the rocker box assembly.
All 4 were just barely nicking the box.
It stopped when the bike got warm and stretched.
Clearance can be done with a die grinder or Dremil Tool.
| Check for wear at the side of the pushrod arms at the box. 28) | |
| Check for wear at the side of the valve arms at the box 29) | |
| You can see where the contact occurs. 30) | |
| After clearancing the box. 31) | ||
| Rockers installed and not hitting the box anymore. 32) | |