Table of Contents

EVO: Oiling & Lubrication
Oil Leaks
Ever hear “Harleys don't leak oil, they just mark their spot”?
That is not the case with Sporsters. They should NOT leak oil.
What constitutes an oil leak? 1)
- Leak: Liquid oil on the outside of your rocker box, head etc.
- Weep: An oily residue that traps road dust leading to a damp, dirty build up.
- Sealed: No oil migration at all.
The gaskets / seals made for Sportsters are more than efficient for stopping leaks.
If you have continual leaks after installing new gaskets, chances are it's not the gasket's fault.
There may be manufacturing, fitting, high internal pressure pulses, warped sealing surfaces or other issues to address.
An oil leak could easily be the result of a crankcase pressure problem.
A situation where the engine is both blowing out, then pulling in air stemming from piston movement is normal.
An imbalance in the pressure can ruin gaskets and seals.
The pressure needs to be maintained like everything else on a Sportster.
The main thing you can do is to inspect and replace the breather valves periodically.
04-up engines seem to be more susceptible to crankcase pressure problems.
It's important to inspect and change out the breather valves periodically.
Read more about the breather valves and vents below.
See Crankcase Pressure Problems below.
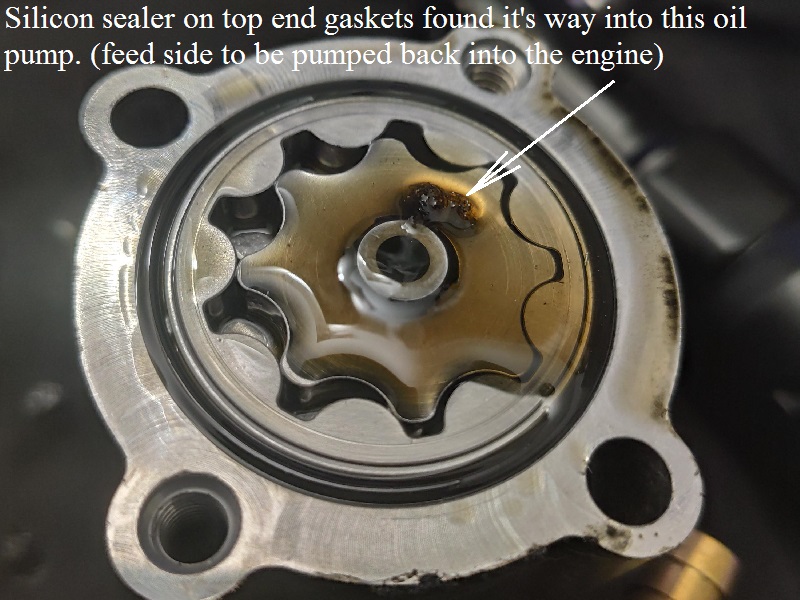
Do Not Use Silicone In Your Engine
First and foremost, do not use silicone sealer on any engine, oil pump or related parts or gaskets to stop a leak.
The heat coupled with crankcase pressure pulses can break pieces of it loose and send them through the engine.
These pieces may stop up oil passages and starve the engine of oil.
The gaskets / seals made for Sportsters are more than efficient for stopping leaks.
If you have continual leaks after installing new gaskets, chances are it's not the gasket's fault.
There may be manufacturing, fitting, high internal pressure pulses, warped sealing surfaces or other issues to address.
Silicone can break up into small film sheets and float around the oil path stopping up the small restricted passages.
Both feed and return sides of the oil pump create suction on their inlet sides as they rotate.
The feed side of the pump is gravity fed from the tank and the feed gerotors send pressure into the engine.
It is mainly dependent on gravity oil from the tank.
The scavenge side of the pump is fed by crankcase pressure pushing the oil to the scavenge port in the crankcase.
It is more dependent on the flywheels to get the oil to the scavenge port.
If there is an obstruction in the return path from the crankcase to the oil tank, it will slow the flow of oil out of the engine. This can cause weak or no oil flow.
If the scavenge side of the oil pump is not flowing oil fast enough to the tank, oil will build up in the sump.
This can result in higher crankcase pressure, more oil film spinning around the flywheels, engine drag, blowing rocker box gaskets and general oil leaks.
In an instance where used silicone was used to seal the gaskets, pieces of silicone (or sheets) could be sucked in, stretched and broke off into the engine.
This silicone 'gummy bear' sheet was found in the oil pump.
 2)
2)
Diagnosing the Origin of External Leaks
- You can put red food coloring in your primary or engine so you can tell if it is engine oil or tranny oil leaking. 3)
Just be sure to do an oil change once you've found and fixed the problem. - Using powder to detect a leak:
- Degrease the bike until there's no oil remaining.
Then take some Soft n Dri (women's antiperspirant spray), talcum powder etc. and spray it around the rocker gaskets (or other suspected leaking area). 4)
It will go on clear but when it gets heated will turn to a white powder. Just a light film is all it takes.
Whenever it starts leaking it'll show up exactly where the leak is.
- Clean the engine, then start it and use a bright light to see where the leak is coming from. 5)
The light should make the liquid oil shine. You may only have to run your scoot for a few seconds to start leak. - Leaking with Engine Running (weeping gaskets).
See also Wet Sumping in the Sportsterpedia.- Weeping cylinder base gaskets:
Please do not jump the gun. Clean the area and ride the bike. - Checklist for weeping gaskets:
- The first thing usually thought of with weeping gaskets is loose bolts.
- Too much vacuum in the engine caused by failing breather valves can implode or work loose gaskets.
See Crankcase Pressure Problems below. - Don't rule out a crankcase seam leak until you've cleaned and inspected it.
- Testing breather valve(s) from the outside:
- You should be able to blow in one breather bolt and get air from the other.
But there should be some resistance if you blow hard and you'll still get air from the other.
Light breath = less resistance. Heavy breath = should be more resistance. So it's not conclusive to test the umbrella(s) like this.
If the umbrella(s) are hard and not flexing to allow air to and fro like they should, that'll cause crankcase pressure problems.
And it could easily cause weeping gaskets.
- The top rocker box cover fiber washers could allow air past them, increasing pressure problems.
- If the oil tank vent line is plugged/kinked, that'll cause pressure problems.
- If you have too much oil in the tank, that'll cause pressure problems.
- If the transmission vent line is kinked, that could cause pressure problems.
- If you have a non factory (modified) breathing setup with a filter on the end of your breather hose, it can stop up and cause pressure problems.
- Or any combination of the above can cause pressure problems.
- Running the bike hard shouldn't be an issue.
However, running the bike hard compounds the problem if there are any issues listed above.
High RPM makes these issues worse.
- Leaking with Engine Shut Off.
See also Sit Sumping in the Sportsterpedia.- Clean the area thoroughly (like with rake cleaner and air blow dry). 6)
Let it sit long enough to begin leaking and blow some talcum powder over the area.
The talc will stick to the oil and pinpoint the origin. - Take an old bike tube and cut a piece while retaining the valve stem. 7)
Use a hose clamp to tighten it over the filler neck on the oil tank.
Then put a pound or two of air pressure on it and see if that helps you locate where it's coming from.
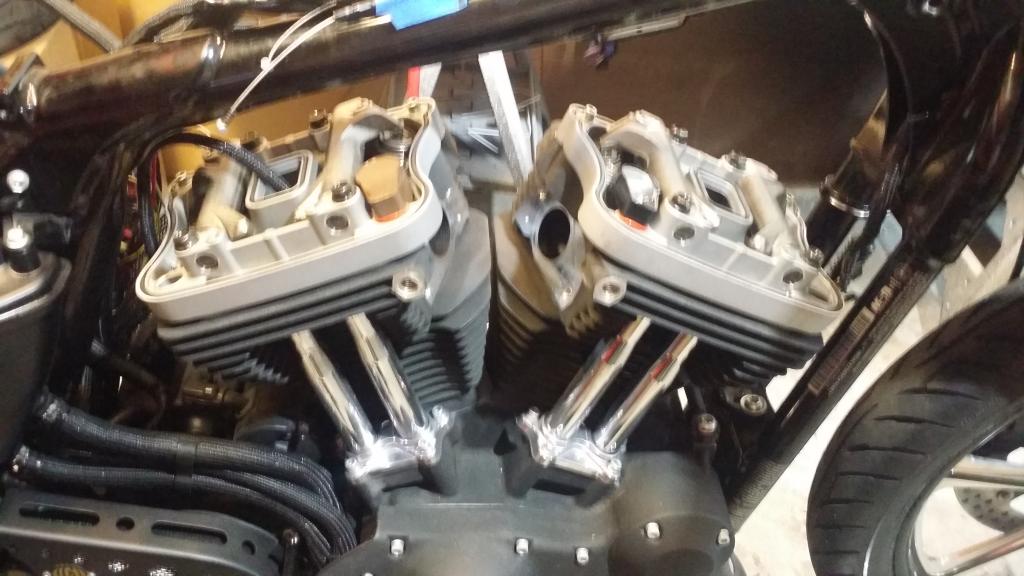
| Rocker boxes sprayed with powder antiperspirant to detected oil leaks. 8) | |
 |  |
Diagnosing the Origin of Internal Oil Leaks
See also in the Sportsterpedia:
Obviously you must find exactly what is leaking before you can determine what will be needed to fix it. 9)
Degrease the area in question and run the bike a little and watch the area for the beginning signs of seepage.
Check torque on the bolts on covers and parts with gasket/seals but do not tighten more than the specs in the FSM to stop a leak.
That may result in stripping the threads.
If you have a gasket / seal that has needed replacing several times, you must find the cause of the continued failure.
In some cases, a considerable amount of the engine has to be disassembled just to get to the problem. Refer to your FSM for the proper procedures.
Always keep a close watch on oil levels if you know you have a leak.
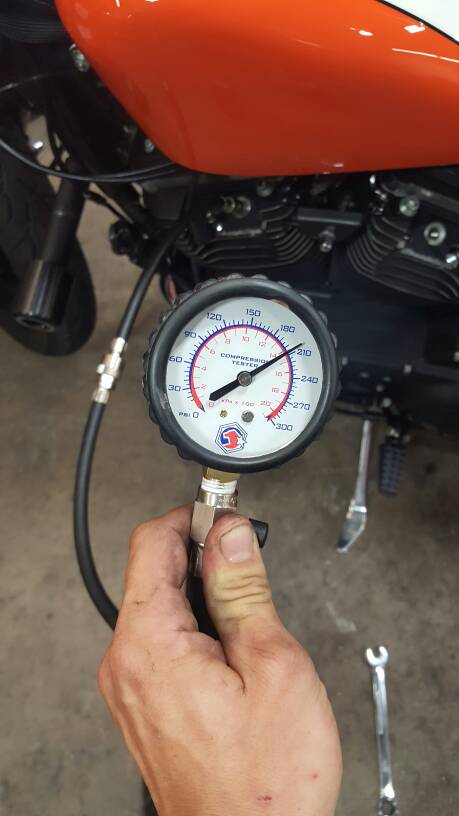
A compression or leak down test will tell you the condition of your rings and valves.
A manometer will allow you to test crankcase and primary compartment vaccum.
Oil Consumption Service Bulletin - August 10, 2005
This Tech Tip reprinted by Krayven Sumhead of the XLFORUM 10)
See the original Tech Tip (#59, 8-10-05) PDF here in the Sportsterpedia.
Diagnosing Oil Consumption
There has been a rise in oil consumption complaints on 2005 – 06 model year vehicles. The intent of this Tech Tip is to help you determine if there is an actual oil consumption issue and more accurately diagnose the root cause.
- First, determine if there is excessive oil consumption by analyzing the customer complaint and vehicle condition.
- Many times fuel delivery related issues cause smoking complaints and may even gas wash cylinders leading customers to believe they have an “oil burner” on their hands.
- Is the vehicle modified and what is its state of tune?
- Does the EFI calibration match the actual components on the vehicle?
- Is there fuel stand off in the air cleaner or manifold?
- What is excessive consumption?
- Customers may not realize that all engines have some normal rate of oil consumption, and air cooled engines are more prone to use some oil in the course of normal operation. It would not be unusual for a Twin Cam engine to use one quart of oil in 1500 miles or a middleweight powertrain to use one quart of oil in 1000 miles.
- Oil consumption is impacted by engine condition, mileage, duty cycle (how the vehicle is operated and in what environmental conditions), and accessories.
- Is the vehicle through its break-in period? Remember rings must seat before they will begin to seal the cylinder to piston clearance.
- After a discussion with the customer on the complaint and a brief inspection of the vehicle you should be able to determine if you a dealing with a rich condition, oil consumption complaint, or customer misperceptions.
- Determine the real rate of consumption.
- To determine the rate of oil consumption bring the oil level to the full line following the “Checking With Warm Engine” procedures outlined in the service manual and tape the filler neck closed.
Note on that tape the mileage and the date.- For those with a cam chest breather hose or an external breather hose mod; 11)
Remove the breather hose from the carb backing plate and stick it into a catch bottle.
The catch bottle should be non- breakable, such as a plastic baby bottle.
Remember to cover the fitting in the carb backing plate.
Secure both the bottle and the hose firmly to the vehicle.
Don't seal the top of the catch bottle as this could pressurize the system.
Instruct your customer to check the catch bottle every day.
If the catch bottle begins to fill with oil, the vehicle should be returned to your dealership.
Start looking for a restriction on the return side of the pump.
Here is an article in the Sportster with pics on Building a test catch can
- Have the customer ride the vehicle and inspect the level at 500-mile intervals to determine the actual rate of consumption. Be careful not to overfill the tank, as that will provide a false indication of consumption.
- If the rate of consumption exceeds the norm, you will need to review duty cycle with the customer and then begin your inspection of the engine's state of-tune accordingly.
- Verify the system before you tear it down.
- Don't overlook the obvious items before disassembly. How are the oil hoses (tight clamps, routings, etc.)?
- Verify breather operation, this might be a carry-over situation. If you blow lightly into the breather snorkels, there should be some resistance if the umbrella valves are closing properly.
- Verify oil pressure and oil return functions. You might be dealing with an oiling system issue and/or a wet-sumped lower end.
- Take a compression reading and perform a leakdown test. Remember to write down the numbers, Technical Service is sure to ask for them.
- If leak down exceeds 10% determine where it is leaking by. Into the lower end, out the exhaust or intake port, or through a head gasket?
- Now begin your disassembly based on your findings, and keep both eyes open as you take things apart for clues to the root cause.
- If the leakage was primarily into the crankcase, then you are chasing a piston to cylinder sealing issues. To rule out a barreled or tapered cylinder re check leak down in three places (top - middle - bottom) in the stroke once the rocker arm support plate is removed.
* By the way how did those umbrellas look, and was the rocker box fairly well scavenged? No clogged return passages right? No signs of leakage at the head gasket oil returns? Good gasket surfaces?
* Check the piston crown for carbon build up. Washed areas on the edges of the piston crown are a good indication of an “oil pumper” (bad rings or piston to cylinder fit). Solid carbon build up across the piston crown generally indicated it is coming from above.
* With the cylinders off you will be able to more closely examine (and take note of) ring end gap locations. Do they match the service manual recommendations or are they lined up? Also, check the second compression ring, also called the middle or scraper ring, installation. The “dot” should face up, but even more important the outer bevel slants toward the piston and it has a slight chamfer on the ID that goes to the bottom to allow it to function properly. It is rare but sometimes the “dot” is up and ring's taper face is wrong.
* While you are looking at the rings check their wear patterns. A ring that is over spread or twisted during installation will not seal properly. - Leak down past the valves and into the ports requires you inspect them for bad seats and bent stems, or you may find carbon built up to the point they just were not able to seal the combustion chamber.
* Heavily carbon’ed valves and oil in the intake or exhaust ports are indications of leaking valve seals.
* It also pays to look for the unusual, like leakage between the valve guide and the cylinder head. Are the guides loose? Was the head's guide bore scored or damaged during guide installation? This can sometimes be indicated by unusually clean or unusually golden patches in specific spots around the guide. The same is true if there is actual porosity in the head.
Valve Seal Updates - August 10, 2005
- 2005 models and early production 2006 vehicles use a one-piece valve seal and lower spring seat design (p/n 18094-02) that can cause oil leakage between the guide and the seal when side loaded or miss-installed. These can be identified by the silver seal ring and black rubber material.
- A new version one-piece valve seal and lower spring seat design (p/n 18094-02A) is being implemented into service parts to improve sealing properties and minimize installation issues.
- The first batch of this new seal can be identified by a green seal ring as shown below. Towards the end of the month 18094-02A seal kits will change to an orange colored rubber material to improve visual identification of the new parts.
- Twin Cam 88/88B production will be moving to this design in the near future with middle-weight powertrain and service parts to follow shortly thereafter.
- Please utilize this new design during any future top end services.
- Warranty and Service Procedures
- Any individual 18094-02 valve seals in your inventory may be used on Middle-Weight Powertrain repairs.
- Current engine gasket kits may be used on 2004 - 2006 Sportster and 2003 - 2006 Buell engines.
- Current gasket kits (top end p/n 17052-99B and engine p/n 17053-99A) may also be used on 2004 and earlier Twin Cam 88/88B engines without any special steps.
- When using current gasket kits (top end p/n 17052-99B and engine p/n 17053-99A) on 2005 and 2006 Twin Cam 88/88B models discard the 18094-02 valve seals included and use part number 18094-02A in their place, and the included seal protector during installation.
- For warranty repairs that involve the use of these engine gasket kits (p/n 17052-99B & 17053-99A), you may also claim 1 valve seal kit p/n 18094-02A as part of the repair.
- These additional parts will only be allowed on MC warranty claims filed against your existing inventory of gasket kits used to repair 2005-2006 Big Twins.
- Future kits will have the new valve seals included so additional parts should not be listed on warranty claims. 18094-02A Valve Seal Identification
Visual Inspection
Rocker Box / Gaskets
- Installation error.
- It's easy to get the rocker box gaskets shifted off center if you're not careful when installing them.
- Once you've got them sitting in place and install the top section, you can make final alignment before installing the screws.
This final alignment sometimes shifts the gasket out of the channel it sits in. The screws will pull down and torque properly.
But you'll end up with a leak if the gasket doesn't stay in the channel.
Check the gasket for leaks all around the rocker box especially between the heads where it's hard to see. - The 3 piece covers are sensitive to alignment and progressive tightening. Patience during installation is a must. 12) 13)
Keep the valve covers (all 3 pieces) in perfect vertical alignment on all four sides.
Tighten down each screw a little at a time crisscrossing as you go. The gaskets are rubber and can be reused if not damaged.
You might just try loosening the screws, check alignment and re-tighten before doing a complete dis-assembly.
- Improper torque and / or torque sequence can warp the rocker box.
- Failure to roll the engine around to where both valves are closed before installing the boxes can result in loose bolts once the valves close.
- Improper torque sequence can warp the boxes.
- The fiber washers on the top section have been reused without issue.
However, they need to be inspected periodically either way to make sure they aren't brittle or broken / half broken leaking air.
- There is no need to add any silicone or other sealer to the rocker box gaskets
- If they curl up on you and make it hard to keep them down for installation;
Add a little bearing grease in strategic spots to hold the gaskets down.
Crankcase pressure can suck the sealer out and send it into your oiling passages and cause loads of damage.
- Loose top cover bolts or broken washers will leak air and /or oil.
- If using the fiber washers, they harden after installation and do not ride concentric with the bolt or bolt hole.
Getting it back exactly the same will be impossible and result in new leaks. So, don't do it twice. 14) - Use caution torquing the cover bolts down.
They have been known to strip out of the lower threaded holes or crack the cover pulled down too tight.
- Too much crankcase pressure.
- A good amount of rocker box leaks go misdiagnosed as bad gaskets. When in fact, the crankcase venting is not keeping up with the crankcase pressure. 15)
It is this increased crankcase pressure inside that causes leaks to occur in the weakest point of the bottom end.
In these cases, the weakest point happens to be the rocker box cover seals. Simply replacing the breather valve(s) may leave your leaky boxes behind you.
See Crankcase Pressure Problems below.
- Loose rocker box bolts can create in imbalance of crankcase pressure.
- Loose top or bottom rocker bolts allows air to be pulled into the engine and muck up crankcase pressure.
(which could lead to wetsumping and blowing out of the breather(s) ).
- Repair.
- Check the rocker boxes for war-page
- They are known to warp if the bolts are not removed in the proper sequence or not torqued properly.
Put a sheet of Emory cloth down on a flat surface, glass is usually good. 16)
Drag the top cover on it a few times and see if you have any markings that would indicate high or low spots.
- Also, if the rocker boxes are chromed, the rubber gaskets will slip and slide all over when installing them.
- Check for pitting around the sealing surfaces.
- See also “2004-2006 Rocker Box Design Change” below.
- Check the engine breather valve(s) for blockage.
- It is necessary to check / replace / maintain the crankcase breathing system to avoid gasket leaks.
See also Crankcase Ventilation in the Evo section of the Sportsterpedia for breather valve replacement.
- Also inspect the breather venting system especially if you have aftermarket vent or mods.
- See also Breather Venting / Relocation in the Sportsterpedia.
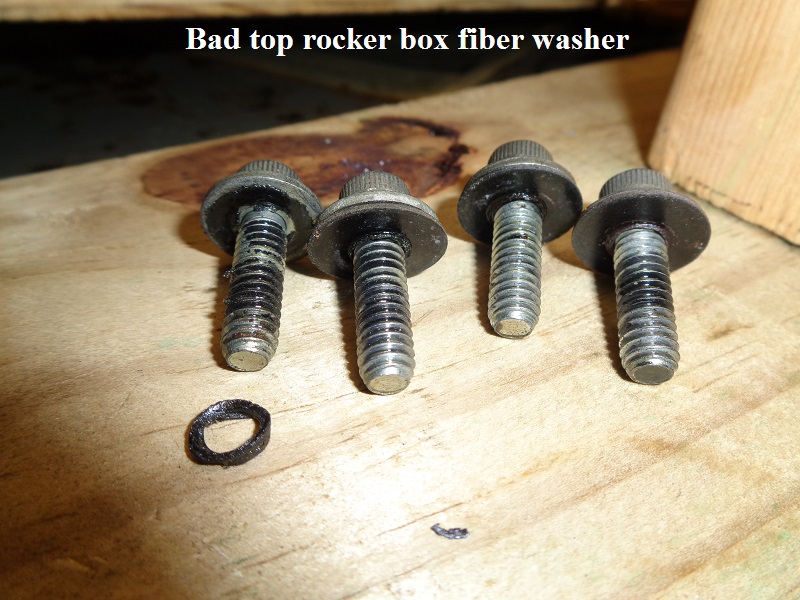
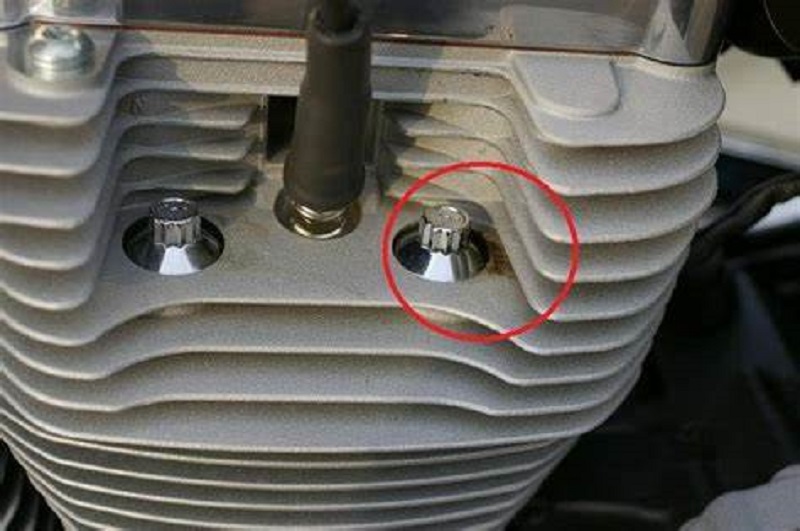
In the third pic below, you can see 1 fiber washer (supposed to be a flat washer) with the center broken out from one of the bolts.
Note that the OD of the washer had gotten smaller than the other three and the part that broke out was curled up looking more like a small O-ring.
The entire washer was on it's way of imploding and getting sucked into the rocker box.
The fiber washers are crisp and brittle when installed. As oil and heat work on the center, so does crankcase pressure vacuum.
The engine these came from was tested making a pressure vacuum of 27-1/2“ of water column at hot idle due to one umbrella valve getting hard.
Notice that the other 3 are also showing signs of implosion in the center of the fiber washers.
The fiber will still seal until the whole OD is curled up or the thickness gets small enough to loosen the torque on the bolt.
This may be one example of how rocker box bolts get loose by themselves.
| Damaged lower rocker box gasket. 17) (caused by sandwiching sensor wire with gasket) |
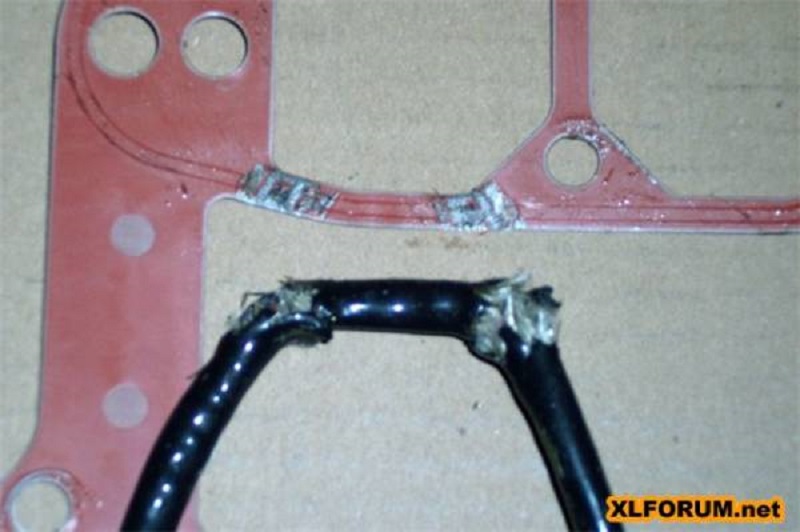 |


2004-2006 Rocker Box Design Change
Click here to go to the TSB page in the Sportsterpedia. Click on the “Y” next to M-1168A to download the full service bulletin with pics and instructions.
The MoCo sent out a service bulletin detailing a problem with the original rocker box design.
The bulletin (M-1168 / M-1168A) doesn't have to apply to your bike for you to have a rocker box leak.
If you have the bad covers for some reason, you should consider getting new ones.
The bulletin provides a new part number for the redesigned rocker covers to improve this design. The part number has been
revised since 9/12/05.
It covers 2004-2006 Sportsters with chrome rocker covers built between 11/15/03 and 9/12/05.
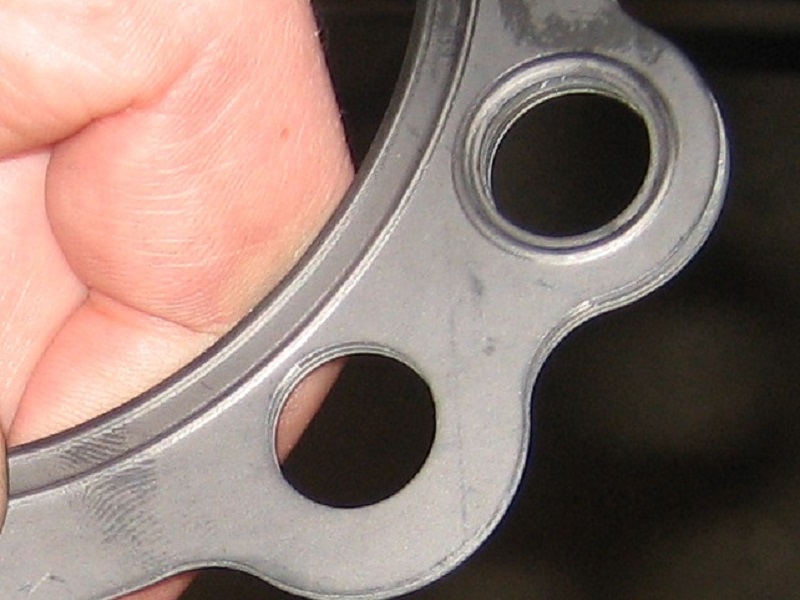
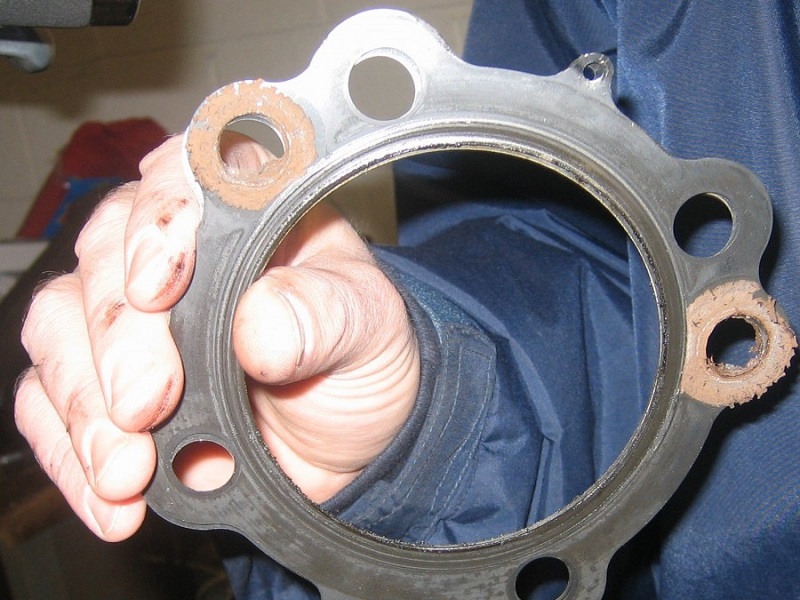
- Examine the inner rocker box gasket channel. If it has wide or narrow slots made into the gasket channel, it is the old design known for leaks.
- Part number (17537-96A) has wide slots.
- Part number (17537-96B) has narrow slots.
- The newer lower box (17537-96C), introduced 9-12-2005, does not have any slots there.
- Replace the rocker cover gasket with the new style gasket (17353-89B).
The new style gasket has square edges, whereas the old style gasket has rounded edges.
The new replacement rocker box gaskets are different from the originals and have a Teflon or rubberized surface on both top & bottom faces. 24)- Do not apply silicone for an adhesive for the old style or new style gaskets.

Air Cleaner / Filter
- Oil puking and oil seepage out the air cleaner are different conditions.
- You'll know it if it pukes as there will be a good puddle of oil on the shop floor or gobs of oil running rearward of the A/C all over the bike.
This is a sign of too much oil added to the system or wetsumping. - Oil seepage (or the oil filter getting saturated with oil over time) may be perfectly normal.
- Air / oil mist normally is present out the engine breather(s) and if the filter isn't changed regularly, it'll get saturated and stop up from oil separating from the mist.
- See Why Oil Pukes Out the Air Cleaner in the Sportsterpedia.
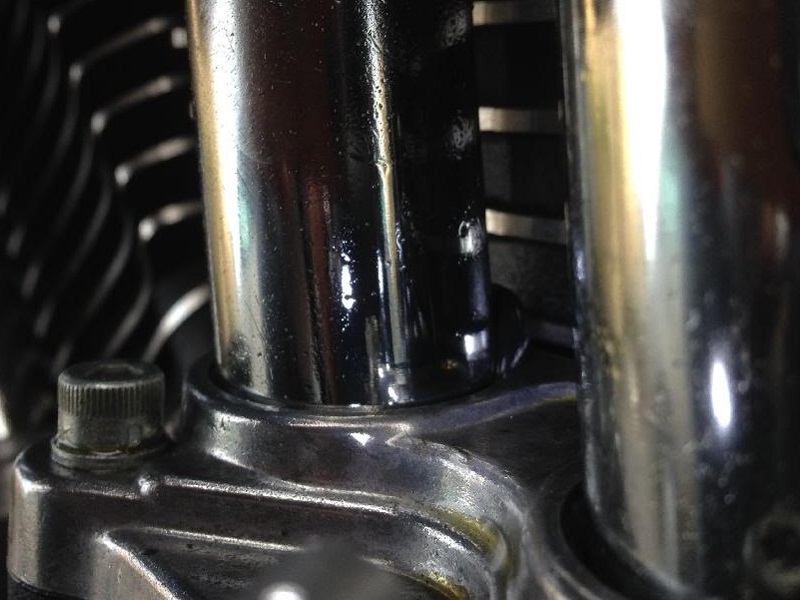
Pushrod Tubes
- Installation error.
- Upper pushrod tube oil leak.
- There are O-rings placed in the heads where the upper part of the pushrod tubes connect.
The O-rings have to be placed in the head and locked/popped in their corresponding seats/grooves.
Installing the O-rings on the tubes first will result in a leak.
The O-ring at the top, slipped down the tube, won't compress into the head by the boss on it's own.
You can poke a rag on a very small regular screw driver up at the top of the covers to check for a sign of fresh oil.
- Lower pushrod tube oil leak.
- It is very important to make sure the lower O-rings are installed properly.
Make sure the seal support block(s) are installed flush with the engine case and add a little oil to the O-ring before installing.
One trick for installing, use a little bit of super glue to the retainers before you slide the pushrods on and oil the I.D. of the O-rings. 26)
This keeps the O-rings from squishing out and leaking. Oil the inner side so it slides easily. - Inspect the case deck where the tubes sit. If there are any scratches, especially deep ones, the tubes will leak until the scratches are dealt with.
Be careful to not scratch the aluminum case when you slide the pushrod tube back in or out especially with stock tubes.
If you're using the billet blocks, this won't matter as much. 27) - The O-ring base / holder can warp from poor installation or during use.
That pot-metal ring is just flimsy, and even if it doesn't bend, it also doesn't preload the seal evenly. It can be a real challenge to make it work. 28)
Before installing them, make sure they are still flat across the bottom using a flat surface (glass maybe) and a feeler gauge.
If they are warped, do not try to install them with extra torque to pull them in farther. Just replace them.
Don't add silicone to them to stop a leak. It'll get loose, work it's way into the engine and stop up the oil system.
- Non sealing pushrod tubes can contribute to an imbalance of crankcase pressure.
- See Crankcase Pressure Problems below.
Head Gaskets / Bolts
Head gasket leak.
- Installation error.
- Failure to follow the proper torque sequence in the FSM and or your engine builder /supplier advice when installing the heads.
- The most important part of the whole procedure is remembering to torque the bolts down gradually, in the right pattern, and to the right torque spec. This will also cause a leak if not done properly.
- Evo cases have 2 problematic head bolt holes.
- Sometimes the two center head bolt holes on the right side of the case will strip, loosen the head(s) and leak oil.
- Those 2 side by side bolt holes are each drilled into the opposing holes and tapped.
So each hole is depending, in part, of the strength of the other.
With the bolts loosening, it is at least suspect that the threads or the hole strength is compromised.
There is a procedure in the manual for tightening the studs before installing the cylinders using a steel ball under the head bolt cap.
The ball allows you to achieve spec'd torque and still remove the nut without unscrewing the stud.
This 'sets' the studs into the case in addition to the torque applied to the head bolts.
Without the initial torque on the studs, they are totally dependent on the torque of the head bolts.
But they shouldn't back out unless either they weren't installed right to begin with or the hole has been stripped / compromised.
- Sometimes the studs will stretch upon torque (especially too much torque).
- If this happens, the wrench will say you hit torque, but when you release pressure, the stud spins with you back to it's relaxed state.
In that case, you did not get to final torque.
Just something to think about when torque'ing the heads.
Be aware that the stud itself could stretch (or twist in the middle).
You can feel when this happens. It takes longer to get to torque due to the stud turning with you in the middle.
If that's the case, you can't get to full torque without noticing something is wrong.
- Using O-rings with MLS gaskets will cause a head gasket leak.
- A leaking head gasket usually makes some noise (whine and chirping sound like a bird in the intake or carb).
And accompanied by oily or sooty areas around the gasket in the area of the leak.
You can confirm a head gasket leak by performing a Compression Test or Leakdown Test on the cylinder. - A leaky head gasket usually has little to do with crankcase pressure problem.
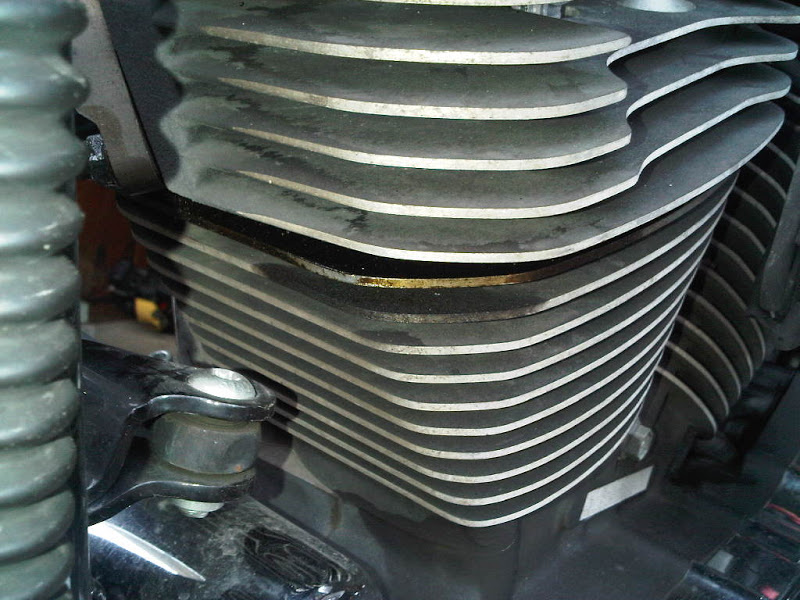
- Check oil smudge marks on the head gaskets when removing the heads.
When dismantling the top end (or to bring parts to your mechanic) and before cleaning the head gaskets / surfaces, check them for oil smears. 30)
Smudge marks can be a give away as to where any leaks might occur.
Also take a few pics of them (no flash, direct light and a steady hand).
The gasket has been known to raise around the head oil drain and only on the inside edge of the gasket.
So no outward sign of the leak. With the head removed an experienced eye may be able to spot the problem.
If you have a blown gasket and it's near the head oil drain, you may have just found your problem. - Oil around head bolts.
You may have a slight amount of oil sitting around the head bolt(s) after a new build.
This is thought to be just assembly lube from when the heads were installed but it could also be that you need to get the head gasket replaced. 31)
Try wiping it off and it may stop leaking after a few months.
There should not be a washer under the bolt.
There shouldn't be any way for oil to work it's way there unless the head \ gasket wasn't cleaned and torqued down right in the first place. 32) - Repair.
- Officially, a leaking head gasket should be replaced.
- DO NOT try to simply tighten the head or rocker bolts that may be loose. You will distort the cylinder head
Cylinder head fasteners should never be re-torqued on any Evolution engine. 33) All multiple bolt fasteners are required to be torqued in a cross pattern.
Likewise, simply tightening only the bolts that are loose will change the clamp load on the ones that are tight and not touched.
If you feel it's simply a loose bolt, loosen all the bolts on the rocker box / head / etc.
Then torque them back using the correct specs and tightening sequence. - If one or both of the two center cylinder studs on the right side of the engine are loosening, backing out or stripped;
The fix is usually a helicoil or other thread repair insert into the case. See Cylinder / Head Bolt Issues and Repair in the Sportsterpedia.

| Deteriorated O-rings used with MLS gaskets. The MLS gasket is tight around the dowel and has a raised area to seal the dowel. No need for an O-ring. 36) | Head gasket leak. 37) | |
 |  |  |
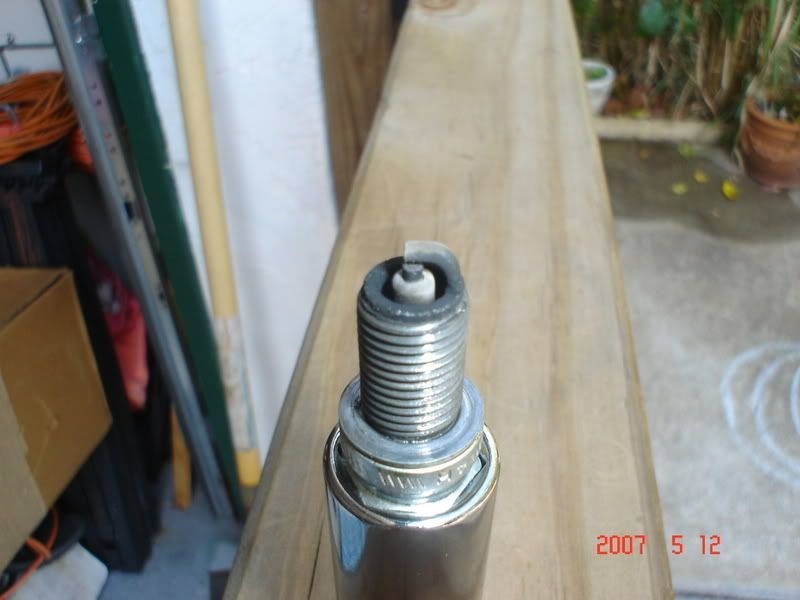
Check the spark plugs for oil fouling.
Worn rings or an imbalance in crankcase pressure can send oil up into the combustion chamber and foul the plugs.
Check the plugs for wet oil saturation.

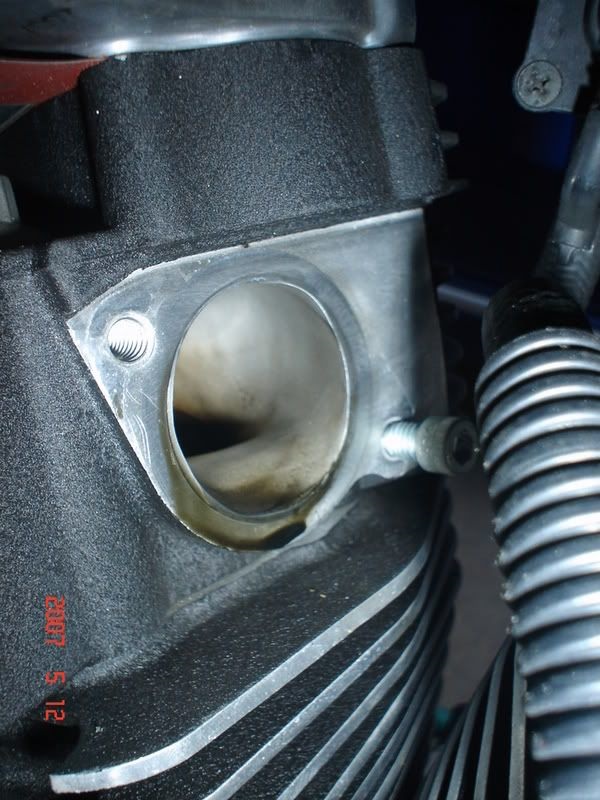
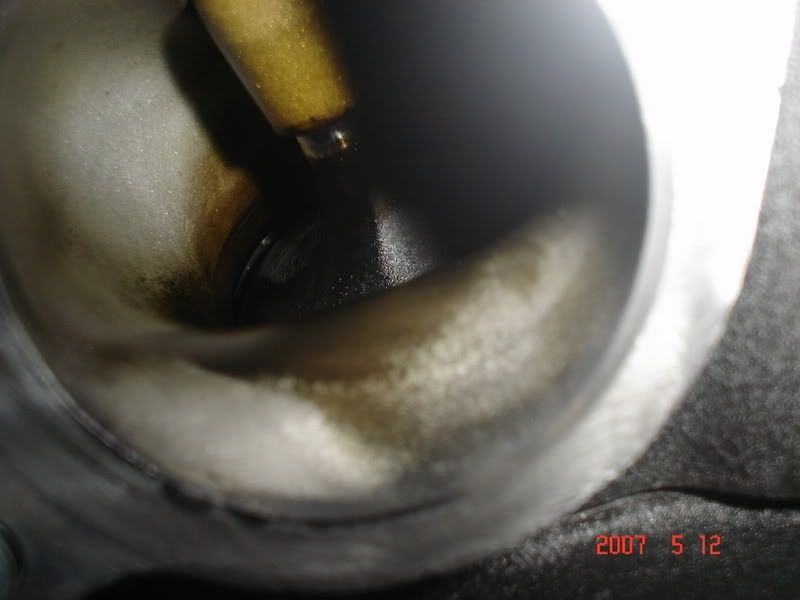
Check intake and exhaust ports in the heads.
You can pull your exhaust pipes and intake manifold and look at the valves to see if the oil is leaking past the valve stem seals. 40)

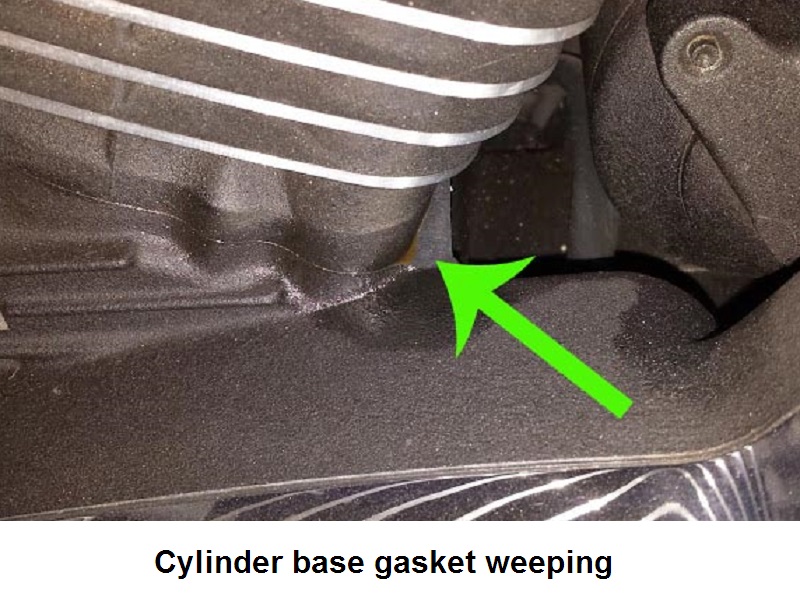
Cylinder Base Gaskets
Weeping base gasket leak.
- Installation issues.
- Sometimes the heads were not torqued right to begin with.
- Paper gaskets can wear out faster than MLS gaskets.
- The sealing surfaces might have been contaminated during installation.
If the gaskets get liquid (oil) between them, they won't torque well. The oil won't compress. 44) - Some people don't install a gasket at all or use sealant on the bottom of the cylinders while trying to adjust the Squish Band up top.
Depending on what sealant was used, there may be a leak due to a breach in sealant.
- Too much crankcase pressure.
- See Crankcase Pressure Problems below.
- Repair.
- Officially, the head and cylinder need to come off for a new gasket install. You can pull the cylinders with the pistons still in them. 45)
You only need to replace one wrist pin clip on each piston. There is no need to re-ring or hone the motor if just replacing the base gaskets. - However, some will say that this type of seepage is merely cosmetic if it doesn't leak very much oil and they'll just let it leak.
Periodic cleaning is good enough as it keeps you riding instead of wrenching.
However, it can affect crankcase pressure (induced air leak) especially if the leak is significant and can indicate a pressure problem.
Engine Case Seam
- Installation error.
- The case halves are put together with sealant (not gaskets).
It is possible, when mating the left and right case halves, to not spread the sealant evenly and create a future leak.
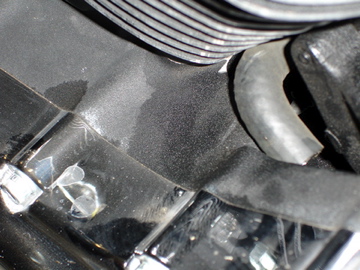
Too thin in some places and too thick in others. If the bolts are not properly torqued, this could leave gaps in the sealing surfaces. - Motor mount bolts may appear to be leaking oil when the oil is actually coming from the case seam around the bolts.
- The bolts don't actually enter the case but rather through bosses on the outside of the case.
One practice to seal up old case seam leaks at the bolt holes has been to remove the bolts, add silicone to the threads and reinstall the bolts. 47)
So if you are leaking out the bolt holes, someone may have smeared sealant on the bolt to make up for the failure of the case seam there.
This patch will not in itself cause any harm and may well hold up, but it is not right.
The alternative is to completely strip the engine and re-seal the cases.
- Too much crankcase pressure. See Crankcase Pressure Problems below.
- More often, it seams this is a result of excess crankcase pressure sucking the sealant out of the joints.
Excess (vacuum) pressure is generated from failing crankcase breather valve(s) or a kinked/blocked transmission vent hose.
2004-up Sportsters (due to internal changes) seem more susceptible to having crankcase pressure problems.
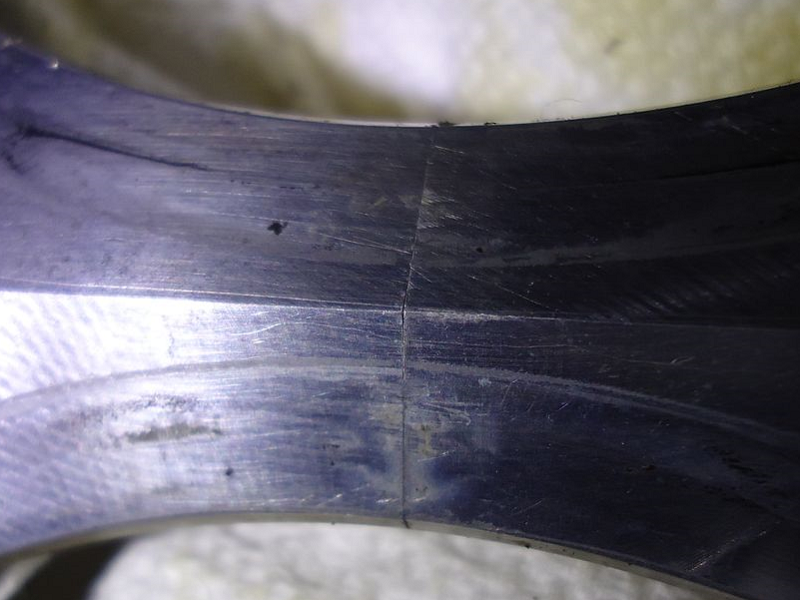
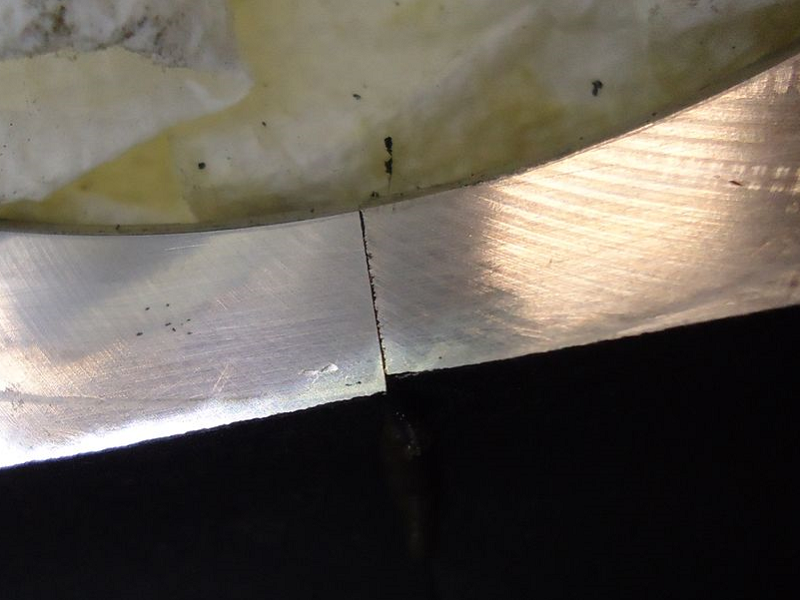
- Case seam mismatched under cylinders.
- This is very common and isn't caused by any accident. The case halves are held into alignment with each other via short 1/4” inch dowels.
You would bust the cases long before you bent those dowels or elongated their holes for that matter.
You can use gasket sealer on the base gaskets. The case decks distort, particularly around the cylinder studs.
Lots and lots of guys with base gasket leak issues have used sealer to solve the problem. Permatex Aviation sealer can be cleaned off reasonably easily.
Three-Bond makes some good products too, that can be cleaned off with common solvents. Don't use silicone.
- Repair.
Either repair below may be only temporary unless you check / replace / maintain the crankcase breathing system.
See also Crankcase Ventilation in the Evo section of the Sportsterpedia for breather valve replacement.- Officially, the cases need to be split and the joint re-sealed.
- However, you can try this repair idea from aswracing to apply sealant from the outside of the joint. Depending on which area the seepage is; 48)
- Drain the primary and/or engine oil.
- Hook up a Mightyvac to the transmission breather hose (if sealing joint involving tranny compartment) or crankcase breather (for engine area).
- Apply vacuum.
- Clean the area very very thoroughly … use lacquer thinner or brake cleaner.
- Apply sealant externally (3-Bond 1194, Yamabond etc.)
- Keep the vacuum applied until the sealer gets tacky. (the vacuum from the inside should help pull the sealer in the joint from the outside)
- Make sure it's the case seam leaking before making any repairs.
- The case seam is the lowest part of the engine.
Any leaks from above can seep down beside parts you can't see around and end up at the case seam, making you believe the seam is leaking.
Clean off the area thoroughly and watch to see where the leak is actually coming from. See Leaking with Engine Running (weeping gaskets) below.
| Case seam mismatched under cylinders causing a leak. 49) | ||
 |  |  |
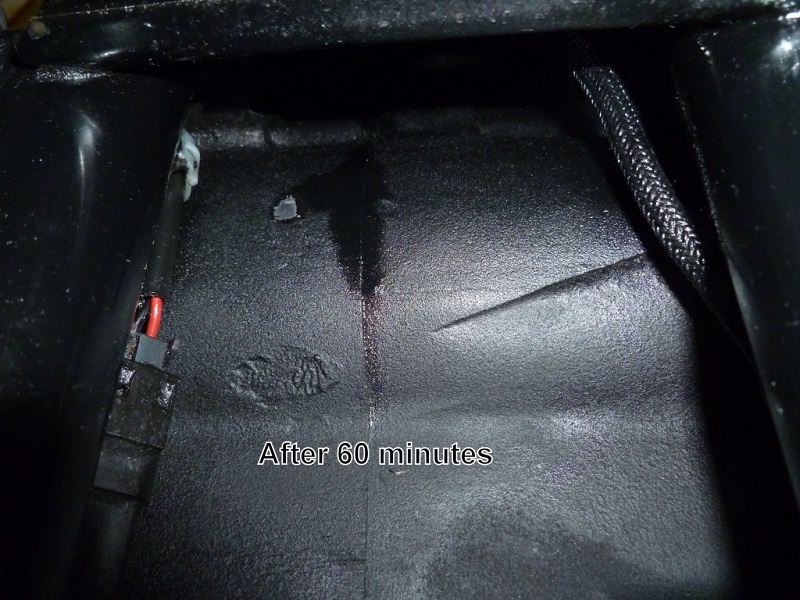
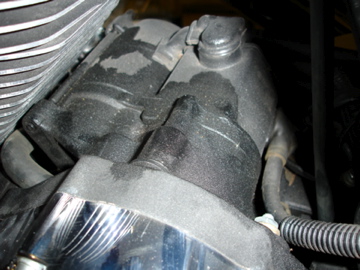
| This seemingly case seam leak turned out to be a leak at the point where the stator wire grommet comes through the primary case. The oil would pool up on top of the transmission during riding and when parked would run down the back and onto the ground. Every morning, after riding, there would be a 6“ oil pool under the bike. These pics are underneath from the rear at the transmission. 50) |
||
 |  |  |
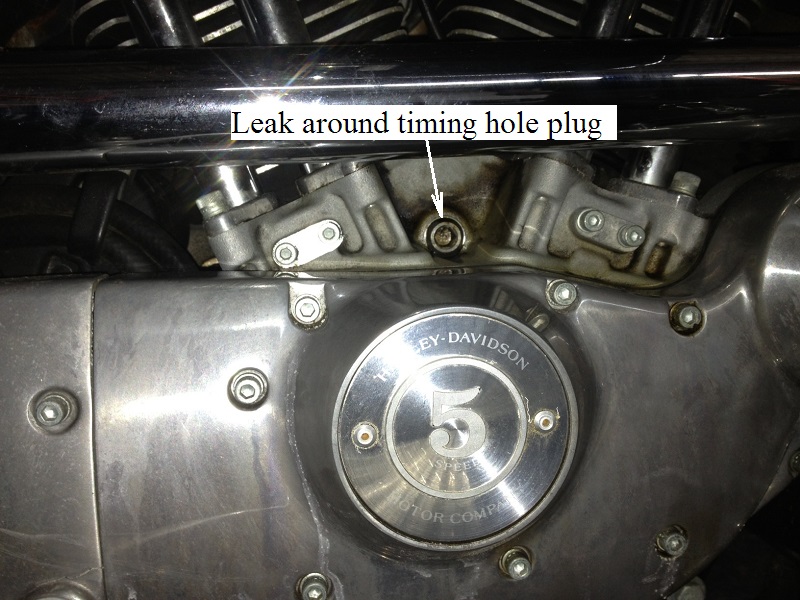
Timing Inspection Plug / Drain Plugs
- These have been common areas for an oil leaks.
- Over-torque during installation and heat / expansion during use seems to be the primary cause of distorting the threads.
- 1986-2003 engines (only) have a removable timing inspection plug.
- Look for stripped threads or fixes by the PO that may not have sealed properly.
- Repair. (see these links in the Sportsterpedia)
Oil Filter Housing
- Check that the oil filter is tight.
- Also check that there no nicks or pits in the oil filter sealing surface of the housing.
And that the rubber seal on the filter hasn't separated from the filter itself.
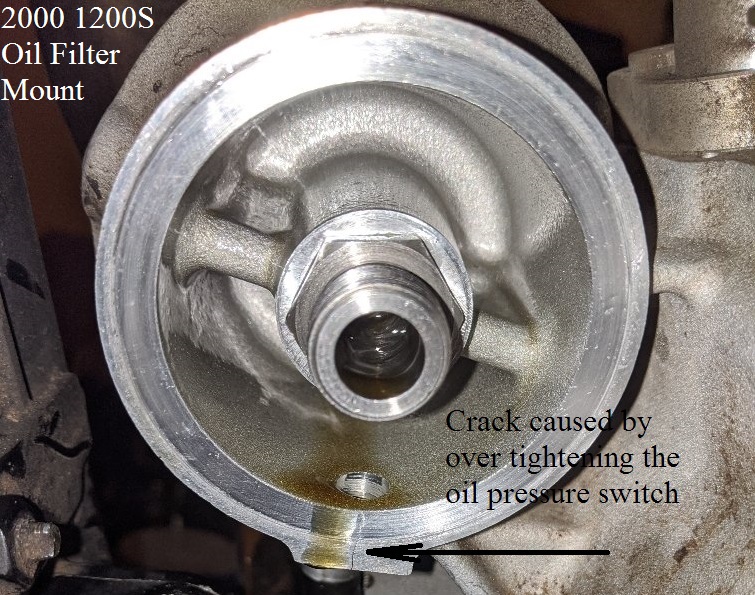
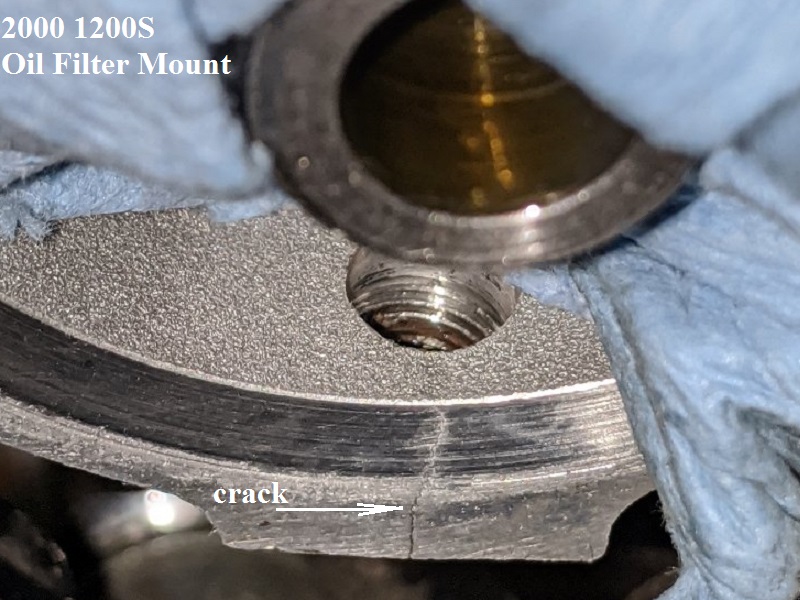
- Check the threads around the oil pressure switch.
- They leak a lot and oil blows back when you ride so it may look like it come from someplace else. 52)
- Tightening the oil pressure switch too much on 91-up motors can crack the aluminum oil filter housing pretty fast and to different degrees.
- Click here for more information about function, installing and repair in the Sportsterpedia.
| This filter housing was cracked due to too much torque being applied while tightening the oil pressure switch. 53) | ||
 |  | 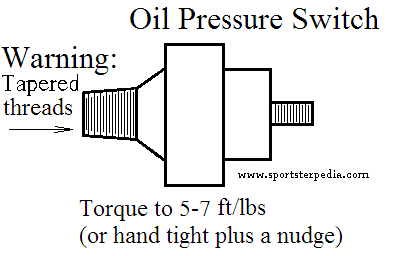 |
Oil Pressure Switch
- Some oil pressure switches leak out their body.
- On some sending units, the contact comes up through a plastic core that is at the center of the unit. They may leak between the contact and the plastic core. 54)
Oil Tank / Lines and Connections
- If you have an oil leak from anywhere, the oil tank is subject to having oil all over it.
- It is an accumulation of spills from filling, blowback from engine gaskets / seals / breathers and road grunge.
- The best way to find out if the oil tank is leaking is to clean it up (try some blue dawn and a nylon brush).
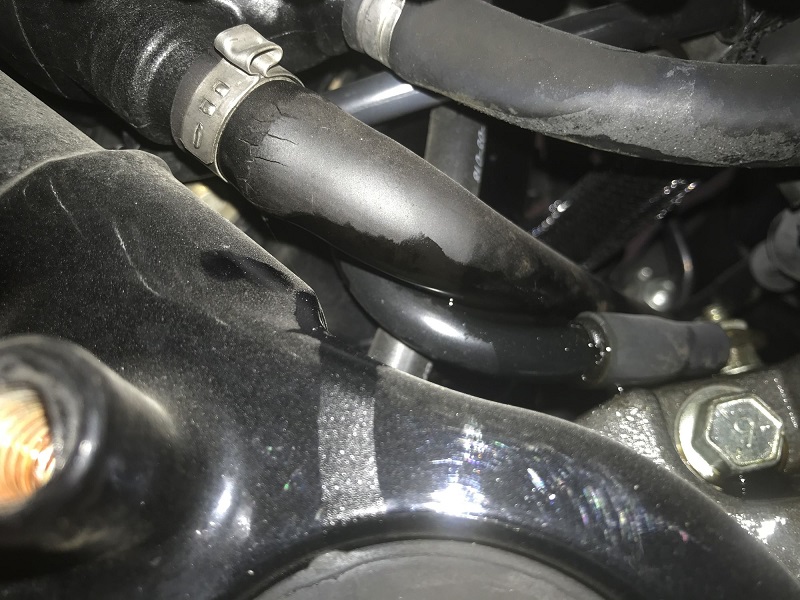
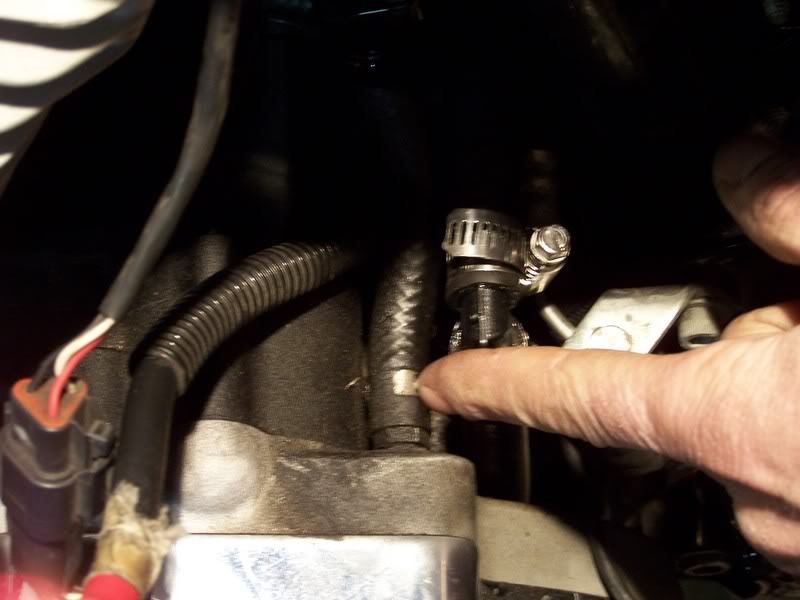
(and use some spray SOFT-N-DRI or talcum powder in the area). - Periodically inspect all oil hose connections for leaks or cracks / deteriation, especially before long rides.
- Replace any lines that are cracked.
- They have been known to have the inner rubber come loose and form a sort of flap valve inside the oil line. 55)
- Restricted oil tank vent line.
- Oil carry over may occur while driving the vehicle at highway speeds. The amount of carry over is directly related to the amount of restriction. 56)
More restriction equals more carryover.
In most cases the restriction is minor and translates to a small amount of carry over, which if left alone creates a bothersome mess.
Start looking for pinched hoses or a restrictive oil filter.
Pull the line off at the tank and make sure you can blow through it into the cam gear case.
Then blow through the oil tank fitting with the lid off and make sure that path is clear. - There is a Service Bulletin for 04-later engines discussing proper oil tank vent hose routing with illustrations.
You can download the bulletin PDF, M-1143, from this page in the Sportsterpedia.
- Oil tank drain lines.
- There is a known problem with 04-05 factory oil drain plugs.
- The plastic clamp breaks from fatigue and the hollow stud will allow your oil to leak out onto the ground without warning while you're riding.
See 04-05 Oil Drain Plug Mods for suggestions on how to fix this problem.

Overfilled oil tank
More on Overfilling the Oil Tank here in the REF section of the Sportsterpedia.
More on Oil Tank Pressure here.
How about that oil sucking gremlin that steals half a quart every evening? You feel compelled to bring that oil level up to spec the next morning. 60)
- This has been the single most reason for oil puking out the breather vent(s) / air cleaner and popping the oil cap on Evo Sportsters.
- Before topping off the oil tank, run the engine if possible for about a 30 min. ride.
- This heats up the oil to operating temperature and suspends the solids in the oil instead of it laying on the bottom of the case.
- This also allows the oil pump to send most of the oil in the engine back to the tank before you add more so you get a more accurate account of the oil level.
- Failure to heat the engine up to operating temp before warm the engine first can result in an overfull condition in the system.
And you can end up blowing the cap off the oil tank and a big mess. - Overfilling your oil tank can also result in engine drag (wetsumping) and puking oil out the air cleaner.
Click here to read more about wetsumping in the Sportsterpedia.
When the tank is slightly over filled, oil that was standing in the sump is added to the tank via the oil pump, thus raising the level in the tank.
The excess oil in the tank will either flow back into the gearcase via the tank vent or up and out of the oil cap.
Excess oil that returns to the gearcase through the tank vent is picked up with crankcase air pressure and blown out the engine breather valve(s).
So, depending on your venting setup, oil can be blown into the air cleaner or out the vent lines due to overfilling the oil tank.
- The oil tank is vented to the gearcase / cam chest in the engine using a stand pipe in the oil tank.
So, the air space in the oil tank is part of the crankcase space. - Too much oil in the whole system overcomes the oil tank once it's all scavenged back by the oil pump.and subsequently the tank vent.
(which is only supposed to send air from the tank to the gearcase).
The result will be oil being sent back to the gearcase and out the engine breather.
This is also a cause of many oil caps being popped out and lost on the road. - Some will say that you should reduce the amount of running oil level in the tank to the lower mark on the dipstick.
(creates more air space in the tank). - However, that is more like using a band-aid to cover a more important underlying condition of too much total crankcase pressure.
This condition doesn't just go away when you lower the oil level. - Likewise, when you increase your oil level, you decrease your crankcase empty space volume.
This may increase the pressure in the crankcase if your vent(s) are not keeping up.
This is the reason that running a higher (or proper) level of oil has the effect of contributing to rocker cover leaks or oil puking from the air filter.
See also Crankcase Pressure / Venting in the Oil Tank in the Sportsterpedia. - Blowing the oil cap off could from too much oil in the tank or (on 04 and later models) it could be from broken internals in the cap itself.
Click here to see 04 Style Oil Cap Repair.
Cracked Oil Tank
- 83-93 oil tanks are prone to cracking and leaking where the oil tank and battery tray are connected.
Fractures were due to poorly supporting the weight of the battery. 61)
Harley offered 62472-93A and 62482-93A oil tank upgrade kits for replacement (94-96 tank assembly).
However, the original oil tank can be reinforced and welded. - 04-06 oil tanks were prone to splitting at the seam.
Presumably from either poor quality welds, adding too much oil or excess crankcase pressure.
Damaged or Flooded Oil Tank Vent / Return Tube
Vehicles with oil tanks, that have all the fittings on the bottom of the tank, use a stand tube inside the tank for the vent line. 62)
- Short, damaged or tilted stand tubes:
- The top of the stand tubes should be above the oil level at all times. Check aftermarket oil tanks to be sure of this before using them.
- If the stand tube is damaged below the oil level or the level of oil is above the top of the stand tube;
Oil carry over will continue until the level of oil is below the damaged portion or the top of the stand tube. - Tilted stand tubes:
- Oil may carry over thru a tilted stand tube as long as the oil supply exists.
- Diagnostics #1:
- With the oil level correct in the tank and the ignition off, pinch off the vent hose and remove it from the crankcase vent hose fitting.
- Direct the hose into a catch pan and un-pinch the hose.
- Bike should be upright.
- If oil begins to trickle out of the vent hose, allow it to run until it stops.
- Recheck oil level in the tank.
- Down a quart? Must be a short or damaged stand tube.
- Replace the oil tank.
- No oil ran out the vent hose?
- Don't give up.
- Leave the vent hose unconnected and cap off the crankcase vent fitting.
Note: If you do not cap off the vent fitting, you're going to have a real live mess. - Now start the engine and remember to keep that hose pointed into the catch pan.
- If oil begins to trickle out you have a tilted stand pipe.
- Try switching the return oil hose with the oil tank vent hose at the oil tank before you replace it.
This simple act may save both time and money by not replacing the tank. - No trickle from the vent hose?
- So the problem's not in the oil tank. Reconnect the crankcase vent hose and move on to the next step.
- Diagnostics #2: Return system vs motor:
- Remove the return hose at the oil pump return fitting and plug the hose so oil doesn't run everywhere.
- Select a length of oil hose long enough to reach the oil tank filler neck when connected to the oil pumps return fitting.
Note: Before connecting the test hose, note the number of threads exposed on the return fitting to return elbow connection. - Remove the fitting and elbow and inspect how far the fitting is screwed into the elbow.
- The fitting may be restricting the return oil flow. If so, modify the fitting as required and reinstall.
- Now connect the test hose to the return fitting and direct the open end of the hose in to the oil tank.
- Run the engine and note if the carry- over is much improved or stops.
- If it stops or improves, the problem is between the oil pump return fitting and the oil tank.
Note: In rare instances you may have to ride the bike to reproduce the same set of circumstances to be sure you've corrected the problem. - Remember, put the breather hose in a non-breakable container, secure both the bottle and hose to the frame.
- A plug must be fabricated to hold the test return hose in the oil tank filler neck and control spillage of oil from the oil tank.
- A modified oil dipstick plug may fill the bill.
Important: No restrictions in the test return hose. - The carry-over cleared up?
- Start looking for that restriction i.e., a pinched return hose, after market oil filter, oil cooler, plugged fitting or hose.
- Friends let's bow our heads and repeat after me.
I will never willingly install any fittings, probes or adapters which reduce the oil pump's ability to return oil to the oil tank as this will lead to carry over big time.
Amen!
Breather Valves and Vent(s)
See Crankcase Pressure Problems below.
Oil leaking out the breather vents (or oil carry-over) can happen for many reasons.
First, the air leaving the engine can carry oil mist with it which is normal.
Breather bolts on the heads (91-up) must have pipe sealant of some sort applied to the threads during installation (very critical). 63)
The MoCo has done a lot of re-engineering over the years, but the problem of oily air filters and oil drips never went completely away.
There are however, different degrees of oil carry-over out the breather(s).
- Oil only in breather bolts and no where else.
- Oil in breather bolts, small amount in sponge, small trace on backplate.
- Oil in breather bolts, large amount in sponge, oil visibly thick on backplate, element still clean.
- Same as #3. Filter element now collecting oil.
- Same as #3, Filter element completely saturated.
- Oil exiting air cleaner from backplate.
Oil is supposed to be fed to the engine, lube the related parts and be sent back to the tank as quick as possible.
If the oil is allowed to stay in the engine too long before returning to the tank, the result is more oil 'carry-over' inside the engine than designed for.
Carry-over , where do you start? What are you looking for? First you've got to qualify the complaint.
Ask the right questions.
- When does the breather(s) puke?
- Driving at steady highway speeds? See Click here for Wet Sumping at high RPM.
- After the bike's been sitting for a couple of days and you start it up? See Click here for Sit Sumping.
- Is the oil tank cap popping off? See Overfilling the Oil Tank and Oil Tank Pressure in the Sportsterpedia.
- Clean the affected area and ride or run the bike and reproduce the problem with the breather hose in a baby bottle (or other) test catch can as described here.
This will help you better understand the amount of carryover you're dealing with.
- Start the diagnostics and separate the systems qualifying each one as you go.
- Oil tank: see Inspecting the Oil Tank above.
- Return lines: see Inspecting the Engine Oil Return System above.
- Venting system: see Crankcase Pressure Problems below.
- And finally, inspecting engine internals.
Primary / Transmission Vent Hose
- Check the vent hose for blockage.
- A blocked transmission vent can blow oil out the primary cover and / or ruin the engine sprocket seal.
- Oil may leak out the clutch cable, adjuster nuts, primary gasket, stator wire grommet or the starter gasket.
- The blocked up and rising pressures in the crankcase can also blow out the sprocket seal between the primary and engine compartments.
This can mix engine and primary oils, cause crankcase pressure problems and blow oil out the breather vents. - The hose can be blocked from gunked up oil/dirt and in some cases has been known to be blocked by creatures (think Wasps and Dirt Dobbers). 64)
- Blow on the hose end to make sure you can push air thru it. Do not used compressed air as that can damage the sprocket shaft seal.
Replace the hose if it can't be cleared. Also keep in mind that the walls of the hose can collapse from the inside.
So just straightening a kink may not unblock the hose.
- Check the vent hose for kinks.
- 2003 and prior engines have a long hose leaving the vent fitting on the engine running up around the seat.
Then at the top, it curves downward so that water and dirt can't directly enter the tube.
The end of the hose isn't connected to anything (open to atmosphere).
There should be no sags in the hose between the attachment to the engine and the open end of the hose.
Reroute the hose if it is showing a kink in placement or replace it if you can't blow through it.- There is a Service Bulletin for 2000-2003 engines discussing proper tranny vent hose routing with illustrations.
You can download the bulletin PDF, M-1103, from this page in the Sportsterpedia.
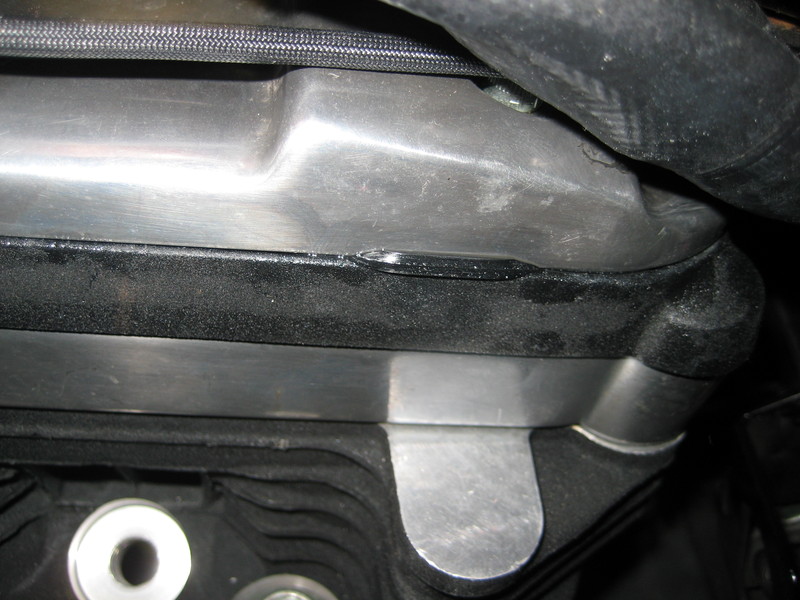
- 2004-up engines have a short preformed hose attached to the tranny vent that also just vents to atmosphere.
Due to where it ends, oil can seep from the end of the hose appearing to be a leak from the rear base gasket, starter, primary or case seam leak.
It may also appear to be a leak from the rear motor mounts. However the motor mounts don't enter the engine oil areas.
A leaky tranny vent could be mis-diagnosed as a case seam leak behind the mounts.
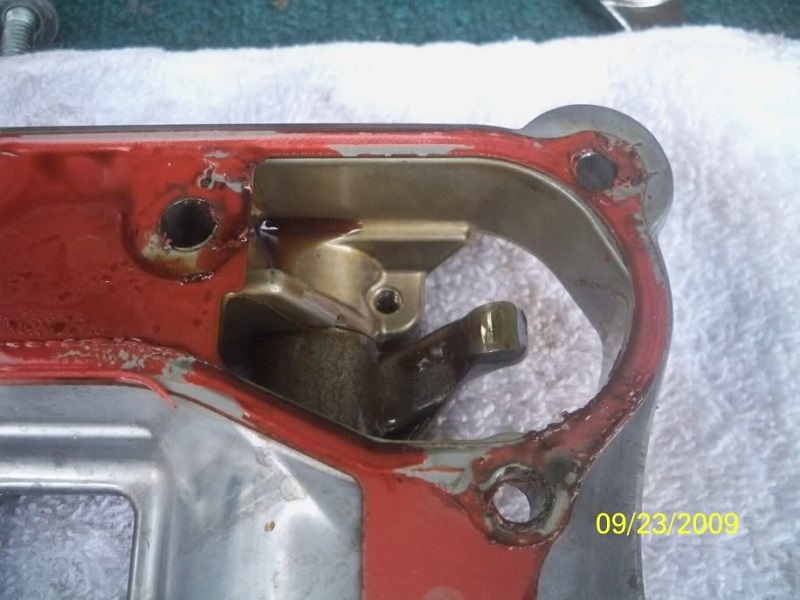
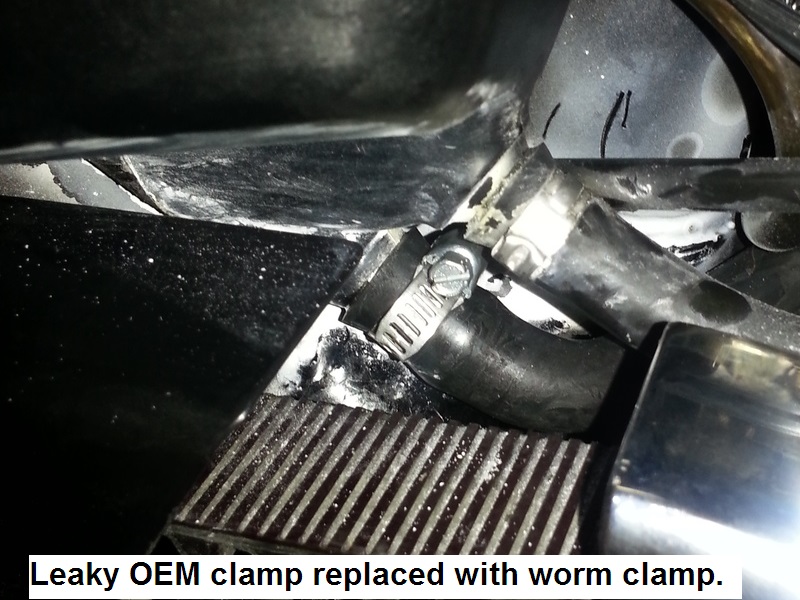
| 1998 transmission vent hose. 65) | ||
| 2000 transmission vent hose. 66) | |
 |  |
Timing Inspection Plug / Drain Plugs
- These have been common areas for an oil leaks.
- Over-torque during installation and heat / expansion during use seems to be the primary cause of distorting the threads.
- Click here for Timing Inspection Hole and Plug - Sealing and Thread Repair.
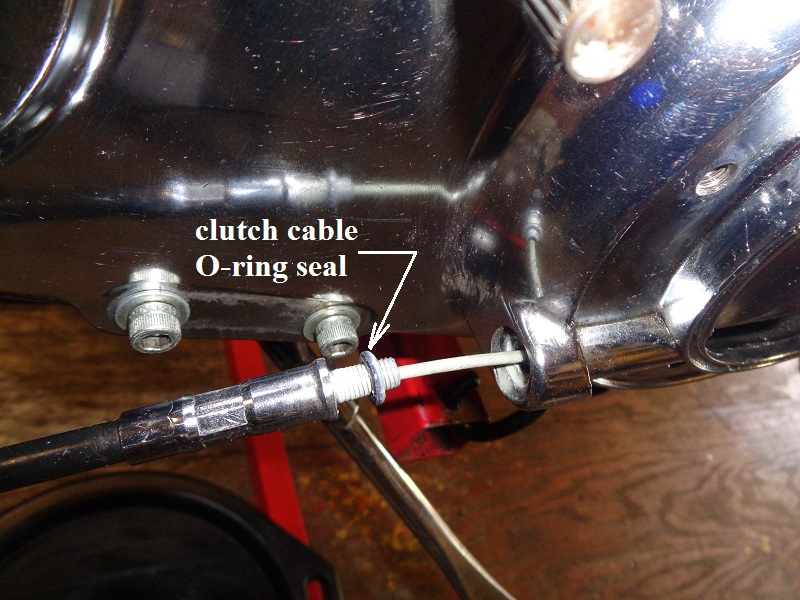
Clutch Cable or Connection to the Primary Cover
- The ferrule that connects the cable to the cover has an O-ring. 69)
- If it's leaking here, the ferrule may be broken and you need a new cable.
- Or just the O-ring is shot and you need a new one.
- If you tighten the cable too much, it'll spit / split the O-ring, break the cable threads or the cover threads.
All you want to do is seat the connector against the O-ring with a decent nudge. It doesn't have to be tight/tight.
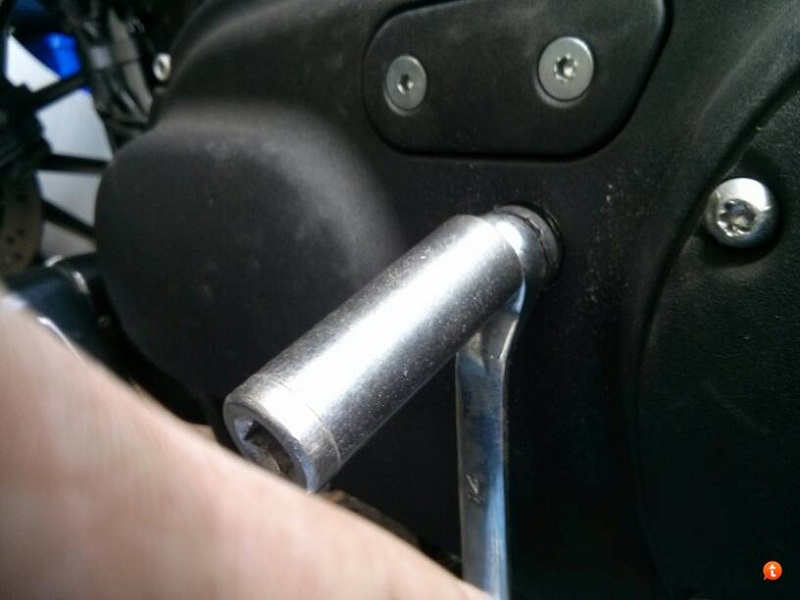
If you break the cable threads off in the cover, you may be able to use a small screwdriver wedged in the hole to back out the threads. 70)
- The connection where the cable meets the ferrule or cable adjuster can be disengaged / broken.
- This needs a new cable to fix the problem. 71)
- A temporary fix may be to clean the area with alcohol and apply some adhesive (Right Stuff, etc) inside the ferrule to stop the leak.
But eventually you'll have to replace the cable. It's best not to use silicone as it can dislodge into the primary compartment. - Another temporary fix may be to use some heat shrink tube over the cable-connector.
Home Depot sells a 4:1 shrink tube with sealant made by Raychem in electrical section.
Clean the cable with contact cleaner or other means. Remove the cable from the lever.
Remove the boot from the adjuster and slide the shrink tube down cable over the crimped connector and shrink the tube.
You can use a second smaller piece to cover the whole connector also. - A temporary fix for a crack in the clutch cable sheath can also be done using the shrink wrap tube or Gorilla tape.
- The female threads in the cover may be have been cross threaded during the last install of the cable. This is pretty easy to do if you're not careful.
Or, if you've laid the bike over or ran into something on the left side, the cable or the cover threads can be damaged.- You can buy a new / used cover to replace the one with the bad threads.
- You can try wrapping the cable threads with plumbers tape or pipe dope to stop a leak as long as the threads are good enough.
- You can drill, tap and install a Helicoil in the hole. A Helicoil fix is said to be stronger than the original threads.
The cover needs to come off to do this properly and not get shavings in the engine. - If the threads have stripped from too much torque, you can try using a tap with the same thread pitch as the cable end to chase the threads.
This restores the original thread pitch (with imperfections now from being stripped).
It can be a great fix as long as there is still enough meat left in the hole to straighten back out.
The cable doesn't have to be installed very tight against the threads.
It is the O-ring that actually seals the connection, not the tightening of the threaded connection.
- Make sure it's the primary threads that are stripped before doing any work as it could just be the clutch cable. 72)
- Adjust the clutch cable to maximum slack. The adjustment is in the middle of the cable under a rubber boot.
Once this is done remove cable from the clutch lever. Next unscrew clutch cable from primary cover.
Inspect the cable threads to make sure these are not messed up.
If they are not messed up and you can not get the cable to tighten up during reinstalling, it is the primary threads.
- A blocked or kinked transmission hose can bottle up primary pressure using the clutch cable as an escape route.
- Sometimes, just blowing out the transmission vent will stop the clutch cable leaks. 73)
If the hose stops up (long hose, plus oil and dust) the primary that can't breathe is gonna push oil out somewhere. - Kinks in the line will have the same affect as a blockage. Check where the hose comes up and bends down.
- Too much oil in the primary compartment.
- Too much oil in the primary can leak out the clutch cable while running, or at rest, the kick stand leaves the bike in a lean angle.
This could be a result of;- Adding too much fluid in the primary.
- A blown engine sprocket seal allowing the primary to fill up with engine oil.
- A blocked or kinked transmission hose.
- The clutch cable should not be too long as to loop down leaving the cover before rising up toward the lever.
- Normally, any oil that could run up into the cable innards should be able to run back down into the primary compartment (engine at rest).

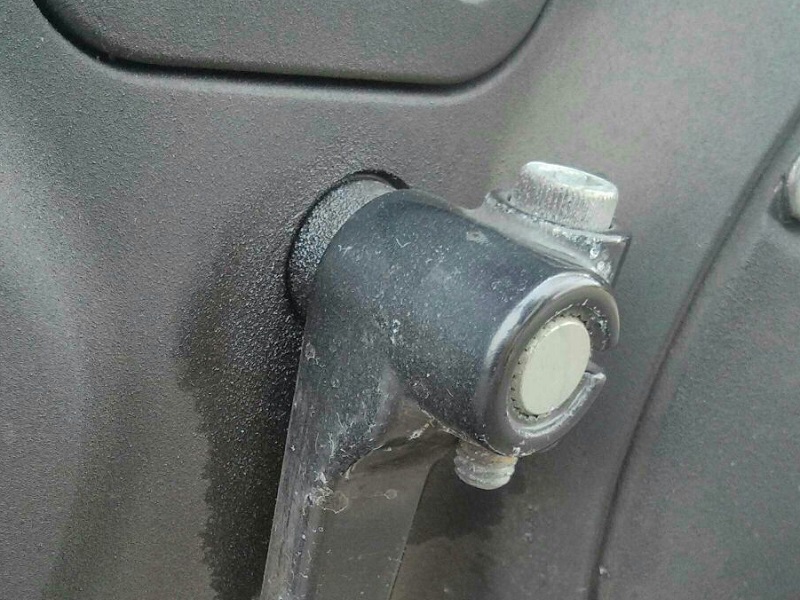
Shifter Shaft
- The seal installed in the primary cover sometimes develops an oil seepage.
- This can be due to age of the seal.
- It can be from a bad engine sprocket seal filling up the primary compartment past the shifter shaft location.
- It also could be a kinked/pinched transmission vent hose not allowing the primary to vent and building up pressure around the shifter seal.
- You may also want to look at the part of the shaft itself that resides in/around the seal.
If it's pitted or roughed up, it won't allow the seal to do it's job and may even wear out the next seal.
You can clean up surface rust with a slight of hand and a small wire brush.
Else you may want to replace the shaft and the bushing together. - They don't all leak. Many leak because they were installed by sliding them over the sharp splines on the shifter shaft.
- Slight seepage at the shifter shaft can be helped by adding an O-ring behind the shift lever, adding a little more pressure to the seal itself. 76)
After installing the seal and rubber washer, you might install one or two O-rings to take up the gap between the shift lever and the washer.
The O-ring(s) do not seal against leaking oil but, instead, put additional pressure on the oil seal in the primary cover cavity, which does help to seal against leaks.
Just make sure the problem is just from age or wear and not other problems mentioned above. - To remove / install the seal, it can be removed without removing the primary cover.
- Remove the lever, then use a pick or screwdriver to pry the seal out of the cavity. It is simple press fit and the seal is flexible.
- Next, make sure the shaft is free from rust or debris, clean all oil/debris from the seal bore in the cover and tape over the splines.
- The seal (O.D.) goes in the cover dry, spring side toward engine. You can lube the I.D. of the seal then slide it down the shaft and seat it with a deep socket.
You can also use the old seal against the new seal so you can press the new seal in without damaging it. - Remove the tape from the splines, install the spacer, O-ring(s) then the shifter and ride.
| Leaky shifter shaft seal on 09 Sportster. 77) |
 |
Cam Cover or Primary Cover
- Loose bolts or a worn gasket.
Caution, tightening loose bolts on the cover without using the proper torque sequence can warp the cover.
If you find loose bolts, loosen all of them and re-torque the entire set using the correct sequence and torque specs.
See also Removing, Inspecting and Installing the Cam Cover in the Sportsterpedia. - Remove the cover and check it for warpage.
- You can lay the sealing side on a flat surface or use a straight edge placed diagonally end to end.
- Use a feeler gauge in several spots under the mating surface to measure amount (if any) of warpage.
- You may be able to file down slight warped areas. If not, you may need to replace the cover.
- Inspect the cover for hairline cracks.
- These are notorious for hairline fractures where the bolts go that can produce a leak. 84)
Even the primary chain, prior to needing adjustment, can hit those areas and create a leak.
If there is a crack evident, you may be able to fill the bolt hole with gasket maker (not silicone) or have it brazed. - If it is a top bolt, it is not sitting in oil. 85)
So it is leaking oil that has been flung on it, which means it's coming from a place that is less likely to leak.
Leaks up top are more likely to be seepage rather than dripage.
So a crack is good possibility if the bolts up top are tight and the gasket is good.
If it's not coming out of the gasket joint, but rather the bolt;
The leak is coming through the part of the gasket that wraps around the inside edge of the bolt.
(rather than the side that is visible as you look at the edge of the gasket)
Or through the bolt threads if that hole is not a blind hole but rather a hole that goes all the way into the primary.
Also, check the transmission vent line before doing anything else. A clogged vent can force oil out of places that you wouldn't believe.
- Modifications to the cover.
- If your cam cover has been modified on the bottom, there is a rifling hole there for a drilled oil passage running vertically thru the cover.
If the cover was cut / sanded close to this factory welded up hole, it could break thru and leak.
If it was cut thru and siliconed / epoxied shut, the sealant could be leaking oil.
See also Chopping the Cam / Gearcase Cover in the Sportsterpedia.
- Cover leaks can also be caused by too much internal pressure.
- Loose cover bolts allow air to be pulled into the engine and muck up crankcase pressure.
(which could lead to wetsumping and blowing out of the breather(s) ). - A primary cover leak can also be caused by;
- A kinked or stopped up transmission vent hose. See Transmission Vent Hose below.
- A bad crankshaft seal. See Engine Sprocket Seal below.
- Check the starter gasket.
- Oil can appear to be coming from the primary or case seam when it's actually leaking from the starter mount gasket.
Engine Oil Leaking Into Primary Case
Pull the clutch inspection (derby) cover off the primary, smell the oil and check the primary oil level.
It should not be over full and should smell like gear oil (rough smell compared to engine oil).
If the oil level is higher than it should be or smell like gas, the engine sprocket seal could have failed or have been compromised.
The seal is between the engine and primary oils. If it is bad or has been temporarily compromised, engine oil infiltrates the primary and out the trans vent.
Engine Sprocket Seal
If the primary compartment is filling up with engine oil, then the sprocket shaft seal is leaking. 86)
- There can be a lot of reasons for the leak.
- Worn / torn seal.
- Restricted engine breathing system.
Blocked breather(s) will not allow the engine to vent pressure or vent it properly.
The next place that pressure would go is past either the right or left side case main seals. - Adding too much oil in the tank after seeing it was empty after sitting.
This can create higher pressure in the crankcase to blow the seal. - If you've recently had the oil lines loose or changed tanks, check to make sure the lines were hooked back up correctly.
If you hook the transmission/primary vent line to the oil tank or engine somehow, that could pump oil in the primary and blow the seal. The transmission is supposed to vent to atmosphere, so the fitting on top of the trans should have a hose on it that goes up under the seat and loops down with no fitting or connection to anything else. - Engines with Timken bearings:
According to the Timken website, both their single and double lip seals have a max pressure rating of 4.267 psi.
That should be more than enough protection against seal leaks between the primary and the crankcase.
Pressure can either pull or push depending on it's source.
Their should be a slight predominant vacuum in the crankcase unless the breathers aren't working right.
And even then, enough vacuum to make over 4 psi and blow the seal is very excessive.
A better bet is the seal is deteriorated or was damaged / nicked during installation.
Leaking with Rotor / Sprocket Removed
Let's say you've removed the rotor doing some work. The bike sits for a while awaiting time and parts.
The seal area was dry or you dried it up the last you pulled the rotor off.
Later, you notice a small leak coming from the seal area. With the rotor/sprocket removed, this is normal. 87)
The leak is most likely not coming from between the spacer and the seal but rather between the spacer and the sprocket shaft (which would now be removed).
Once the rotor/sprocket is bolted back up, it should effectively stop the leak. Oil slowly draining down into the crankcase from the oil tank is not that unusual.

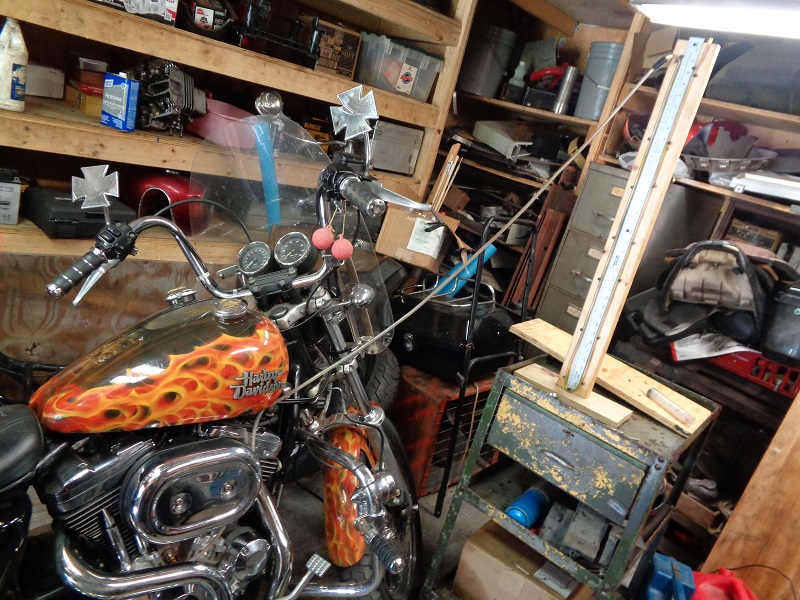
Test for Excess Primary Compartment Vacuum
You can test for too much vacuum in the primary with the engine running / transmission in neutral. 89)
You can make your own slack tube pretty cheap out of some 2×4 pieces, a 2-3 ft ruler and a clear tube.
See Building Your Own Slack Tube in the Sportsterpedia.
Or you can adapt a clear hose to the tranny vent line and drop it into a glass of water.
If one inch or more of vacuum is present, the sprocket shaft seal may be allowing engine crankcase pressure (air/oil mist) past it.
Check the Condition and Direction of the Sprocket Shaft Seal
Beginning on April 1st, 1993, Harley-Davidson began to reverse the direction in which the sprocket shaft seal is installed. 90)
The open side of the seal (exposing the spring) now faces towards the engine sprocket and primary/drive compartment.
This will promote better crankcase sealing, while reducing the potential for transfer of fluids and crankcase pressure. The seal spacer inside diameter was also reduced to .995”-1.000“ for a tighter fit on the sprocket shaft. The spacer and seal part numbers did not change.
Primary Oil Smell Like Gas?
Where did the gas smell come from?
See Why Does the Oil Smell Like Gas in the Sportsterpedia.
A failed transmission sprocket seal will allow engine oil/mist mixed with fuel into the primary.
The rotation of the sprocket rotor, clutch and transmission gears, especially at high revs, has the capability of making a lot of positive (pushing) pressure.
This generated air pressure is usually vented from the tranny vent hose.
If the carb were to leak gas into the crankcase and mix with the engine oil;
Then the pressure builds in the primary due to a kinked hose;
The primary pressure could open the seal and vent into the crankcase.
The crankcase is always pulsating positive and negative pressure (push pull air motions are generated).
So while the primary opens the seal, the CC is pulsating oil/gas/mist into the primary.
There is an internal spring on the seal to hold it against the shaft.
If the spring fails, it's failed for good until it's replaced.
However, higher pressure than designed for can skeet oil past the seal.
And when that pressure subsides, the spring lays back down.
The seal still works as long as the nitrile rubber hasn't been compromised in the process.
Crankcase Pressure Problems
See also in the Sportsterpedia:
- Evo Crankcase Pressure and Engine Breathing for crankcase pressure theory and testing in the Sportsterpedia.
Excess oil coming from the breather vent(s) could be a symptom and the root cause can sometimes be related to an imbalance in crankcase pressure.
Fixing the imbalance can be from re-routing the vent lines to replacing the umbrella valve(s) to replacing the rings.
It depends on what the problem is.
- Crankcase Pressure.
- Engine crankcase pressure is designed to have a slight vacuum with the engine running.
- That is a little confusing as it is a variable pressure measurement based on ring seal and RPM.
You'll have the most vacuum at idle. As the RPM rises, you'll have less vacuum.
Around 5000-5500 RPM, ring flutter will turn the vacuum into a positive (pushing) charge.
- Engine breather valves.
- These are often thought of as being akin auto PCV valves although the construction is different and no springs are used in the assembly.
Rather, rubber flaps (known as an umbrella valve) are installed in a contained compartment, (1) 86-90 and (2) 91-up, to separate oil / air mist.
The oil is directed back into the engine and the air exits the engine thru breather vent(s), (1) 86-90 and (2) 91-up. - Worn or non functioning breather valve(s) will not react to engine RPM as fast as newer one(s).
- They can cause a glob of oil to puke out the vent(s).
- They can cause a buildup of vacuum in the crankcase that pushes and pulls on gaskets and seals causing them to leak oil and blow out seals.
- They can cause a thicker oil condition (air and oil froth or bubbling) making oil scavenging more tiresome for the oil pump and create more engine heat.
- In a perfect world, you would only have a slight oil mist coming out of the crankcase breather.
(now routed into the air cleaner, keeping the E.P.A. happy by depositing the oil back into the engine instead of dripping on the ground).- This problem has been almost eliminated with the OEM breathers venting into the A/C.
But the problem still appears on Sportsters with external vent lines added.
To clarify, oil mist is always present to some degree. It's just not as visible when the vents are connected to the air cleaner.
- Loosing the balance.
- Crankcase pressure imbalance has been the cause of many oil leaks on Evo Sportsters.
- It has been responsible for rocker box, pushrod tube, case seam, cylinder base gasket, air cleaner, cam/primary cover leaks and others.
- Excess crankcase pressure can pull and suck on the gaskets / seals allowing oil to seep past to the outside making it appear the gasket is worn out.
And this can also wear out gaskets and seals.
Excess pressure is generated from failing crankcase breather valve(s) or a kinked/blocked transmission vent hose and others.
2004-up Sportsters (due to internal changes) seem more susceptible to having crankcase pressure problems.
If you have recently replaced the gaskets and still have a seepage problem, the breather valve(s) are suspect.
On 91-up engines, if you replace the gaskets, it's a good idea to replace the breather valves while you have the rocker cover off.
- Good crankcase pressure can also be messed up by other parts of the engine.
- Gasket leaks (extra air intake), breather vent blockages and poor piston ring seal can throw off the balance of crankcase pressure.
Once the alternate problem is fixed, crankcase pressure will return to normal.
- Worn piston rings increase blowby to the crankcase.
- Good rings can also. The rings are always moving around and sometimes the ring gaps all line up vertically inline.
They will move away from being lined up also by themselves. They don't stay in one spot.
But when they are lined up that way, they could easily allow more air thru to the crankcase which would be a temporary amount of excess blowby.
Click here to read more on ring blowby.
- Weeping breather bolt threads may show themselves after an oil change and a spirited ride down the highway.
- 91-up breather bolts (installed in the heads) have a tighter than standard thread pattern.
If you replace OEM bolts with aftermarket or custom bolts, the standard thickness threads may weep oil even though there isn't a problem elsewhere.
Be sure to use Loctite on the threads before installing them as it is also a thread sealant accompanied by it's thread locking ability.- The heads and the breather bolts expand at different rates and the oil can weep out the threads.
- If you have external breather vent hoses;
- Make sure there are no kinks in the lines(s) that would stop or slow down the engine from breathing.
This would bottle up crankcase pressure and cause the internal pressure to implode the gaskets and create a leak.
Also make sure there are no obstructions (sludge) in any bends that may be in the lines.
However, a few drips of oil out a vent hose while parked is normal.
This does not qualify as oil 'puking' out of the vent (which is more of a sudden rush of oil).
See also Breather Venting / Relocation in the Sportsterpedia.
- The breather vents usually work fine on OEM engines as long as they are maintained properly.
- Problems have been noted however when bigger pistons / performance upgrades have been added.
Engine upgrades sometimes comes with extra baggage.
Bigger pistons brings with it more air displacement under the pistons (higher air volume in the lower case, more oil getting splash around).
- Aftermarket accessories sometimes seem better than they are.
- Just because someone made it doesn't make it work as it should.
Some aftermarket breathing systems and accessories can make normal oil carryover visible sooner than OEM systems.
- A stopped up / restricted air filter can back up crankcase pressure and cause an imbalance inside.
(especially with a filter on the end of a vent hose) - Heavy oil flow 'puking' from the breather vent(s) on cold start-up;
could be from a sit-sumping condition where oil is draining into the sump when parked.- Your motor may be filling with oil while the bike is not running and it all gets pushed out the breather when you start the bike.
- Fixing the balance.
- Repair an oil leak as soon as possible.
- Oil leaving the engine means air could be coming into the engine from the same place.
- Extra air in (especially excess air) can cause an imbalance in crankcase pressure with problems to follow.
- Check the breather valves (umbrellas).
- The umbrella valves are simple rubber flaps that will get hard over heat and time.
They should be inspected periodically for hardness and replaced if they are not soft.
In use, they should flex fast enough to keep up with RPM changes. Too hard and they can not. - L82-90 umbrellas are now obsolete parts. You may find some NOS ones at your local dealership or online.
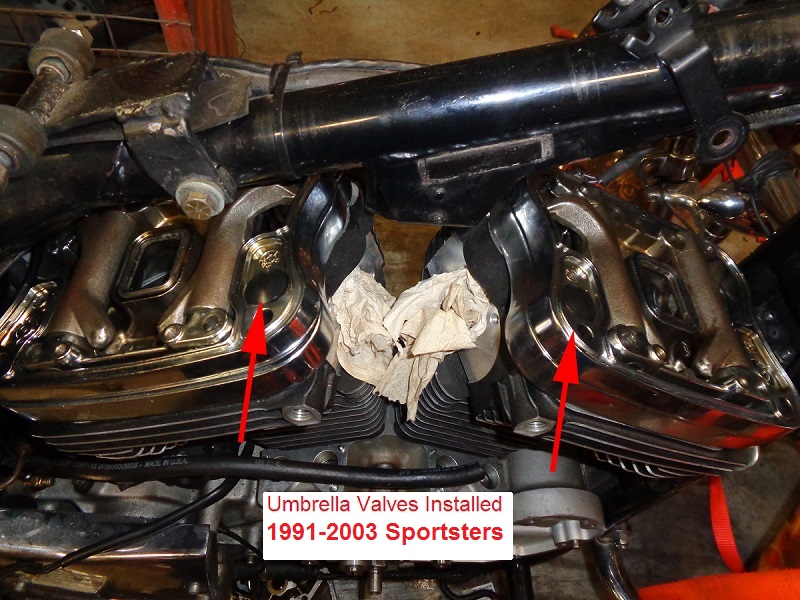
An alternative is to install an external reed valve inline when your OEM umbrella fails. - 91-03 models have the umbrellas visible with the top rocker box section removed.
- 04-up umbrellas are not replaceable themselves as they are built inside the 'replaceable' plastic breather valve assembly.
- Confirm how well the rings seal by performing a Compression Test or Leakdown Test on the cylinder.
- Make testing crankcase pressure part a normal tuneup.
- You can buy or make your own manometer (slack tube, U-tube) for testing.
Once you have the apparatus, bolt it to wall where you normally do maintenance.
It only takes a few minutes to hook it up and get a reading and it helps to spot trouble before trouble happens.
See Using / Diagnosing with a Slack Tube (Manometer) for testing crankcase pressure.
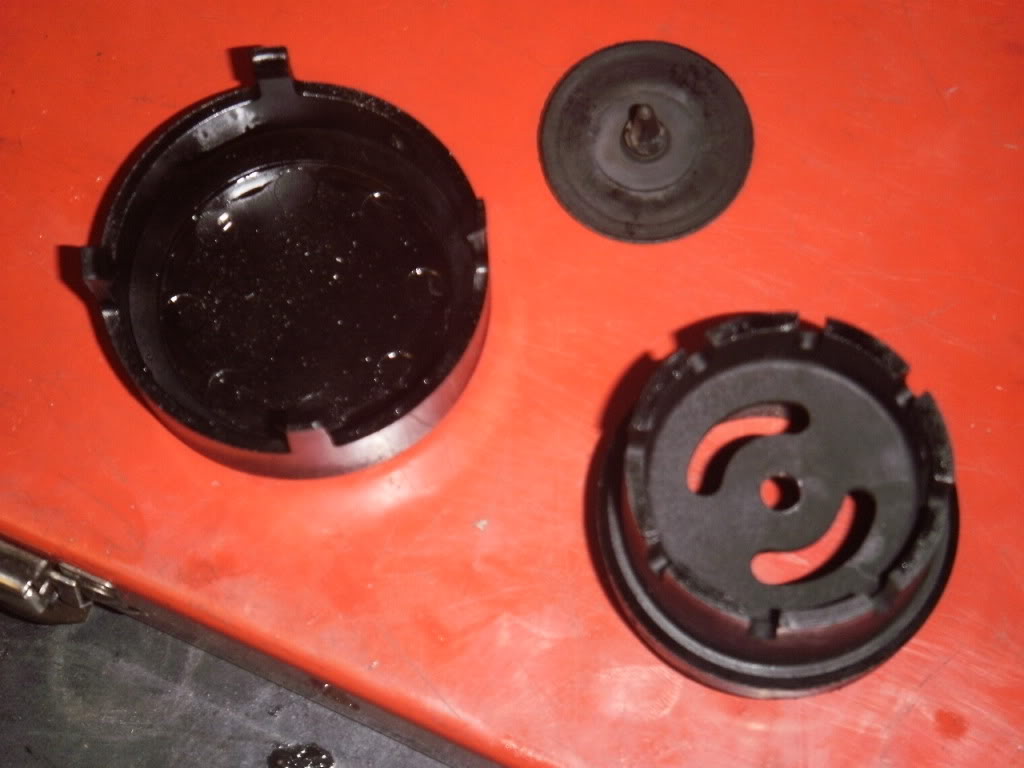
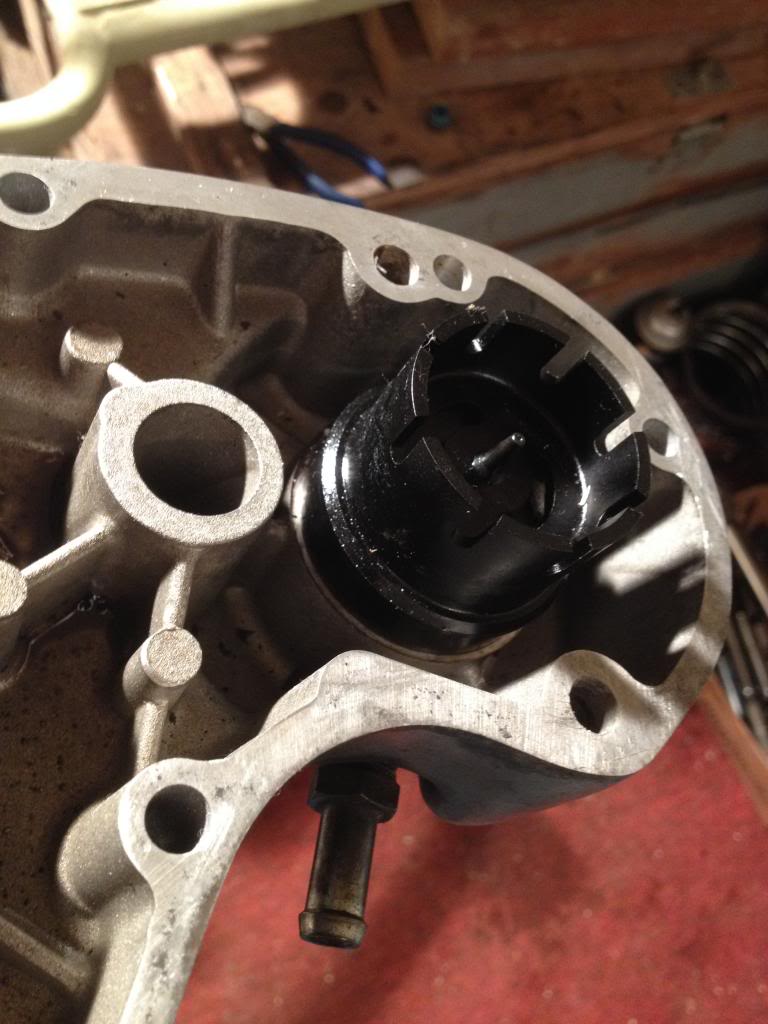
| 91-03 breather valves 94) | 04-up breather valves 95) | Homemade manometer using a ruler as a scale. 96) |
 |  |  |