Table of Contents
EVO: Transmission & Final Drive
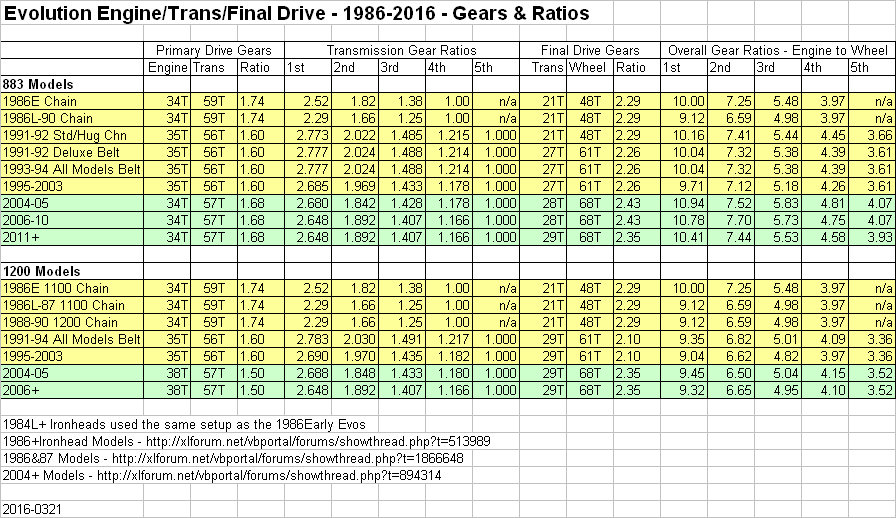
Primary/Transmission/Final Gear Ratios
883 Belt Model Trans Sprocket Part Numbers
1991-92 883 Deluxe
1993-94E 883 All
| Part | Oil Seal | Spacer | Trans Sprocket | Belt | Sprkt Kit w/mtg parts |
| Part # | 12050 | 33334-85 0.849“ Thick | Only-In-Kit» | 40022-91 128T 1-1/8” | 40285-91A 27T |
| As a set, the seal, spacer & sprocket from 1995 can be retrofitted back to the 1991-94 models. | |||||
1994L-2003 883 All
| Part | Oil Seal | Spacer | Trans Sprocket | Belt | Sprkt Kit w/mtg parts |
| Part # | 12067A | 33344-94 0.600“ Thick | 40288-95 27T | 40022-91 128T 1-1/8” | 40285-91B 27T |
2004-06 883 All
| Part | Oil Seal | Spacer | Trans Sprocket | Belt |
| Part # | 12067B | 33344-94 0.600“ Thick | 40379-04 28T | 40570-04B 136T 1-1/8” |
2007-2010 - 883
| Part | Oil Seal | Spacer | Trans Sprocket | Belt |
| Part # | 12074 | Built into Bearing | 40379-04 28T | 40371-07 136T 1“ |
2011+ - 883
| Part | Oil Seal | Spacer | Trans Sprocket | Belt |
| Part # | 12074 | Built into Bearing | 40409-04 29T | 40591-07 137T 1” |
1200 Belt Model Trans Sprocket Part Numbers
1991-94E - 1200
| Part | Oil Seal | Spacer | Trans Sprocket | Belt | Sprkt Kit w/mtg parts |
| Part # | 12050 | 33334-85 0.849“ Thick | Only-In-Kit» | 40022-91 128T 1-1/8” | 40202-91A 29T |
| As a set, the seal, spacer & sprocket from 1995 can be retrofitted back to the 1991-94 models. | |||||
1994L-03 - 1200
| Part | Oil Seal | Spacer | Trans Sprocket | Belt | Sprkt Kit w/mtg parts |
| Part # | 12067A | 33344-94 0.600“ Thick | 40205-95 29T | 40022-91 128T 1-1/8” | 40202-91B 29T |
2004-06 - 1200
| Part | Oil Seal | Spacer | Trans Sprocket | Belt |
| Part # | 12067B | 33344-94 0.600“ Thick | 40409-04 29T | 40571-04B 137T 1-1/8” |
2007+ - 1200
| Part | Oil Seal | Spacer | Trans Sprocket | Belt |
| Part # | 12074 | Built into Bearing | 40409-04 29T | 40591-07 137T 1“ |
Rear Belt Driven Sprocket Part Numbers
| Rear Belt Driven Sprocket | Rear Sprocket Bolts/Washers | ||||
| Year | Part No | Part Description | Year | Part No | Description |
| 1991-1999 | 40213-91 | 61T BLACK | 1992-1999 | 3730A 6516HW | BOLT (5) WASHER (5) |
| 40227-93 | 61T SILVER | ||||
| 2000-2003 | 40213-00 | 61T BLACK | 2000-2022 | 3899 6516HW | BOLT (5) WASHER (5) |
| 40227-00 | 61T SILVER | ||||
| See the note below about casting# 40246-91 | |||||
| 2004-2006 | 40350-04 | 68T BLACK | |||
| 40352-04 | 68T SILVER | ||||
| 2007-2015 | 40350-07 | 68T BLACK w/highlights | |||
| 40444-07 | 68T BLACK (Nightster / 883 Iron) | ||||
| 40353-08 | 68T BLACK (883 Iron / 48) | ||||
| 2016-2022 | 40350-07 | 68T BLACK w/highlights | |||
| 40444-07 | 68T BLACK (Nightster) | ||||
| 42200121 | 68T BLACK (48) | ||||
NOTE: 40246-91 is a casting number - These casting numbers are on both early, 1991-1999, and late, 2000-2003, Sportster 61 tooth x 1-1/8” pulleys. The offset is the same for early and late but the early and late are not interchangeable; the early has a 2“ center hole, the late is 2-3/16”. There are adapters available so you can use a late (2-3/16“) on an early wheel (2”) , but the early does not fit the late. You can tell the late pulley visually by looking at the machined bosses for the mounting bolts. The late model bosses are intruded by the center hole and do not show completely round. The early pulleys either have no bosses or the bosses are completely round. The early pulleys are silver, the late are silver or black, from the factory.1)
Final Drive Trans Belt Sprocket Issues (Differences between 1991, 1995 & 2004)
Remember, the Final Drive Trans Belt Sprocket has left-hand threads! Use a locking tool when removing or installing the sprocket.
The Final Drive Trans Belt Sprocket (from the transmission) must align with the Rear Wheel Sprocket, which is determined by the wheel width. The Trans Drive Sprocket has a belt guide flange on one side only.
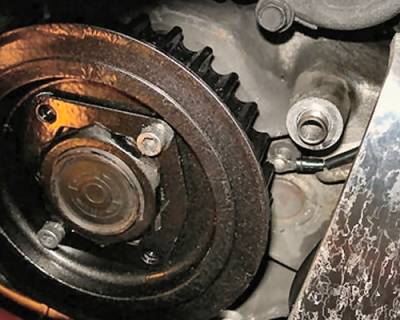
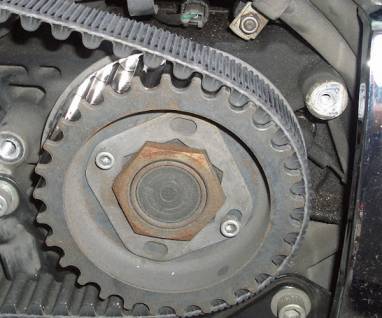
| For 1991-2003 the sprocket flange is away from the engine. But, there are spline differences between 1991-1994 and 1995-2003. | For 2004-later the sprocket flange is near the engine. |
 2) 2) |  |
Pre-2004, on the outer flanged side, the center mounting splines are relatively flush with the flange face. But, on the engine side of the sprocket, the center mounting splines are recessed from the edge of the belt drive face. On 2004-later, the flange is on the engine side (with recessed splines there) and the mounting nut and lock plate are on the outer, flangeless, side.
On 1991-94 Sportsters, the flanged side of the sprocket is away from the engine. On the opposite side, between the case bearing seal (for the transmission Final Drive Shaft) and the recessed splines on the Trans Drive Sprocket, is a spacer to fit in that recess. The width of the splines in contact with the Final Drive Shaft is 0.500“.
On the 1995-03 models, the center spline contact area of the Trans Drive Sprocket (on the Trans Drive Shaft) was widened to 0.766” and the recess spacer was reduced accordingly. The flanged side of the sprocket is still away from the engine. (As a set, the seal, spacer & sprocket from 1995 can be retrofitted back to the 1991-94 models.)
Note: To fit a 1995-03 pulley to a 1991-1994 model requires the matching seal. The '95+ spacer has a larger outside diameter than the 1991-94. Also note, that 1994 was a transition year to the later style pulley; “early” '94s had “early” pulley setups, “late” '94s had '95+ pulley setups.
On the 2004-later models, the Trans Drive Sprocket design was reversed. The flanged side was placed toward the engine, thereby pushing the usable belt surface farther away from the engine to allow for a wider rear tire (150mm). On the flanged side, the center mounting splines are recessed .400“ from the flange face.
For 2004-2005, the older spacer (as used on '95-'03) was still used between the case bearing seal and the sprocket.
On the 2006+ models, the spacer was incorporated into the transmission output shaft bearing.
| Year | Description & P/N | Note | |
| 1991-E94 | Oil Seal | 12050 | Spacer for Sprocket with 0.500 width splines |
| Spacer | 33334-85 | ||
| L94-1995-2005 | Oil Seal | 12067B | Spacer for Sprocket with 0.766 width splines |
| Spacer | 33344-94 | ||
| 2006-later | Oil Seal | 12074 | Spacer is part of shaft bearing |
| Spacer | 8964 | ||
Note: The early trans pulleys will not mount to the '04-up's (even with the flange turned inboard) because:
- 1) the “extra” 1/4” for the inner spline is only a “bump”, there is no area for the nut and lockplate on the early versions.
- 2) The splines need to be recessed .400“ from the (now inboard) belt flange - they are not recessed on the early versions.
- 3) With the flange outboard, the early version Final Trans Drive Sprocket cannot be properly aligned with the 2004+ Rear Wheel Sprocket. If the belt rides against the flange, overheating may occur and the flange (press fitted) can separate from the sprocket.
This XLForum Thread was used for collecting the above information. Thanks to those who contributed, especially Sirrom1.
Final Drive Sprocket - Stripped Splines
Symptoms:
Symptoms of stripped splines include feeling like the clutch or transmission is “slipping” or “jumping” out of gear. It may appear as slipping or lurching from a certain gear and later progress as slipping in all gears depending on the amount of spline damage. It seems some people have different experiences, as shown below.
- *Lurching” in 1st and maybe even 2nd to begin with under light to medium acceleration (lower gears are usually under more torque than higher gears). And it will most likely progress to happen in higher gears under power. Careful shifting may make it seem less of a problem (splines still present with light to moderate damage).
- Under slow acceleration, the nut may hold it with no lurching/slipping. But when you get on it, it may slip and jump and chatter (splines still present with light to moderate damage).
- Bike won't move with motor running and transmission in any gear (splines fully stripped out).
Causes of Stripped Splines:
This problem is usually caused by the lock screws and the main nut becoming loose. With even a little play, the pulley will rock on the shaft every time you open or close the throttle. This will cause wear on the splines no matter what material the pulley is made of. 3) The stock pulley is made of softer metal than the transmission mainshaft gear and the pulley will generally wear out first. Although the splines on the mainshaft gear should be inspected as well as they may get some wear from the pulley rocking back and forth (which has also been a problem to some). It doesn't happen every time but it can and has happened before. So you may notice seemingly good mainshaft splines when you remove the offending pulley. But if you install a new pulley with good splines and still notice a little slop between the pulley and mainshaft, replacing the mainshaft as well may help. 4)
- Pulley nut wasn't properly torque'd (including Loctite) upon last installation.
The nut holds clamp force against the drive gear shaft.
It doesn't have to look loose to not have enough clamp force to hold it tight when pressure from the transmission comes onto the pulley. - Retainer plate screws loose/missing and allowing the pulley nut to loosen.
- Worn splines on mainshaft (harder metal).
- Worn splines on drive pulley (softer metal).
Causes Other Than Stripped Splines:
Keep in mind that these symptoms do not just have to be associated with stripped splines.
There are other issues that may exhibit the same symptoms.
If you suspect the splines have stripped or are on their way out, move to Diagnosing below.
- Damaged transmission gear dogs has about the same symptoms (except for jumping/lurching in all gears).
- Some of these symptoms are also noticed with clutch problems.
- A drive belt that is too loose may skip a tooth on the drive pulley especially at low speed and 1st gear.
Diagnosing:
If these ideas fail to find the problem, you might check the clutch. That can cause the same symptoms. The spring plates commit suicide at times on these machines. 5)
- If you look behind the pulley cover and find metal shavings against the pulley, they most likely came from the pulley splines.
Next to dig deeper into the origin of the shavings. - Look at the position/condition of the metal plate behind the pulley nut. It should not look mangled or have circular scratches on it.
If so, the big pulley nut may be turning against it which will eventually wear the plate's thickness down enough to break the plate. - Look at the shaft position to the pulley nut. If the pulley nut gets loose, the pulley can rock back and forth and start pulling away from the shaft.
- If the pulley is completely stripped out, the transmission mainshaft will spin inside the pulley. You can lift the rear wheel off the floor, put it in gear & spin the wheel with your hand. If the pulley rotates & the shaft doesn't move, you have a stripped pulley. 6) You may have to drop the rear brake cylinder away and remove the sprocket cover depending on your setup. Maybe the rear exhaust too. Easier to check than opening the primary, and the first thing you should look at, especially since an over tightened belt will cause this. 7)
- To inspect the splines and get a visual confirmation, you'll have to remove the small screws and the big nut on the pulley.
Removal:
(Caution: 1991-UP MODELS HAVE LEFT HAND THREADS ON SPROCKET NUT = CLOCKWISE TO REMOVE)
The 2 cap screws are right hand thread. Remove them and the metal retaining plate first. Then remove the pully nut. You'll most likely need a breaker bar also if not using an impact wrench to remove the 1-7/8“ nut (it takes a lot of torque to break it loose). And you'll need to either lock the transmission from turning or lock the pully from turning to use a breaker bar/socket to remove it.
- Click Here to view sprocket tools in the Sportsterpedia.
- You can use an impact wrench to remove the sprocket nut (CAUTION: MAKE SURE TRANSMISSION IS IN NEUTRAL BEFOREHAND).
The impact wrench can smack the transmission gears together and damage them so the transmission should NOT be locked. - Ideas for locking the transmission;
- You can put the bike in 1st gear and use a big breaker bar and socket on the pulley nut while someone sits on the bike. 10)
- With the primary cover removed, you can use a sprocket locking tool (4” brass door hinge) between the engine and transmission sprockets to lock the mainshaft.
Then use a breaker bar to remove the nut. 11)
- For locking the pulley;
- You can buy a final drive sprocket locking tool to hold the sprocket while turning the nut. But if the splines are fully stripped, this tool won't do any good.
Prevention and Maintenance:
It wouldn't hurt to keep a close eye on the the front drive pulley as a matter of preventative maintenance. 12)
Check out the information under Diagnosing above for ideas on spot checking the pulley without going into the primary cover.
Belt Sizes & Part Numbers
| Year | PartNo | Models | Description |
| Chains — 530 Final Drive Chain - 530 means Pitch = 5x 1/8“ & Width = 3x 1/8” | |||
| 1986-87 | 883/1100 | 106 Links | |
| 1988-90 | 883/1200 | 108 Links - 1/2“ longer Swingarm | |
| 1991-92 | 883 Std/Hug | 108 Links - 1/2” longer Swingarm | |
| 40028-15E | 883/1100/1200 | Duckworth Brand 530 Chain | |
| Chain is 110 Links Long - Needs shortened to 106 or 108 Links 40053-65 Duckworth Connecting Link |
|||
| 40029-15E | 883/1100/1200 | Diamond Brand 530 Chain | |
| Chain is 110 Links Long - Needs shortened to 106 or 108 Links 40052-65 Diamond Connecting Link |
|||
| Year | PartNo | Models | Description |
| 1-1/8“ Belt Width | |||
| 1991-92 | 40022-91 | 883Dlx/1200 | 128 Tooth |
| 1993-2003 | 40022-91 | 883/1200 | 128 Tooth |
| 2004-2006 | 40570-04 | 883 | 136 Tooth |
| 40571-04B | 1200 | 137 Tooth | |
| 1” Belt Width | |||
| 2007-2010 | 40371-07 | 883 | 136 Tooth |
| 40591-07 | 1200 | 137 Tooth | |
| 2011-2022 | 40591-07 | 883/1200 | 137 Tooth |
Belt Twist for Carrying Spare Belt
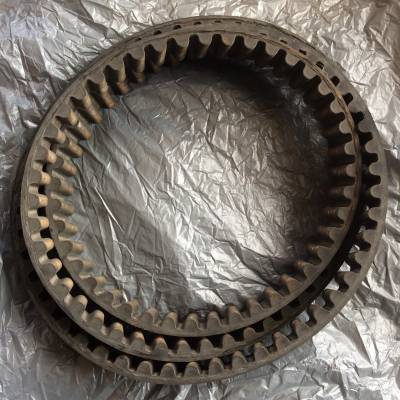
| According to Sportsterpaul (of the XLForum) it is worth carrying a spare belt for any long trip. When you replace a high mileage belt, save the old one for a spare.13) Make a note of the rotation direction. Then, carefully, do a double twist of the belt to stack it three layers high. It keeps a nice big radius (not damaging the belt) and packs well. If your present belt should break, having a spare belt with you can work for a roadside repair, without fully removing your tire. The suggested way to replace the belt14) is to remove the lower bolt from the shock and swing it out of the way. Loosen the axle nut and the axle adjusters so the tire can move forward. Slip the belt up and over the belt guard, over the front sprocket, then onto the rear sprocket from behind. Push the tire back and readjust the adjusters & tighten the axle. Then align the shock and replace the lower bolt. |  |
| You could also shortcut the procedure (if you dare to do so carefully). Don't loosen the axle or adjusters. Just remove the lower bolt from the shock & swing it out of the way. Slip the belt up and over the belt guard, allowing it to be low behind the rear sprocket (not on it). Then slip the belt over the front sprocket & start it (as far as possible) over the rear sprocket rim at the bottom. Pull it up snug to stay in place. Then roll the bike forward so the belt pulls up around the rear sprocket and 'slips' into place. Replace the shock & bolt. The old belt will likely be a little loose from wear and will 'slip on' in this way as a 'temporary' fix until you can replace it with a new belt. Or, do it the longer way if you have any concerns. |
|


