Table of Contents
This is an old revision of the document!

REF: Service Procedures 40
General Drilling and Tapping
Thread Tap and Drill sizes
NPT
- Pipe threads come either straight (nps) or tapered (npt). 2)
- Both are based on the pipe outside diameter as follows:
- 1/8 pipe = .405 pipe dia. 3)
- 1/4 pipe = .540 dia. 4)
- 3/8 pipe = .675 dia. 5)
- The above sizes are the major dia of the male straight thread (as the pipe od is the major) and major dia. of tapered male thread at its big end (if fitting is made to the americian standard). 6)
- The tapered thread has diameter reduced on a taper of .0625 per inch of thread length. Almost all hardware store fittings will be tapered thread.7)
- Little known fact: All iron heads pipe threads used in cases, rocker boxes, and oil pumps are straight female thread, fitted with tapered thread male fittings.8)
NPSC Tap Drill Sizes
| Tap / Thread Size | Drill Size 9) |
|---|---|
| 1/8-27 | 11/32 |
| 1/4-18 | 7/16 |
| 3/8-18 | 37/64 |
| 1/2-14 | 23/32 |
| 3/4-14 | 59/64 |
AN Thread Sizes
| AN Size | Metal Tube OD | SAE Thread Size 10) |
|---|---|---|
| 3 | 3/16“ | 3/8”-24 |
| 4 | 1/4“ | 7/16”-20 |
| 5 | 5/16“ | 1/2”-20 |
| 6 | 3/8“ | 9/16”-18 |
| 8 | 1/2“ | 3/4”-16 |
| 10 | 5/8“ | 7/8”-14 |
| 12 | 3/4“ | 1-1/16”-12 |
| 16 | 1“ | 1-5/16”-12 |
SAE and Metric Tap Drill Sizes
Below are standard pre-drill sizes for size taps used. These are common drill sizes and they are sufficient for most applications on a Sportster. 11)
| SAE Tap | Drill Size | Drill Bit | Metric Tap | Drill Bit | |
|---|---|---|---|---|---|
| Thread size | #/Letter | Diameter- in | Thread Size | Diameter- mm / in | |
| 6×32 | 36 | 0.1065“ | M3 x 0.5 | 2.50 mm / 0.0984” | |
| #6×40 | 33 | 0.1130“ | M3.5 x 0.6 | 2.90 mm / 0.1142” | |
| #8×32 #8-36 | 29 | 0.1360“ | M4 x 0.7 | 3.30 mm / 0.1299” | |
| #10×24 | 25 | 0.1495“ | M4.5 x 0.75 | 3.70 mm / 0.1457” | |
| #10×32 | 21 | 0.1590“ | M5 x 0.8 | 4.20 mm / 0.1654” | |
| #12×24 | 16 | 0.1770“ | M6 x 1 | 5.00 mm / 0.1968” | |
| #12×28 | 14 | 0.1820“ | M7 x 1 | 6.00 mm / 0.2362” | |
| 1/4“x20 | 7 | 0.2010” | M8 x 1.25 | 6.70 mm / 0.2638“ | |
| 1/4”x28 | 3 | 0.2130“ | M8 x 1 | 7.00 mm / 0.2756” | |
| 5/16“x18 | F | 0.2570” | M10 x 1.5 | 8.50 mm / 0.3346“ | |
| 5/16”x24 | I | 0.2720“ | M10 x 1.25 | 8.70 mm / 0.3425” | |
| 3/8“x16 | 5/16 | 0.3125” | M12 x 1.75 | 10.20 mm / 0.4016“ | |
| 3/8”x24 | Q | 0.3320“ | M12 x 1.25 | 10.80 mm / 0.4252” | |
| 7/16“x14 | U | 0.3680” | M14 x 2 | 12.00 mm / 0.4724“ | |
| 7/16”x20 | 25/64 | 0.3906“ | M14 x 1.5 | 12.50 mm / 0.4921” | |
| 1/2“x13 | 27/64 | 0.4219” | M16 x 2 | 14.00 mm / 0.5512“ | |
| 1/2”x20 | 29/64 | 0.4531“ | M16 x 1.5 | 14.50 mm / 0.5709” | |
| 9/16“x12 | 31/64 | 0.4844” | M18 x 2.5 | 15.50 mm / 0.6102“ | |
| 9/16”x18 | 33/64 | 0.5156“ | M18 x 1.5 | 16.50 mm / 0.6496” | |
| 5/8“x11 | 17/32 | 0..5312” | M20 x 2.5 | 17.50 mm / 0.6890“ | |
| 5/8”x18 | 37/64 | 0.5781“ | M20 x 1.5 | 18.50 mm / 0.7283” | |
| 3/4“x10 | 21/32 | 0.6562” | |||
| 3/4“x16 | 11/16 | 0.6875” | |||
| 7/8“x9 | 49/64 | 0.7656” | |||
| 7/8“x14 | 13/16” | 0.8125“ | |||
| 1”x8 | 7/8“ | 0.8750” | |||
| 1“x12 | 59/64” | 0.9219“ | |||
| 1”x14 | 15/16 | 0.9375“ |
Thread Tolerance
Threads can be cut to a tighter or looser fit depending on the needs or sometimes availability of drill bit sizes. For instance, drill bits are available in a wide variety of sets or kits. The most common sizes are usually the ones that are provided. However, many suppliers carry a drill index kit which comes with a huge amount of drill bits in step sizes. Some are in 1/32 steps and some are in one thousandths increments. So, if you want a close tolerance fit on a 3/8”x16 threaded connection, you could use a 0.2969“ pre-drill or for a looser fit you could use a 0.3230” pre-drill. Even with a standard 0.3125“ drill bit, a hand drill is not going to produce a straight hole every time. If you have to over compensate with it and wallow out the hole just a bit to get it straight, you may be producing a looser threaded connection without realizing it. Care should be taken on tighter pre-drilled holes since it creates more friction and heat when tapping than a standard or slightly larger hole and it can lead to breaking taps off in the hole or cracking the piece you're working on. 12)
Drilling
Use Sharp Drill Bits
Always let the bit do the cutting.
Pressing harder on the drill only flexes the bit. (Broken bits or wallowed out holes to follow).
Just because a bit is new doesn't mean it is sharp or made for the application used on.
There may be quality control issues with a new bit at times that may have been already addressed by the tool maker.
But, not before you bought the bit.
Also, some bits are for general purpose usage and some are material specific.
Dull bits will still drill through most wood and burn through most plastics.
They will also work until they won't on steel and aluminum.
However, for a precision hole (for engine fasteners, helicoils and the like), it's best to make sure they are sharp.
- The longer the chips, the sharper the bit for the application.


Grease or Oil the Bits
Make sure to cover drill bits, taps and dies in grease or heavy lube to capture any swarf (shavings) while working.
Back them out, clean and re-lube them periodically to minimize any loose particles getting loose in your work area.
This also helps to control heat buildup.
| Lubing bits. 16) | ||
 |  |  |
Make a Pilot Hole Before Drilling
- A drill bit (without a pilot hole) wil want to walk away from the originally intended starting place.
- A pilot (or center hole) is made with a center punch and a hammer and it establishes where the drill bit enters the piece to be drilled.
| Center punch used to make a pilot hole for the drill bit. 17) | ||
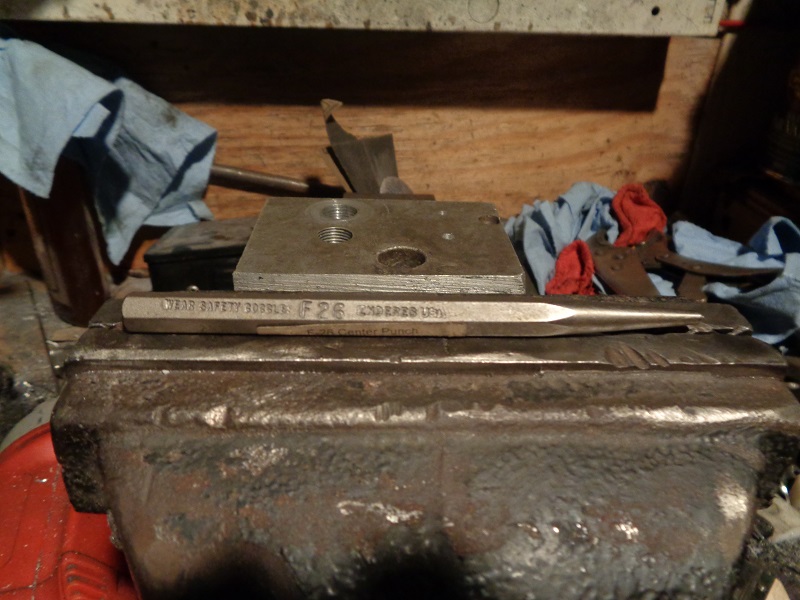 | 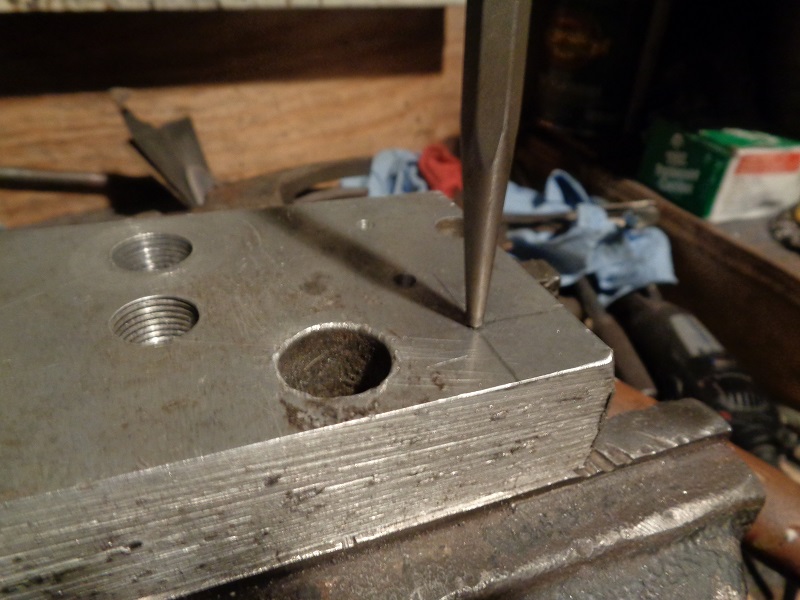 |  |
- A pilot does not guarantee a straight hole but rather just where the hole begins.
This hole was drilled starting off center, just a tad, although it looked centered before beginning.
When the bit went down, it found the pilot hole and followed it even though it was not centered with the bit.
In the third pic below, it is obvious that the bit flexed to the pilot hole and began drilling in.
When pulled out and back close to the hole, the offset is revealed.
This starts an off-centered hole and the bit will follow it to the end of the hole or until the bit flexes too far and binds up or breaks. 18)
| Drill bit appears to be centered to the pilot. 19) | Bit found the pilot and began drilling. 20) | Later inspection revealed the pilot was placed off center from the bit centerline. 21) |
 |  |  |
- While using a drill press, watch the end of the bit when first engaging the pilot hole.
If the bit flexes to the pilot when spinning, it can be noticed before the hole is fully started and you can adjust the piece to the bit center from there.
(before plunging into the hole)
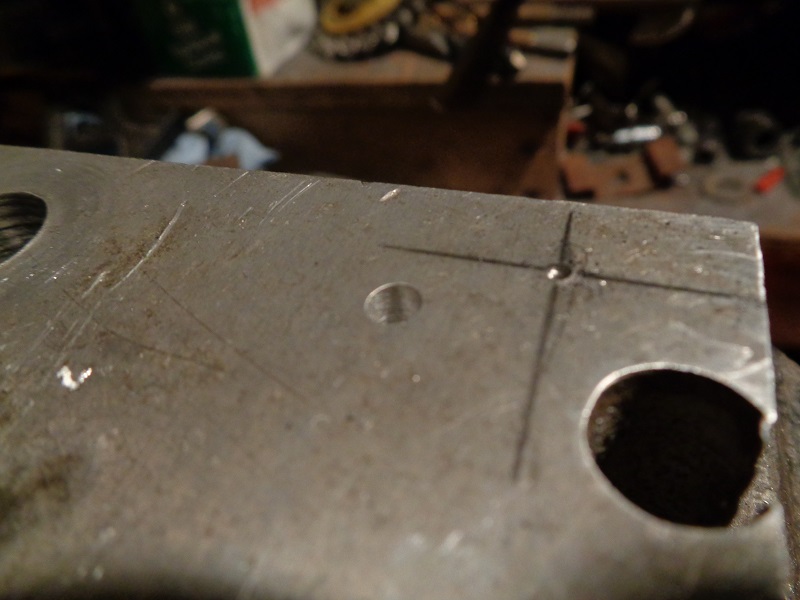
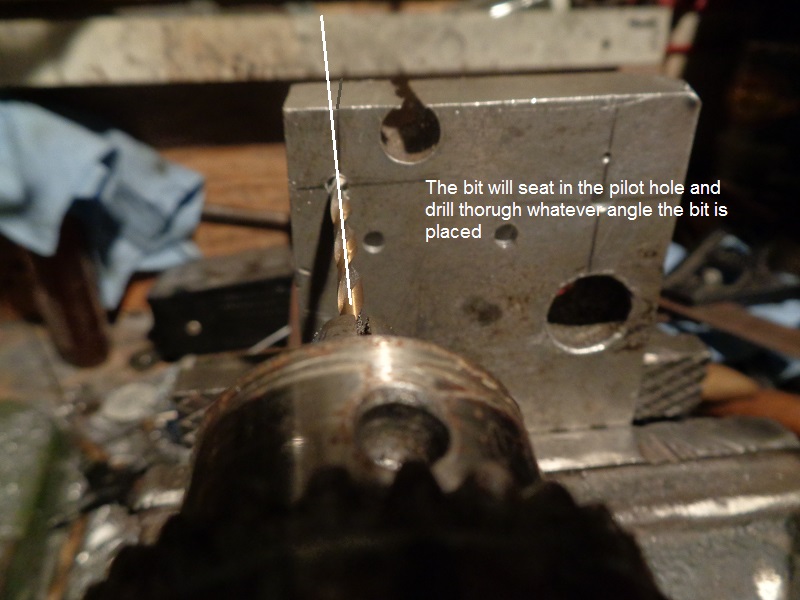
- While using a hand drill, the bit will find the pilot center and follow it though at whatever angle the drill is.
| Starting a crooked hole with a pilot 22) |
 |
Tapping
Make sure to use sharp tap and dies. 23)
This is a Craftsman master rethreading kit (5105).
It looks like a tap and die set but the threading doesn't have the sharp cutting edge. \
They are great for cleaning the crud out of threads and straightening out slightly mangled threads.
(by pushing them straight again without removing any material)
The kit comes with thread files that come in handy to clean up threads.
If these don't work, then you can use the regular tap and dies.
Methodically chasing existing threads is never a bad idea.
You just have to make sure you are using the correct size tool and don't get in a hurry and cross thread a tap and really screw things up.
Harbor freight may have a cheaper thread chasing kit.
Removing a Broken Tap
- The best way to remove a broken carbon steel tap is to use a small hole punch to the center of the broken tap and smack it with a hammer while exploding the hardened tap. You don't stand a chance at drilling it out without damaging the hole/ threads and chances are since pressure was enough to break the tap, it'll take more pressure than that to remove the broken lil stubby that's left. 24) 25)