Table of Contents

IH: Oiling & Lubrication
Oil Tank, Lines and Routing
Oil Tank Assemblies
Sub Documents
Tank Assembly per Year Model:
^ |||||
|||||
| Year | Model | Tank Part # | Oil Cap | Battery Tray |
| 1957-E1962 | XL,XLH | 62507-56A | 62610-52 | 66224-52B 66224-52C |
| Notes: | 6v battery carrier (66224-52C) replaced -52B for 57-60 in 1961. | |||
| 1958-1961 1962 1963-1965 | XLC, XLCH | 62503-52 62503-52A 62503-52B | 62626-54 62625-62 | N/A |
| Notes: | Screw-in filler cap. Cap 62626-54 has no dipstick, 62625-62 and future caps have a dipstick. | |||
| L1962-1963 1964 | XLH | 62507-62 62507-62A 62507-62B | 62610-52 | 66224-52C |
| Notes: | Tank 62507-62B (sold for L62-66 since 1969). | |||
| 1965-1966 | XLH | 62507-62B | 62610-52 62610-52A | 66223-65 |
| Notes: | Filler cap 62610-52 (E66), cap 62610-52A (L66). | |||
| 1966-1969 | XLCH | 62508-66 | 62625-62 62625-66A | N/A |
| Notes: | Filler cap 62625-62 (66), cap 62625-66A (67) (both screw-in caps). Drain plug (704) in on the left side of the bike. Oil filler hole is on the front side of the tank. |
|||
| 1967-1971 | XLH | 62507-67 | 62610-52A | 66205-67 66205-67A (70) |
| Notes: | (12v) battery support (66480-67) required. | |||
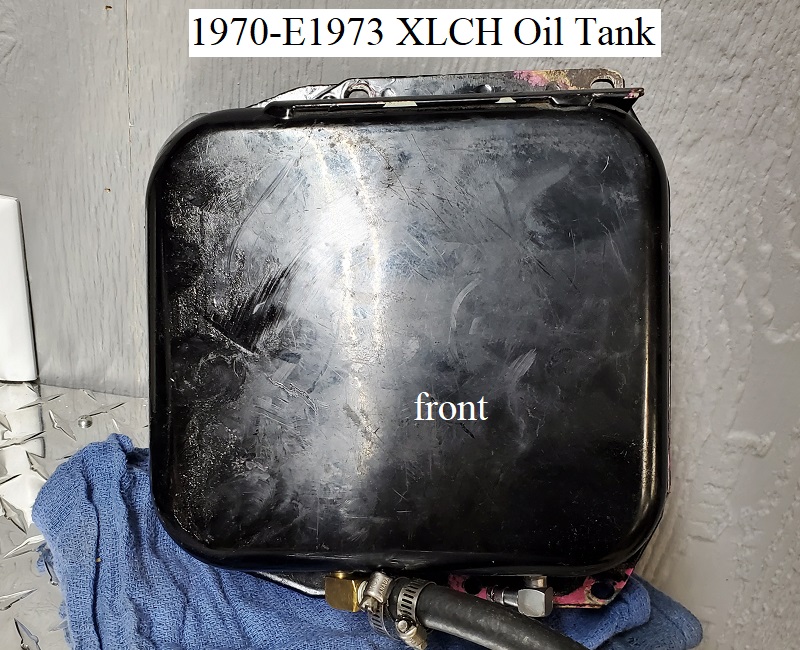
| 1970-E1973 | XLCH | 62508-70 | 62625-70 | 66208-70 |
| Notes: | 62508-70 “lunchbox” tank. Drain plug (704) is on the right side at the bottom of the tank. Oil filler hole is on the rear side of the tank. |
|||
| 1972 1973-1978 | XLH | 62507-72 62507-67A | 62610-52A | 66205-67B 66205-67C (75) |
| 66205-75 66205-78 |
||||
| Notes: | ||||
| L1973-1978 | XLCH | 62508-73 | 62625-70 | 66236-73 |
| Notes: | ||||
| 1977-1978 | XLCR | 62514-77 | 62625-70 | Built-into oil tank |
| Notes: | Triangle shaped side, has threaded 90° fittings on the left front side for 1/4“ oil sight tube. Oil spout is on the top of the tank beside the 90° fitting for the 1/4” vent hose. “AMF” transfer decal on the left side. Drain plug (704) on (L) bottom of tank. |
|||
| 1979 | XL, XLS, XLCH | 62449-79 | 62599-79 | Built-into oil tank |
| Notes: | Triangle shaped side. Drain plug (704) on (L) bottom of tank. Primed tank not sold for parts order (no part# until 1981). Painted Part#s: (62450-79DH Vivid Black), (62450-79EN Concord Blue) (62450-79EP Chestnut Brown) |
|||
| 1980-1981 | XL, XLS | 62587-80 | 62625-80 62635-79 | Built-into oil tank |
| Notes: | Triangle shaped side. Drain plug (704) on (L) side of tank at the bottom. Non-painted tank not sold for parts order (no part# until 1981). Dipstick 62635-79 with oil temp gauge. Label on cap (62481-80) ie, “Power Blend” etc. |
|||
| 1982 | XL, XLS | 62475-81A | 62595-82 62595-82A | 66191-81A |
| Notes: | Battery box no longer built to tank. Tank now with rubber mount fasteners. Drain plug (706) on the bottom. | |||
| 1983-1993 | XL, XLS | 62475-83 | 62595-82A | 66191-83 |
| Notes: | ||||
| 1982-1993 | All except XR-1000 | 62475-97A (98 tank) | 62634-84A | 66194-94A (97) |
| Notes: | Retrofit oil tank kit with battery box, oil lines and fittings. See the link above under sub documents (1982-1993 Sportster Retrofit Oil Tank Kit) for more information. |
|||
Oil Lines
Sub Documents
The OD of the oil & vent lines is as important as the ID. 1)
If you buy automotive lines that are larger OD, they will be difficult to run in the limited space and easy to kink.
Feed and Return: 3/8“ ID X 5/8” OD reinforced rubber was introduced in 1969.
Vent: 1/4“ ID, 1/2” OD reinforced rubber also introduced in 1969.
The tank is vented to the cam chest because it applies a slightly negative pressure to the tank. 2)
This promotes the evacuation of condensate from the tank and keeps the tank from being pressurized (by the air that is also returned by the scavenge pump).
General oil line routing on AMF Sportsters:
The vent and the return lines route under the starter and solenoid. (can't run over them since the exhaust is there) 3)
Use care under the starter as to not kink or flatten the lines (rubber or copper) 4)
Feed line runs out the bottom of the oil tank, close to the chain, around the swing arm and under.
The filter and cooler are (plumbed) in the return line. 5)
Oil Line Routing
XLCH models did not come with a factory fitted oil filter. 1957-1978 XL, XLH models were factory fitted with oil filters inside the oil tank.
You can swap to an external oil filter on XLH or add an external filter to an XLCH.
Click Here to reference External Oil Filters in the REF section of the Sportsterpedia.
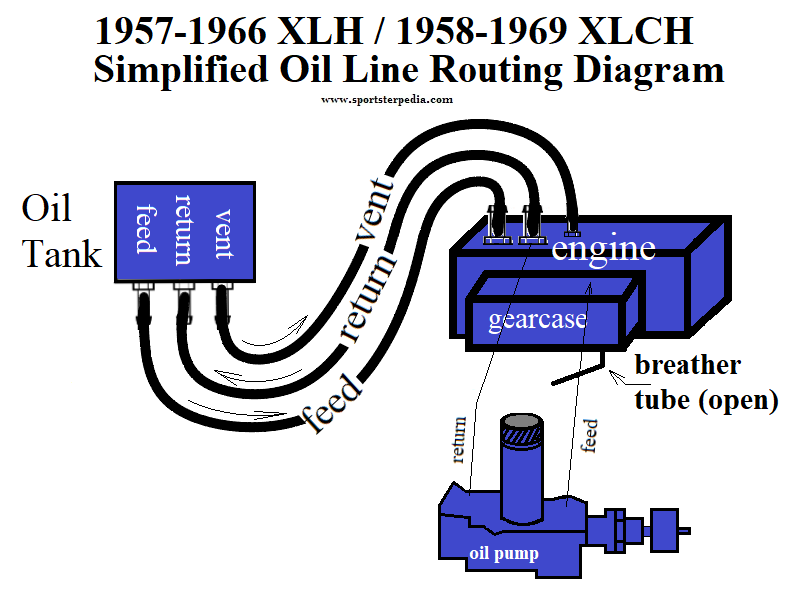
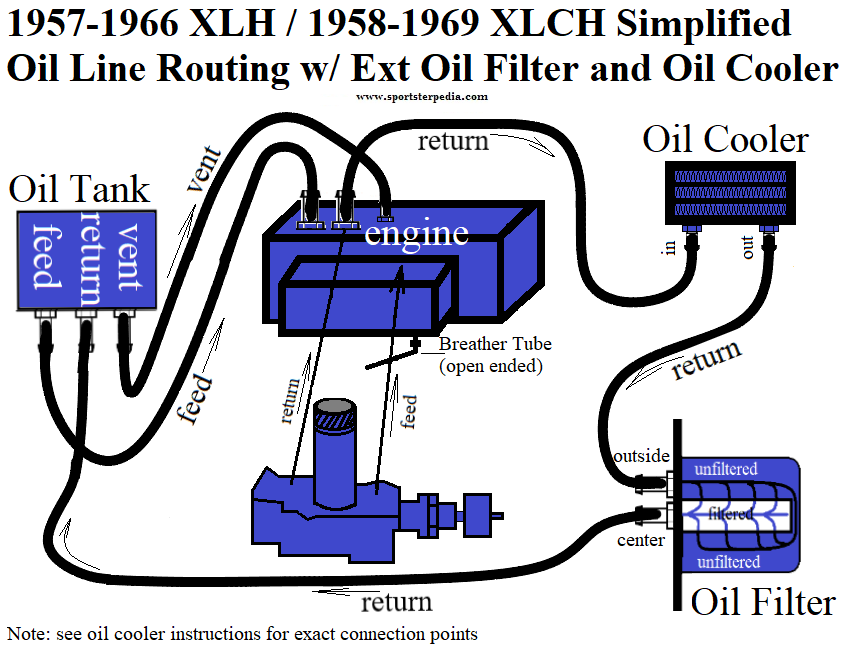
- 1957-1966 XLH and 1958-1969 XLCH:
- Oil feed from the tank is on the top of the case behind the rear cylinder (rear fitting).
- Oil return to the tank is on the top of the case behind the rear cylinder (front fitting).
- Vent line from the oil tank is on the top of the case behind the rear cylinder (lowest and smallest, 1/4“ hose fitting).
- The primary / transmission vents thru the motor internally via the oil transfer valve.
- Drain plug is threaded into the tank.
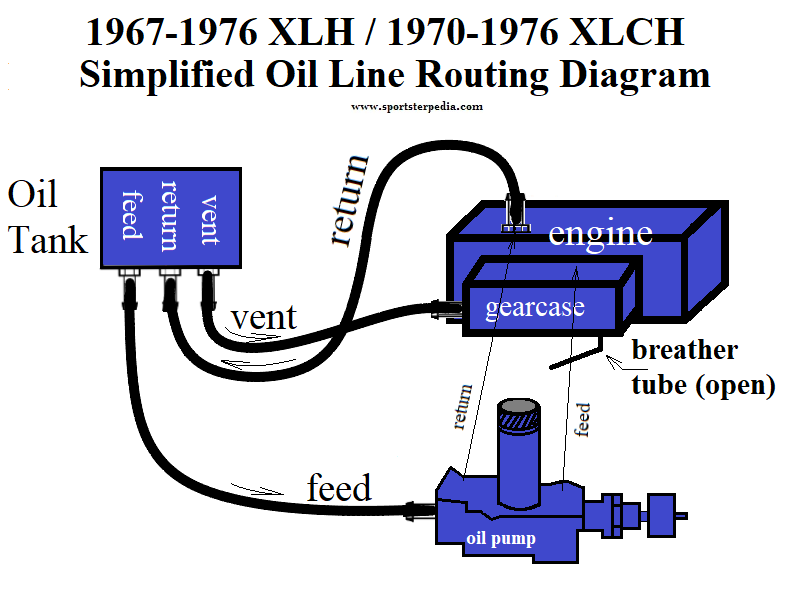
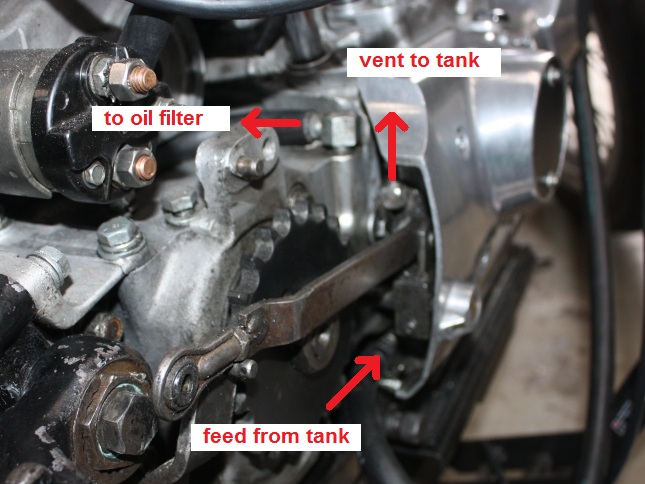
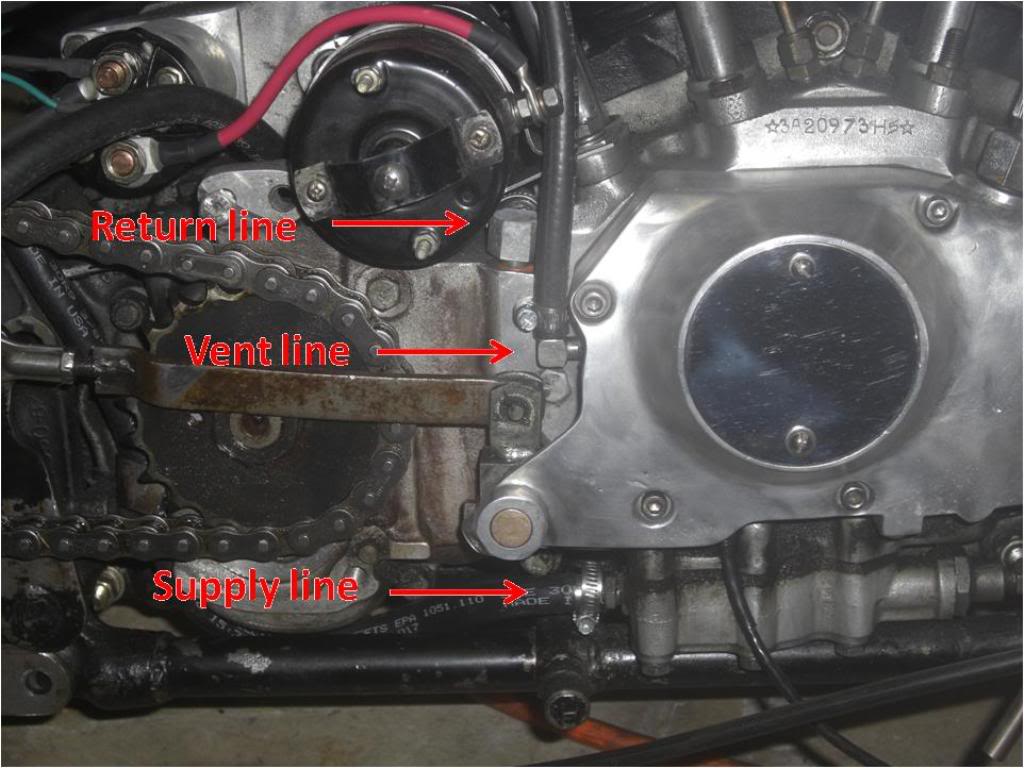
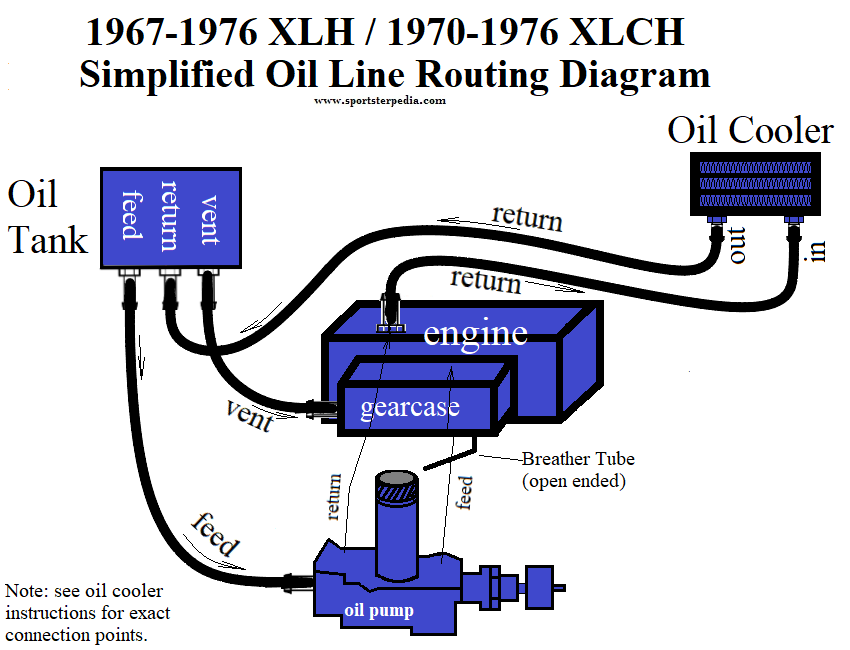
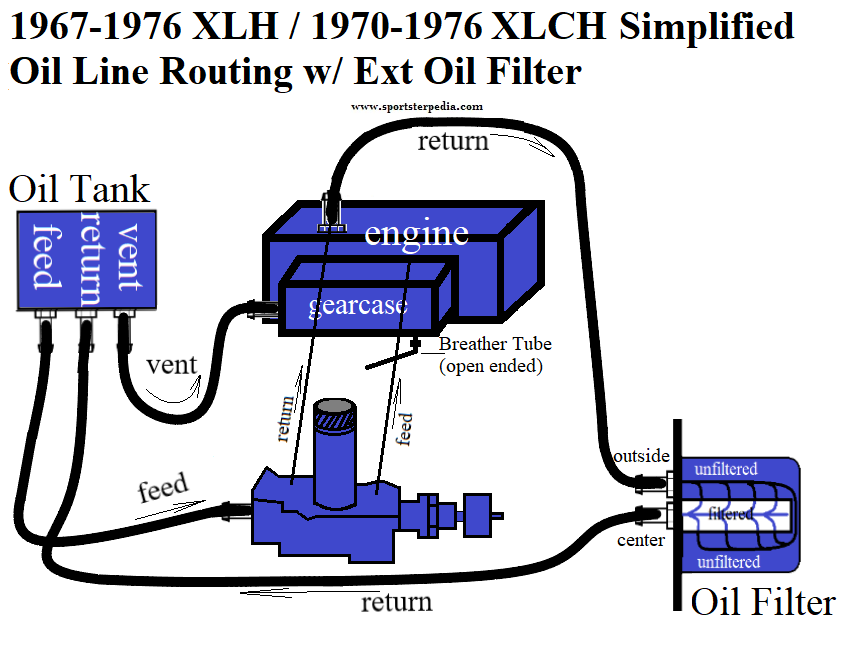
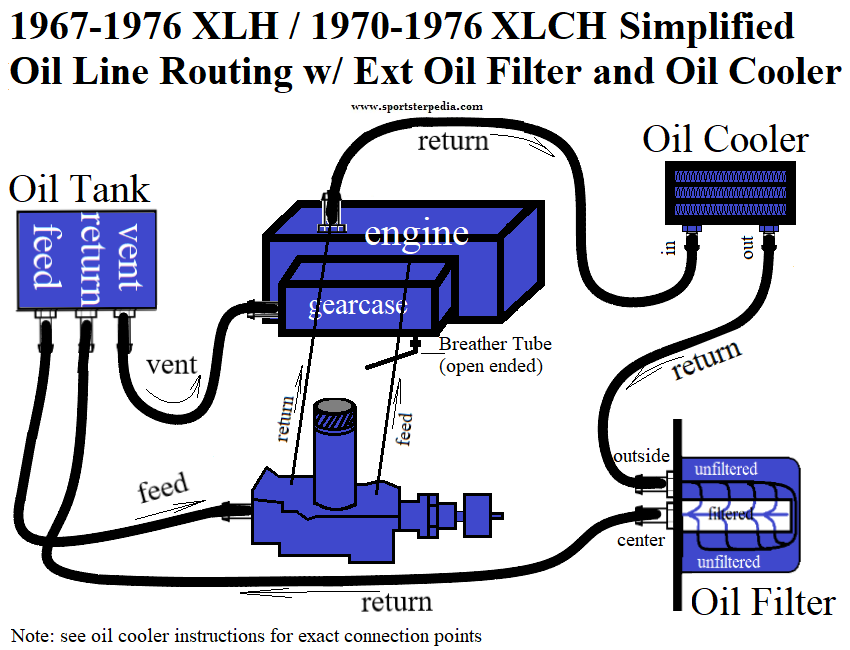
- 1967-1976 XLH and 1970-1976 XLCH:
- Oil feed from the tank is on the rear of the oil pump (3/8” hose fitting).
- Oil return to the tank is on the top of the case behind the rear cylinder (3/8“ hose fitting).
- Vent line from the oil tank is on the rear of the cam cover (1/4” hose 90° fitting).
- The primary / transmission vents thru the motor internally via the oil transfer valve.
- Drain plug is threaded into the tank.
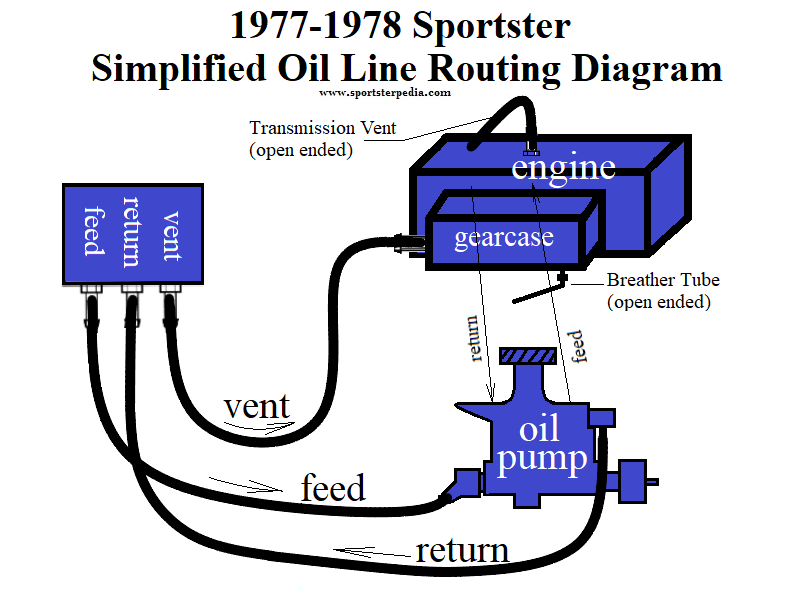
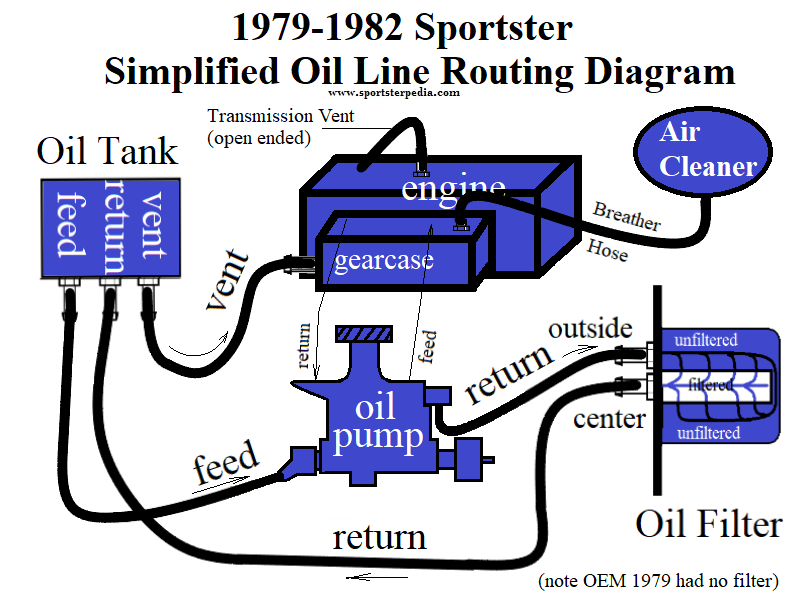
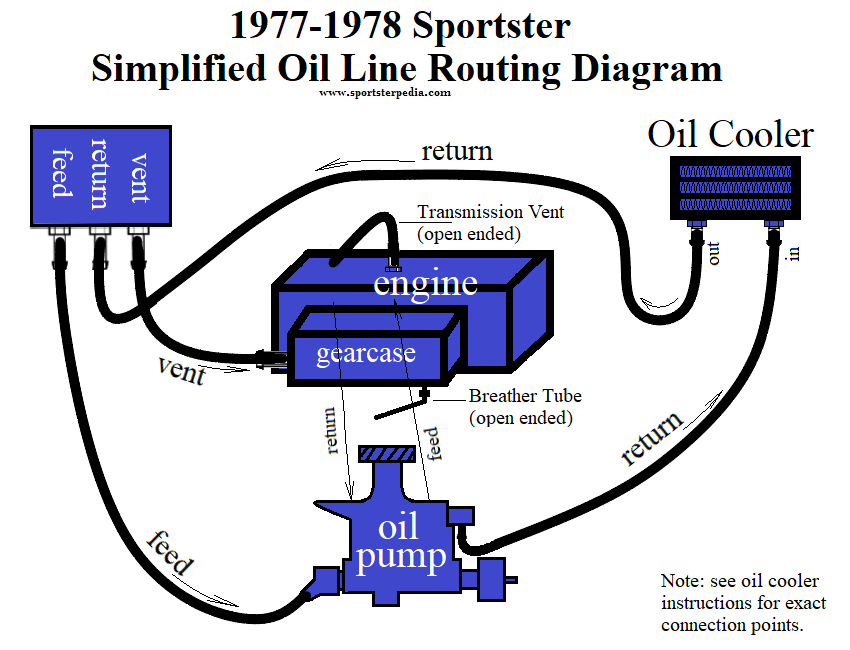
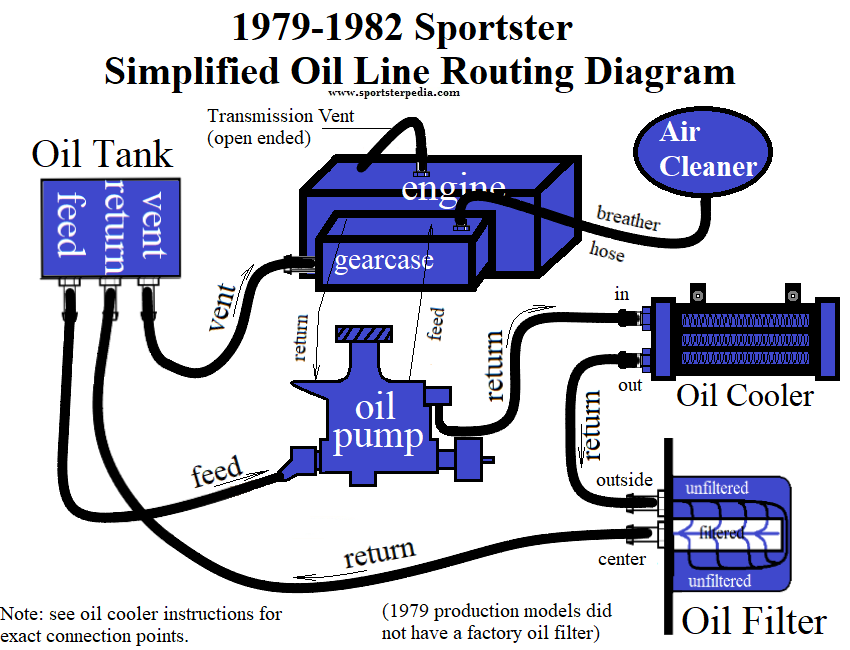
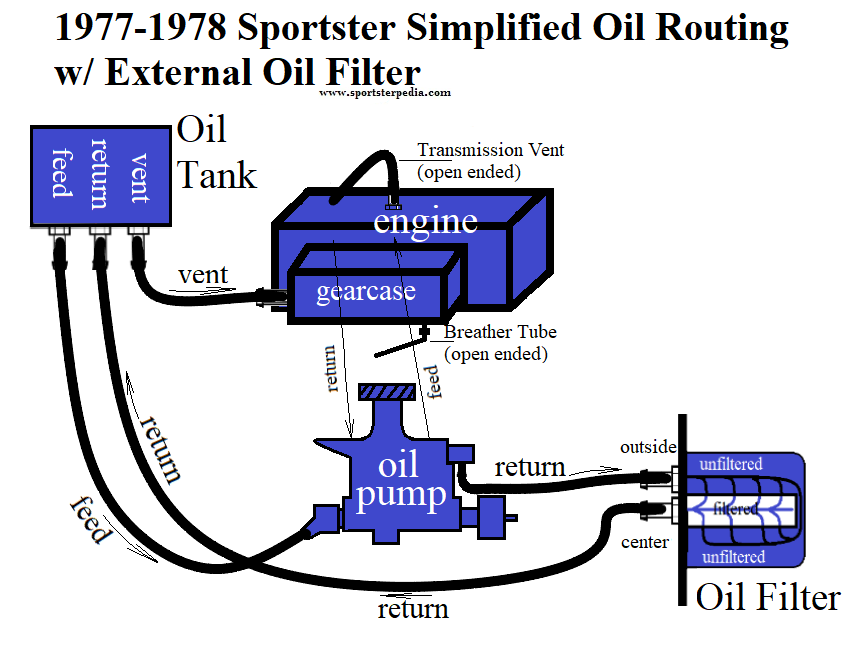
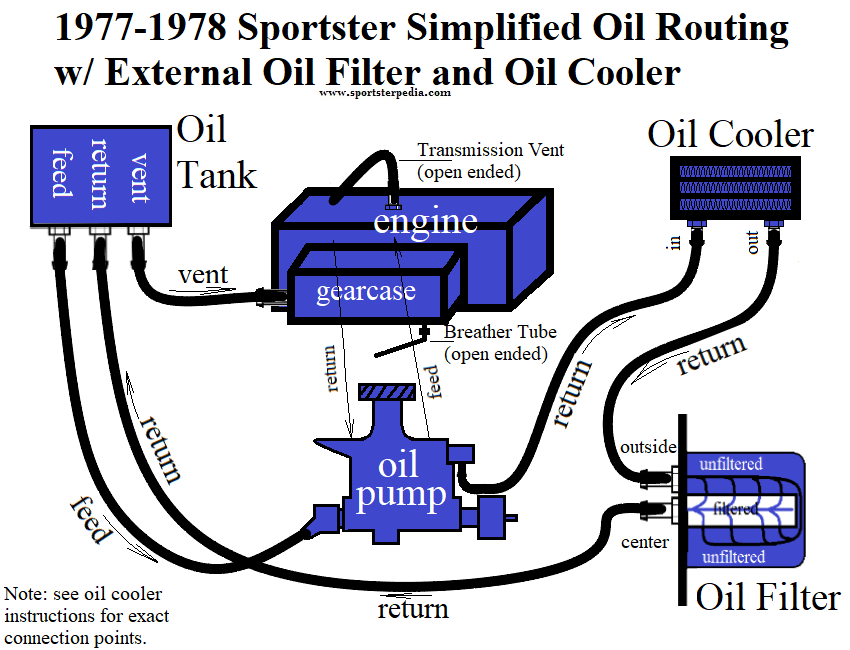
- 1977-1985 (all models):
- Oil feed from the tank is on the lower rear of the oil pump (3/8“ hose fitting).
- Oil return to the tank is on the upper front of the oil pump (3/8” hose fitting).
- Vent line from the oil tank is on the rear of the cam cover (1/4“ hose 90° fitting).
- The primary / transmission vents to atmosphere from the top of the transmission near the rear motor mount just in front of the solenoid (1/4” hose fitting).
Click here for more information on the trans/primary vent in the Sportsterpedia.- 77-80: The hose should run straight up under the seat and then loop back down (without kinks).
- 81-85:The hose should run under the starter Over (all oil lines and the rear brake line) and down between the pivot bolt and swing arm (without kinks). 6)
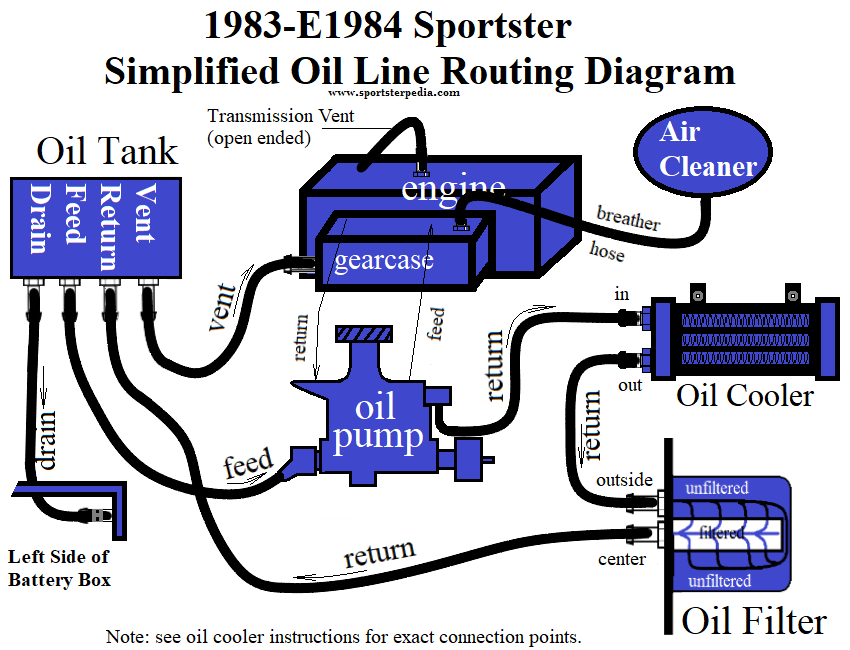
- Oil drain:
- 77-82: Drain plug is threaded into the tank.
- 83-85: Drain hose is attached to the tank, runs across the bike terminating on a welded steel plug under the battery tray.
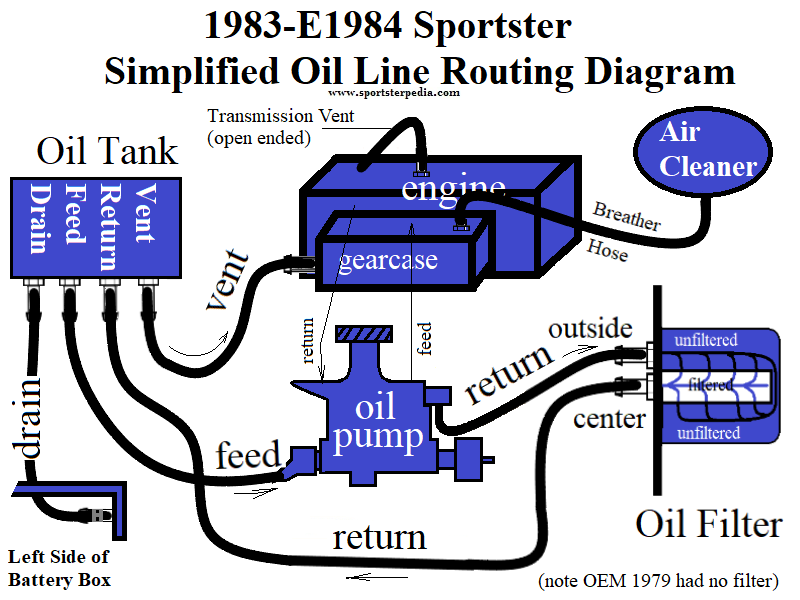
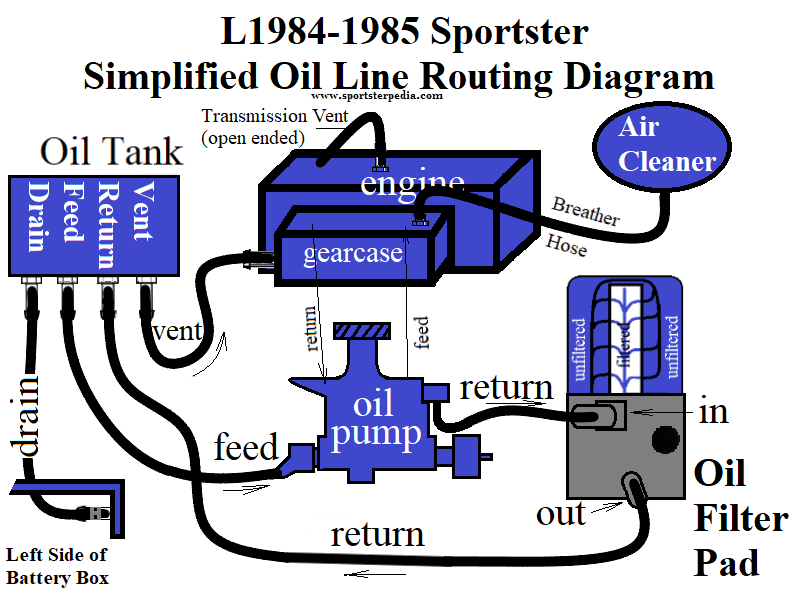
Simplified OEM Oil Line Routing Drawings: 7)
Click on a drawing to enlarge:
Proper line routing is crucial. Mixing up the line connections can destroy your engine!
There is a steel bracket that holds the oil line in position. 8)
It mounts onto one of the rear engine mount or case bolts and keeps the line away from the chain.
The bracket is a piece of .060“ sheet metal about 3/4” wide and maybe 3“ long with a hole in one end where the bolt passes through it.
The other end is bent in a half circle that fits over the oil line and holds it against the frame / engine.
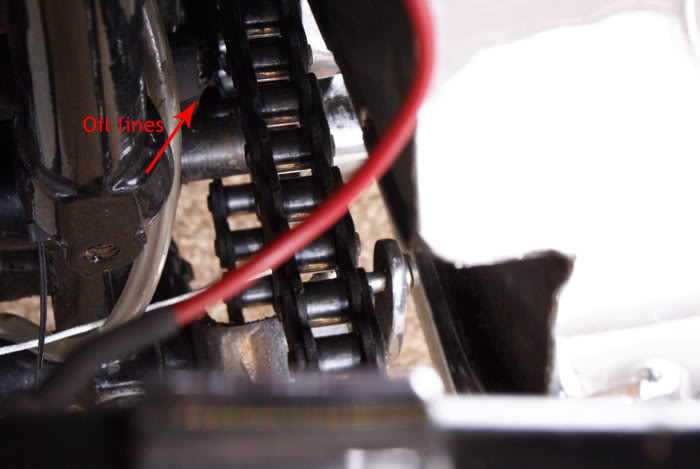
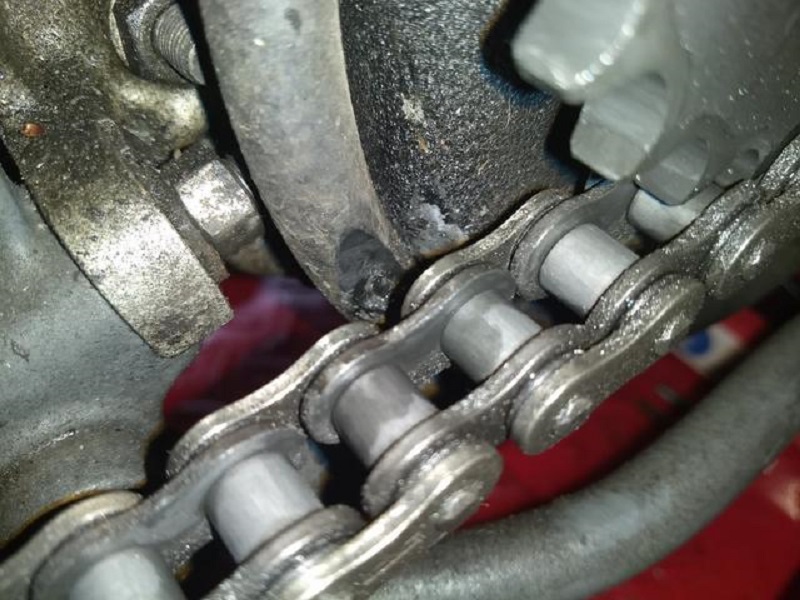
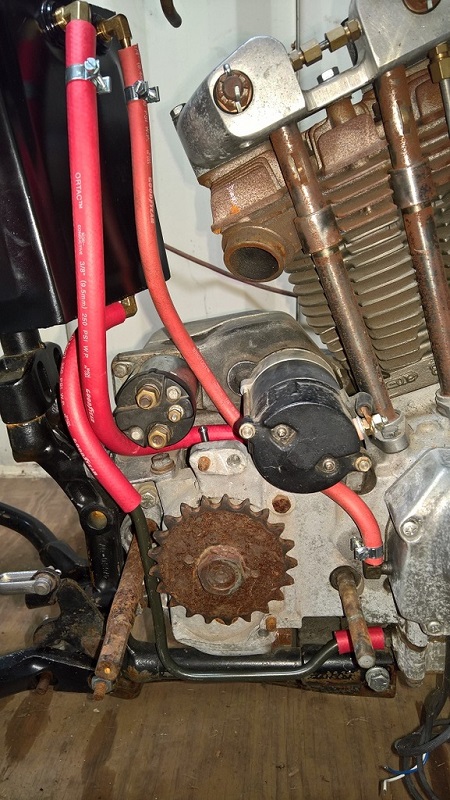
| Feed line behind the chain on 73 XLCH 9) | Missing clamp allows the chain to rub the hose. 10) | A steel line was used to replace the rubber hose. 11) |
 |  | 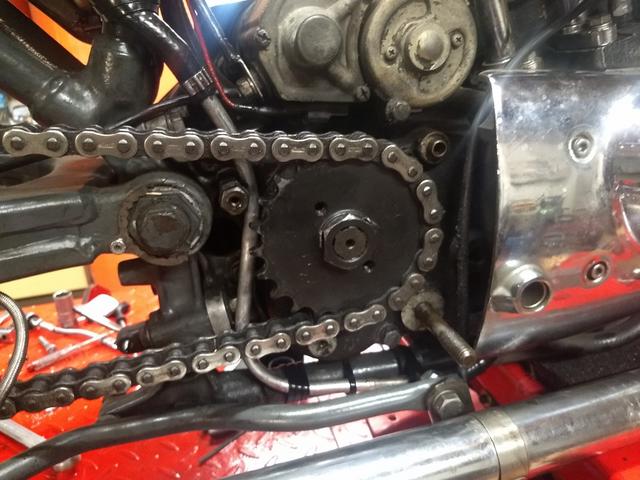 |
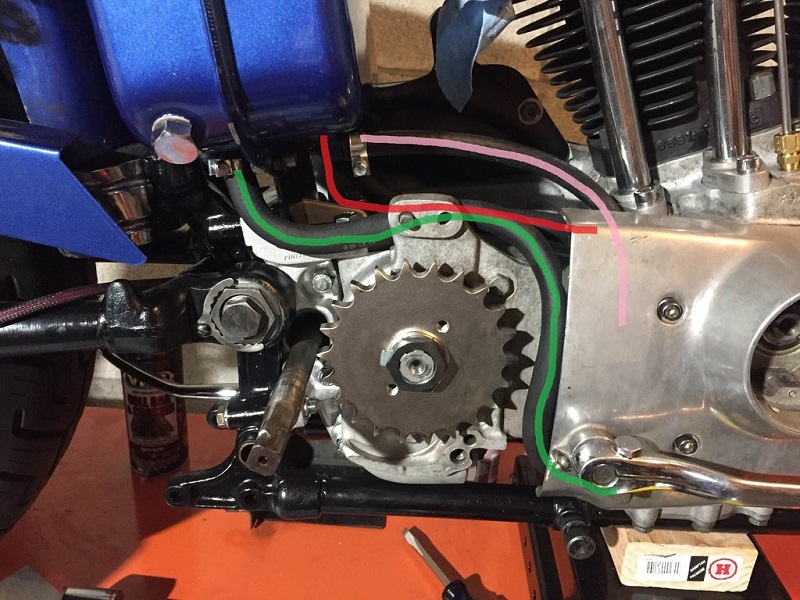
77-85:
The oil return comes off the front of the oil pump, not the top of the case like earlier years.
Essentially you have the following lines: 12)
Feed: From the bottom of the oil tank to the rear fitting (inlet) on the oil pump.
Return: From the top of the oil tank to the front oil pump fitting close to the pressure switch.
(perhaps after going through a cooler)
Vent: From the top of the oil tank to the 1/4” hose nipple on the upper backside of the cam cover in front of the sprocket.
| Oil Lines on 77 XLCH. 13) | |
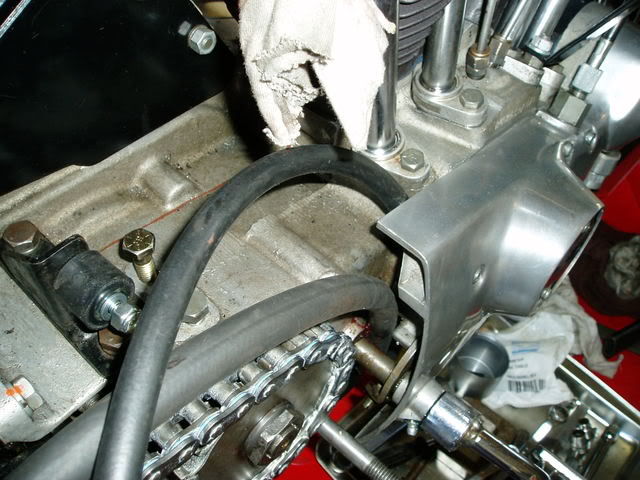 |  |
Line and Fitting Part Numbers
- 1957-E1961 XLH
- Feed Line: Rubber hose with compression fittings on both ends.
- 63517-54 Rubber hose (oil suction line)'
- 63533-52 NPT to rubber hose fitting.
- 63529-52 Brass compression sleeve (both ends).
- 63527-52 Compression nut (both ends).
- 63539-54 Compression to Rubber Hose 45° Elbow.
- Return Line: Steel tubing, bare ended, with rubber seal compression fittings on both ends.
- 63507-56A Pre-bent steel tubing.
- 63525-50 NPT to tube connector fitting (both ends).
- 63529-50 Rubber compression sleeve (both ends).
- 63527-50 Oil line nut (both ends).
- Oil Tank Vent Line: Steel tubing, bare ended, with seal compression fittings on both ends.
- 63570-56 Pre-bent steel tubing.
- 63526-57 Vent line connector (both ends).
- 62360-50 Rubber compression sleeve (both ends).
- 62361-50 Oil line nut.
- 1958- XLCH:
- Feed Line:
- 62356-53 3/8“ Rubber hose.
- 63540-53 3/8” Hose bibb 45° elbow at the engine. (1958-E1962)
- 62696-62 3/8“ Hose bibb 90° elbow at the engine. (L1962-1965)
- Return Line:
- 62356-53 3/8” Rubber hose.
- 63540-52 3/8“ Hose bibb 45° elbow at the engine. (1958-E1962)
- 63540-62 3/8” Hose bibb 90° elbow at the engine. (L1962-1965|
- 63540-66 1/8“ NPT (M-FM) 90° elbow at the engine. (1966-1969)
- Vent Line:
- 63578-41 Banjo fitting assembly at the oil tank.
Connections at the Oil Tank
1957-1978 XL, XLH "Kidney" Tanks


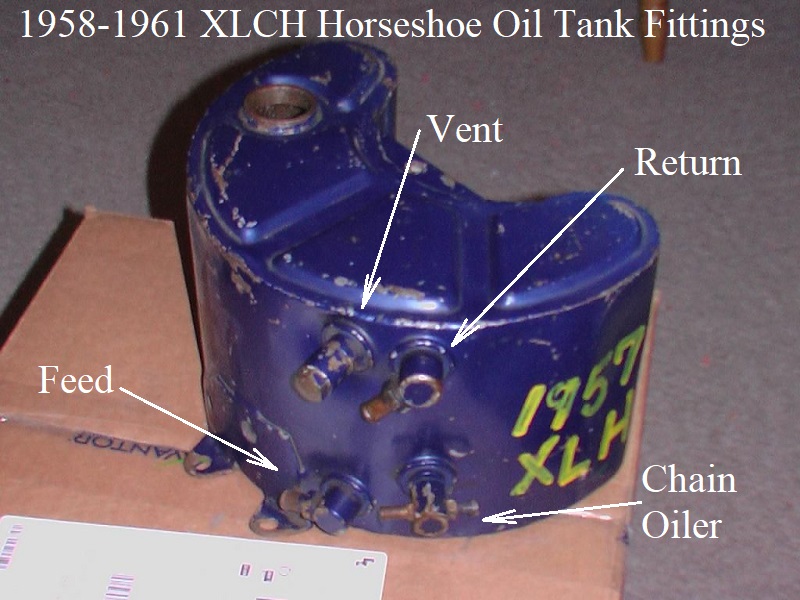
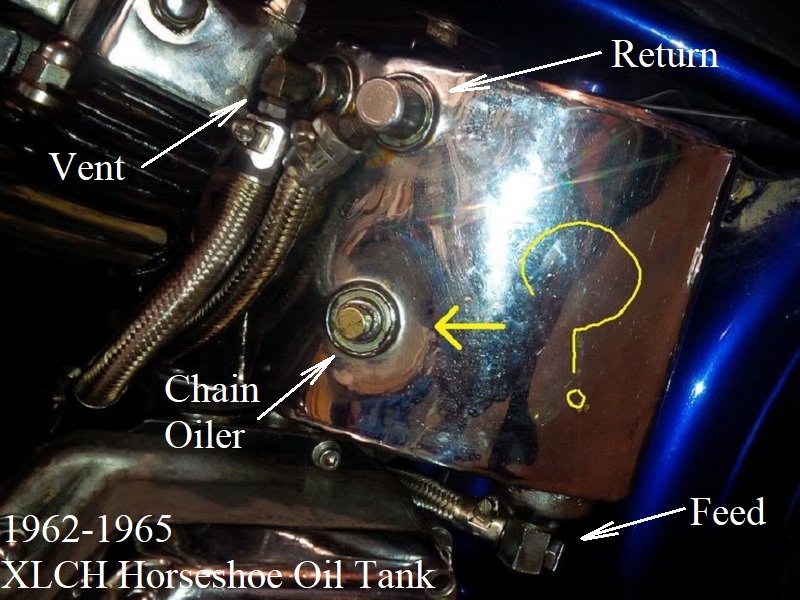
1958-1965 XLCH (Horseshoe) Tanks
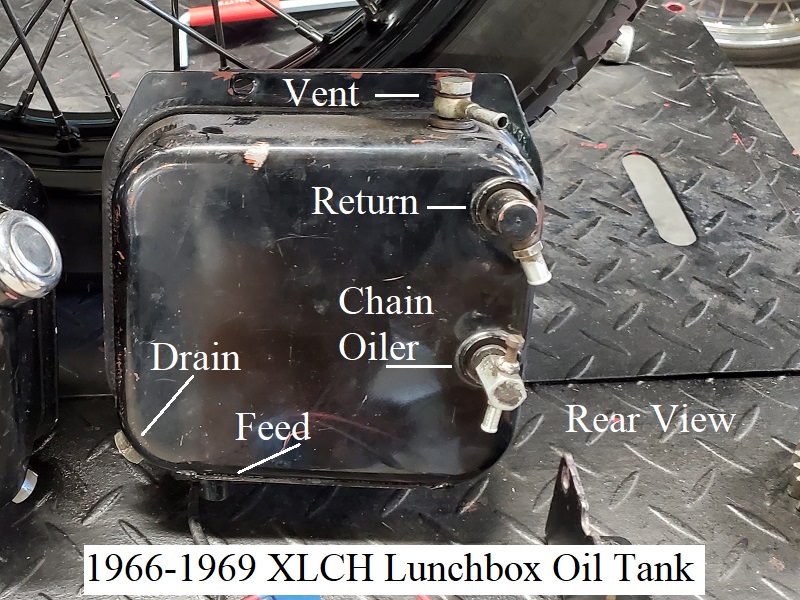
1966-1978 XLCH (Lunchbox) Tanks
- 1966-1969 XLCH Oil Tanks;
- The vent line is at the top (banjo fitting with 1/4” hose nipple).
- The return is on the rear side near the top of the tank (3/8“ hose fitting).
- The feed is on the bottom left behind the flange (3/8” hose fitting).
- The drain plug is on the left bottom corner.
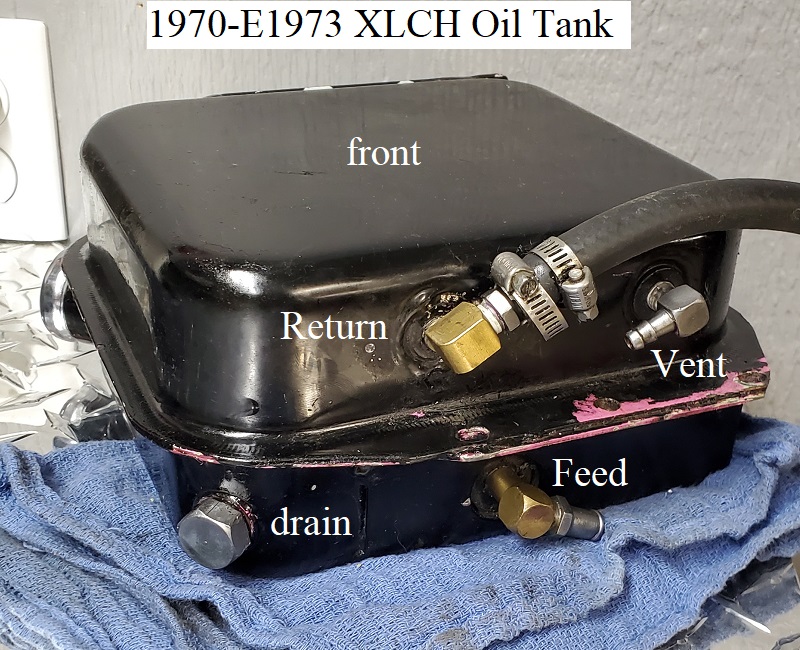
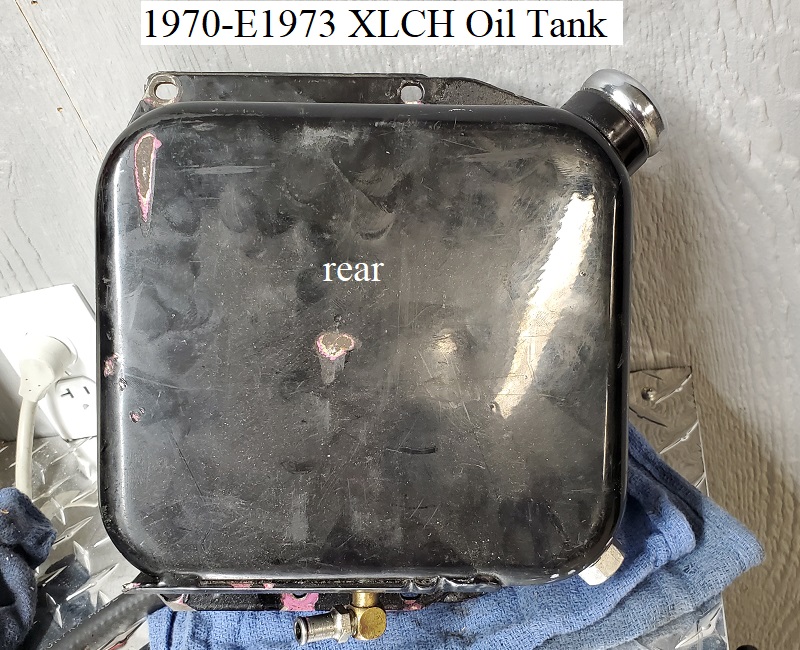
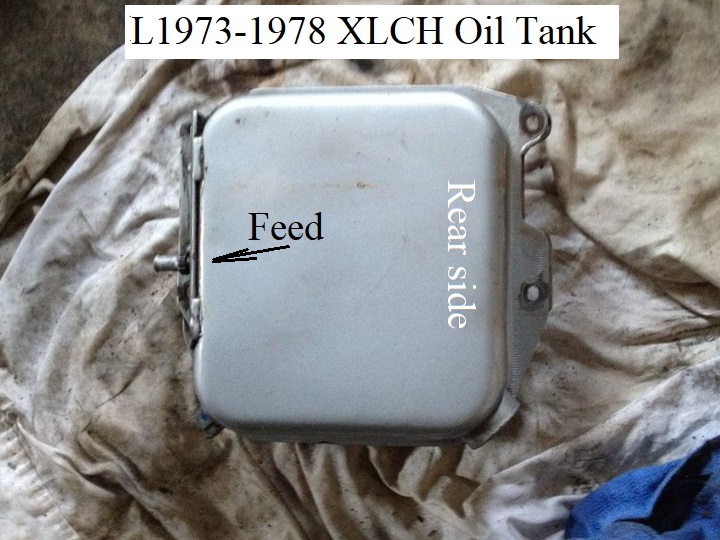
- 1970-E1973 XLCH Oil Tanks;
There are (3) 1/8“ NPT fittings all on the bottom of tank.- The lone fitting rear of the center flange is the feed (straight 3/8” hose barb).
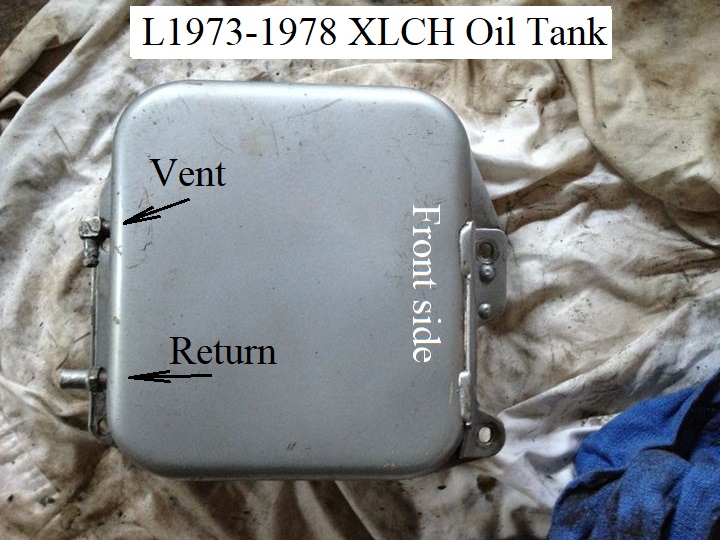
- The fitting forward of the flange on the left (primary) side of the tank is the return and also uses a straight 3/8“ hose barb.
- The fitting forward of the flange on the right (cam side) is the tank vent uses a 90° hose barb fitting for a 1/4” hose. 18)
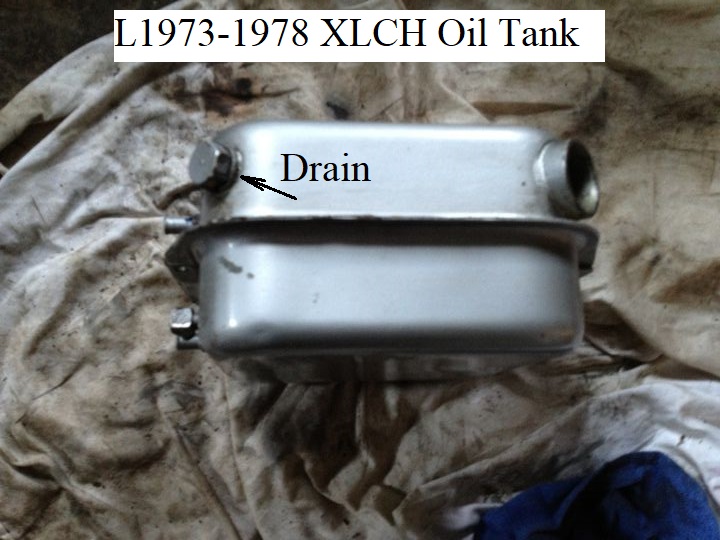
- The drain plug is on the right bottom corner.
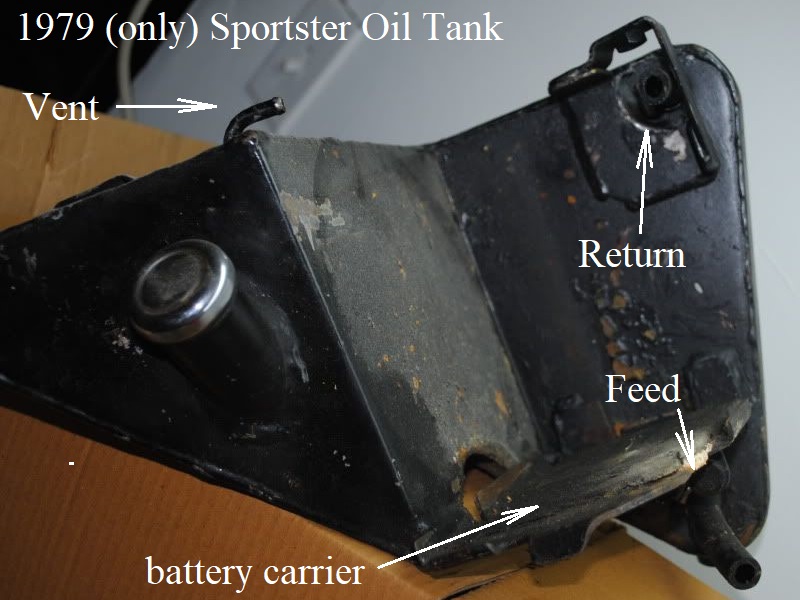
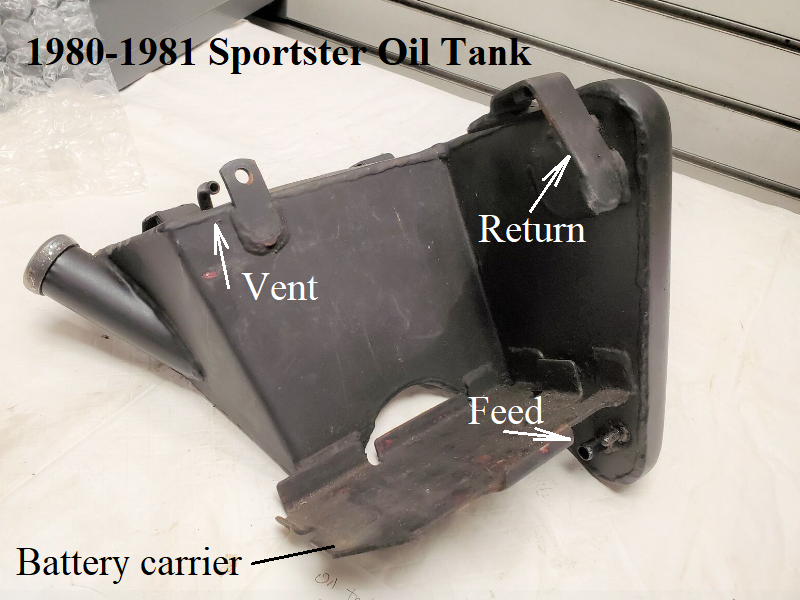
1979-1981 Sportster Oil Tank
There were two tanks used (79 and 80-81) and both of them connect to the engine the same way.
The vent is the right angle nipple on the top of the right side (1/4“ hose fitting).
The return is the upper straight nipple on the left side of the tank (3/8” hose fitting).
The feed is the lower straight nipple on the left side of the tank (3/8“ hose fitting).
The drain plug is on the left bottom (79) and left side at the bottom (80-81).
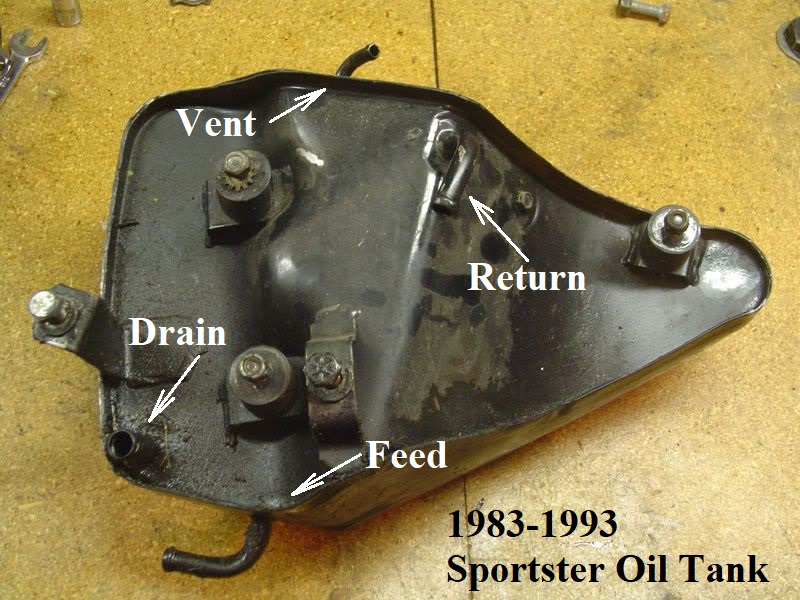
1982-1993 Sportster Oil Tank
The 82-93 tanks basically look the same cosmetically and hose connections are the same with the exception of the drain plug.
The vent is the right angle nipple fitting on top of the tank (1/4” hose fitting).
The return is the upper right angle nipple on the back side (3/8“ hose fitting).
The feed is the right angle nipple on the bottom of the tank (3/8” hose fitting).
1982: There is a drain plug on the bottom of the tank.
1983-1993: The drain is the bigger straight nipple on the back near the bottom of the tank (1/2“ hose fitting).

Connections at the Oil Filter
Click Here to reference “Remote Oil Filters” in the REF section of the Sportsterpedia for plumbing, connections and custom applications.
The oil filter (HD 63782-80T) is the small one that is usually used on custom bikes. Chrome or black can be found. 30)
On all spin on oil filters, dirty oil goes in the outside of the filter. Clean oil comes out the center. 31)
If you are not sure, start the motor momentarily with the filter off and if oil is pumped out the center port, you have it backwards.
1979 Sportsters didn't initially come stock with an oil filter at all. The MoCo offered an oil filter kit for it.
Connections at the Engine
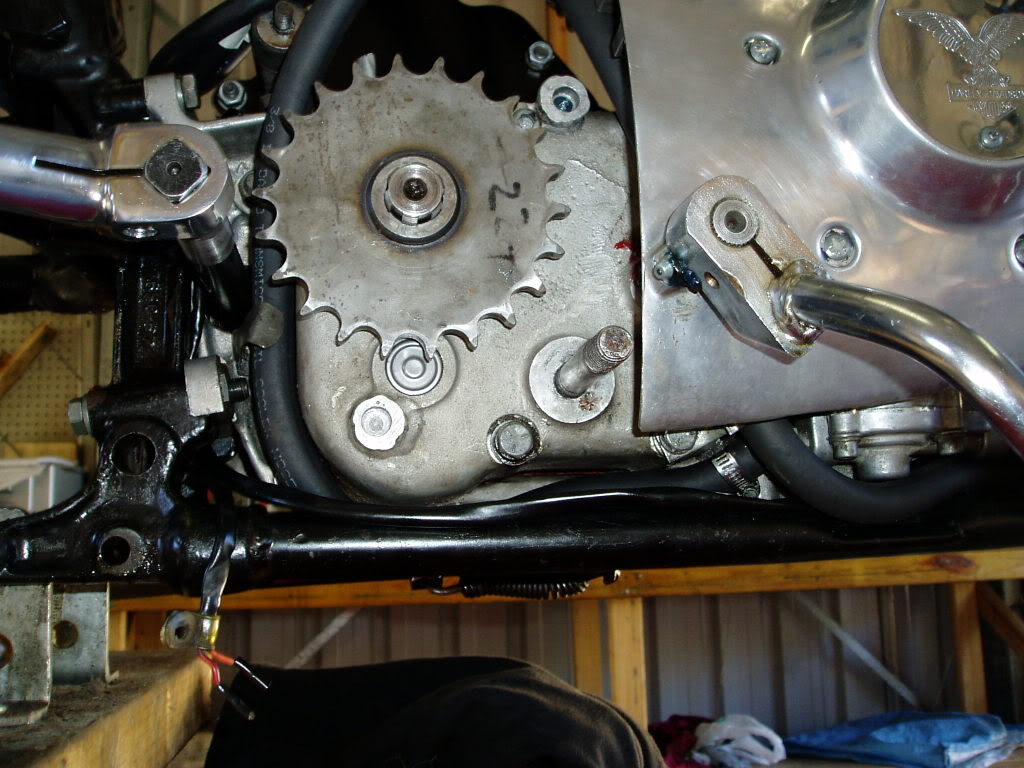
| Oil line connections on a 61 XLCH 32) Fittings (L) Return, (R) Feed, (hole) Vent | Oil line connections on a 67 XLCH 33) 1- Return to tank, 2- Feed to motor, 3- Vent hose 34) |
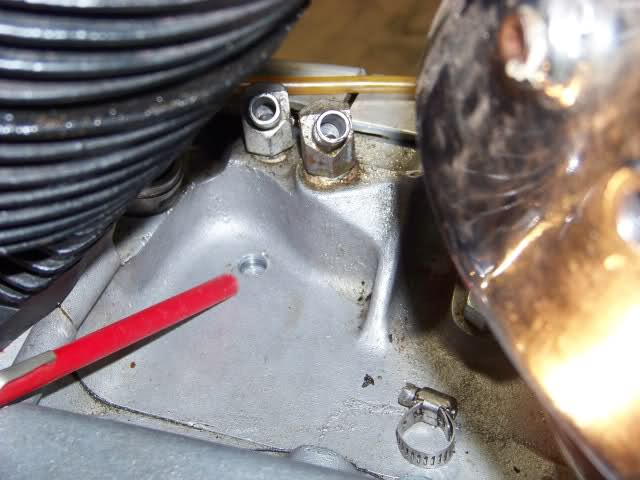 | 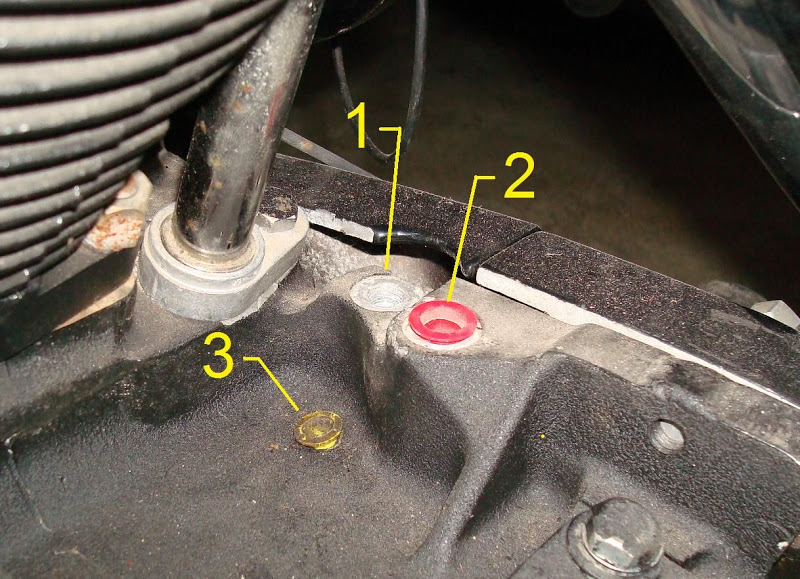 |

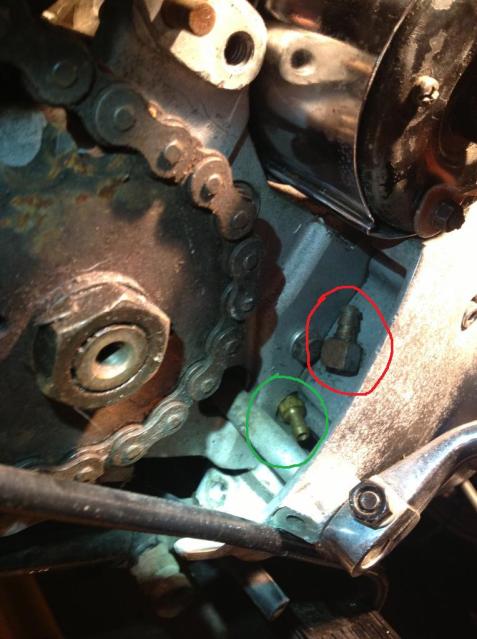
This pic of a 74 model shows the chain oiler fitting (circled in green) which is usually just plugged off. 40)
The one circled in red is the vent return to the tank.
| Oil fittings on a 74 model 41) |
 |
Connections Using an Oil Cooler
XLCH models did not come with a factory fitted oil filter. 1957-1978 XL, XLH models were factory fitted with oil filters inside the oil tank.
You can swap to an external oil filter on XLH or add an external filter to an XLCH.
Click Here to reference External Oil Filters in the REF section of the Sportsterpedia.
Click Here to reference External Oil Coolers in the REF section of the Sportsterpedia (includes hose routing pics).
Notes:
- The oil cooler is plumbed into the RETURN side of the oiling system.
- All oil coolers and lines are installed in the part of the oil flow loop that returns engine oil to the oil tank.
The oil outlet must direct oil flow into oil filter or the return hose to the oil tank.
CAUTION: DO NOT CONNECT THE OIL COOLER IN THE FEED PATH BETWEEN THE OIL TANK AND OIL PUMP.
- Oil cooler inlet and outlet.
- On oil coolers without a built-in thermostat, either side can be an inlet or an outlet. Be sure you remember which you decide is the inlet/outlet.
- Which first, oil cooler or oil filter?
- Although the cooler must be in the oil flow return loop, it can be installed either before or after the oil filter.
- For 1957-1978 models:
- Below are drawings for adding an oil cooler inline WITH FACTORY OILING SYSTEMS that have the filter in the oil tank.
Simplified Oil Line Routing Drawings Using an Oil Cooler: 42)
Click on a drawing to enlarge:
Proper line routing is crucial. Mixing up the line connections can destroy your engine!


Connections For Converting 57-78 Models to an Ext Oil Filter and Oil Cooler
1957-1978 XL/XLH models had an oil filter factory installed in the oil tank and 1958 XLC/XLCH models didn't have an oil filter factory installed.
To use an external filter on XL/XLH models, the oil filter has to be removed from the tank and the plumbing for the oil filter and oil cooler are shown in the diagrams below.
Any XLCH having an in-tank oil filter also needs that filter removed.
Simplified Oil Line Routing Drawings for Converting 1957-1978 models to an External Oil Filter: 43)
Click on a drawing to enlarge:
Proper line routing is crucial. Mixing up the line connections can destroy your engine!

Simplified Oil Line Routing Drawings for Converting 1957-1978 models to an External Oil Filter and an Oil Cooler: 44)
Click on a drawing to enlarge:
Oil Drains
1957-1982 OEM oil tank models have a threaded plug screwed into the tank either on the bottom or on the side at the bottom.
1983-Up models tanks have no drain plug but rather a drain hose from the back side of the tank plugged under the battery tray (left side).
It comes out from the tank, makes a 90 degree bend to the rear and fits into a cylindrical plug welded to the underside of the battery tray.
(on the rear part of the tray, near where the battery strap is fastened) 45)

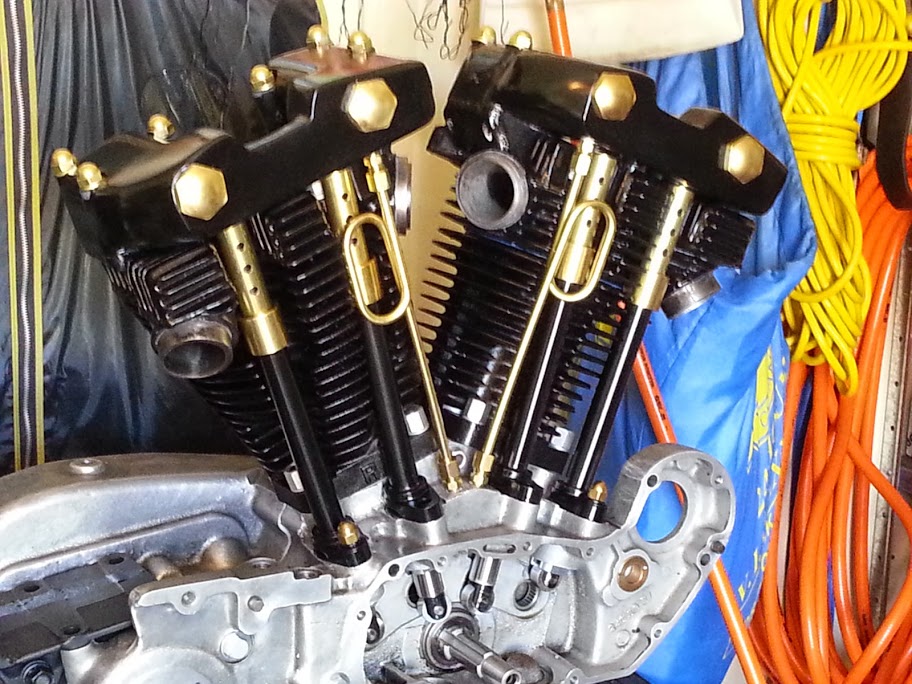
Oil Lines to the Rockers
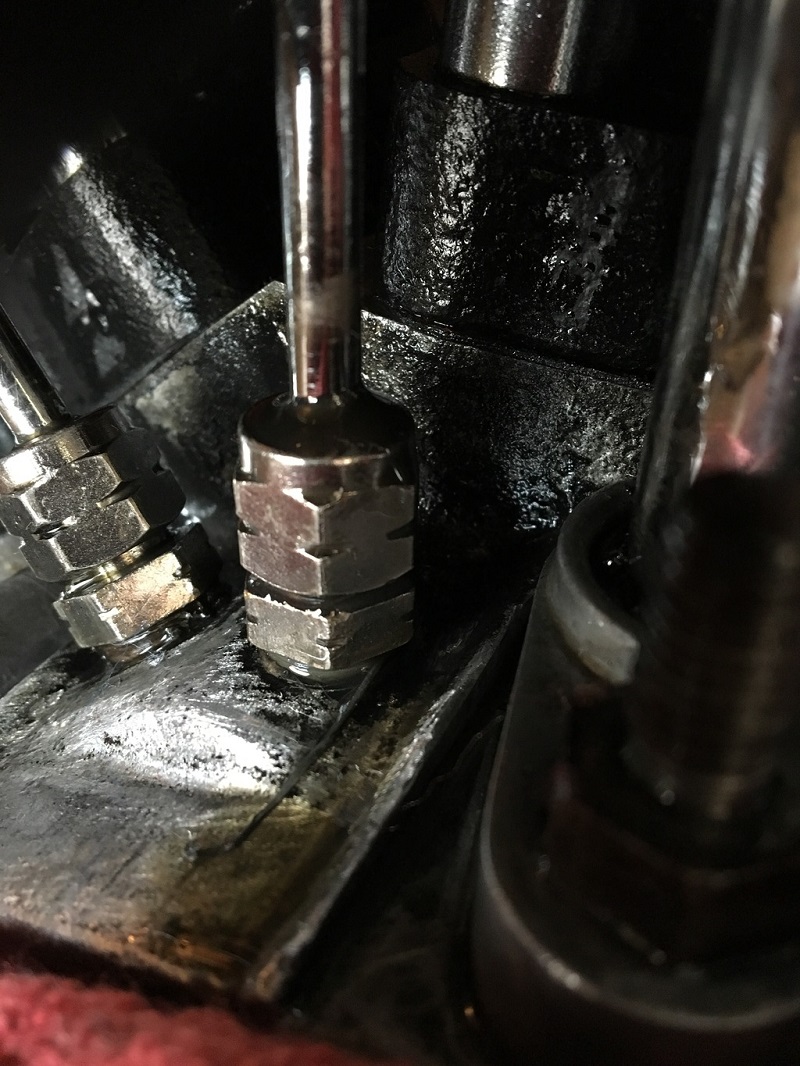
Installation:
The ends are slightly different sizes. 48)
The larger-sized ends go on the case and the smaller-diameter ones go to the rockers.
In other words the closer they are to the oil pump, the bigger they should be.
Most people never even notice this.
Issues getting oil to the top end:
If your pump is primed, and the breather gear is properly timed, then the problem lies in the lines and/or their fittings.
If you have a leak here, you may not have to replace any parts.
Try to uninstall them, clean, inspect and reinstall them and see what happens.
Note for reinstalling the metal oil lines; 49)
The line is just long enough to be inserted a small amount at each end at the fittings.
So insert at the top, then the bottom ensuring that it is more or less even from top and bottom.
You can install the rubbers an inch or more from the line ends.
Then, while keeping it from shifting, slide the rubbers into place.
Then slip each line-end in place, and hold it there while sliding the rubbers into final position.
Tightening the nuts will seat the rubbers. Light grease on the rubbers will help.
Tighten them alternately, again keeping it from shifting.
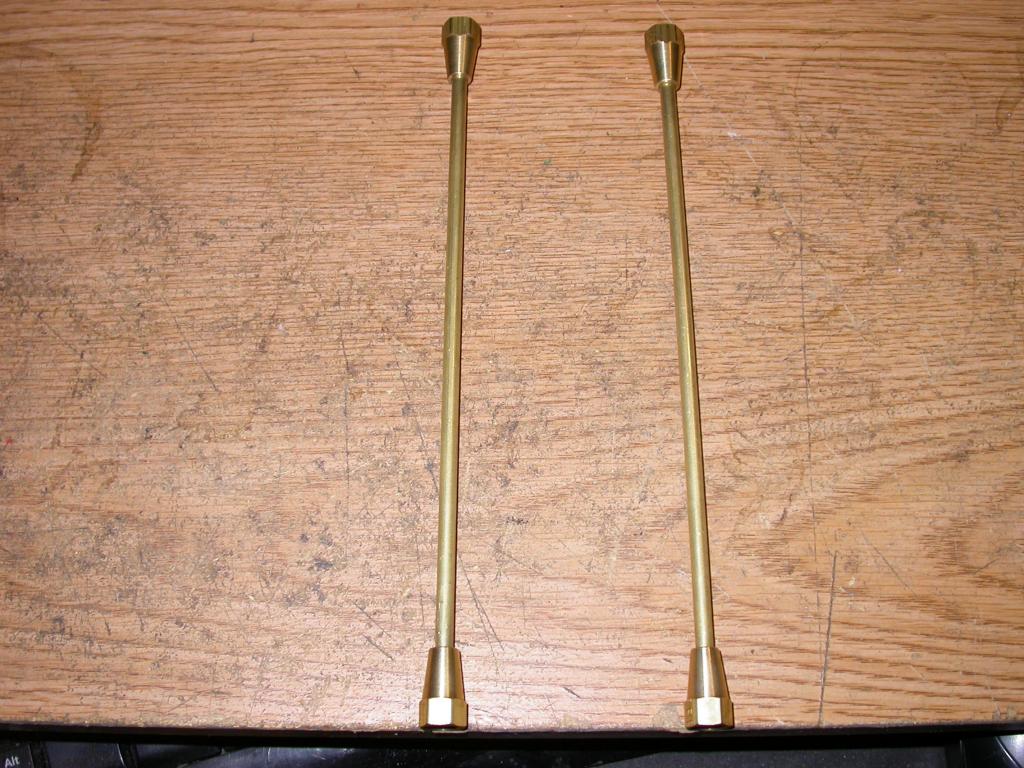
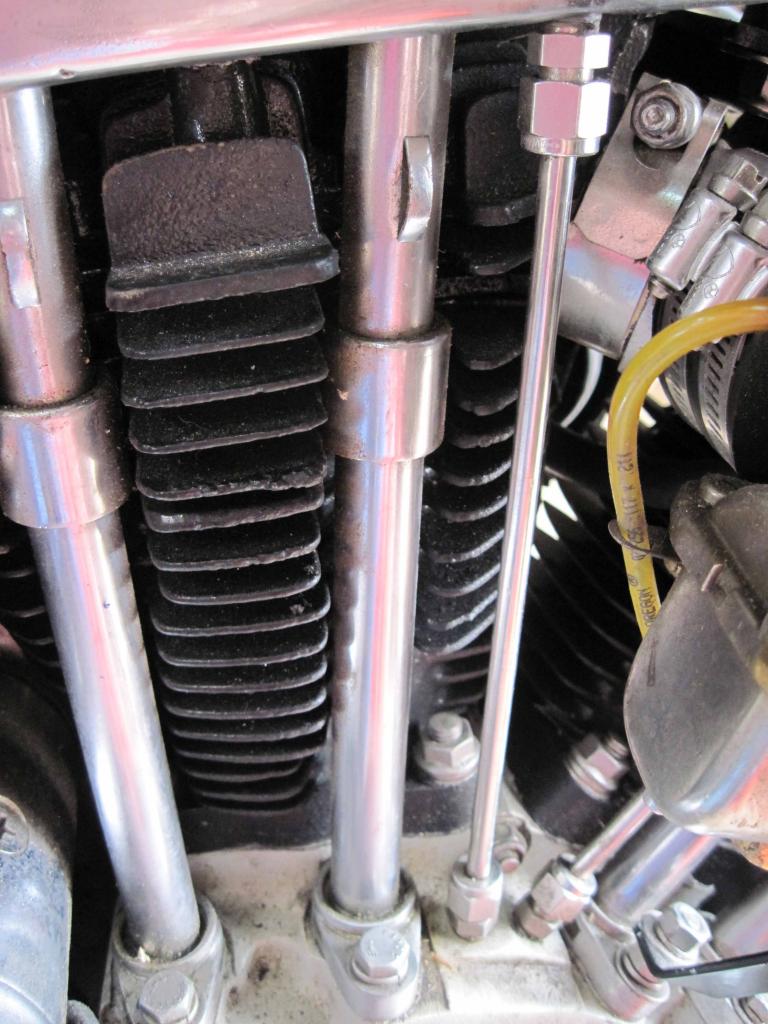
Keep an eye on which style you buy (if any need replaced). 50)
The OEM is barrel shaped.
Some aftermarkets are a barrel with 45° cuts on the top and bottom.
The 45° ones are no good.
Either a different polymer is used or you really need that full barrel shape to seal the oil line properly.
| Rocker oil line 51) |
 |
Braided Oil Lines
Braided lines can flex, leak, and sometimes flatten out. 52)
Before you try threading any threads into your engine, try threading them on a pipe fitting first. 53)
If the new parts are chromed then you should (must) wire wheel (with light pressure) the chromed threads before installation. 54)
This is especially important for chromed threaded bolts or bolts that have old Loctite on them.
* Always wear a face mask as you can loose hold of the bolt (using a wire wheel on a bench grinder) it will go flying.
You can lightly clamp the fastener flats in a vise and use a Dremil or angle grinder wire wheel also.
Either way, a mist of metal will get airborne and you don't need that getting into your eyes.
You can also chase the new threads with a die. This will also remove extra bulk on the threads due to the chroming process.
See also Chasing Threads in the REF section of the Sportsterpedia.
Copper, Brass and Stainless Tubing
These were made with flared fittings and are a positive seat fitting.
They do not allow for any growth once the motor gets hot (if that's a concern). 55)
The OEM style tubing uses slip compression type fittings which will allow expansion.
However, the flared fittings have been used on Sportsters.
Click on a pic to enlarge:
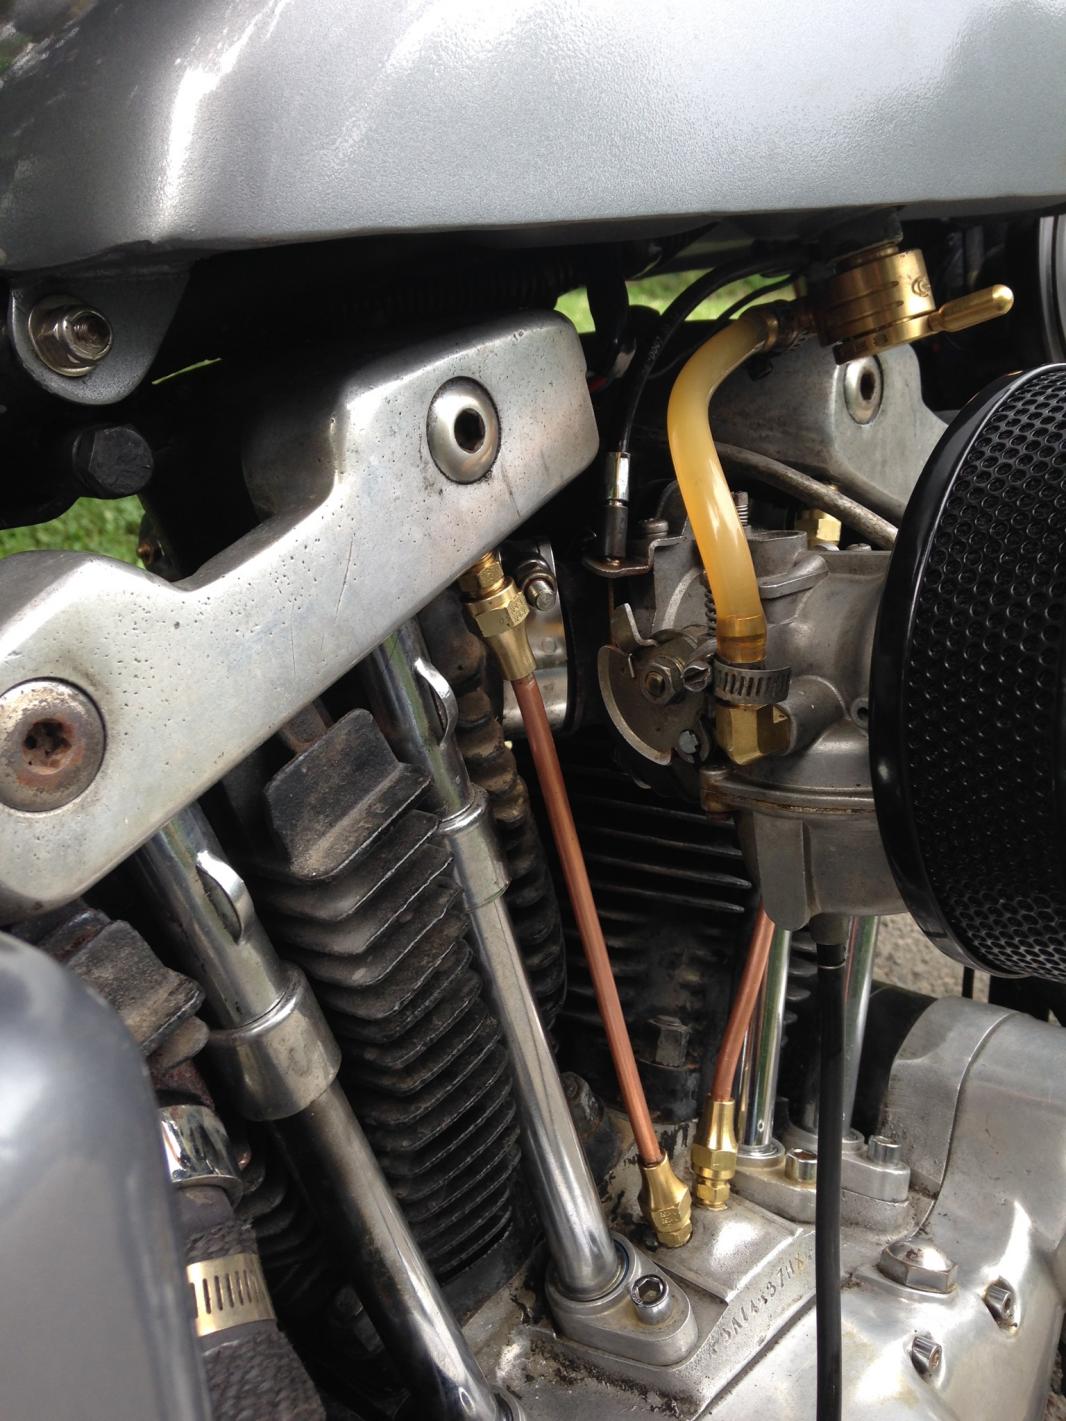
Copper
| Copper Oil Lines 56) |
 |
Brass
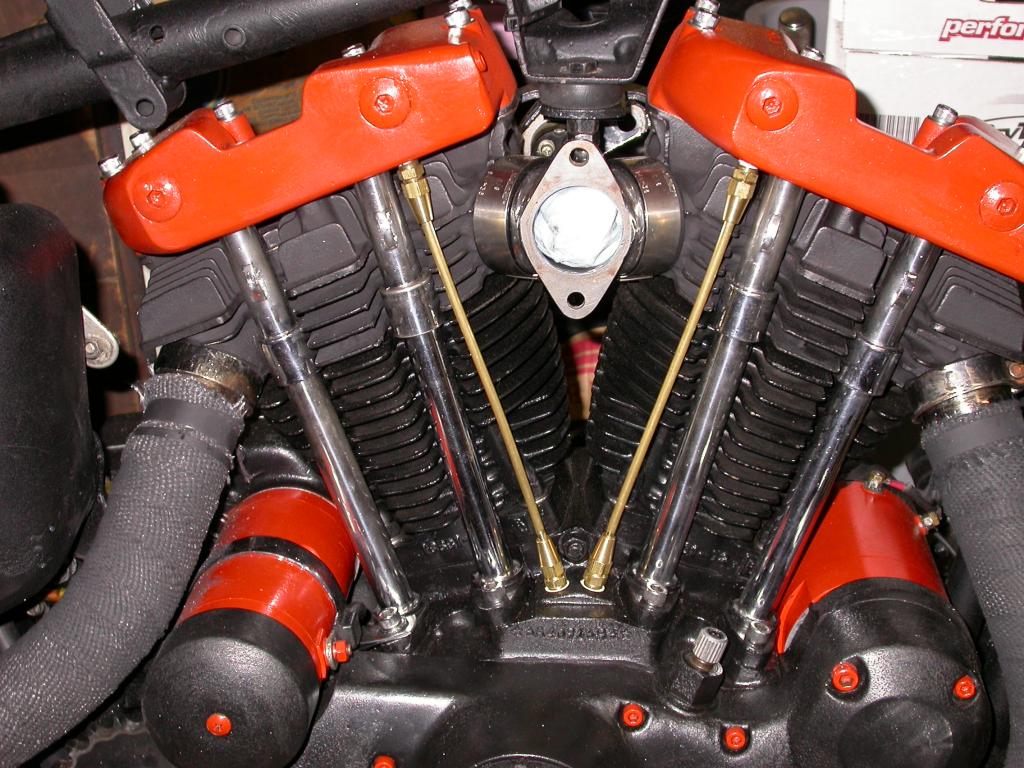
Stainless Steel
Stainless steel tubing will polish up like chrome and does not rust.
You can also use Parker stainless steel fittings and 1/4” tubing. 59) 60)
They will come with compression fittings, DO NOT USE!!!!
On the bottom fitting.
On the upper fitting, drill the 1/4“ hole to allow the tube to slide up into the rocker box.
There will still be a slight taper left.
This will allow you to insert the tube into the rocker box and then down into the bottom fitting stop.
You can cut pieces of fuel line hose to make the seal rings as it will resist the oil and heat.
You can use O-rings here if you have them also.
| Stainless steel oil lines 61) | |
 | 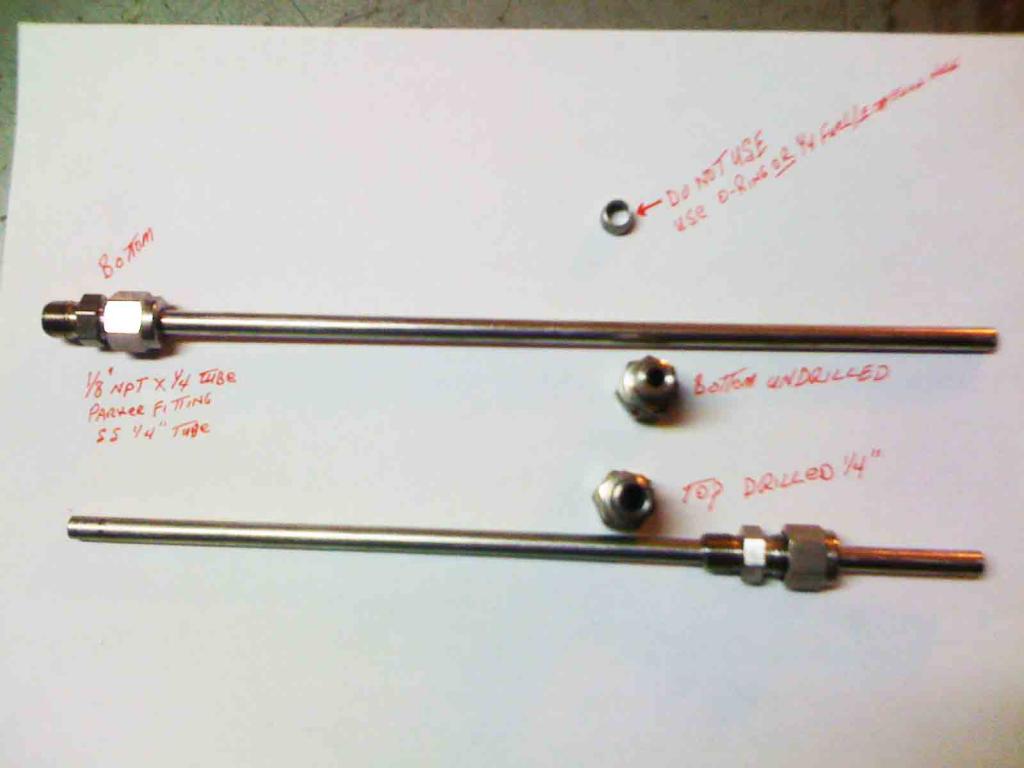 |
6)
HD Service Bulletin #M-813 dated January, 30 1981
14)
photo by Magneto Sportster of the XLFORUM, labeled by Hippysmack https://www.xlforum.net/forum/sportster-motorcycle-forum/sportster-motorcycle-era-specific-and-model-specific/ironhead-sportster-motorcycle-talk-1957-1985/198705-magneto-sportster-s-1964-xlh-restoration-project/page4?t=2075542&page=4
16)
photo by fergerburger of the XLFORUM, annotated by Hippysmack
17)
photo by Ted B of the XLFORUM, annotated by Hippysmack
27)
photo courtesy of Cycle Warehouse https://cyclewarehouse.online/ (Ebay seller cyclewarehouse)
28)
1982 Sportster Oil Tank (used with permission)
41)
photo by whyNot, of the XLFORUM, as labeled by ironheadjunkie https://www.xlforum.net/forum/sportster-motorcycle-forum/sportster-motorcycle-era-specific-and-model-specific/ironhead-sportster-motorcycle-talk-1957-1985/148522-74-oil-line-return-to-tank-from/page2?t=1613141&page=2
47)
photo by chris16371 of the XLFORUM https://www.xlforum.net/forum/sportster-motorcycle-forum/lubrication-and-lubricants/185512-oil-drain-hose?t=1985862
58)
photo by 62 Ironhead of the XLFORUM