This is an old revision of the document!
EVO: Suspension - Sub-02A
Rear Shocks & Springs
- Generally, there are only 2 choices for shock springs, heavy and light. Although I have not looked in what Ohlins and Penske offers, Works is the only company that offers Dual Rate springs for shocks. But from my experience with Works Pro Racers, they are only guessing. Progressive does offer different spring rates for different lengths of shocks, but tuning the spring rate is limited to preload changes. Progressive has admitted to me that the shock valving is not changed, only the spring is changed from heavy to light. 9)
- Since our choice of springs is so limited, so is our ability to fine tune our suspension. The other big part of the problem is that most bikes with twin shocks are not considered hi performance, and therefor the aftermarket companies are not putting any effort into making good suspension for our specific bikes. 10)
- So it seems to me that the greatest amount of adjustability to spring rates is offered by the Works Dual Rate springs. 11)
Here is a simple series of steps to get to your goal
- Take a bunch of mixed up Harley parts, matched the spring rate to your weight, unload the spring so it can work the way it is supposed to, match the damping curve to the spring rate, and then you end up with a better ride than HD put on the bike originally. 12)
- Pick a shock that has the most possible available stroke that when in the most compressed position will provide enough clearance for wires, fenders and other expensive things that the tire or belt may contact OR set this up so that you are 1 1/2“ below the ride height that you are looking for. Measure this totally compressed length at the lower of these two points in the suspension travel. We will be aiming to only get the shock to this point at the biggest bump you ever intend to hit. Hopefully you can find a shock with around 3” of available stroke. 13)
- Next you need to find a spring that with the shock at full droop can be installed on the shock by hand. This guarantees that at full droop the spring has no more energy that needs to be controlled. With a sportster and with a rider in the 140 lb range the spring will end up at about 75 lb / per inch. At 250 lbs., I would expect the spring rate to end up in the 140 lb. / inch range. The spring rate needs to now support the bike and you so that there is still about 1 1/2“ available shock travel to deal with bumps. Air shocks may be an option but I have never had a set to play with. They still need to meet these rules. 14)
How to Compress the Shock Springs for removal of Shocks
- I have a way to hang the shock in a press and then I have a tool I built that grabs the top cap and pushes the cap down so that I can grab the top C clip. 15)
The definition of Motion Ratio
- Vertical wheel movement / Change in shock length 16)
- Jack up the bike
- Remove the shocks
- Let the tire drop to the ground and measure what the shock lenth would be if it was there. say 13.5”
- Raise the tire exactly some amount of distance say 4“
- Now measure the new shock length say 10”
- The motion ratio = 4“ / (13.5” - 10“) = 4” / 3.5“ = 1.14 17)
1986-2003 Springs (Except 1200S)
| Complete Shock and Spring Assemblies 18) 19) 20) 21) 22) 23) 24) 25) 26) 27) 28) | |||
| Year | Model | Part # | Standard/ Option |
| 1986-1987 | XLH 883 | 54568-82 (2) | Standard |
| 1988-1990 | 54566-88 (2) | Standard | |
| 1991-1993 | 54566-91 (2) | Standard | |
| 1994-1996 | 54566-94 (2) | Standard | |
| 1997-2003 | 54566-97 (2) | Standard | |
| 1999-2003 | 883 Custom | 54568-92 (2) | Standard |
| 1986-1987 | XLH 883 Deluxe | 54568-82 (2) | Standard |
| 1988-1990 | 54566-88 (2) | Standard | |
| 1991-1993 | 54566-91 (2) | Standard | |
| 1994-1996 | 54566-94 (2) | Standard | |
| 1987-1990 | XLH 883 Hug | 54568-82 (2) | Standard |
| 1991 | 54568-91 (2) | Standard | |
| 1993-2003 | 54568-92 (2) | Standard | |
| 2002-2003 | XL 883 Roadster | 54566-97 (2) | Standard |
| 1986 | XLH 1100 Liberty | 54568-82 (2) | Standard |
| 1986-1987 | XLH 1100 | 54568-82 (2) | Standard |
| 1987 | XLH 1100 Anniversary | 54568-82 (2) | Standard |
| 1988-1990 | XLH 1200 | 54566-88 (2) | Standard |
| 1991-1993 | 54566-91 (2) | Standard | |
| 1994-1996 | 54566-94 (2) | Standard | |
| 1997-2003 | 54566-97 (2) | Standard | |
| 1996-2003 | XL 1200C | 54568-92 (2) | Standard |
1996-2003 Springs For 1200 Sport Model
- For setting up the factory piggyback shocks, see Suspension Settings for Factory 39mm Cartridge Valve Forks and Gas Canister Piggyback Shocks
- Length is 13.5” “eye to eye”.
- The factory dampers for piggyback shocks for S models are now obsolete from the MoCo and not rebuild-able 29). So when they go bad, they have to be replaced either with a used or aftermarket set.
- Some spring weights:
- Be careful, if you need to replace the bushings, not to crack the dampening wheel at the bottom of the shock. 33)
Some Testing on the XL1200S Shocks (and mods)
Article by spacetiger of the XLFORUM 42)
- Common wisdom regarding the S model shocks is that the springs are too soft for a rubber-mounts but, on bumpy city streets, who knows? They may not be far off what you need. With the short forks, raising the rear is going to throw a bit more weight on the front, therefore less on the rear. It's a balancing act. 43)
- Good points:
- Bad points:
- Soft springs (although that may be a good point to some)
- Shocks are not rebuild-able so they have to be replaced when bad
- Obsolete part now so you have to either buy used (possibly weaker) ones or buy aftermarkets if wish to just swap them out.
- However, 2“ ID [Eibach] springs are easy to get. The other items are too, just takes a little effort to source them. 46)
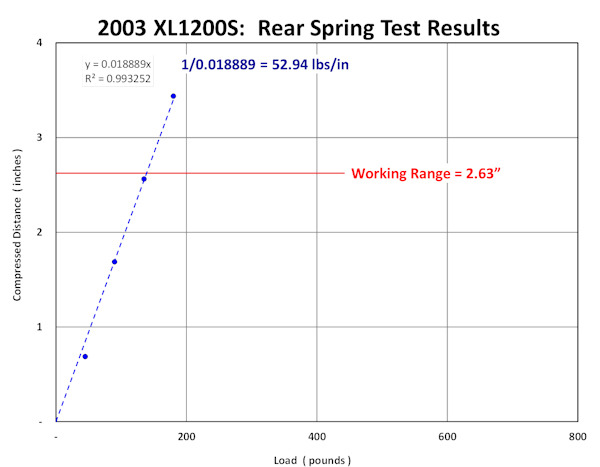
- I have disassembled one and tested the spring - 52.94 lbs/in. It is the weakest spring I have ever tested from any bike. My 86 Honda VF700C had rear 97 lb/in springs and they were inadequate. The springs are weak, but that's why you replace the springs to what you need. The S model shock is a good shock once you get the right [Eibach] spring on. 47)
Some early XL1200S test results:
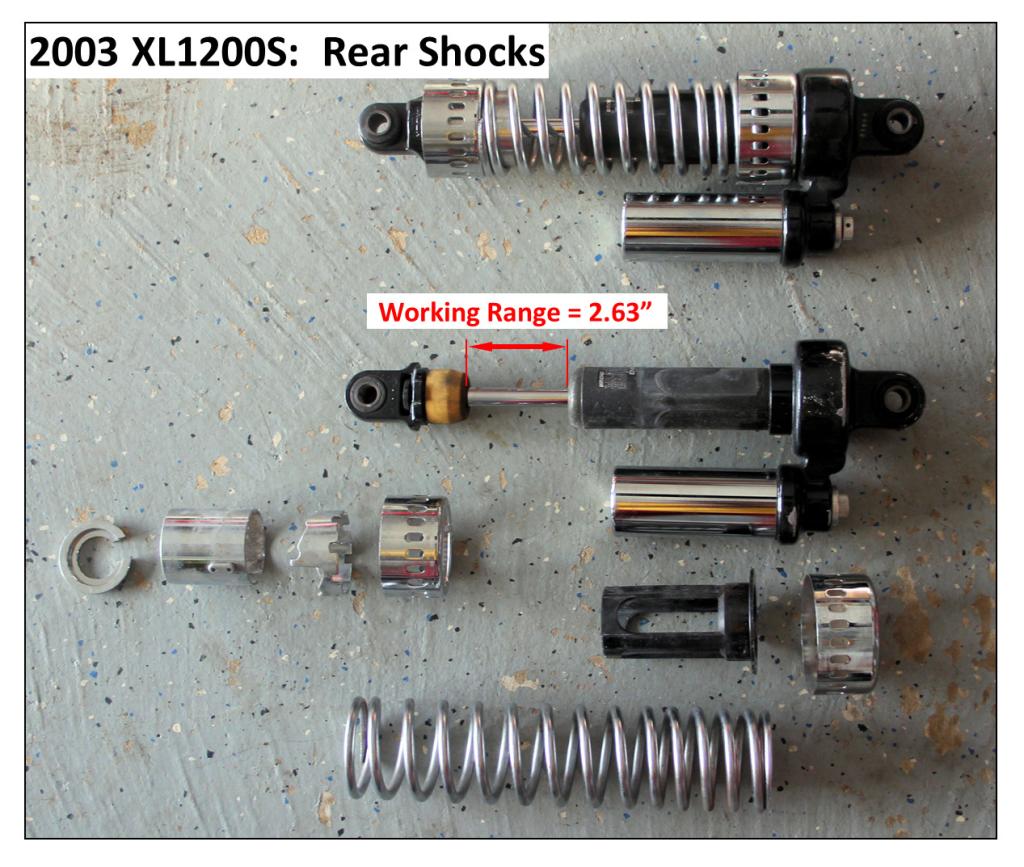 |  |  |
| XL1200S rear shock disassembled 48) → | Spring testing using home gym equipment 49) → | Test results 50) ✔ |
- Here are a few more items that back up how weak the springs are.
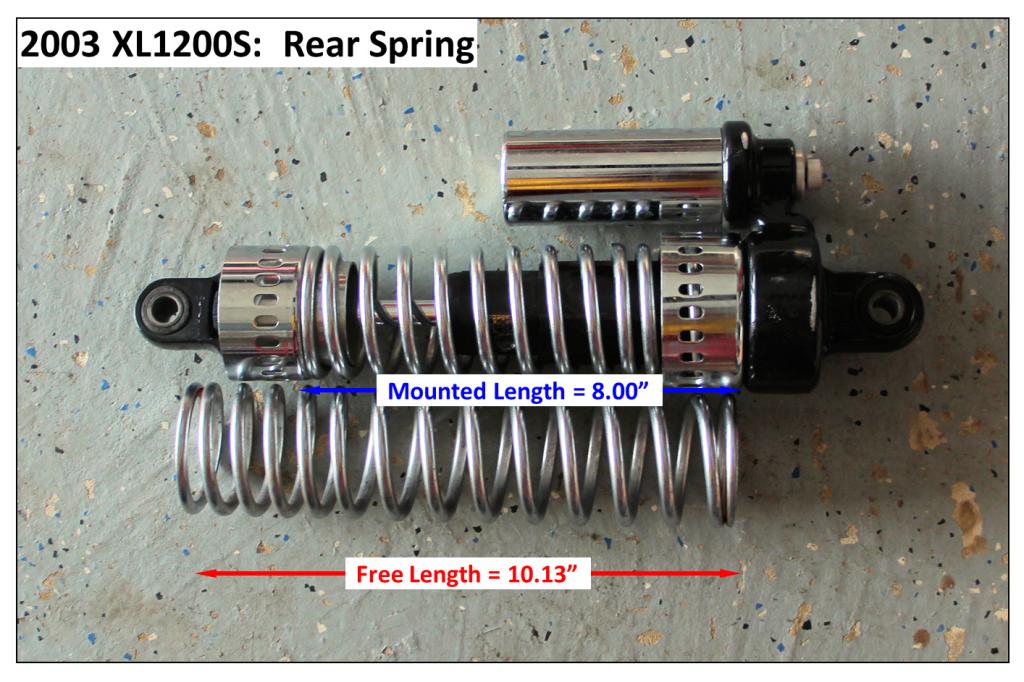
- You can see the suspension strategy for the stock shock using the weak spring. The free length of the spring is a tad over 10” (10.125“). Once mounted in the shock, its mounted length is only 8”. That means the spring is compressed a little over 2“. With a 53 lb/in spring rate, that gives you a 112.5 lb preload - and you have 2 shocks. You can dial in some additional preload, but that's it. For a lighter weight rider, that might be enough to set the initial sag but that's it. The spring doesn't have enough top end capacity to prevent you from bottoming out. 51)
- I also show what the spring capacity is with no additional preload dialed in. This is the blue line with the “1” on it. You can see it starts at 112.5 lb preload (from the spring mounting). As you add more weight to the spring, it begins to compress until it get to the working range of the shock (2.63” later). The total capacity is 252 lbs. If you dial in all the shock preload, the # “1” line moves over and becomes the # “4” dark blue line. Compressing the spring with all the shock preload yields a max capacity of 282 lbs. That 30 lb extra capacity is only about 12% more capacity. So, if you have these shocks and weigh anything close to an average man, you need all the preload dialed in… but I bet you still bottom out a lot. So the strategy is clear if using this shock, you will have to swap out the spring. 52)
- In the 3rd picture below, I ditched the fancy chrome top and bottom trim pieces.

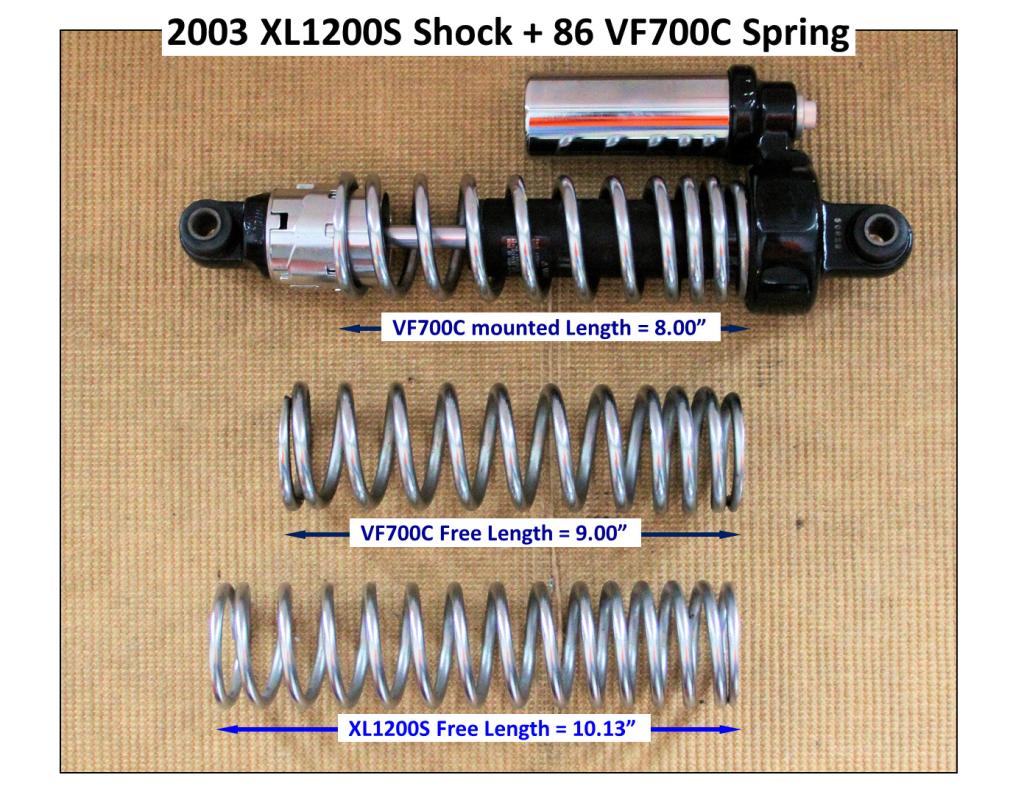
- I wanted a different setup to handle the preload setup for the shocks with a coil over sleeve as I find these excellent to dial your suspension preload and top end right in. The problem is no one makes a coil over sleeve in that small of a diameter (~1.75”) because there is no market for these small sleeves. I found the rear shock for a 2007 Victory Jackpot with a coil over sleeve that looked to be close to the size I needed.
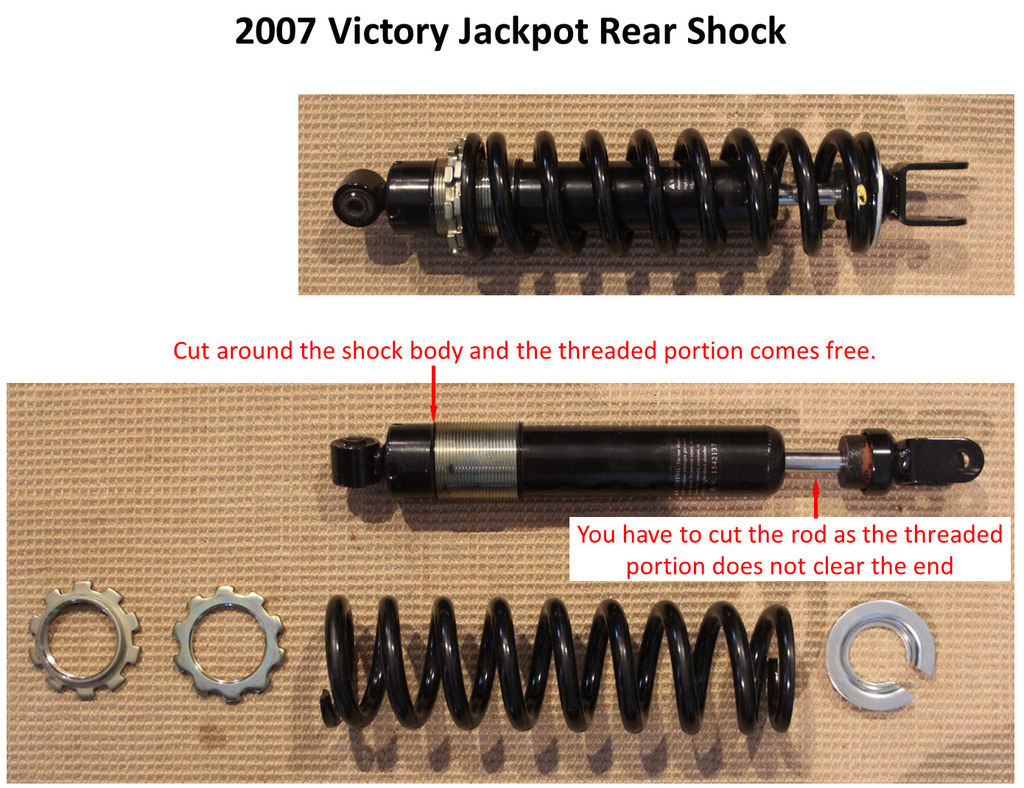 | 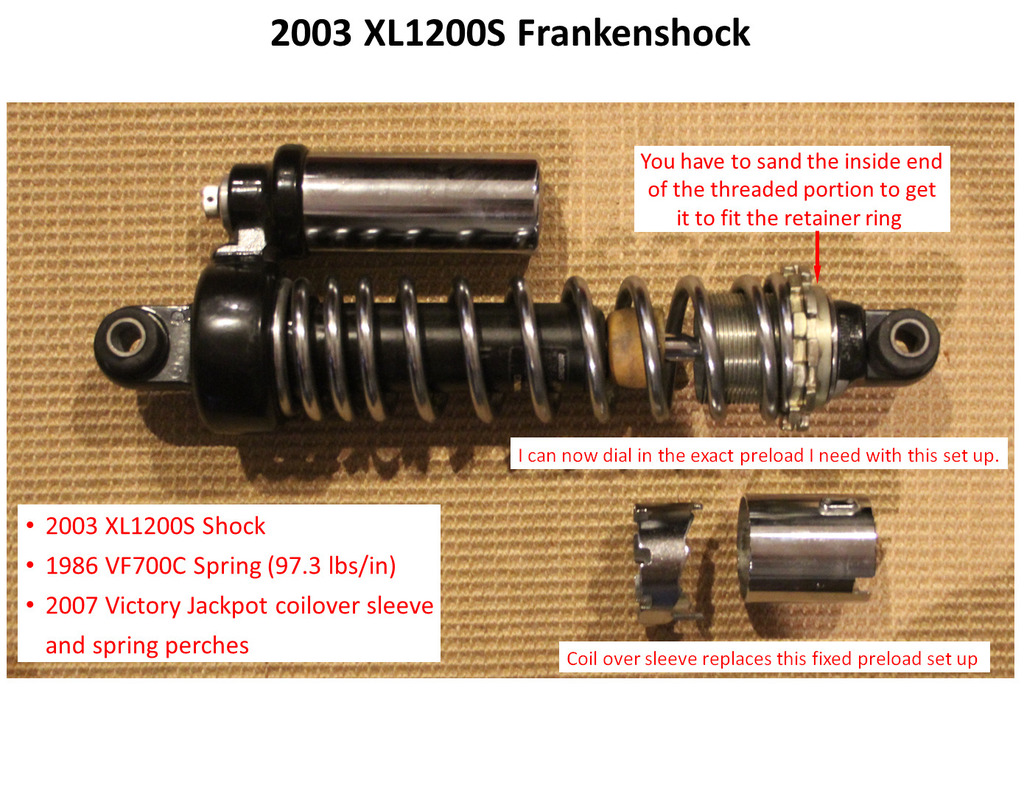 | 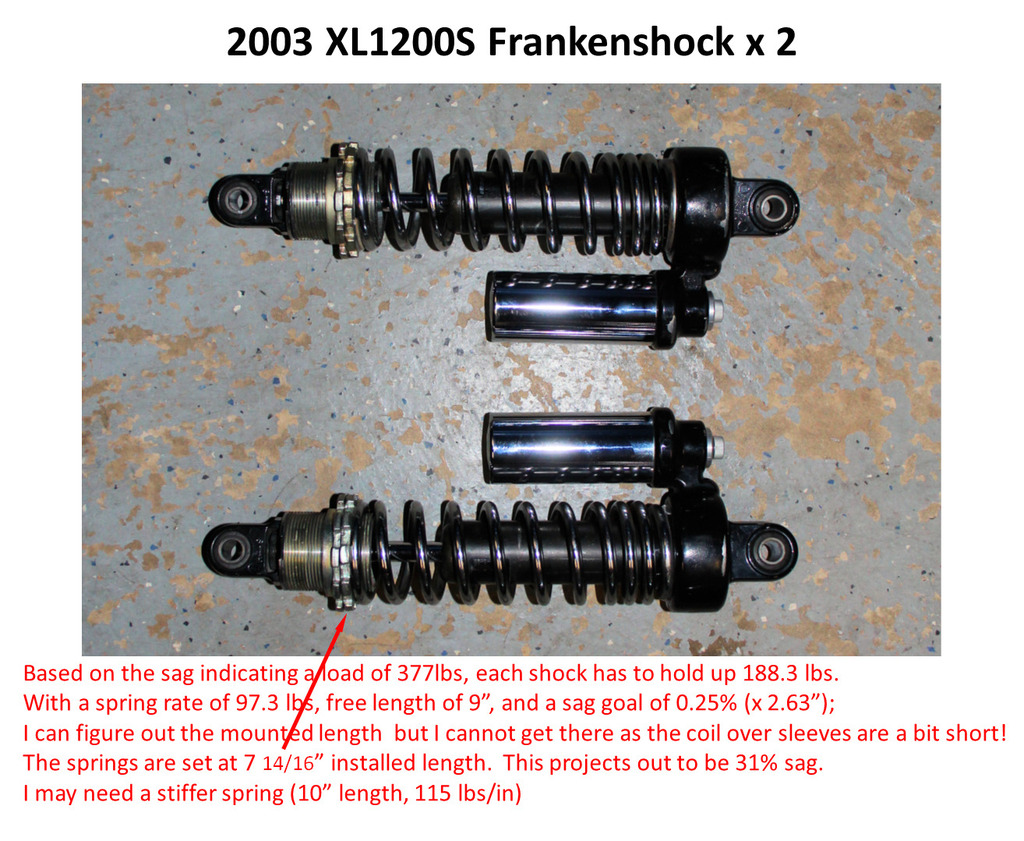 |
| The shock after I disassembled it. The threaded portion would not come free, so I setup the band saw to cut just above the threaded portion. I thought I’d have to cut the shock in half, but I only had to cut just below the sleeve and it came free. I had to sand the inner sleeve a bit to get it to fit the XL1200S retainer clip. 56) → | All mounted up and went together nicely. So here it is; 2003 Harley Davidson XL1200S shock body, 1986 Honda VF700C spring, and 2007 Victory Jackpot coil over sleeve. 57) → | Both shocks modified. I was able to assemble the other shock and set the estimated preload for correct sag. Seems I cannot quite get to a sag at 25% and will have to settle for a 31% sag. A bit on the high side, but I will still have almost doubled the working range of the shock. If this doesn't hold up in real world riding, I will have to get some new Eibach springs. ✔ |
- Harley specs out there own dimensions, which probably do not cross over with anything else that particular brand made. Sometimes shocks are press fit together, and are not rebuild-able.
- Even if you could swap out to a heavier spring, which would be closer to 75/120 lbs/in, I doubt the dampening curves will match that big a jump. Ricor inertia technology makes cartridge/shim stack technology obsolete. 58)
- As you increase spring rate, you need to reduce compression dampening and increase rebound dampening. Then the question becomes if the external adjusters on the 1200S shocks will have enough range of adjustment to match the heavier spring. If they don't, then you have to take the shocks apart and change the internal shims, 59) or change the oil weight or modify the valving (if there is no shim stack), or a some of both. 60)
Characterizing the 1200S Shock Damping
- If you move the compression dial from one end to the other, you would count 16 clicks and see it goes almost 4 times around, so each click is worth 90 degrees of rotation - but what does that mean?
- I found I can use one of my shock compression tools to test the shock (minus the spring) to see what the characteristic of the [compression and rebound] damping adjustments are on a shock. I use a stopwatch to see how long it takes to compress the shock for a given dial setting. The relative time comparison between compression and rebound times allow you to pick a strategy to get to a 2.5 to 1 or maybe as high as 3 to 1 (this is more of a cruiser than a knee dragging ride).
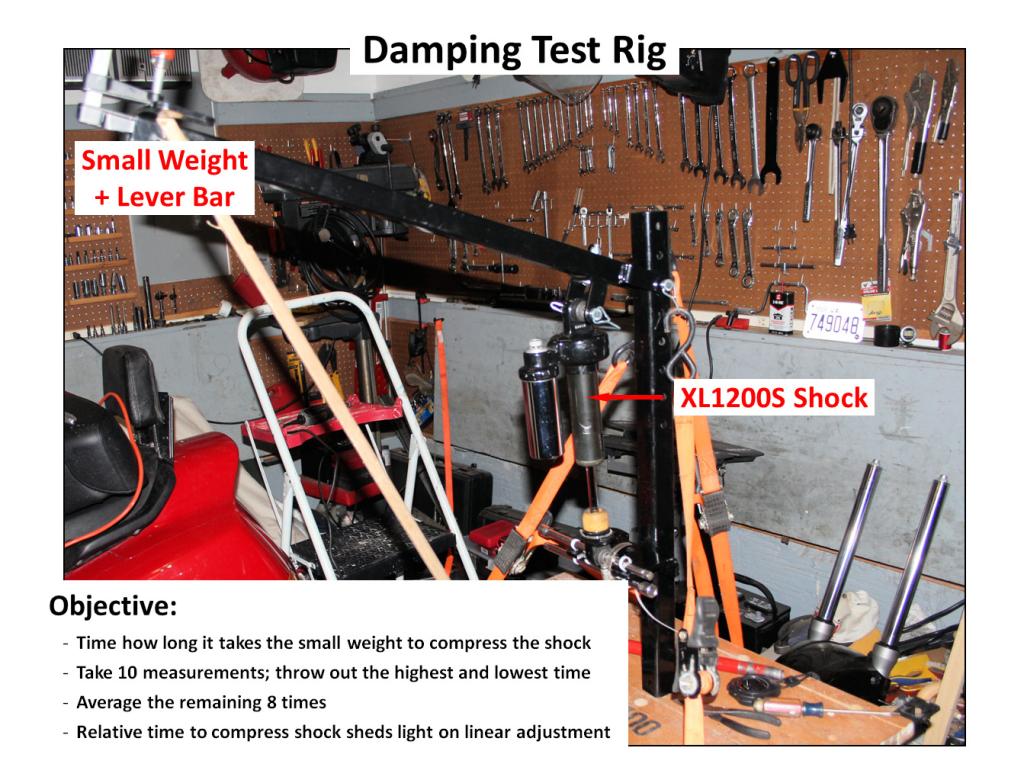 | 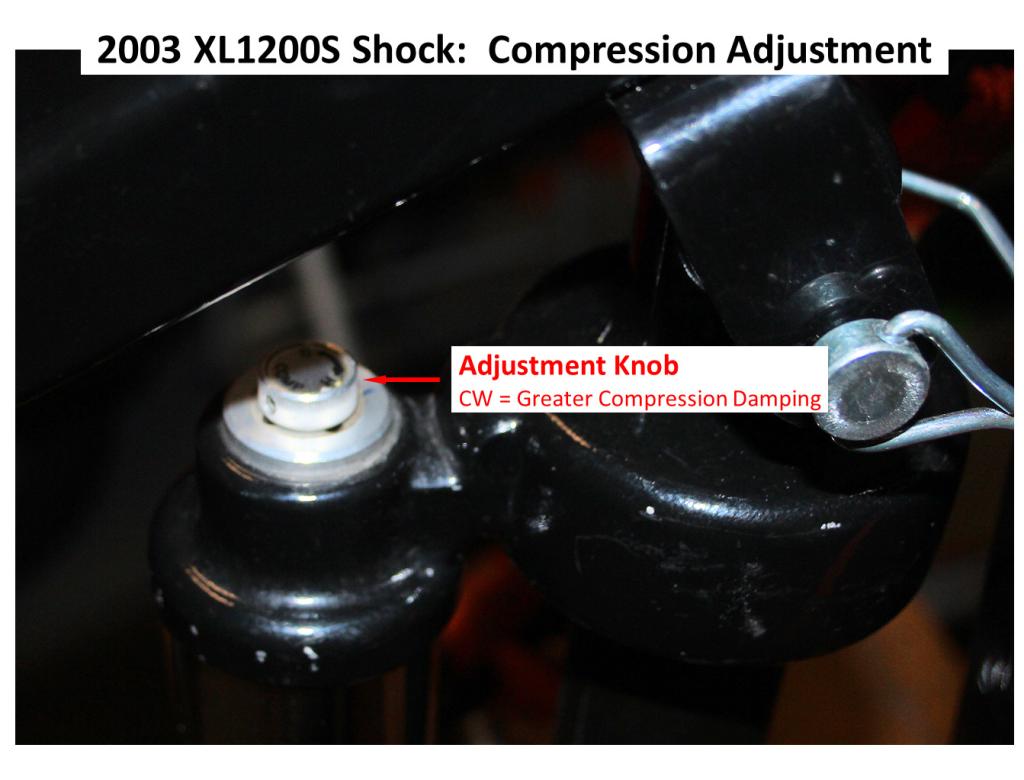 | 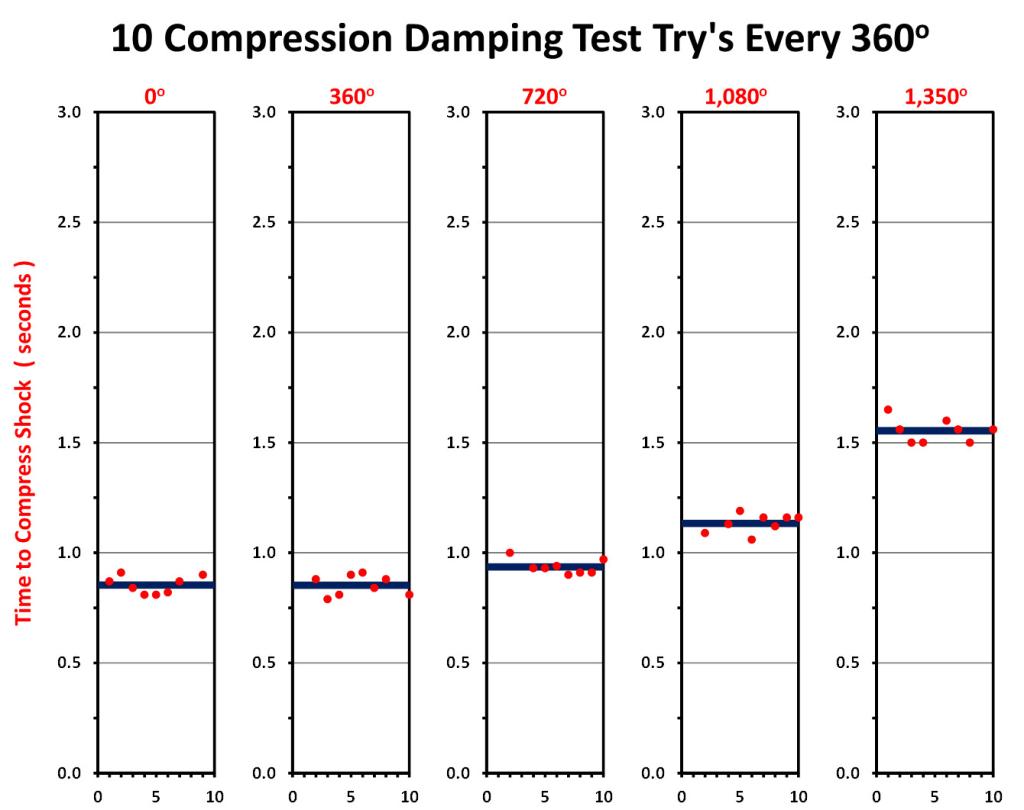 |
| The test rig 61) → | Put the shock into the lowest compression damping setting 62) → | Write down the time for all 10 drops; take out the highest and lowest number; then average the times. The average is the time for that dial setting. Rotate the dial 360 degrees, then repeat time collection. Do this until you are at the end. For the compression dial, the last try only move 279 degrees, not a full 360 degrees 63) → |
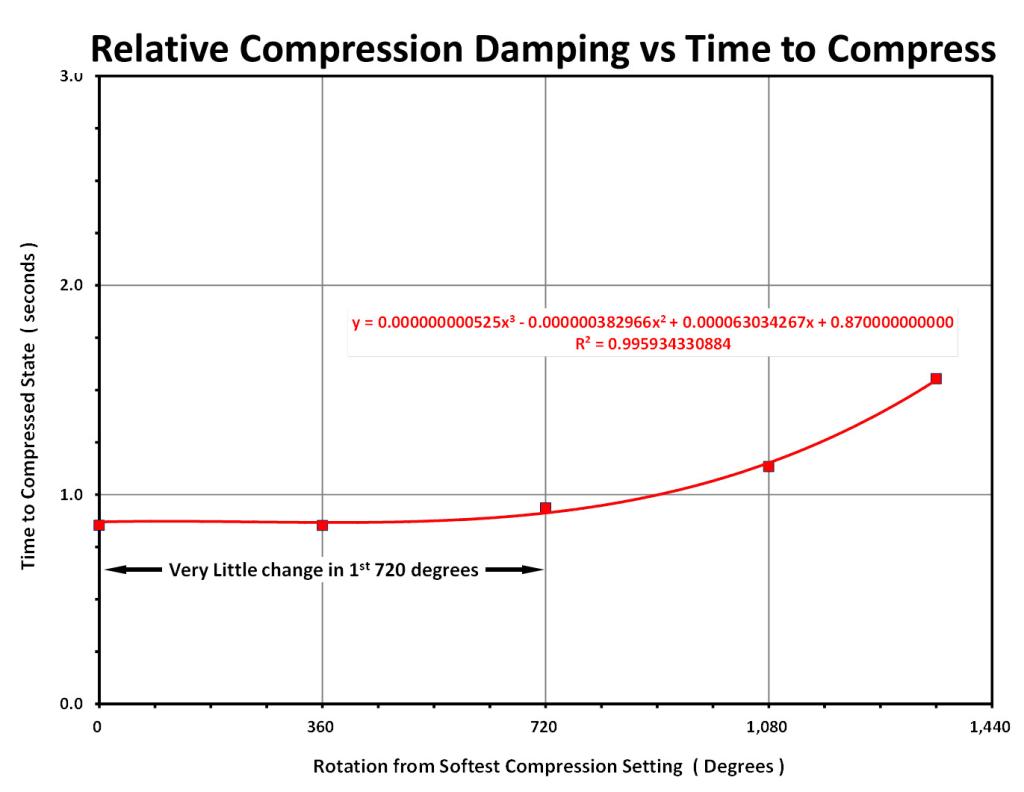 | 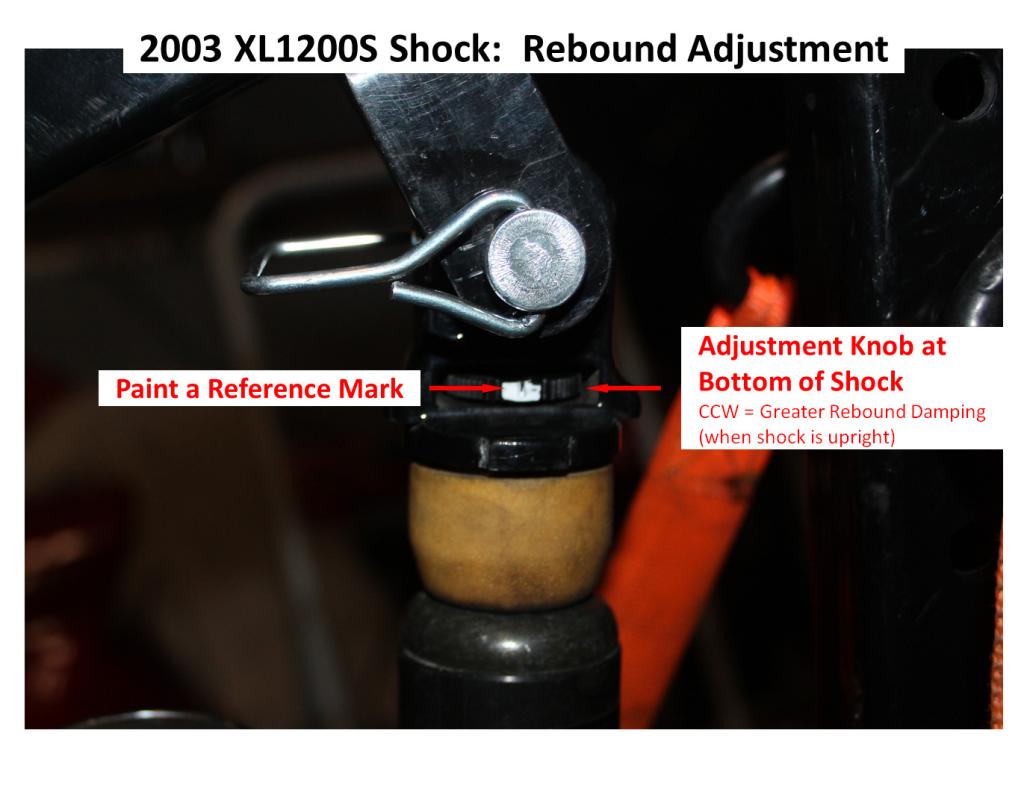 | 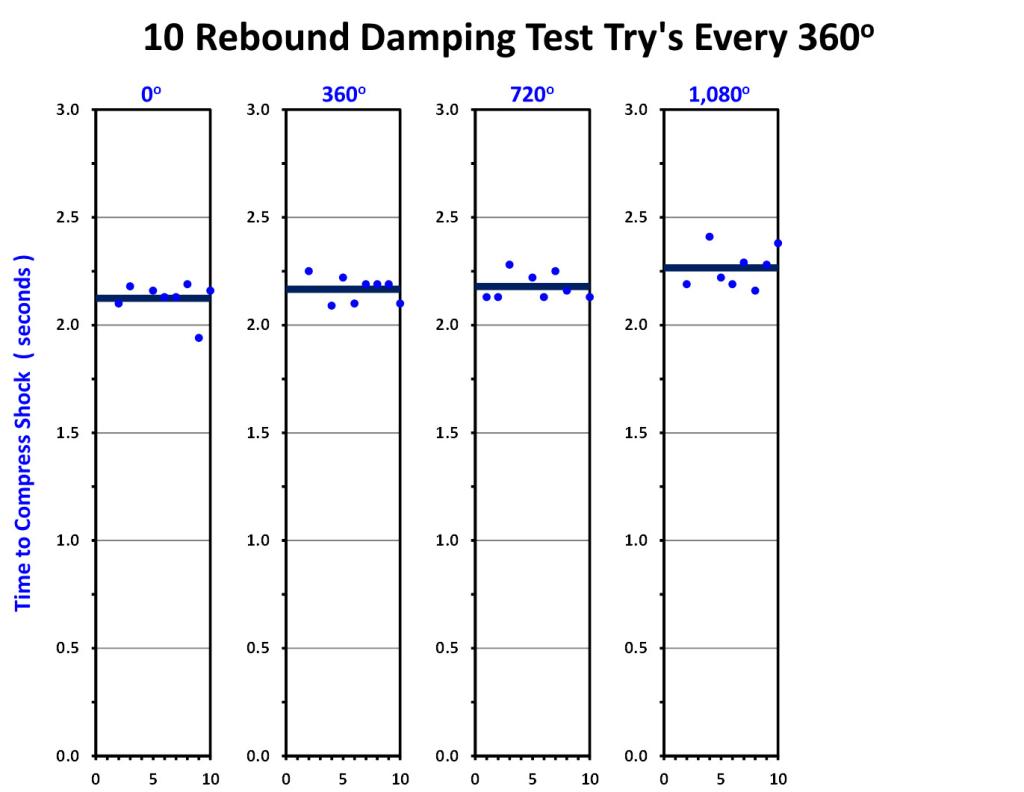 |
| Plotting the average times per 360 degree rotation yields this graph. You can see, not much happens the first 720 degrees. 64) → | Time to flip the shock and test the rebound damping. Dial back to the lowest rebound setting and paint a reference mark 65) → | Collect the data the same way as the compression testing. The rebound dial only goes around three 360 degree turns. 66) → |
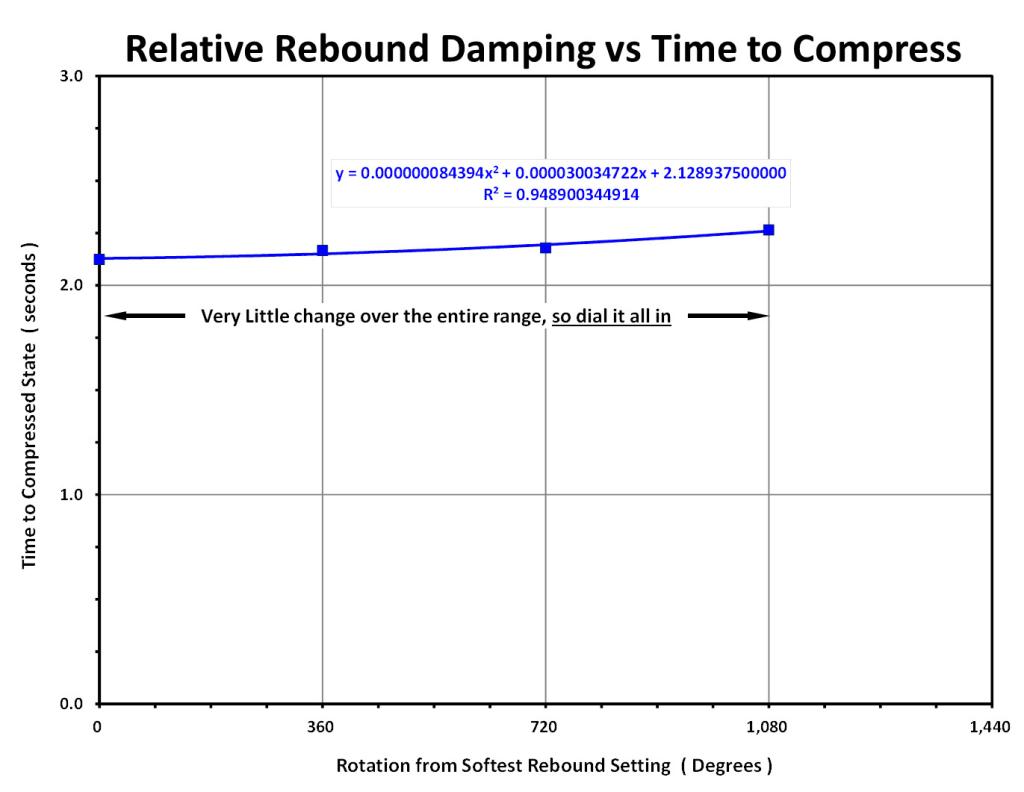 | 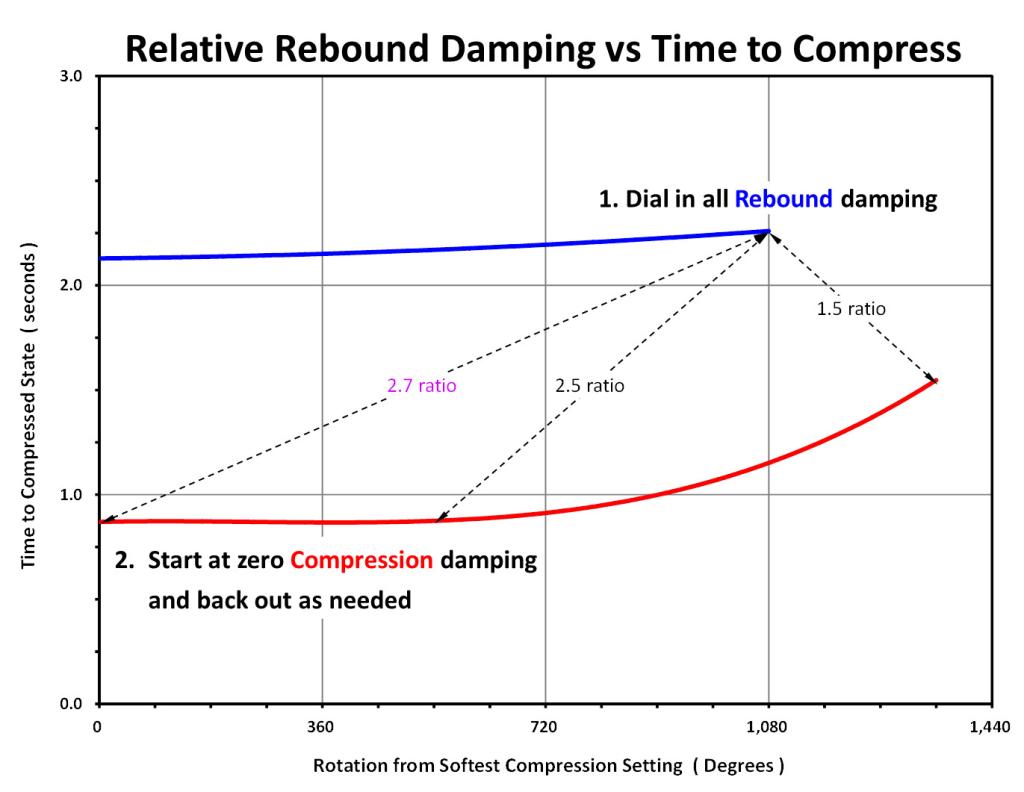 |
| The Rebound damping timing curve 67) → | Put the two curves together and you can see the damping strategy shooting for the highest ratio desired (3.0). You dial in ALL the rebound damping, then dial in zero compression damping. That sets you up with a 2.7 ratio. You can walk in compression damping as needed. I would work in 0.2 ratio increments (can our butts feel 0.1 increment changes??) 68) ✔ |
- High speed compression dampening can't be done on the bench. You have to do that with your butt on the road. I have found if you avoid the pot holes, it may not be critical for how you ride. 69)
2004-later Springs
| Complete Shock and Spring Assemblies 70) 71) 72) 73) 74) 75) 76) 77) 78) 79) 80) | ||||||||
| Year | Model | Part # | Standard/ Option | Shock Travel | Spring Free Length | Spring Rate (lbs per inch). | Spring Installed Length | Spring Preload (ft/lbs) |
| 2004-2008 | XL883 Domestic | 54566-04 (2) | Standard | 3.25“ 81) | 11.33” 82) | 69 83) | 9.64“ 84) | 116 85) |
| 2009 | 54566-09 (2) | Standard | ||||||
| 2009 | 54566-09 (2) | Standard | ||||||
| 2004-2008 | XL883C Domestic | 54568-04 (2) | Standard | |||||
| 2009-2010 | 54568-09 (2) | Standard | ||||||
| 2005-2006 | XL883L Domestic | 54568-04 (2) | Standard | |||||
| 2007-2010 | 54626-07 (2) | Standard | ||||||
| 2011-2015 | 54568-09 (2) | Standard | ||||||
| 2009 | XL883N Domestic | 54540-07 (2) | Standard | |||||
| 2010-2015 | 54550-10 (2) | Standard | ||||||
| 2010-2013 | HDI, England, Australia | 54570-09 (2) | Standard | |||||
| 2011-2013 | Asia-Pacific | Standard | ||||||
| 2013 | India | Standard | ||||||
| 2014-2015 | HDI | Standard | ||||||
| 2014-2015 | Japan | 54550-10 | Standard | |||||
| 2005-2008 | XL883R Domestic | 54570-05 (2) | Standard | |||||
| 2009-2015 | 54570-09 (2) | Standard | ||||||
| 2007 | XL-50 (1200) Domestic | 54568-04 (2) | Standard | |||||
| 2004-2008 | XL1200C Domestic | 54568-04 (2) | Standard | |||||
| 2009-2010 2012-2015 | 54568-09 (2) | Standard | ||||||
| 2013 | XL1200C Anniv Domestic | 54568-09 (2) | Standard | |||||
| 2013-2015 | XL1200CA Domestic | 54568-09 (2) | Standard | |||||
| 2013-2015 | XL1200CB Domestic | 54568-09 (2) | Standard | |||||
| 2012-2015 | XL1200CP Domestic | 54568-09 (2) | Standard | |||||
| 2007-2008 | XL1200L Domestic | 54568-04 (2) | Standard | |||||
| 2009-2010 | 54568-09 (2) | Standard | ||||||
| 2011 | 54568-09 (2) | Standard | ||||||
| 2007-2009 | XL1200N Domestic | 54540-07 (2) | Standard | |||||
| 2010-2012 | 54550-10 (2) | Standard | ||||||
| HDI, England, Australia | 54570-09 (2) | Standard | ||||||
| 2011-2012 | Asia-Pacific | Standard | ||||||
| 2004-2008 | XL1200R Domestic | 54566-04 (2) | Standard | 3.25” 86) | 11.33“ 87) | 69 88) | 9.64” 89) | 116 90) |
| 2009 | 54566-09 (2) | Standard | ||||||
| 2015 | XL1200T | 54000060 (10 1/2“) (L) 54000061 (10 1/2”) (R) | Standard (Showa) w/ dial adjuster (L) w/o dial adjuster (R) More Info | |||||
| 2016 | 54000060 (10 1/2“) (L) 54000100 (R) | |||||||
| 2013-2015 | XL1200V Domestic | 54568-09 (2) | Standard | |||||
| 2010-2015 | XL1200X Domestic | 54550-10 (2) | Standard | |||||
| HDI, England | 54568-09 (2) | Standard | ||||||
| 2013 | England, Australia Asia-Pacific, India | Standard | ||||||
| 2014-2015 | HDI | Standard | ||||||
| 2014-2015 | Japan | 54550-10 | Standard | |||||
| 2009-2010 | XR1200 Domestic | 54668-08 (2) | Standard - Re-designed top mount | |||||
| 2010-2013 | XR1200X Domestic | 54671-10 (L) 54700-10 (R) | Standard - Piggy-backs | |||||
2006-2007 1200L
- 2007 Harley 1200 Low Springs 100 pounds per inch progressive wound (but built by Harley to go progressive too late to help much. It goes to hard rate at a spring height of 6” or a shock length of about 10.5“) 91)
- 2006 Harley 1200 R shocks a little too much low extension damping but appears to be acceptable 92)
- Preload adjuster set to full hard to give about 20lb. of spring preload at 13.25 c to c on the shock (the only setting that is acceptable due to spring length). 93)
- Ride height ends up 1.33” from full compression, (with a 200 lb. rider) and 1.9“ from full extension (bike on a jack) 12.5” shock c to c with the bike on the Low stand. 94)
- Shock length fully extended: 13.25“ (you are in this range any time you crest a hill at high speed the trick is to keep the tire on the road at all cost) 95)
- Shock length with bike straight up no rider weight: 12.1” (you are in this range every time the road goes down, it happens just as often as the road goes up) 96)
- Shock length with a 200 lb. rider: 11.4“ (you are in this range right after a raised or rising bump) 97)
- This is all spring rate trying to save hardware.
Aftermarket Shocks
- Ohlins HD144 shocks
- Piggyback model similar to the Harley Screamin' Eagle shocks.
- Adjustable length as well as both rebound and compression dampening adjustments.
- Progressive makes the following springs that fit the 412 style shock bodies and you could purchase just springs from Progressive. 100)
| Part Number | Rate | Free Length | For Shock Length |
| 03-1310B/C | 90/130 | 7.12 | 11.00” |
| 03-1313B/C | 115/155 | 7.12 | 11.00” |
| 1369-20B/30 | 300/350 | 6.62 | 11.00” |
| 03-1312B/C | 75/120 | 8.5 | 11.50”, 12.00” |
| 03-1370B/C | 90/130 | 8.5 | 11.50”, 12.00” |
| 03-1375C | 115/155 | 8.5 | 11.50”, 12.00” |
| 03-1315 | 125/170 | 8.75 | 11.50” & 12.00” |
| 03-1317 | 270/315 | 7.75 | 12.00” |
| 1362-20B/30 | 300/350 | 7.62 | 12.00” |
| 03-1300B | 65/100 | 9.37 | 12.50”, 13.00”, 13.50” & 14.25” |
| 03-1394B/C | 75/120 | 9.75 | 12.50”, 13.00”, 13.50” & 14.25” |
| 03-1367B/C | 90/130 | 9.37 | 12.50”, 13.00”, 13.50” & 14.25” |
| 03-1368B/C | 105/150 | 9.37 | 12.50”, 13.00”, 13.50” & 14.25” |
| 03-1365B/C | 120/170 | 9.87 | 12.50”, 13.00”, 13.50” & 14.25” |
| 03-1318B/C | 140/200 | 9.75 | 12.50”, 13.00”, 13.50” & 14.25” |
| 03-1364B/C | 140/190 | 10.2 | 12.50”, 13.00”, 13.50” & 14.25” |
Screaming Eagle Piggyback Shocks
- 340 mm / 13.39 inches center to center with 92mm / 3.62 inches of travel.

1)
, 2)
, 3)
, 4)
, 5)
, 6)
, 7)
, 8)
, 13)
, 14)
, 91)
, 92)
, 93)
, 94)
, 95)
, 96)
, 97)
, 98)
, 99)
18)
1986-1990 HD Parts Catalog pg 72
19)
1991-1992 HD Sportster Parts catalog pg 68
20)
1993-1994 HD Sportster Parts Catalog pg 68
22)
1997 HD Sportster Parts Catalog pg 63
35)
1997 HD Sportster Parts Catalog pg 70
43)
, 44)
, 45)
, 46)
, 47)
, 51)
, 52)
spacetiger of the XLFORUM http://xlforum.net/vbportal/forums/showthread.php?t=1863121&page=2
48)
, 49)
, 50)
, 53)
, 54)
photo by spacetiger of the XLFORUM http://xlforum.net/vbportal/forums/showthread.php?t=1863121&page=2
56)
, 57)
photo by spacetiger of the XLFORUM http://xlforum.net/vbportal/forums/showthread.php?t=1863121&page=7
58)
XLXR of the XLFORUM http://xlforum.net/vbportal/forums/showthread.php?t=1863121&page=2
59)
XLXR of the XLFORUM http://xlforum.net/vbportal/forums/showthread.php?t=1863121&page=10
60)
spacetiger of the XLFORUM http://xlforum.net/vbportal/forums/showthread.php?t=1863121&page=10
61)
, 62)
, 63)
, 64)
, 65)
, 66)
, 67)
, 68)
Photo by spacetiger of the XLFORUM http://xlforum.net/vbportal/forums/showthread.php?t=1863121&page=5
69)
spacetiger of the XLFORUM http://xlforum.net/vbportal/forums/showthread.php?t=1863121&page=5
70)
2004 HD Parts Catalog pg 68
71)
2005 HD Sportster Parts catalog pg 72
72)
2006 HD Sportster Parts Catalog pg 72
73)
2007 HD Sportster Parts Catalog pg 75
74)
2008 HD Sportster Parts Catalog pg 75
75)
2009 HD Sportster Parts Catalog pgs 113, 115