This is an old revision of the document!
EVO: Suspension - Sub-02A
Rear Shocks & Springs
- Generally, there are only 2 choices for shock springs, heavy and light. Although I have not looked in what Ohlins and Penske offers, Works is the only company that offers Dual Rate springs for shocks. But from my experience with Works Pro Racers, they are only guessing. Progressive does offer different spring rates for different lengths of shocks, but tuning the spring rate is limited to preload changes. Progressive has admitted to me that the shock valving is not changed, only the spring is changed from heavy to light. 9)
- Since our choice of springs is so limited, so is our ability to fine tune our suspension. The other big part of the problem is that most bikes with twin shocks are not considered hi performance, and therefor the aftermarket companies are not putting any effort into making good suspension for our specific bikes. 10)
- So it seems to me that the greatest amount of adjustability to spring rates is offered by the Works Dual Rate springs. 11)
Here is a simple series of steps to get to your goal
- Take a bunch of mixed up Harley parts, matched the spring rate to your weight, unload the spring so it can work the way it is supposed to, match the damping curve to the spring rate, and then you end up with a better ride than HD put on the bike originally. 12)
- Pick a shock that has the most possible available stroke that when in the most compressed position will provide enough clearance for wires, fenders and other expensive things that the tire or belt may contact OR set this up so that you are 1 1/2“ below the ride height that you are looking for. Measure this totally compressed length at the lower of these two points in the suspension travel. We will be aiming to only get the shock to this point at the biggest bump you ever intend to hit. Hopefully you can find a shock with around 3” of available stroke. 13)
- Next you need to find a spring that with the shock at full droop can be installed on the shock by hand. This guarantees that at full droop the spring has no more energy that needs to be controlled. With a sportster and with a rider in the 140 lb range the spring will end up at about 75 lb / per inch. At 250 lbs., I would expect the spring rate to end up in the 140 lb. / inch range. The spring rate needs to now support the bike and you so that there is still about 1 1/2“ available shock travel to deal with bumps. Air shocks may be an option but I have never had a set to play with. They still need to meet these rules. 14)
How to Compress the Shock Springs for removal of Shocks
- I have a way to hang the shock in a press and then I have a tool I built that grabs the top cap and pushes the cap down so that I can grab the top C clip. 15)
The definition of Motion Ratio
- Vertical wheel movement / Change in shock length 16)
- Jack up the bike
- Remove the shocks
- Let the tire drop to the ground and measure what the shock lenth would be if it was there. say 13.5”
- Raise the tire exactly some amount of distance say 4“
- Now measure the new shock length say 10”
- The motion ratio = 4“ / (13.5” - 10“) = 4” / 3.5“ = 1.14 17)
Characterizing the 1200S Shock Damping
- If you move the compression dial from one end to the other, you would count 16 clicks and see it goes almost 4 times around, so each click is worth 90 degrees of rotation - but what does that mean?
- I found I can use one of my shock compression tools to test the shock (minus the spring) to see what the characteristic of the [compression and rebound] damping adjustments are on a shock. I use a stopwatch to see how long it takes to compress the shock for a given dial setting. The relative time comparison between compression and rebound times allow you to pick a strategy to get to a 2.5 to 1 or maybe as high as 3 to 1 (this is more of a cruiser than a knee dragging ride).
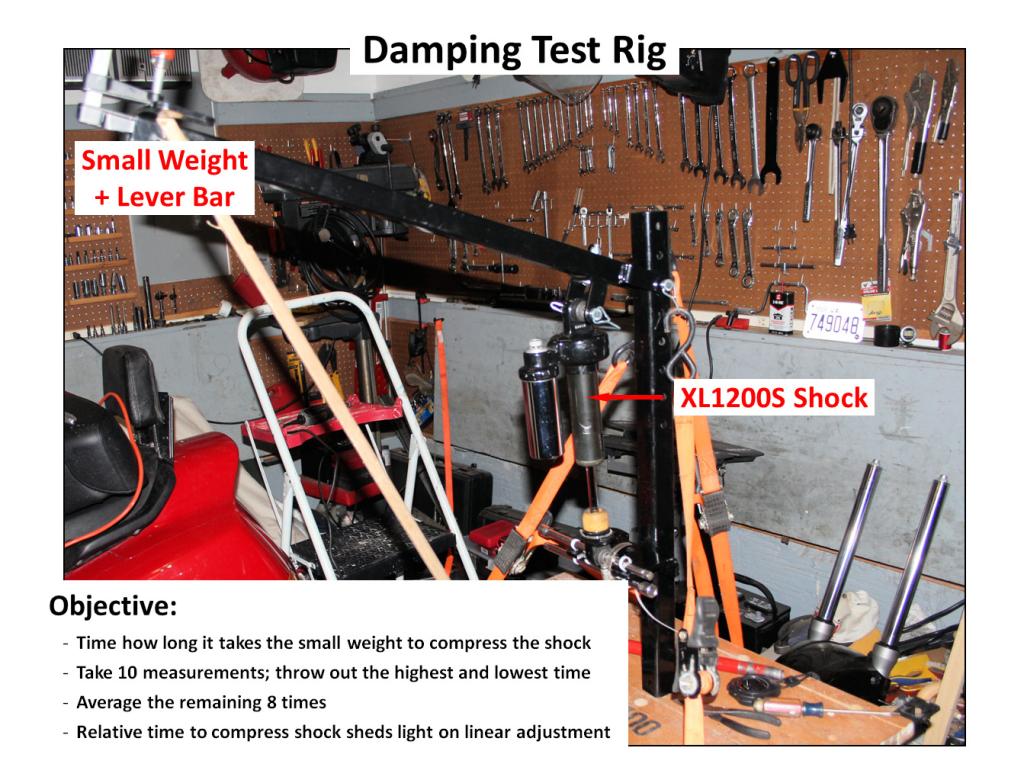 | 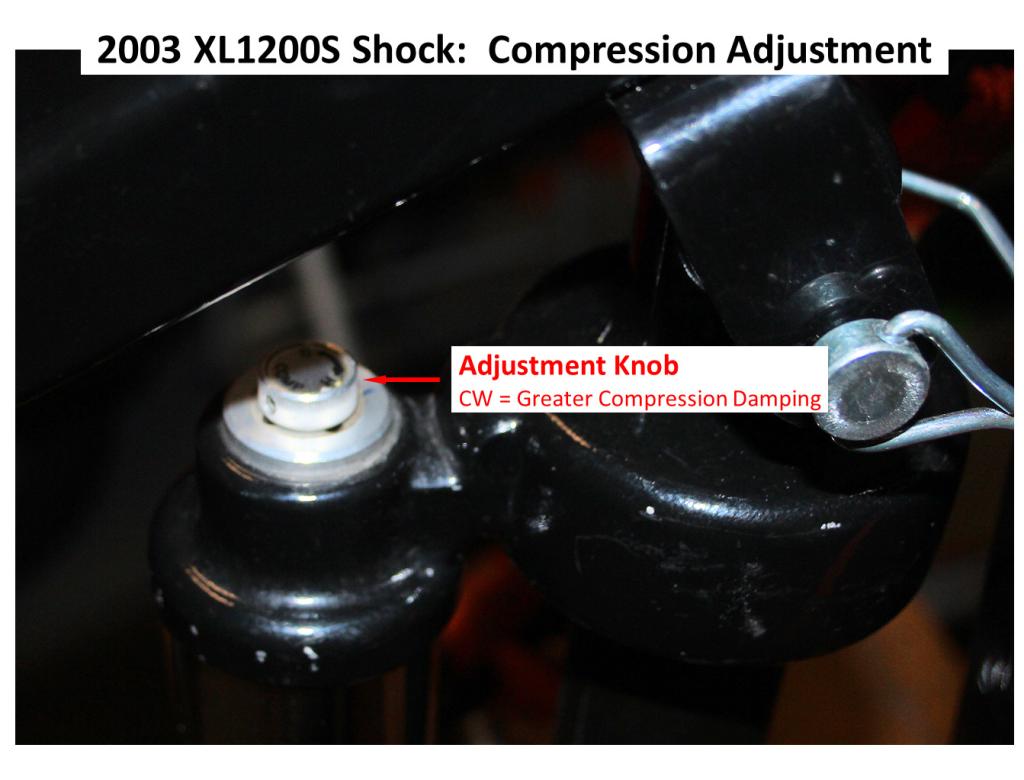 | 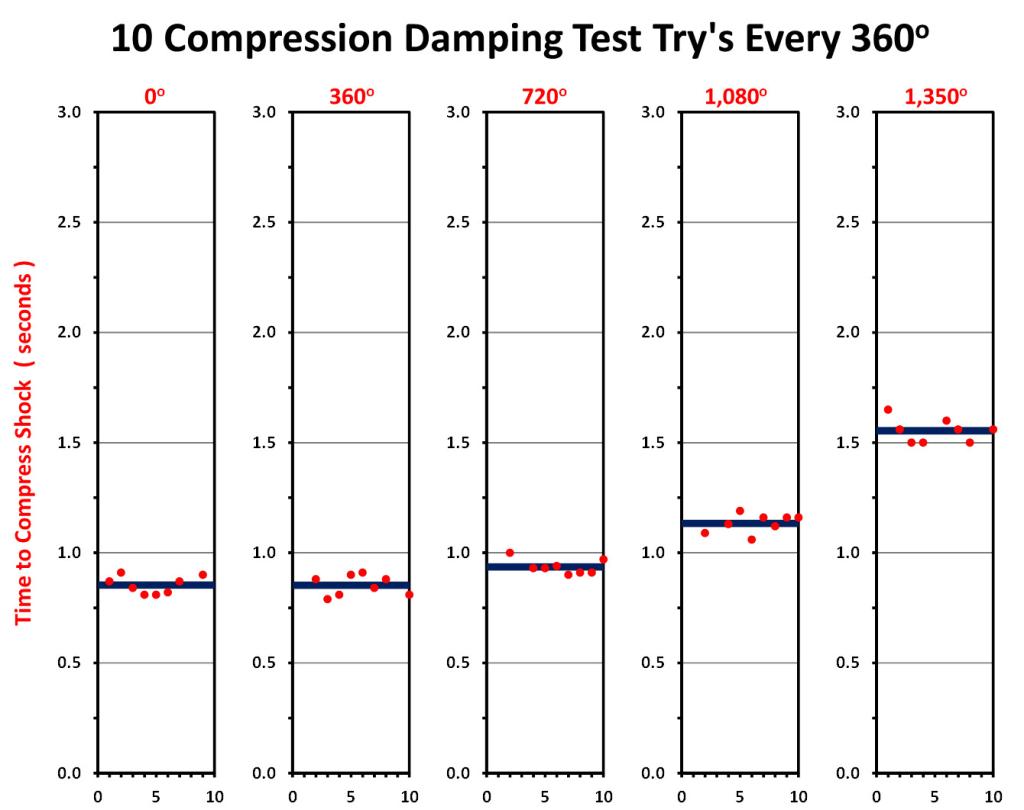 |
| The test rig 18) → | Put the shock into the lowest compression damping setting 19) → | Write down the time for all 10 drops; take out the highest and lowest number; then average the times. The average is the time for that dial setting. Rotate the dial 360 degrees, then repeat time collection. Do this until you are at the end. For the compression dial, the last try only move 279 degrees, not a full 360 degrees 20) → |
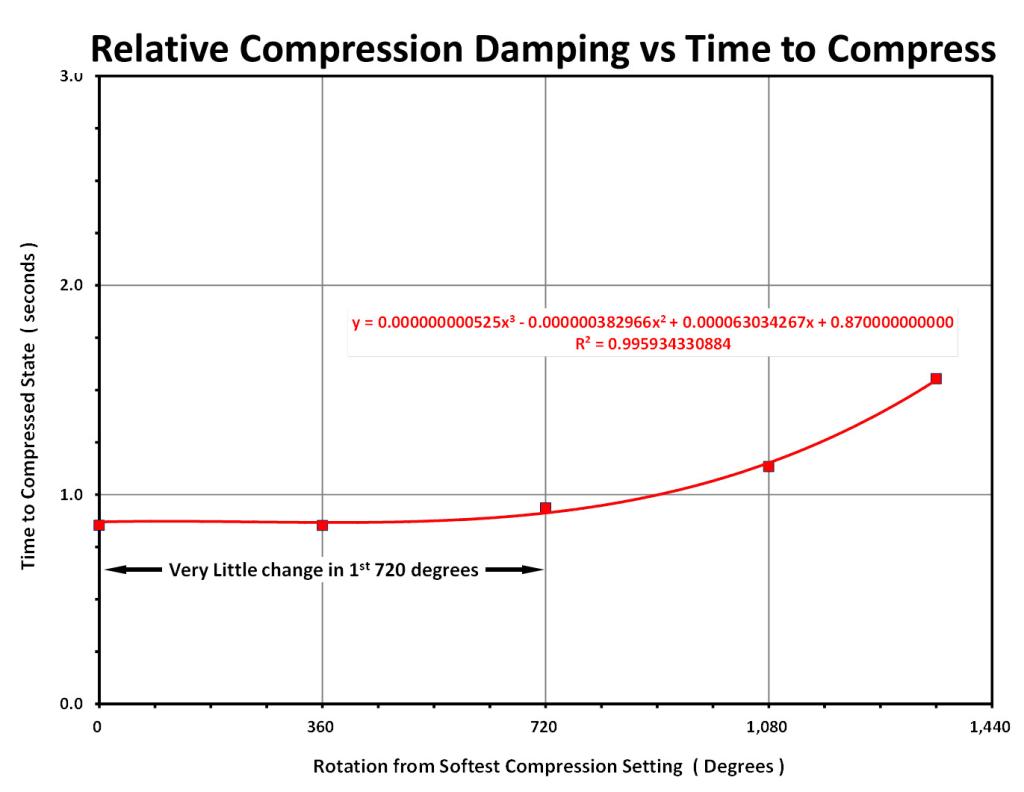 | 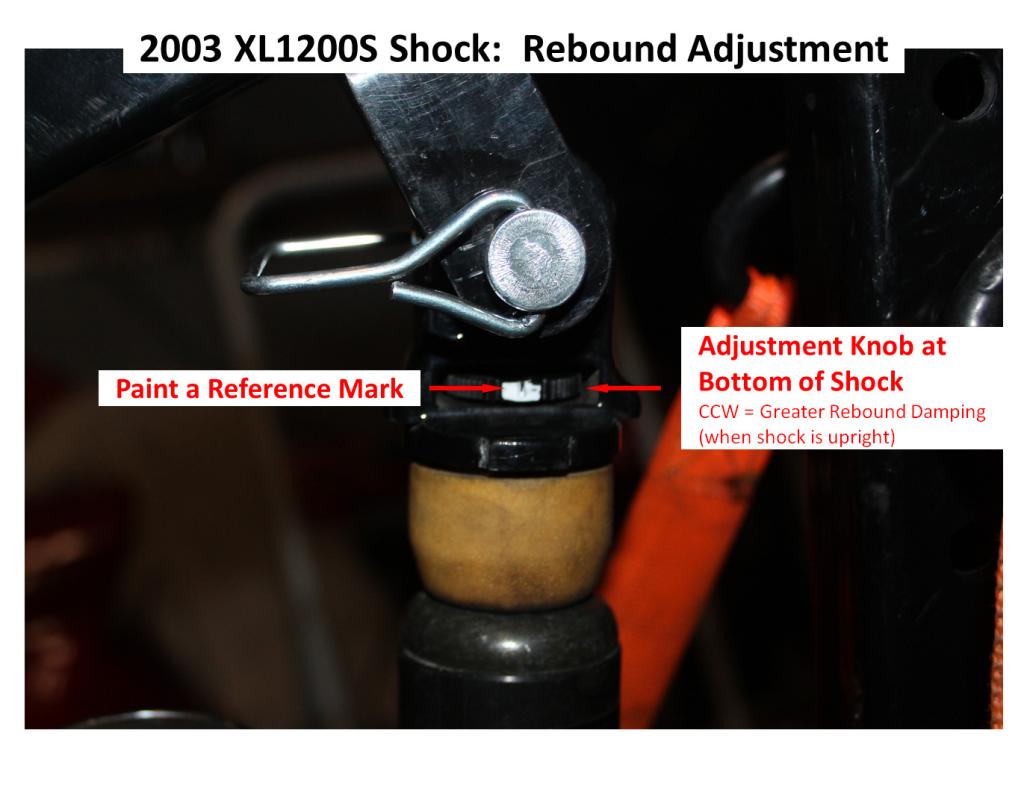 | 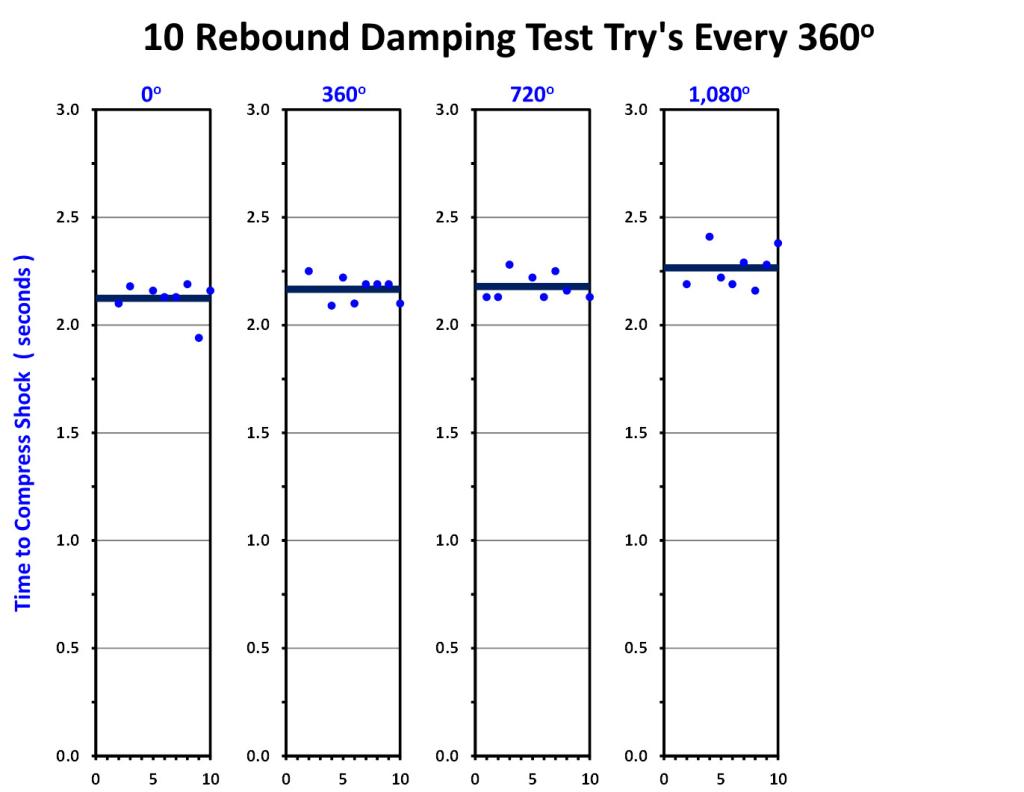 |
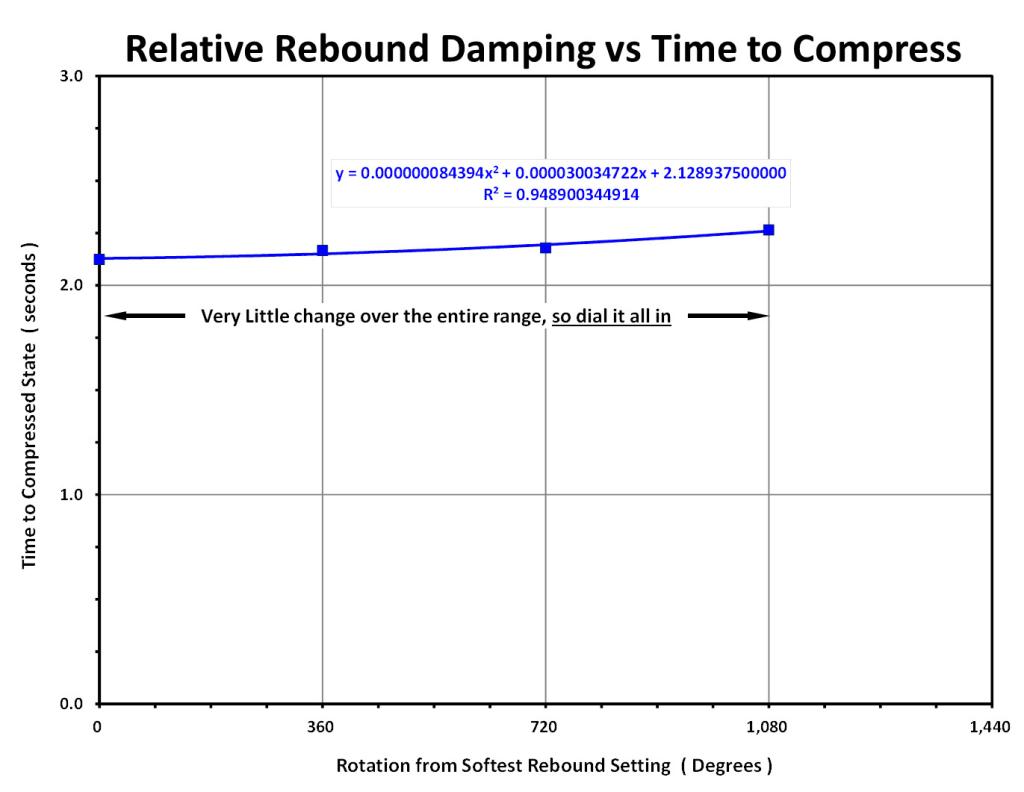
| Plotting the average times per 360 degree rotation yields this graph. You can see, not much happens the first 720 degrees. 21) → | Time to flip the shock and test the rebound damping. Dial back to the lowest rebound setting and paint a reference mark 22) → | Collect the data the same way as the compression testing. The rebound dial only goes around three 360 degree turns. 23) → |
 | 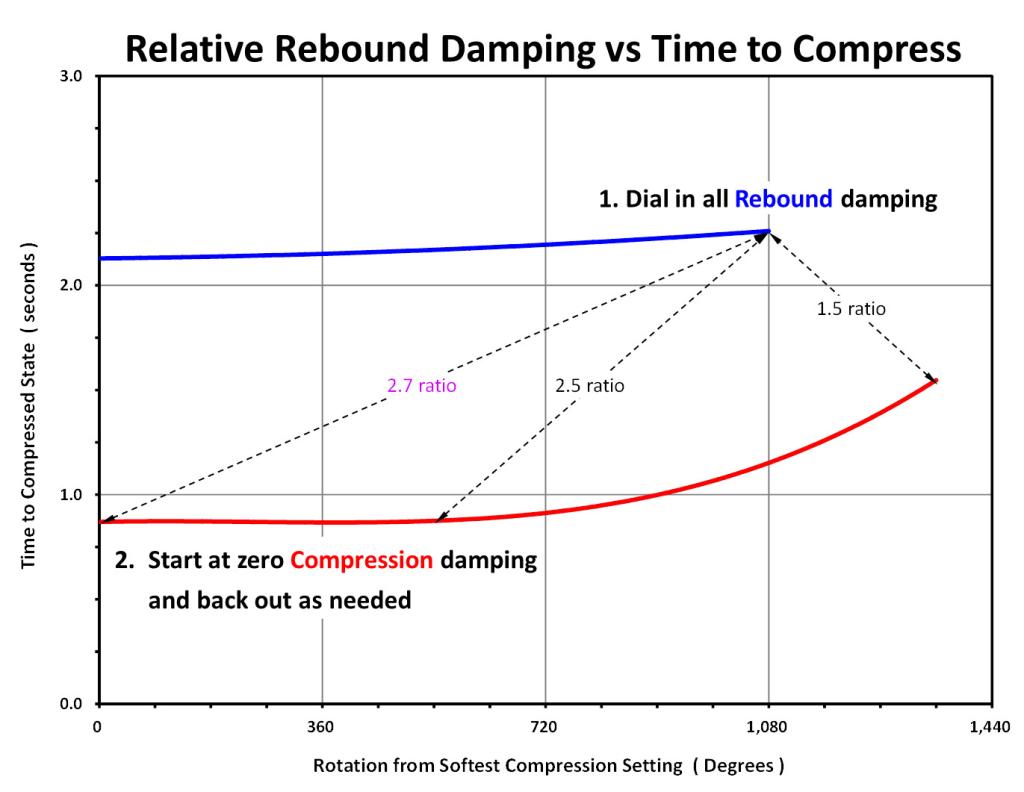 |
| The Rebound damping timing curve 24) → | Put the two curves together and you can see the damping strategy shooting for the highest ratio desired (3.0). You dial in ALL the rebound damping, then dial in zero compression damping. That sets you up with a 2.7 ratio. You can walk in compression damping as needed. I would work in 0.2 ratio increments (can our butts feel 0.1 increment changes??) 25) ✔ |
- High speed compression dampening can't be done on the bench. You have to do that with your butt on the road. I have found if you avoid the pot holes, it may not be critical for how you ride. 26)
2006-2007 1200L
- 2007 Harley 1200 Low Springs 100 pounds per inch progressive wound (but built by Harley to go progressive too late to help much. It goes to hard rate at a spring height of 6” or a shock length of about 10.5“) 27)
- 2006 Harley 1200 R shocks a little too much low extension damping but appears to be acceptable 28)
- Preload adjuster set to full hard to give about 20lb. of spring preload at 13.25 c to c on the shock (the only setting that is acceptable due to spring length). 29)
- Ride height ends up 1.33” from full compression, (with a 200 lb. rider) and 1.9“ from full extension (bike on a jack) 12.5” shock c to c with the bike on the Low stand. 30)
- Shock length fully extended: 13.25“ (you are in this range any time you crest a hill at high speed the trick is to keep the tire on the road at all cost) 31)
- Shock length with bike straight up no rider weight: 12.1” (you are in this range every time the road goes down, it happens just as often as the road goes up) 32)
- Shock length with a 200 lb. rider: 11.4“ (you are in this range right after a raised or rising bump) 33)
- This is all spring rate trying to save hardware.
Screaming Eagle Piggyback Shocks
- 340 mm / 13.39 inches center to center with 92mm / 3.62 inches of travel.

1)
, 2)
, 3)
, 4)
, 5)
, 6)
, 7)
, 8)
, 13)
, 14)
, 27)
, 28)
, 29)
, 30)
, 31)
, 32)
, 33)
, 34)
, 35)
18)
, 19)
, 20)
, 21)
, 22)
, 23)
, 24)
, 25)
Photo by spacetiger of the XLFORUM http://xlforum.net/vbportal/forums/showthread.php?t=1863121&page=5
26)
spacetiger of the XLFORUM http://xlforum.net/vbportal/forums/showthread.php?t=1863121&page=5