Table of Contents
This is an old revision of the document!

EVO: Suspension - Sub-02C
Characterizing the 1200S Shock Damping
- If you move the compression dial from one end to the other, you would count 16 clicks and see it goes almost 4 times around, so each click is worth 90 degrees of rotation - but what does that mean?
- I found I can use one of my shock compression tools to test the shock (minus the spring) to see what the characteristic of the [compression and rebound] damping adjustments are on a shock. I use a stopwatch to see how long it takes to compress the shock for a given dial setting. The relative time comparison between compression and rebound times allow you to pick a strategy to get to a 2.5 to 1 or maybe as high as 3 to 1 (this is more of a cruiser than a knee dragging ride).
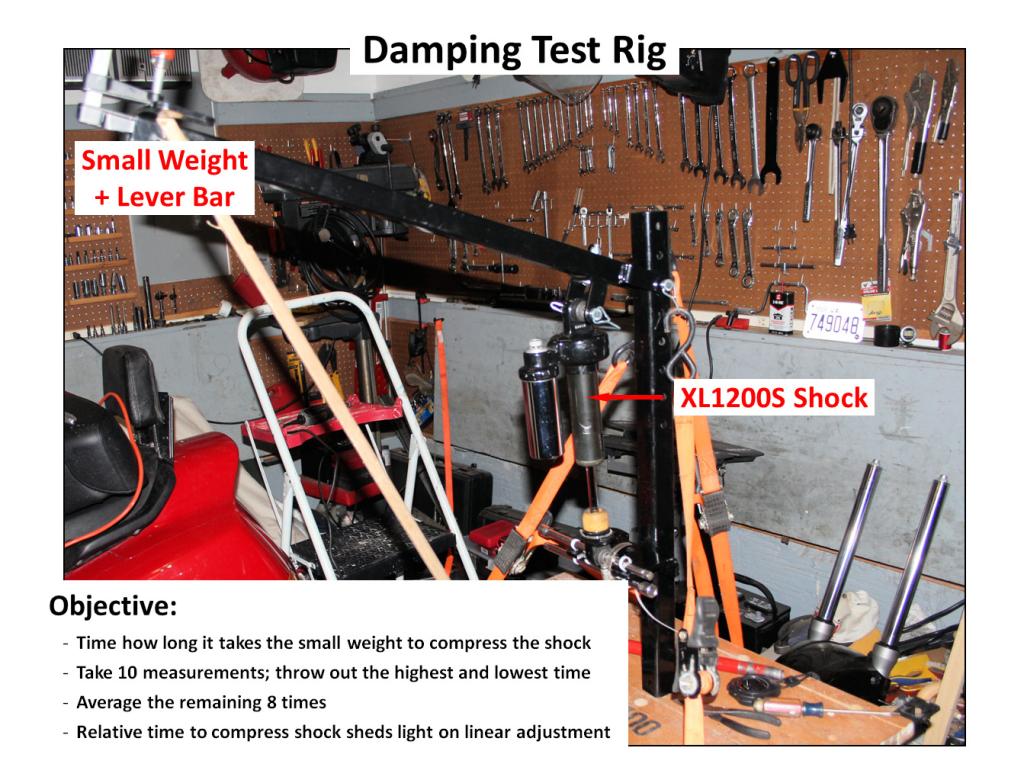 | 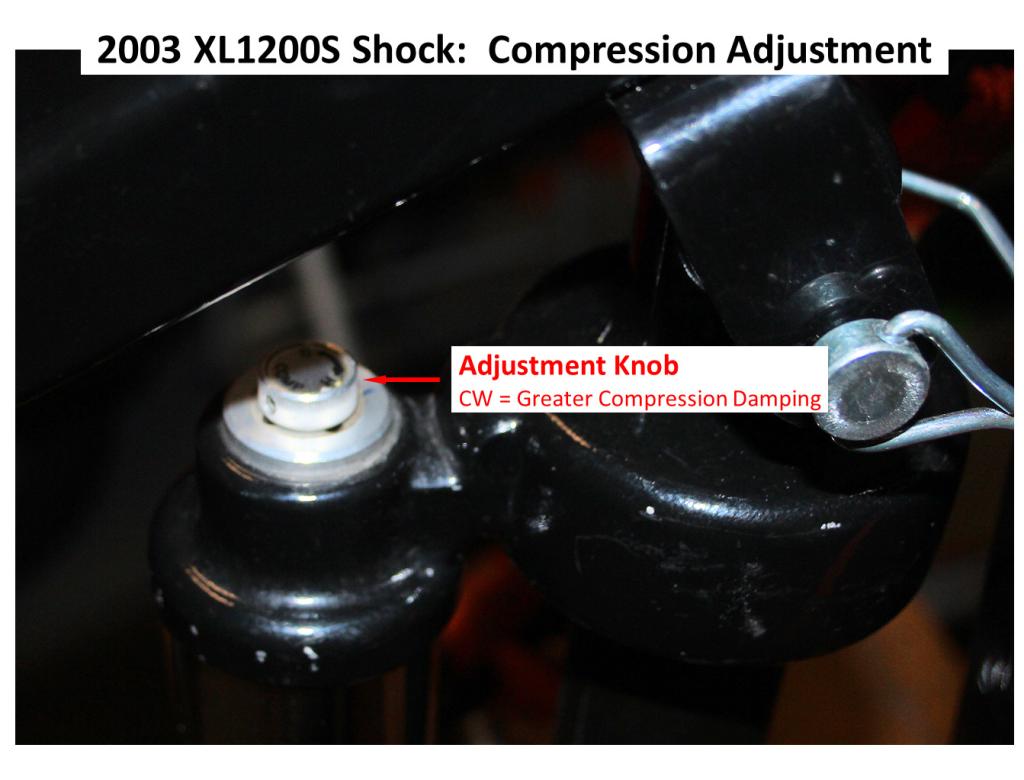 | 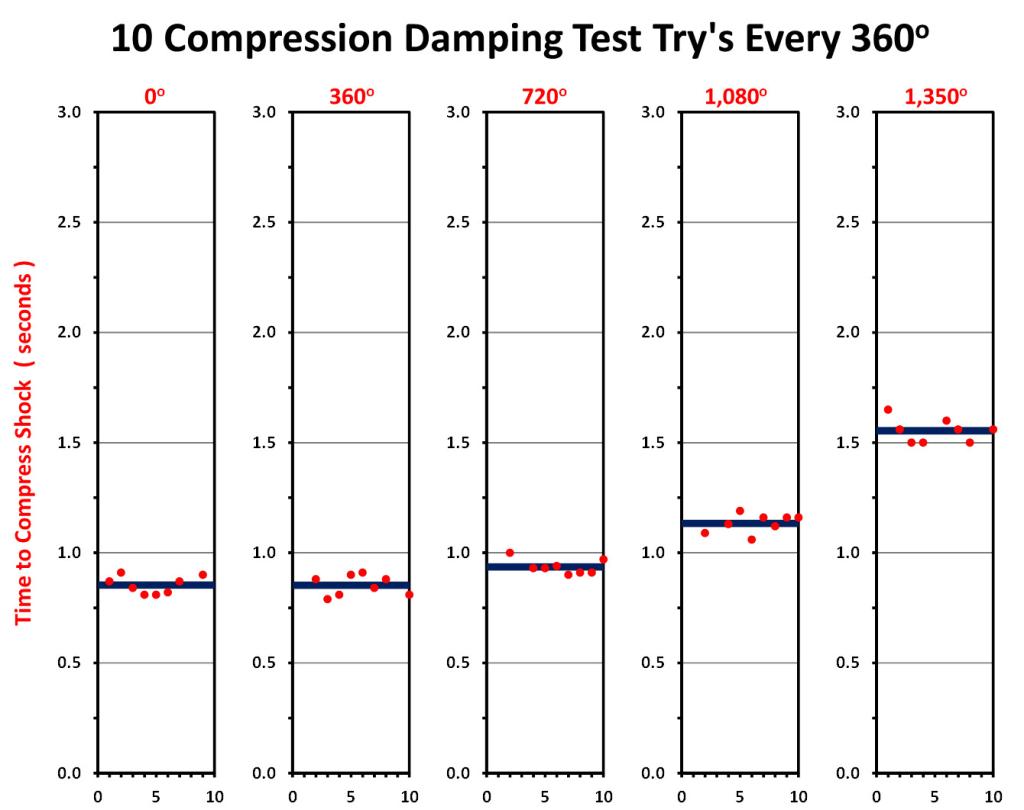 |
| The test rig 1) → | Put the shock into the lowest compression damping setting 2) → | Write down the time for all 10 drops; take out the highest and lowest number; then average the times. The average is the time for that dial setting. Rotate the dial 360 degrees, then repeat time collection. Do this until you are at the end. For the compression dial, the last try only move 279 degrees, not a full 360 degrees 3) → |
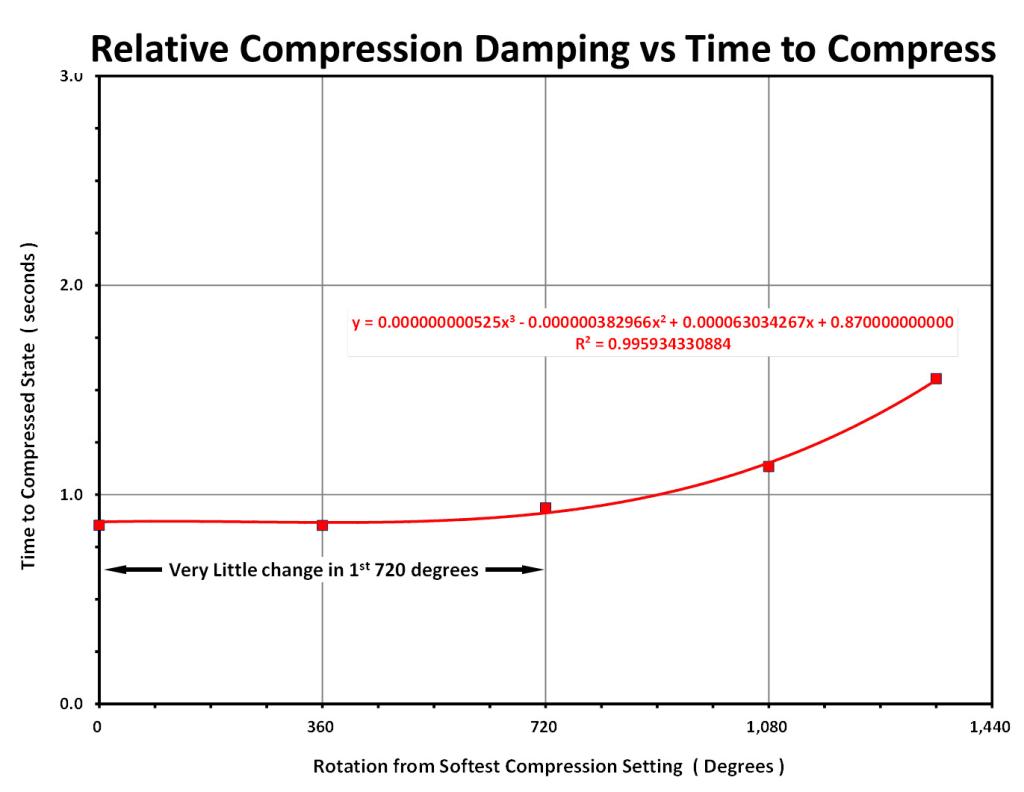 | 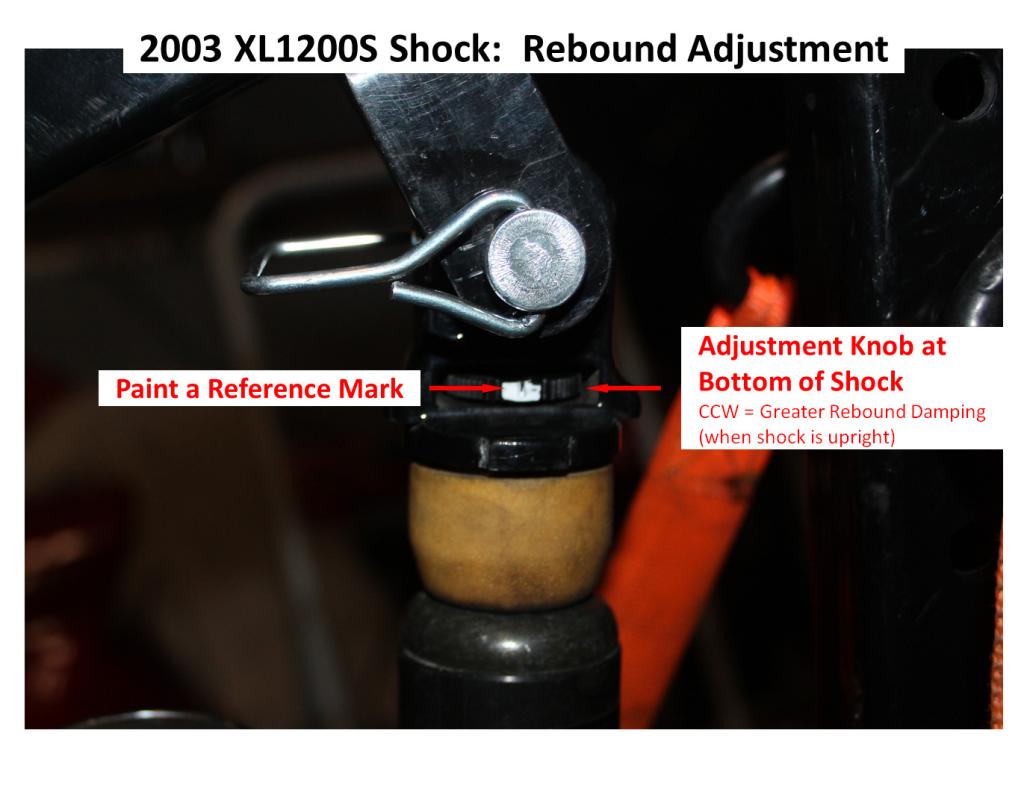 | 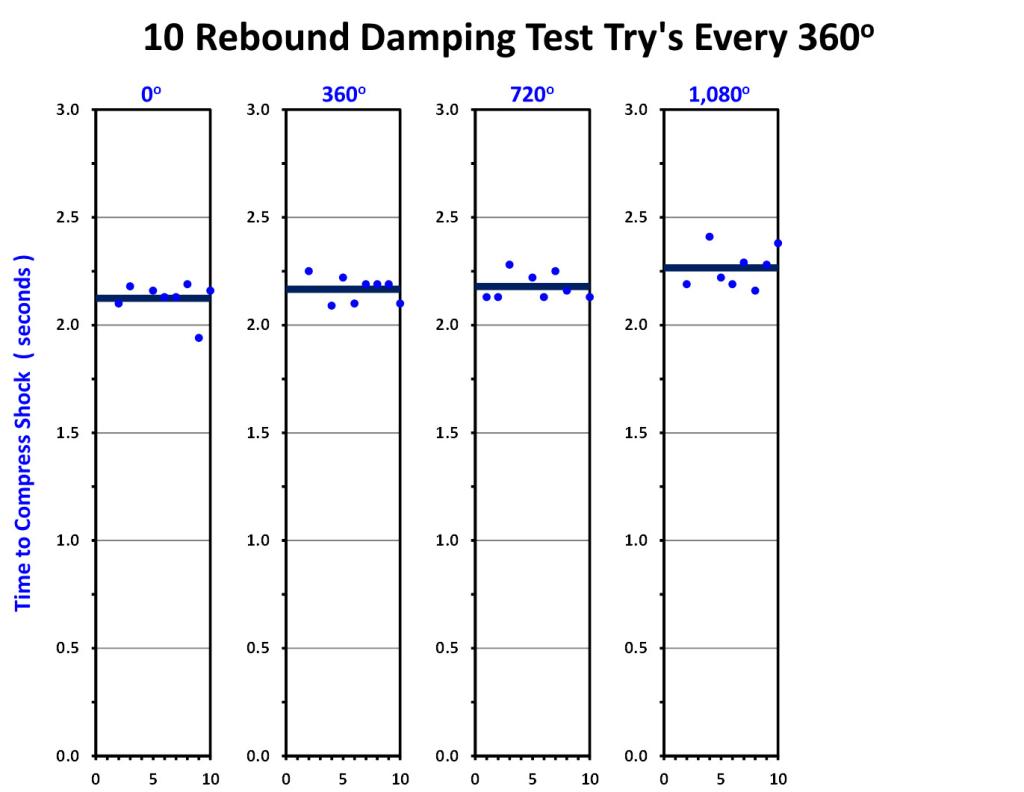 |
| Plotting the average times per 360 degree rotation yields this graph. You can see, not much happens the first 720 degrees. 4) → | Time to flip the shock and test the rebound damping. Dial back to the lowest rebound setting and paint a reference mark 5) → | Collect the data the same way as the compression testing. The rebound dial only goes around three 360 degree turns. 6) → |
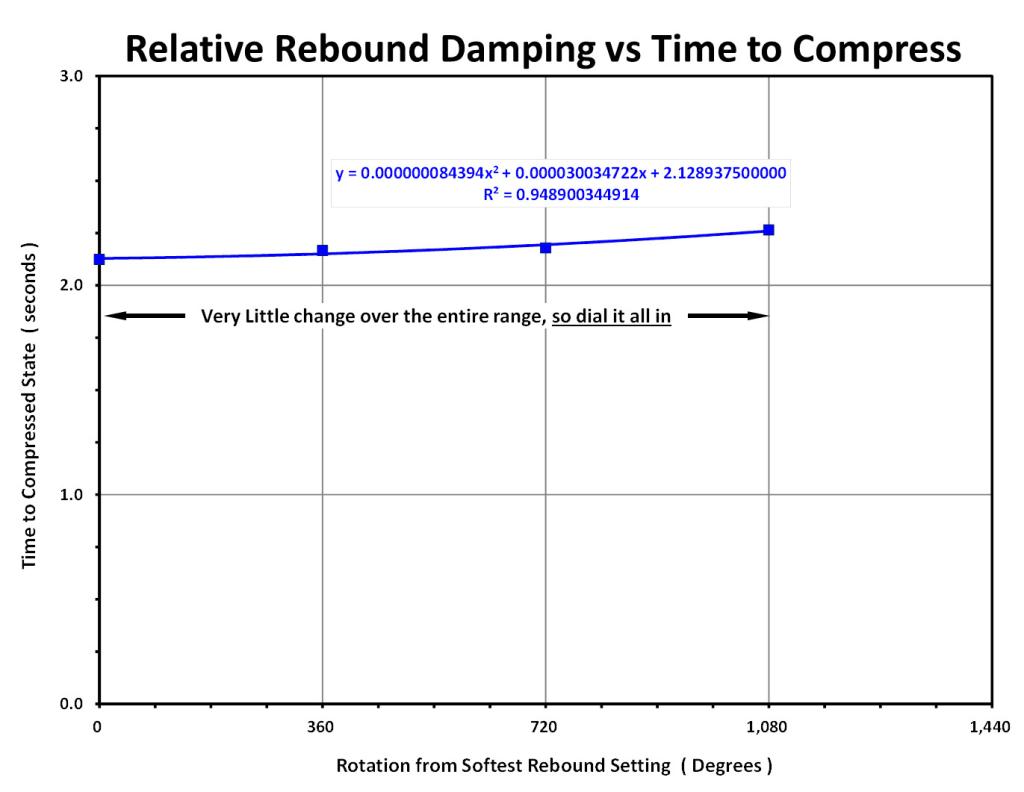 | 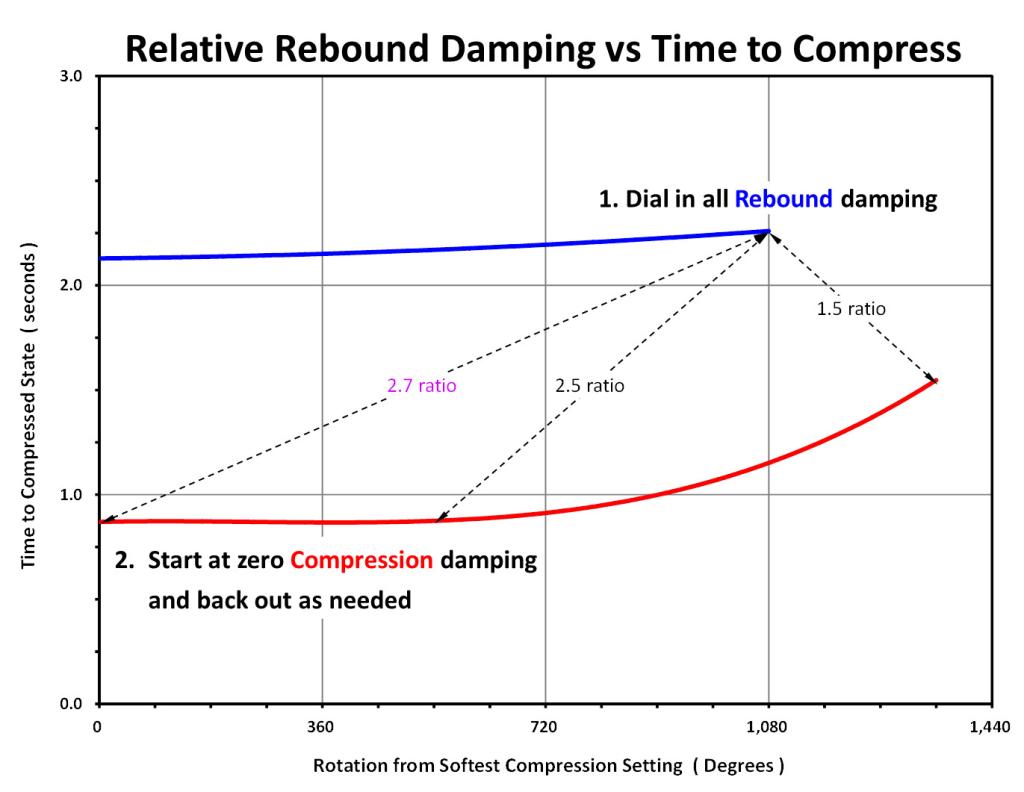 |
| The Rebound damping timing curve 7) → | Put the two curves together and you can see the damping strategy shooting for the highest ratio desired (3.0). You dial in ALL the rebound damping, then dial in zero compression damping. That sets you up with a 2.7 ratio. You can walk in compression damping as needed. I would work in 0.2 ratio increments (can our butts feel 0.1 increment changes??) 8) ✔ |
- High speed compression dampening can't be done on the bench. You have to do that with your butt on the road. I have found if you avoid the pot holes, it may not be critical for how you ride. 9)
Some Testing on the XL1200S Shocks (and mods)
Article by spacetiger of the XLFORUM 10)
- Common wisdom regarding the S model shocks is that the springs are too soft for a rubber-mounts but, on bumpy city streets, who knows? They may not be far off what you need. With the short forks, raising the rear is going to throw a bit more weight on the front, therefore less on the rear. It's a balancing act. 11)
- Good points:
- Bad points:
- Soft springs (although that may be a good point to some)
- Shocks are not rebuild-able so they have to be replaced when bad
- Obsolete part now so you have to either buy used (possibly weaker) ones or buy aftermarkets if wish to just swap them out.
- However, 2“ ID [Eibach] springs are easy to get. The other items are too, just takes a little effort to source them. 14)
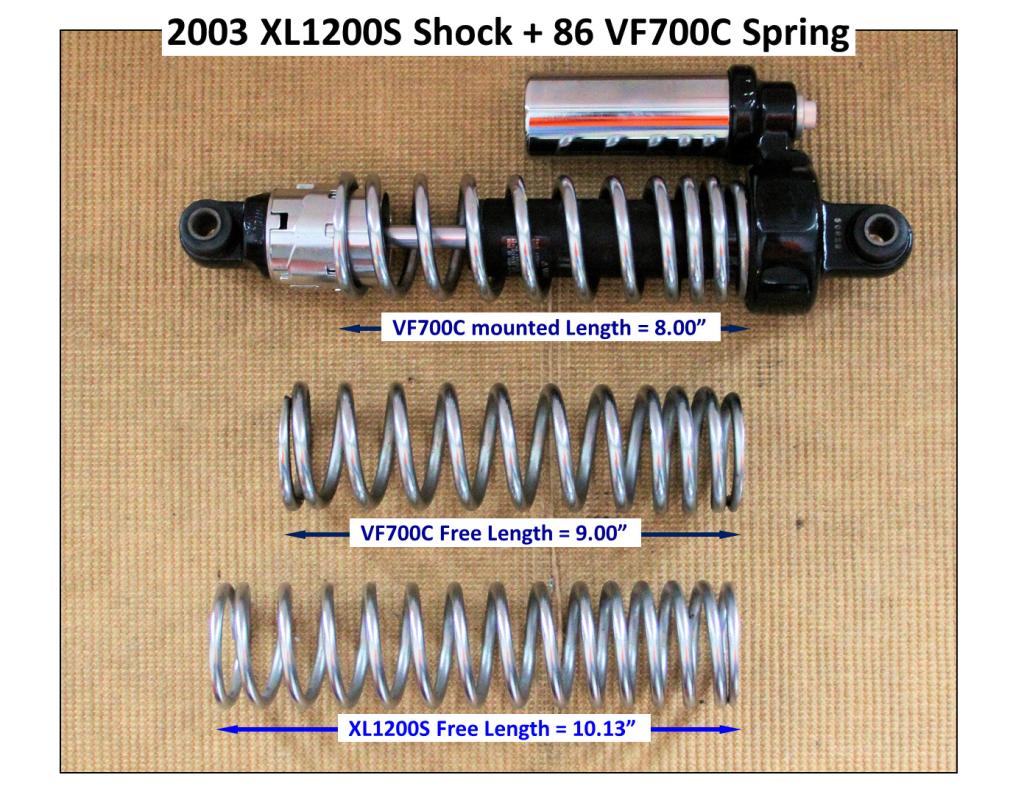
- I have disassembled one and tested the spring - 52.94 lbs/in. It is the weakest spring I have ever tested from any bike. My 86 Honda VF700C had rear 97 lb/in springs and they were inadequate. The springs are weak, but that's why you replace the springs to what you need. The S model shock is a good shock once you get the right [Eibach] spring on. 15)
Some early XL1200S test results:
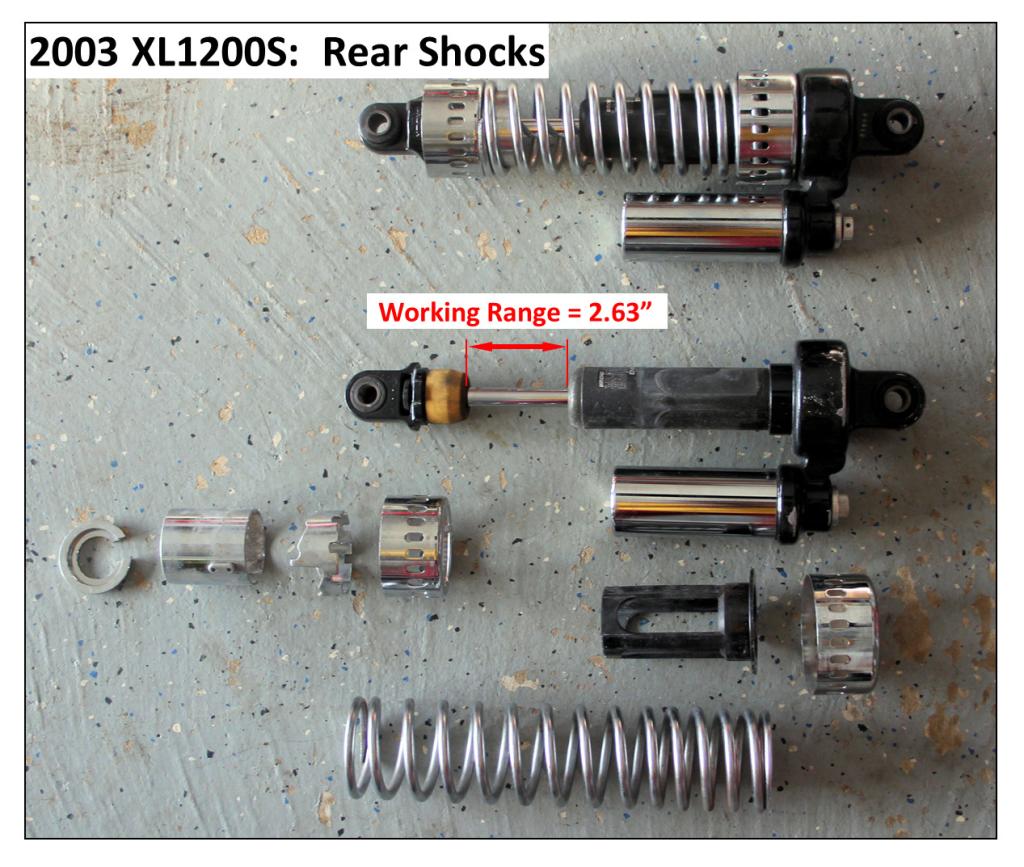 |  | 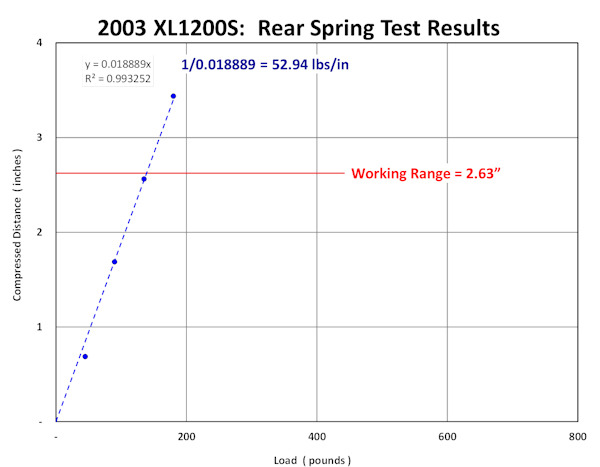 |
| XL1200S rear shock disassembled 16) → | Spring testing using home gym equipment 17) → | Test results 18) ✔ |
- Here are a few more items that back up how weak the springs are.
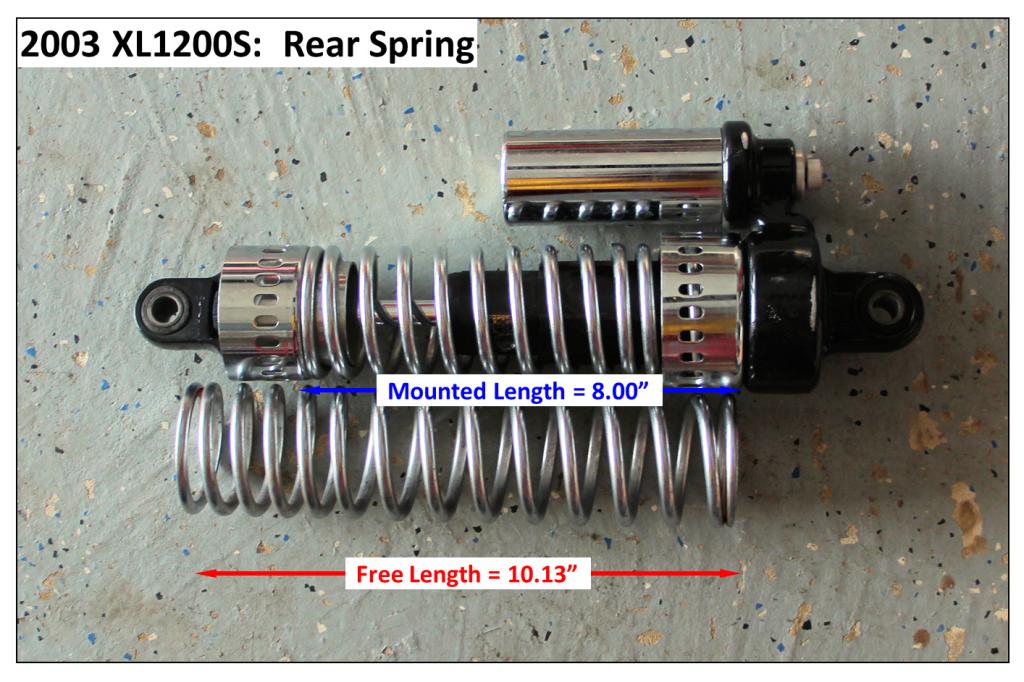
- You can see the suspension strategy for the stock shock using the weak spring. The free length of the spring is a tad over 10” (10.125“). Once mounted in the shock, its mounted length is only 8”. That means the spring is compressed a little over 2“. With a 53 lb/in spring rate, that gives you a 112.5 lb preload - and you have 2 shocks. You can dial in some additional preload, but that's it. For a lighter weight rider, that might be enough to set the initial sag but that's it. The spring doesn't have enough top end capacity to prevent you from bottoming out. 19)
- I also show what the spring capacity is with no additional preload dialed in. This is the blue line with the “1” on it. You can see it starts at 112.5 lb preload (from the spring mounting). As you add more weight to the spring, it begins to compress until it get to the working range of the shock (2.63” later). The total capacity is 252 lbs. If you dial in all the shock preload, the # “1” line moves over and becomes the # “4” dark blue line. Compressing the spring with all the shock preload yields a max capacity of 282 lbs. That 30 lb extra capacity is only about 12% more capacity. So, if you have these shocks and weigh anything close to an average man, you need all the preload dialed in… but I bet you still bottom out a lot. So the strategy is clear if using this shock, you will have to swap out the spring. 20)
- In the 3rd picture below, I ditched the fancy chrome top and bottom trim pieces.

- I wanted a different setup to handle the preload setup for the shocks with a coil over sleeve as I find these excellent to dial your suspension preload and top end right in. The problem is no one makes a coil over sleeve in that small of a diameter (~1.75”) because there is no market for these small sleeves. I found the rear shock for a 2007 Victory Jackpot with a coil over sleeve that looked to be close to the size I needed.
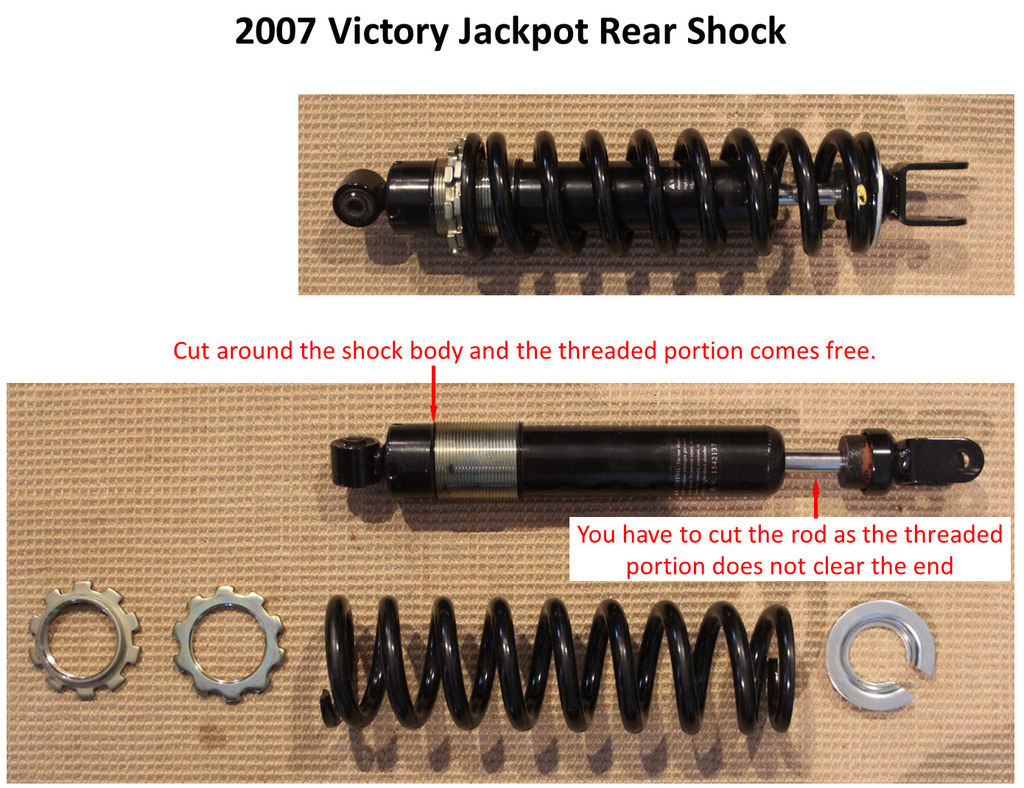 | 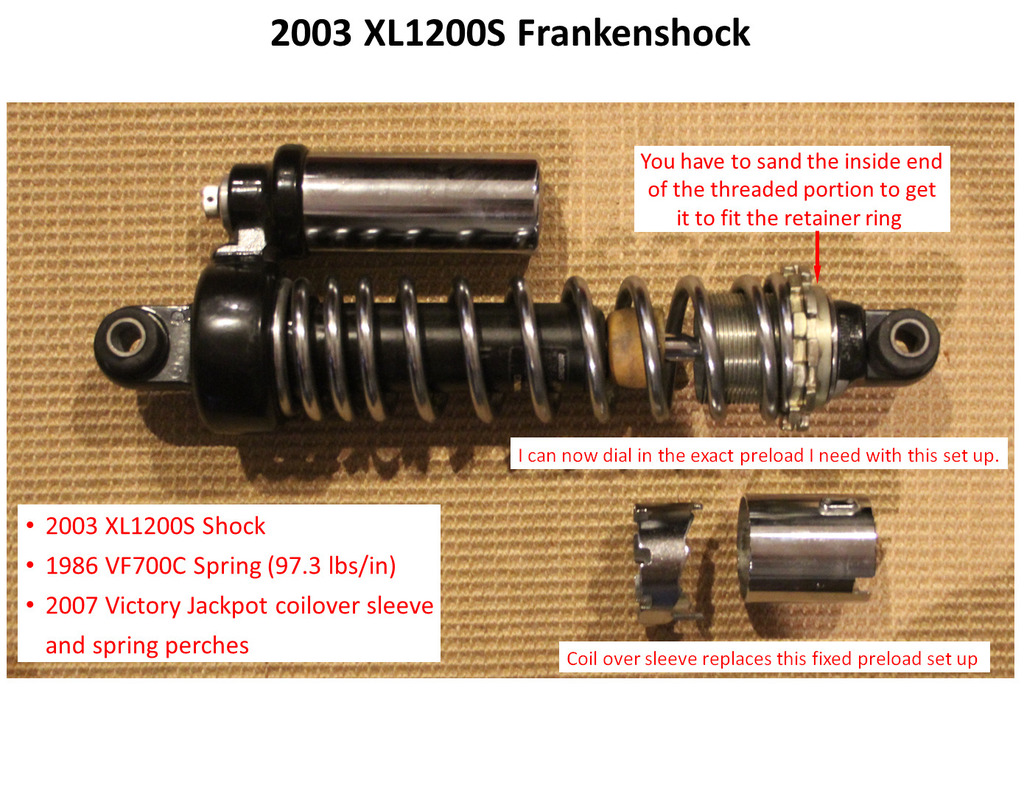 | 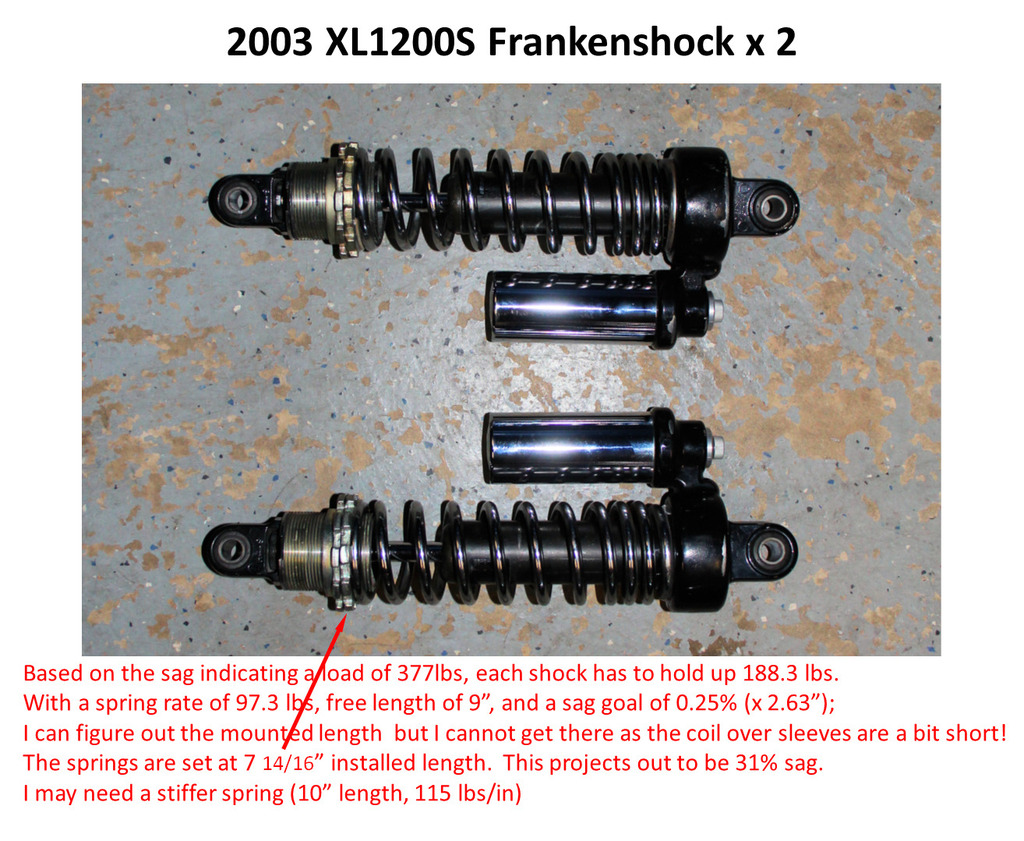 |
| The shock after I disassembled it. The threaded portion would not come free, so I setup the band saw to cut just above the threaded portion. I thought I’d have to cut the shock in half, but I only had to cut just below the sleeve and it came free. I had to sand the inner sleeve a bit to get it to fit the XL1200S retainer clip. 24) → | All mounted up and went together nicely. So here it is; 2003 Harley Davidson XL1200S shock body, 1986 Honda VF700C spring, and 2007 Victory Jackpot coil over sleeve. 25) → | Both shocks modified. I was able to assemble the other shock and set the estimated preload for correct sag. Seems I cannot quite get to a sag at 25% and will have to settle for a 31% sag. A bit on the high side, but I will still have almost doubled the working range of the shock. If this doesn't hold up in real world riding, I will have to get some new Eibach springs. ✔ |
- Harley specs out there own dimensions, which probably do not cross over with anything else that particular brand made. Sometimes shocks are press fit together, and are not rebuild-able.
- Even if you could swap out to a heavier spring, which would be closer to 75/120 lbs/in, I doubt the dampening curves will match that big a jump. Ricor inertia technology makes cartridge/shim stack technology obsolete. 26)
- As you increase spring rate, you need to reduce compression dampening and increase rebound dampening. Then the question becomes if the external adjusters on the 1200S shocks will have enough range of adjustment to match the heavier spring. If they don't, then you have to take the shocks apart and change the internal shims, 27) or change the oil weight or modify the valving (if there is no shim stack), or a some of both. 28)
1)
, 2)
, 3)
, 4)
, 5)
, 6)
, 7)
, 8)
Photo by spacetiger of the XLFORUM http://xlforum.net/vbportal/forums/showthread.php?t=1863121&page=5
9)
spacetiger of the XLFORUM http://xlforum.net/vbportal/forums/showthread.php?t=1863121&page=5
11)
, 12)
, 13)
, 14)
, 15)
, 19)
, 20)
spacetiger of the XLFORUM http://xlforum.net/vbportal/forums/showthread.php?t=1863121&page=2
16)
, 17)
, 18)
, 21)
, 22)
photo by spacetiger of the XLFORUM http://xlforum.net/vbportal/forums/showthread.php?t=1863121&page=2
24)
, 25)
photo by spacetiger of the XLFORUM http://xlforum.net/vbportal/forums/showthread.php?t=1863121&page=7
26)
XLXR of the XLFORUM http://xlforum.net/vbportal/forums/showthread.php?t=1863121&page=2
27)
XLXR of the XLFORUM http://xlforum.net/vbportal/forums/showthread.php?t=1863121&page=10
28)
spacetiger of the XLFORUM http://xlforum.net/vbportal/forums/showthread.php?t=1863121&page=10