Table of Contents
This is an old revision of the document!

REF: Oiling & Lubrication - Sub-05A
High Pressure Oil Bypass
Theory behind installing a high pressure bypass:
The supply side of the oil pump is over supplying oil to the crank case during sustained high RPM running.
The motor is designed to run with a dry sump. 1)
(with only enough oil in the crank case to lubricate the bearings, not a 'splash' wet sump lubrication design)
When the sump gets wet, the crank sees a lot of resistance due to the oil pooling there.
This generates a lot more heat meeting the power demands while overcoming the added drag of the oil on the flywheels.
The combination of the added heat and increased pumping to the top end of the motor results in oil pooling on top of the heads that is thinned by the heat.
The combination of pooling and thinner oil with the increased vacume provided by the motor at high RPMs sucks the oil past the valve guides.
Just adding a cooler may not solve this problem.
You need to get the oil out of the crankcase so it does not interfere with motion of the crank and cause the heating problem in the first place.
The proposed approach is to bleed off excess high pressure oil from the feed side of the oil pump.
Such that the scavaging side of the pump will be able to evacuate the oil from the crankcase before it starts to wet sump and generate the added heat.
Homemade Oil System Bypass (OSB)
Article by aswracing of the XLFORUM 2)
Background:
This mod was done to cure wetsumping at high revs.
- This is exactly what I did to my '04 a few years ago, using a 145 CV jet, and it totally cured the wet sumping. I started with a 165 jet, but it seemed to lower the oil pressure too much, as the oil light would flicker at idle when the motor was good and hot. I swapped it to a 145 and haven't seen the oil light flicker since.
- I run the bejeezus out of my bike and this has caused no issues.
- I did not invent this idea by any means. Probably the first guy who ever raced a Sportster came up with it. Wet sumping has been an issue on high rpm Sportsters for forever, and for some reason, with the oiling system changes on the '04, it got a whole ton worse, we're even seeing it on mildly modified street bikes.
- Your oil pump consists of two sections, a “pressure” section and a “scavenge” section. The pressure section is the bottom area of the pump. On the lower left is the feed line, coming from the oil tank and into the pressure section inlet. We won't be touching this line, just leave it hooked up. On the lower right is the pressure section outlet. This goes through a hose up to the oil filter. On a rubber mount, the pressure side hose is quite a bit shorter than this one (this is a '99 motor), but it's the same deal. From the oil filter, the oil under pressure goes into the engine.
- Above the pressure section is the scavenge section. The scavenge section's job is to pump the oil back out of the engine and send it back to the tank. A Harley uses a “dry sump” oiling system, meaning that the oiling system is designed to keep the oil in an external tank, and the pump is always trying to keep the engine sump dry, or at least nearly dry. The problem with Sportsters is that sometimes the scavenge section doesn't keep up, and the engine starts filling with oil, which we call “wet sumping”. This is what we're trying to fix.
Do you need this mod?:
Wet sumping at high RPMs is really a big problem with the 883 to 1200 conversions as they are running much higher rpms which leads to the wet sumping. 3)
The 1200s run less rpms so they are not as prone to having it happen.
Now if you routinely run above 4,000 rpms then you should consider doing this mod anyway.
On an 03 or older, it's not so much the power level as:
- The rpm of the motor. Wet sumping issues are common on motors that get flogged at high rpm, i.e. drag race, Bonneville, and road race motors.
Also if you run highway speeds in 4th gear or lower, the RPMs are up. - Motors with gapless rings. The better the ring seal, the worse the problem tends to be.
This mod is not recommended on 91-03 or older bikes unless you believe they are wet sumping at high revs.
Also, I have yet to see this issue resolved with an oil pump. 4)
I can tell you that I once put a Pro-Flow billet 3-stage pump onto a problem motor (a Bonneville motor of mine) and it wet sumped anyway.
I broke the cases on that motor shortly after that, and when I rebuilt it, I went with a set of S&S cases and never saw the problem again.
In fact, I put a stock pump back on that motor and put the billet pump on one of my street motors, just for the looks (cam cover is cut down).
I really think the quality of the ring seal is a much bigger factor than the size of the oil pump scavenge section.
The following oil pump plumbing modification has been proven to work as an answer to wet sumping due to high revs.
However, perform this mod at your own risk.
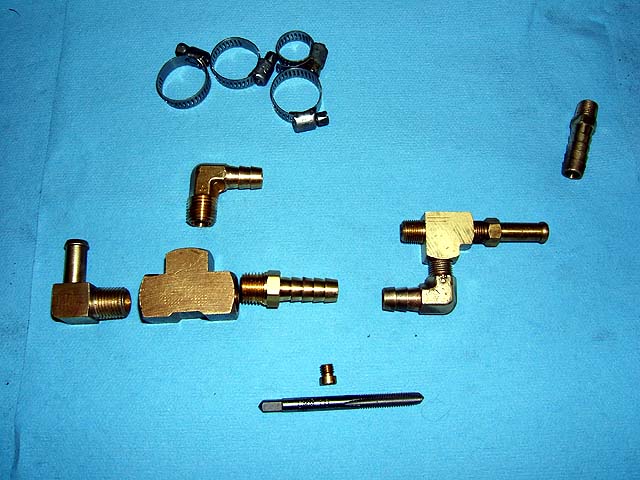
Parts required:
- (7) small hose clamps (even though there's only 4 shown)
- (1) 1/4“ FPT Tee fitting
- (2) 1/4” mpt to 3/8 hose barb 90 degree fittings
- (1) 1/4“ mpt to 3/8 hose barb straught fitting
- (1) 1/8” npt street tee, with the male thread on the run
- (1) 1/8“ mpt to 3/8 hose barb, 90 degree
- (2) 1/8” mpt to 3/8 hose barbs, straight
- (1) 6mm x 1.0 thread tap
- (1) CV jet, ideally about a .145
- (1) can of brake parts cleaner
- (1) roll of Teflon tape
- (1) 12“ or so length of 3/8” oil line hose
- (1) container of Loctite red
Notes:
Before someone goes tapping a hole, make sure of the size of the threads on your jet before you tap it. 5)
Different fittings have different inside diameters.
Some are going to be too big inside for tapping to a jet size.
In general, I've found the style with a serrated hose barb (as shown being tapped) to have a smaller I.D. than the style without a serrated hose barb.
But even in the serrated style, I've seen some fittings that are too large inside.
You may consider doing that section in 5/16“ or even 1/4” hose, instead of 3/8“.
The fitting will be smaller, at least on the hose barb end, and you can always put the jet there instead of the pipe thread end.
The original 04-up forward fitting may not work in the street tee. 6)
If it did, it would reduce the parts list.
But original hose needs to be able to bend enough not to kink.
On my '04 and up engines, it just pinched the hose too much.
Probably wouldn't be so bad on an older motor with the longer hose.
Most industrial supply places that sell hydraulic hose and the like can custom make hoses with crimped on ends, generally while you wait.
Or, a person could just cut down his original hose and use the hose barb / clamp setup at one end of it only.
But that'd be destructive to the hose, if he ever wanted to take it back to the stock configuration.
It's easier to remove the cam cover to access the return oil line. 7)
Caution: The rocker box should be loosened / removed before removing the cam cover to prevent damage to the cam bushings.
See Removing the Rocker Boxes in the Evo section of the Sportsterpedia.
See also Removing the Cam Cover.
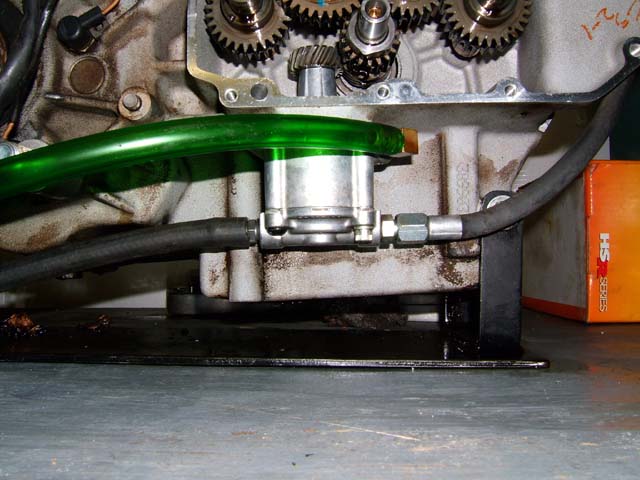
- Here's what your stock plumbing looks like, more or less. This area is largely obscured by the cam cover (removed from this engine) but you can get to it.
- You may need to remove the footpeg and bracket to get access, but you can leave the brake linkage and all hooked up.
- This area will likely be really greasy, which is why you bought a can of brake parts cleaner. Blast away.
- The scavenge section has two inlets, neither of which has a hose or is visible. What matters to us is the hose that's green in this photo. Yours won't be green, I put a green hose on this one to make it easy to identify. This is the scavenge section outlet, or return line, where the oil being pumped out of the engine is returned to the tank.
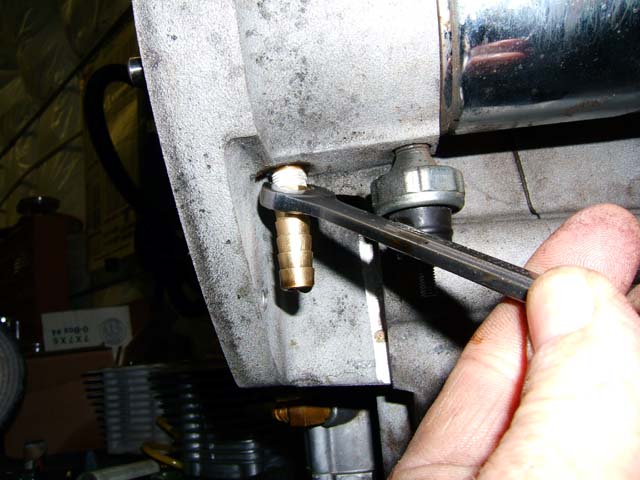
- We'll start by removing the pressure hose. My apologies for people for whom this is all obvious, but you'd be amazed how many people I've run into who don't know what you turn to remove a flare fitting, and end up twisting the hose. Anyway, hold the fitting that's closest to the oil pump with one wrench while you loosen the larger nut. The hose will come off like this.
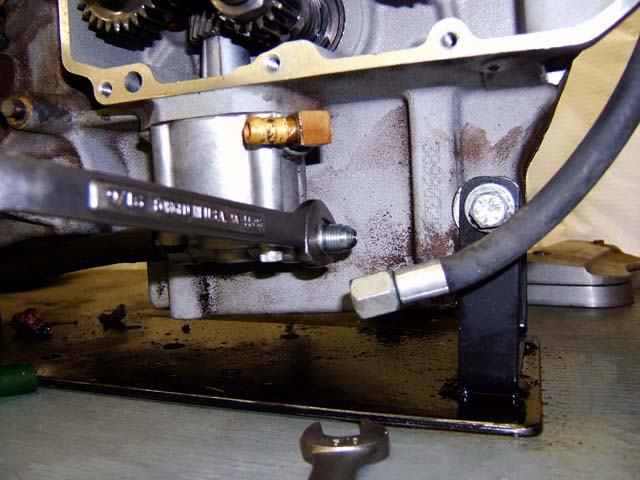
- After the hose is removed, remove the flare fitting from the pump body.
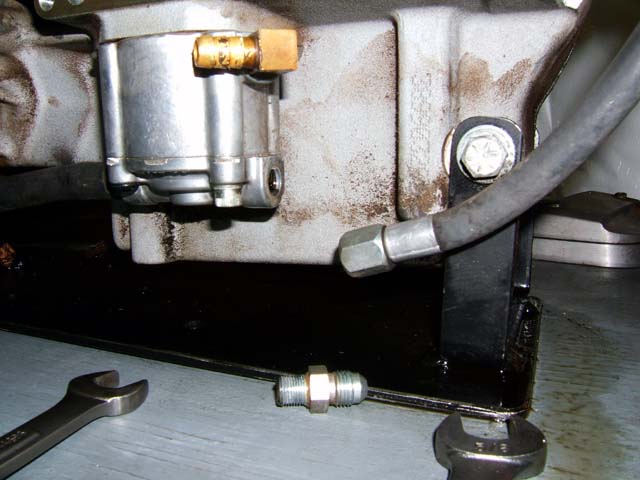
- Now remove the other end of the hose from the engine case.

- Replace it with a 3/8” hose barb fitting. Teflon tape can be used on the threads, but in theory, a brass fitting into aluminum shouldn't need it.
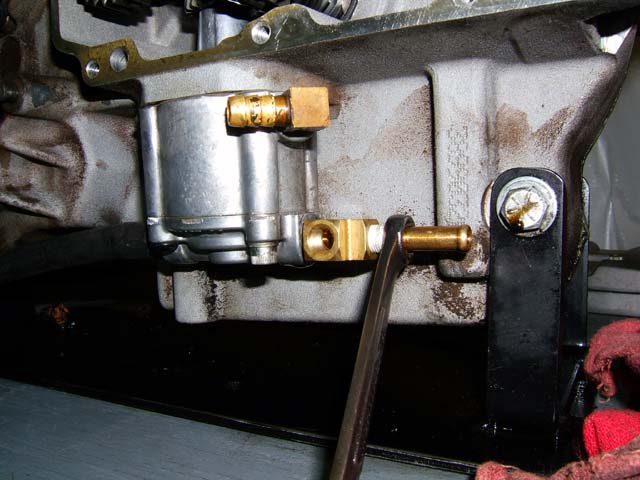
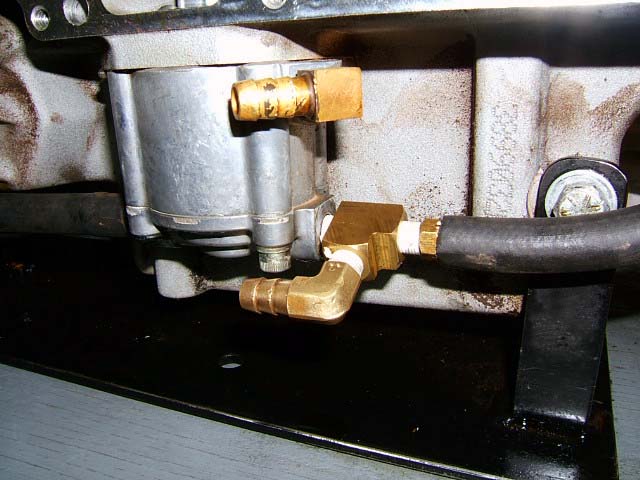
- Install the street tee and another 3/8“ hose barb fitting on the oil pump.
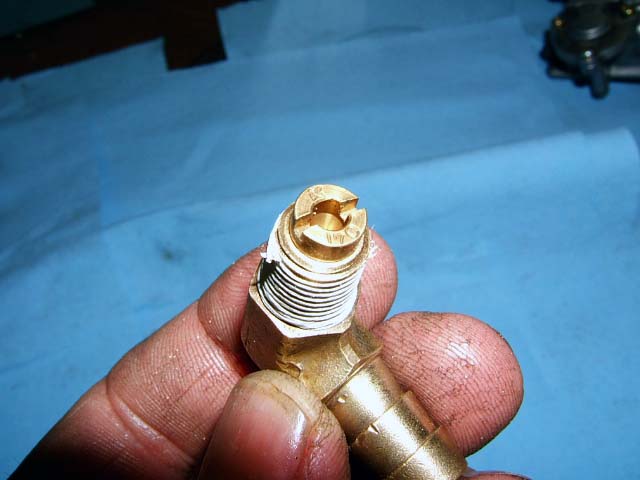
- Next, your going to tap the inside (pipe thread side) of the 1/8” mpt x 3/8“ hose barb fitting.
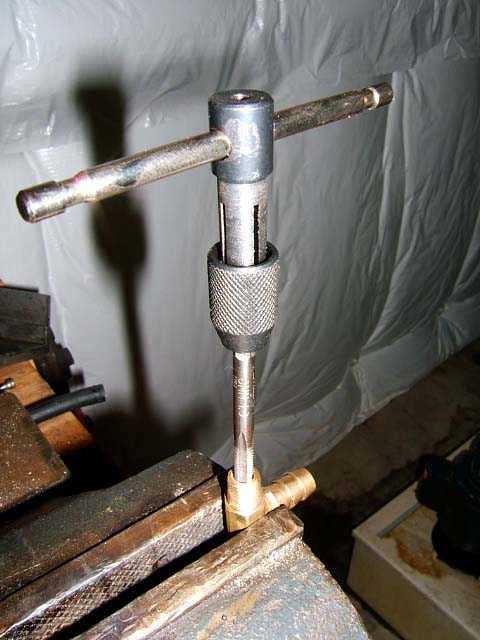
- Hopefully it'll look about like this.
- Note that some fittings have an I.D. that's too big. If you can't find a fitting with a small enough I.D., you can do this section in smaller hose diameter (5/16” or even 1/4“), and if necessary, you can even tap the hose barb end. What we're doing here is creating a very restricted path for the pressure side to bleed off, so it's not necessary to do section this in 3/8” hose, I just chose 3/8“ to keep it all simple.
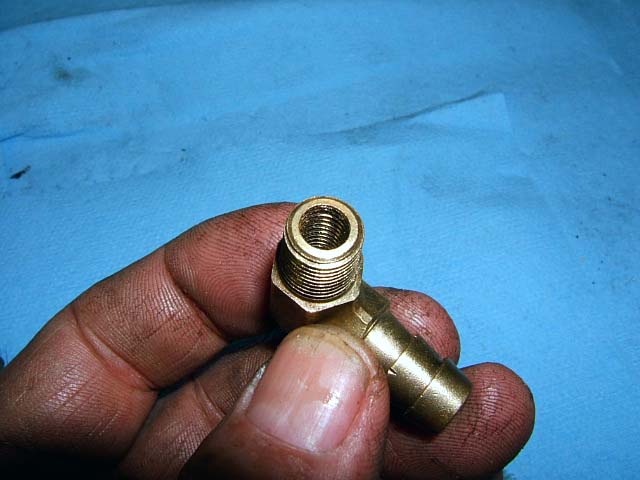
- Here, I've put Teflon tape on the threads and also screwed in the jet (never mind that it's a 170, it's all I had handy for taking these photos). Loctite red on the threads of the jet wouldn't be the worst idea in the world, and tighten it good.
- Install this fitting with the jet onto the street tee as shown.
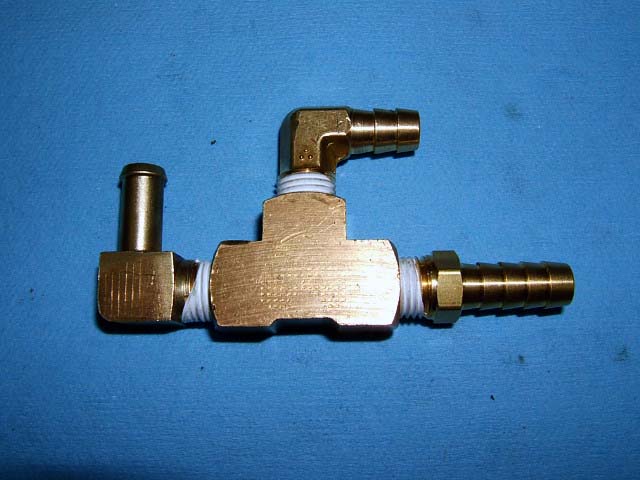
- Now prepare the 1/4” pipe thread fittings as shown. You probably could do all this with 1/8 pipe instead, and it'd be smaller and more compact. I chose 1/4 just because it's important to keep the restriction in the scavenge section minimal. But I'm probably worrying about nothing.
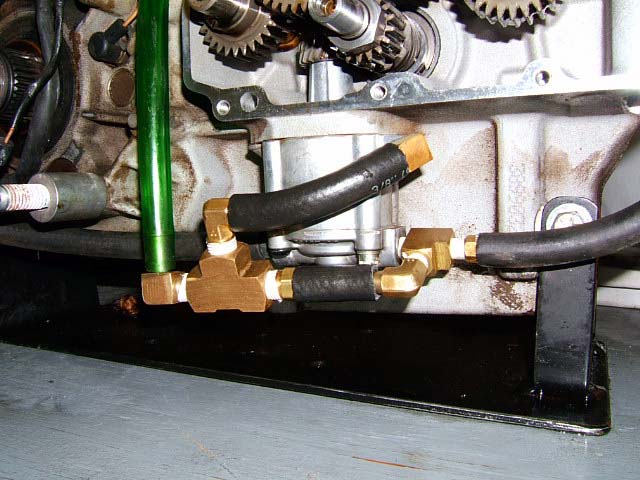
- Install the prepared 1/4 pipe tee and plumb as shown. Use hose clamps though, I was just mocking this up so I didn't bother. Tighten them all securely.
Feedback from installing this mod
Bike: 2005 1200C:
Condition trying to fix: High oil temps at high rpm.
My first test ride after installing the bypass, I saw cooler oil temps. 21)
But at the end of the ride while stuck at lights idling for extended periods, excessively loud sounds came from the top end.
These would go away when the engine revved up after pulling out from the light.
I was only a couple of blocks from home when this occurred so the bike didn't run this way long.
To effectively neutralize the bypass, I used a hose clamp to pinch off the bypass tube and took a 250 mile ride.
The bike performed just as it has always done without the bypass. No excessive noises and the oil temps were running about 20 degrees higher.
Also I let the bike idle for some extended periods and never had any excessive noises.