Table of Contents
REF: Service Procedures 9
Ironhead 4 Speed Transmission Removal / Inspection / Installation
This section is not meant to be a replacement to the FSM.
It is meant as a compliment to the FSM with added information with pics that are not in the manual.
Always buy an Factory Service Manual AND a Factory Parts Catalog to help you along your maintenance path.
The Haynes and Clymer brand service manuals for the most part will suffice and they generally have more pics than the HD Service manual.
But the HD manuals will be the most accurate.
All in all, there are discrepancies in all of them including the HD parts and service manuals though.
Voices of Reason
When faced with what do to if transmission damage is suspected, the best policy is to break it down and inspect everything.
All mechanical things will break down in time. Popping out of gear may be gear dog or slot damage.
Shifting from neutral to (in gear) by itself could be a worn shifter cam or other worn parts.
Gear damage (cracks, pits, etc.) can end with case damage.
So if in doubt, take it out and inspect the parts before letting the problem get worse.
- You're the one with the wrist and butt sensors that knows what it feels like. That said, let's say you decide to put the 250 remaining miles on it and it strands you in the process. How difficult will it be to trailer it home? That is the real question. If you have a good way to economically and safely deal with a failure then no worries, go for it. But, if safety or difficulty and expense seem high just call the season now. (Deimus)
- Next year you could be cruising wondering if you really had to rebuild that tranny. Or, in the parallel universe next year,wondering why you didn’t just fix it and how much longer it will be before you can quit that second job to pay for the welder,machinist and parts because you can’t do those highly specialized skills. In the third parallel universe your still putting it into the extra cases you bought. Stay in this universe fix it now. (shooterj2003)
- My '78 used to pop out of second gear when accelerating. I finally removed the trans and discovered a worn shifter fork, bad shimming and a cam with a worn spot. Repaired the cam, bought new forks and replaced all the gears and shafts with Andrews parts. Gearbox now shifts like butter and has no false neutrals. I shimmed everything to perfection and it was worth every penny to have good Andrews parts in there. (ericfreeman)
- The longer you run it, the more damage will be done. Tear it down before you tear up. (ryder rick)
- Nothing wrong with taking your time (inspecting/repairing). Treat it as if you are working on a precision instrument. Because it is! (doodah man)
- Nothing in this post is ill spirited. It's straight talk between men. My hope is to help you turn a corner so you can actually fix your trans and clutch.
No one on this board can fix your bike because we can't touch it. It takes hands to build machines. Your hands in this case. Hands are useless unless they are given accurate instructions. Those instructions dont come from the internet, they come from your head. All we can do is fill in the mental gaps. It's up to you to lay your own foundation. We can't do it for you. To that end, you need to slow down. Pictures of trans parts and pictures of naked women are equivalent. They are fun to see but posting them won't teach you how to service them. You personally gotta get between the sheets. If you are not sure what this or that parts are or how they are related, you're not sure because you havent studied it. You have to get the Factory Service and Parts Manuals and read them 1st. And read them as you work. All these parts have part numbers. From those part numbers, others will know what you are talking about. If you don't make yourself clear when asking questions, no one will take the time to unravel your cryptic posts. It is your bike and your trans job— the common denominator is you! If your trans came out in pieces——- it didn't have to if you did your research. You need to self educate. Some self-education will keep that trans in one pc. If you don't rectify your thought and work processes concerning mechanical systems, you will be forever lost in front of the workbench. The manual says- assm the trans on the bench and teach yourself how the power flows thru it, and how shifting from gear to gear is accomplished. Then it says no trans building can be accomplished without that done first. You NEED to do this. You also need to identify each part and KNOW where it goes on final assembly. Put your due diligence in on the workbench then on the keyboard. That is a foundation of getting that diligence into your driveline. The most important tool your going to need isn't in your toolbox. It's between your ears. (Dr Dick)
Removing / Installing the Transmission
Sub-Documents
Inspections
A good way to get familiar with the transmission and how it works (after removal from the case) is to put the assembled transmission on the bench or even better in a vice, spin the clutch gear and shift through the gears and watch how it all works together. Plus it's neat to watch. 1)
See the GEAR section below and click on Gear Dog Damage: Inspection and Causes in the sub documents for drawings and an animation of transmission gear action. That will also help understanding how the transmission works.
Gears
Sub-Documents
With some of these parts, finding imperfections and cracks requires more than just glancing at them for obvouos damage.
Thoroughly cleaning the parts/gears from oil and debris and close attention to detail will do you well.
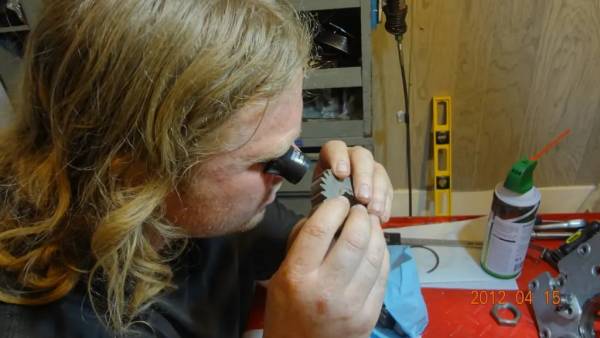
Inspect every tooth and dog on every gear with a magnifying glass or eye loupe. 2)
 3)
3)
Cracks
Any cracks found in a gear's teeth or body and the gear needs to be replaced.
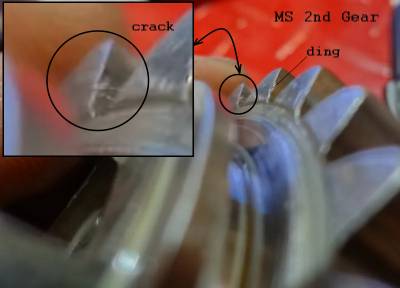
Some cracks are obvious and some are hard to see on a quick glance as shown below.
When finding damage to a gear's teeth, always check it's corresponding gear's teeth.
Replace both gears as a set when damage is found to avoid the old gear's teeth damaging the new gear's teeth.
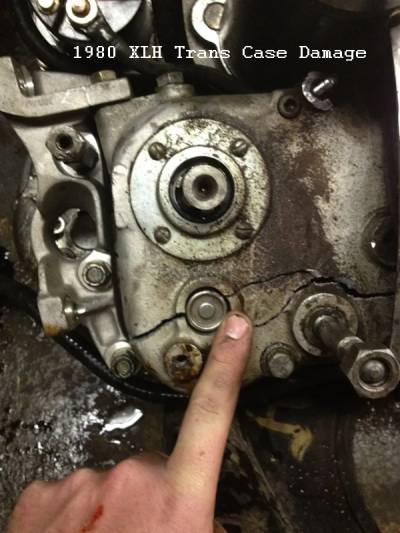
Worst case, a gear breaks and cracks your engine cases.
Here is a MS 2nd gear with a crack on the lower side of 1 tooth and dings on it's other gear teeth.
 4)
4)
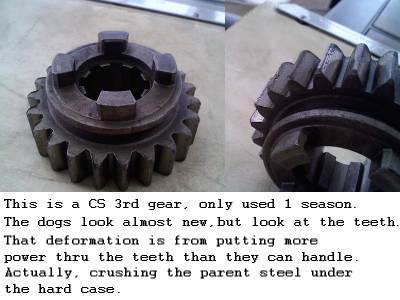
The dreaded exploding gears are OEM MS 3rd and CS 2nd (20T) gears: the other stock gears are up to stock use. 5)
The 20T gears on the MS and CS more or less transmit power at all times regardless of engagement. 6)
For anyone using OEM MS 3rd and/or CS 2nd gears manufactured after 1972; 7)
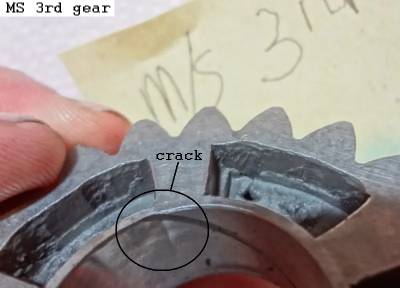
These gears have a habit of cracking on the ID were the cross section changes thickness.
Cleaning with some 2000 grit emery revealed the crack better in the Left pic below. 8)
If you look at them closely, you will see that the dog pockets are formed not machined. 9) They have sharp corners and some of the corners are adjacent to the root of the gear tooth. Those sharp corners and the thin material create stress risers that encourage cracking. In contrast, look at the pockets on the same Andrews gear, it is machined and the corners are round.
Teeth Wear
Repairs
In terms of repairs; the first thing you must make 100% sure of is that there is no damage whatsoever to the case boss. 12) This means you may need to dye penetrate it. Most common radiating cracks seem to appear at 7:30 and 4:30 with these types of breaks.
Also carefully examine the needle bearing in the CS boss in the case. NO rollers can be distorted or hang up. Carefully check it and make sure it moves freely. If you reuse the 4th MS (clutch) gear, make sure the needle there didn't take any unusual force and flat spot or distort.
Then, make sure both your shafts are straight and true. Make sure the counterbores are clean and not nicked if you put it between centers; or use v blocks on your lathe bed or surface plate. If they differ more than .001, get new shafts.
Then, go through your gear needs. Buy them one at a time if you need to. And, above all else, do not overlook anything. Do not rush.
When I assemble a transmission for one of these bikes (stroker, not stock) I spend a lot of time taking the transmission in and out until I am 100% happy with it. A lot of guys just shim and that's it. I prefer to observe how the gears interact on the bench and to set clearances to my preferences (ie more engagement of the dogs to hold under power). Others like less engagement so they get a buttery snick every time they hit the lever.
The point is that you can set these transmissions in many ways. You need to start with the FSM, but then put your thinking cap on and understand under what circumstances you may want more engagement (ie 2nd and 3rd gear roll ons) and where you may not need as much (1st gear). As you develop a better intuitive understanding of what I'm laying down – you'll get an idea of how to set it to suit how you're riding the bike and what to expect.
And yes, strokers can destroy parts without trying. You don't have to beat on it to break it. There's massive amounts of torque available in a stroker from idle on up. If you can wheel stand the bike with a clutch dump in 2nd (you can!) then you can get an idea of just how much force the parts have to deal with. It gets way, way worse the bigger you go. Strokers can be an expensive addiction but also a very sweet ride once you sort this stuff.
Replacing Gears
Dr Dick's rust covered opinion on what the order of Andrews upgrade should be if you got to do it bit by bit:
The first 3 are way more important than the last. 13)
- Mainshaft 3rd
- Countershaft 2nd
- Countershaft 3rd
- Mainshaft 2nd
- Clutch Gear
- Mainshaft
- Countershaft
- Mainshaft 1st
- Countershaft Drive
- Countershaft 1st
Shifter
Sub Documents
Transmission Case
Sub-Documents
The exploded case below was originally believed to be due to the chain coming off, locking the transmission. 14)
Upon further inspection of the gears, countershaft low gear had several chips missing from the teeth.
And sometimes 2nd or 3rd gears split and the pieces get wedged between other gears, forcing the two shafts apart (and cracking the case). 15)
Access Cover (trapdoor)
Sub-Documents
Make sure the trough in the roof of the trans case that leads oil to the bearing isn't compromised. 16)
Another one-inna-million occurrence, but if you are the one, it's unpleasant.

