Table of Contents
This is an old revision of the document!

REF: Tools - 148
Cylinder Leak-Down Test
When to Perform a Leak-Down Test
- A good way to keep track of the progression in engine diagnostics is to take this pressure reading when the engine is healthy.
Then, when you take it later as the engine life is used up, you would notice a lower pressure on the second gauge, indicating an increase in leakage. 1) - When you notice the engine performance dropping off.
- After taking a cylinder compression test showing low compression.
Using a Differential Pressure Gauge
This is basically a flow meter showing the differential pressure between the two gauges.
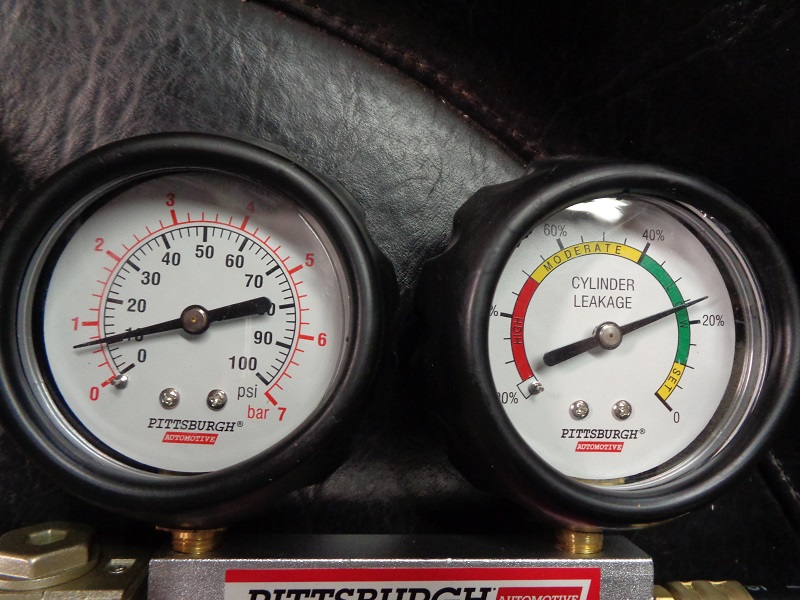
Simply put, the left gauge measures incoming pressure from the air tank and the right gauge measures the pressure lost thru leakage in the cylinder.
- When using the differential pressure gauge set, 2)
- The first gauge shows the regulated pressure.
- Then, the air passes thru an orifice (a smaller hole inline between the two gauges to restrict the flow between them) to the second gauge.
- The air then leaves the second gauge to the cylinder via the spark plug adapter.
- This pressure (end to end) would ideally be the same if there is no cylinder, valve or head gasket leakage.
Setting up the Gauge
- Before attaching the gauge to an air supply: Turn the regulator all the way to the left (off).
Failure to do so can result in damage to the gauge(s).
- Most gauges are subject to damage from dropping / abuse.
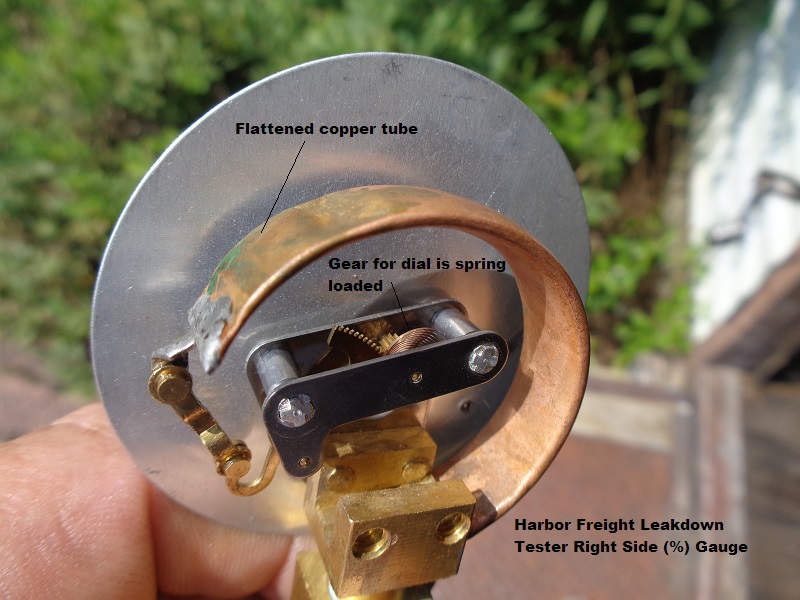
- The pic below demonstrates how easy this one from Harbor Freight can get out of calibration.
The face dial is driven by air pressure thru a flattened copper tube with down-weight from a long armed gear that actuates a spring loaded mechanism to the dial.
The copper tube lifts up on the end under pressure while actuating the gear arm.
One good hit and the weight can ping the spring out of calibration.
Driving the air pressure past zero and enough to ping against the dial stop can also damage the spring.
The gauge will still work, but the dial will stop at various unusable locations.
 |
- Slowly, turn the regulator valve to the right to increase the pressure thru the tool.
- Stop turning the valve when the right gauge reaches '0'.
The regulator gives air to both gauges at the same time.
Both gauges will increase together. However, these two gauges are not calibrated the same.
The right gauge will increase all the way to the zero mark before the left gains much pressure.
With this particular tool, the left gauge will be near 1 bar (14.5 psi) although it may vary slightly.
 |  |  |
- Install the short air hose via a 12mm adapter into the spark plug hole.
Now, your ready to start the test.
Test the Cylinder for Leaks
During the leakdown test, when you apply the air pressure to the cylinder, the piston will be driven downward thereby turning the rear wheel. So secure the wheel by applying brakes or some other method or it will just turn over the engine and open the exhaust valve. 3)
- Note the pressure reading on the left gauge during set-up by memory or by making a mark or with a piece of tape.
You'll need to adjust the pressure later back to this point. - Attach the engine side hose to the gauge and watch the readings.
Both gauges will have lower readings due to the tool filling up the cylinder.
The closer the piston is to TDC, the less area to fill and the gauge will rest at it's static residual pressure on the gauges.
Likewise, the lower the piston, the more volume of air is needed to fill the chamber.
Then, more pressure will drop but it will catch back up when the cylinder is pressurized and you'll see the gauges bounce back up to a static number.
 |  |
- Now increase the pressure. Turn the regulator valve up to get the pressure on the left gauge back to the same point as before it was attached to the engine side hose.
(in this case, near 1 bar) - Note the right gauge reading: This gauge should now show a lower reading than it did when the tool was set up:
| Before testing | After testing |
|  |
| This test was done on a 1250 engine with less than 1,000 miles | |
Interpreting the Readings
Hunting Down the Source of a Leak
A mechanics stethoscope [with the probe removed for this test] makes a good listening device, as does a length of oil / gas line hose.
There will always be some audible leakage, especially past the rings and even on a healthy engine.
Greater leakage results in a sound of lower pitch. 4)
- Listen at the exhaust pipe or exhaust port on the head.
- Excessive hissing here indicates the respective exhaust valve is not sealing.
- Listen at the A/C intake or intake port of the head.
- Excessive hissing here indicates that the intake valve is not sealing.
- Listen at the timing plug hole with the plug removed.
- Excessive hissing here indicates the rings are not sealing.
- Listen around the cylinder to head connection.
- Excessive hissing here indicates the respective head gasket is not sealing.