Table of Contents

EVO: Suspension - Sub-02B
XL1200T Rear Shock(s)
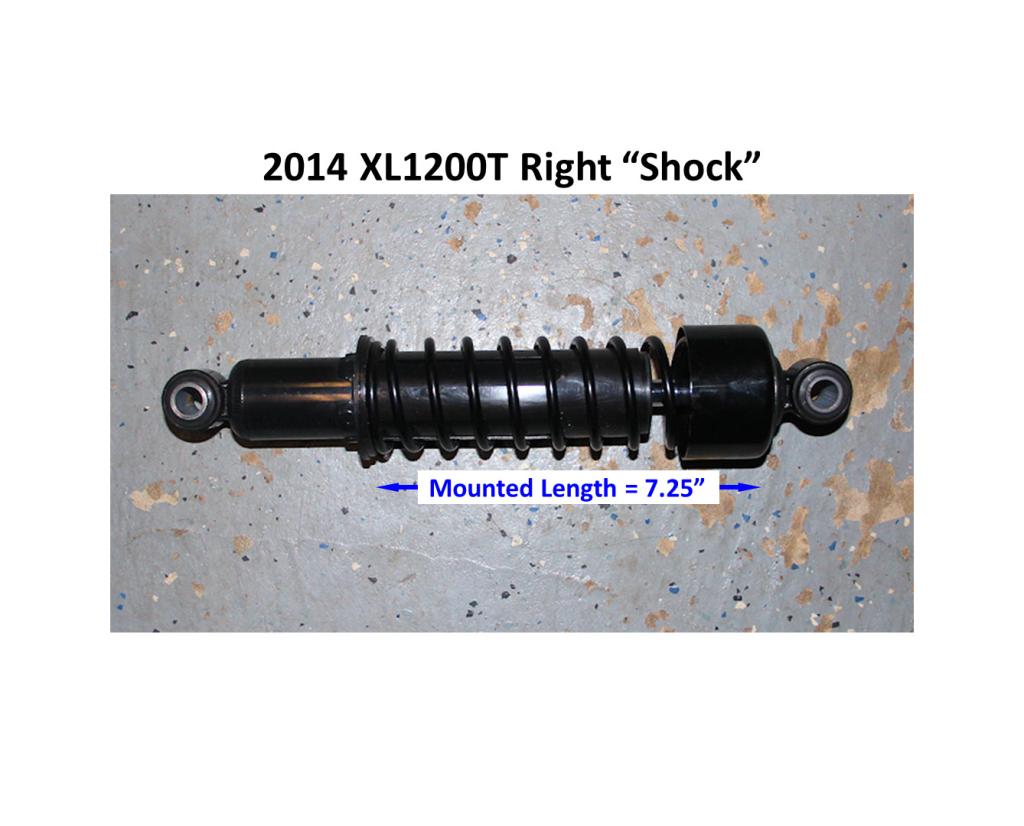
The left shock has an adjustment wheel. However, the right shock has been removed from the assembly. It's basically just a strut inside a spring to create a mono-shock type rear suspension. 1) It seems a it was a cheap way to take a dual-shock swingarm and give it a dial preload adjuster in essence, making it a mono-shock set-up but with the second shock body/spring (or strut) to continue to hold the dual-shock architecture. 2)
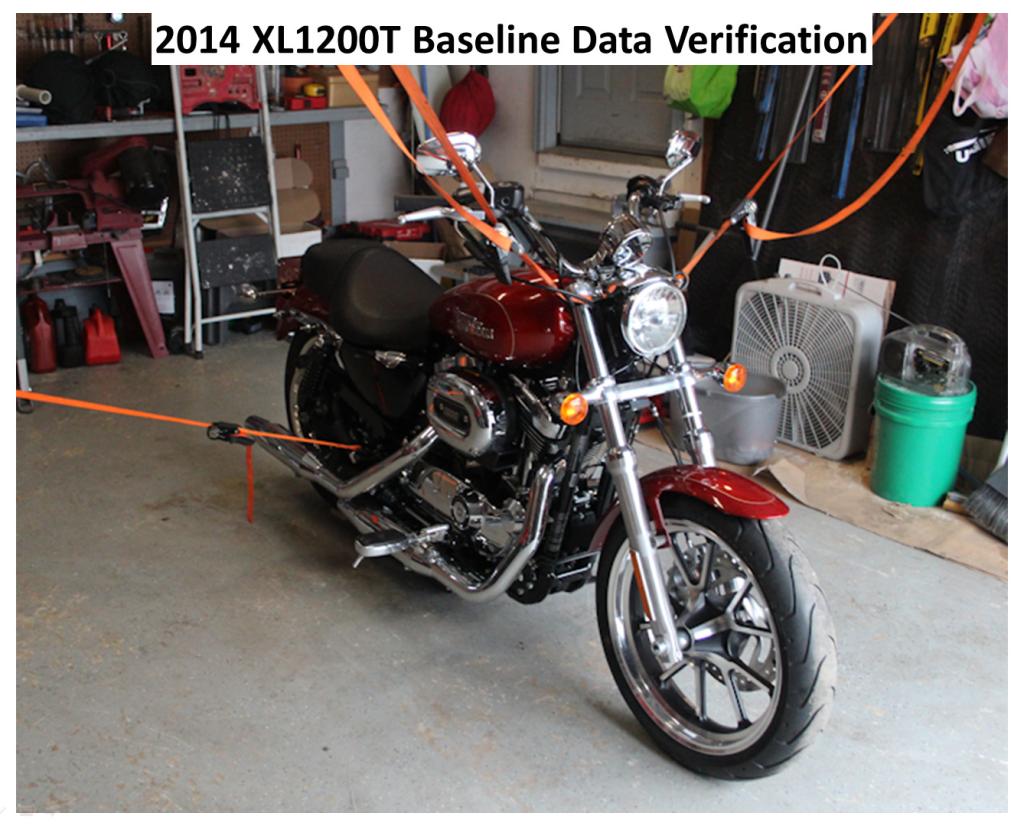
2014 XL1200T - Checking Rear Suspension, Measurements & Modifications
Article by spacetiger of the XLFORUM:3)
Click on a pic to enlarge:
- I'm not posting all this stuff, as I sort out my suspension, so you will do the same thing I am doing. It is my hope that some of the things I post can help some of you as you sort out your rides. There are several things I will do when I sort out my suspension that is different from what others have done, so I try to document the finer aspects of what I'm doing so you can understand what I'm trying to do and why.
- All the work is to calibrate everything, so when I do ride, I know how to interpret what I'm sensing. Then I will know what I need to change. In essence, I can dial in my ride much faster.
- The right rear shock has NO damping; its just a tube that looks like a shock. The spring does contribute some, but it's about 1/5th the capacity of the left spring. The bike is almost a mono-shock set up. I bet if I pulled the swing arm, I'd find it weighs a lot more than the custom swing arm. 4)
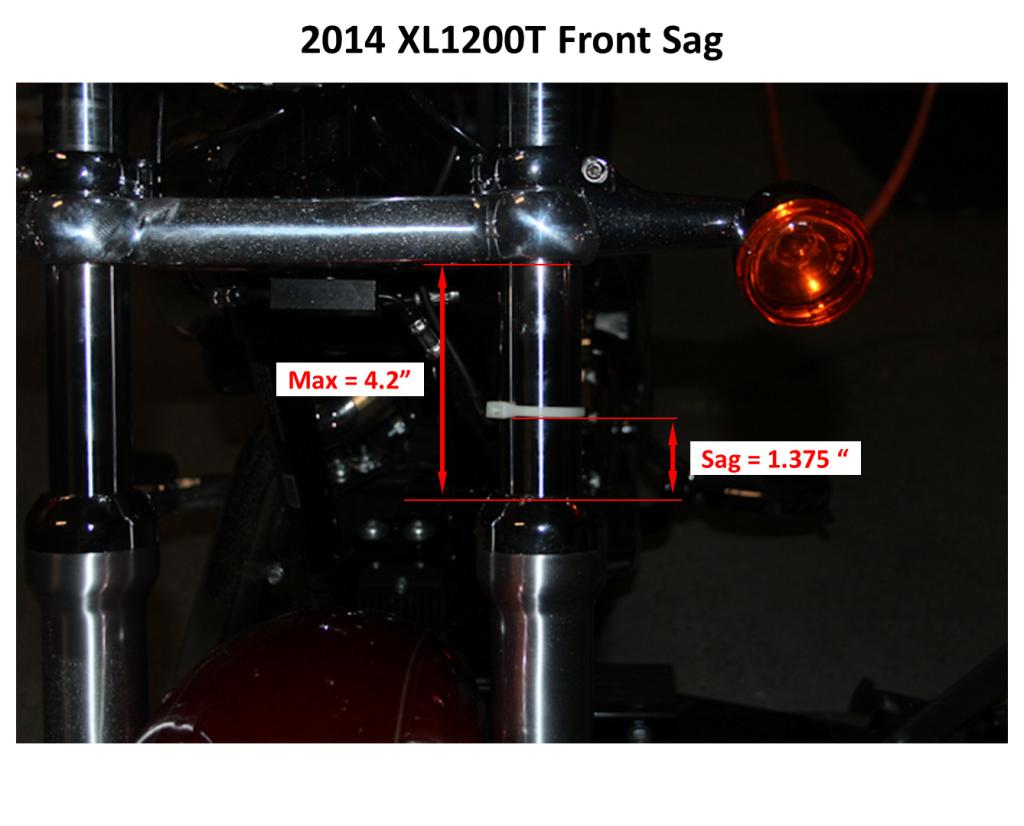
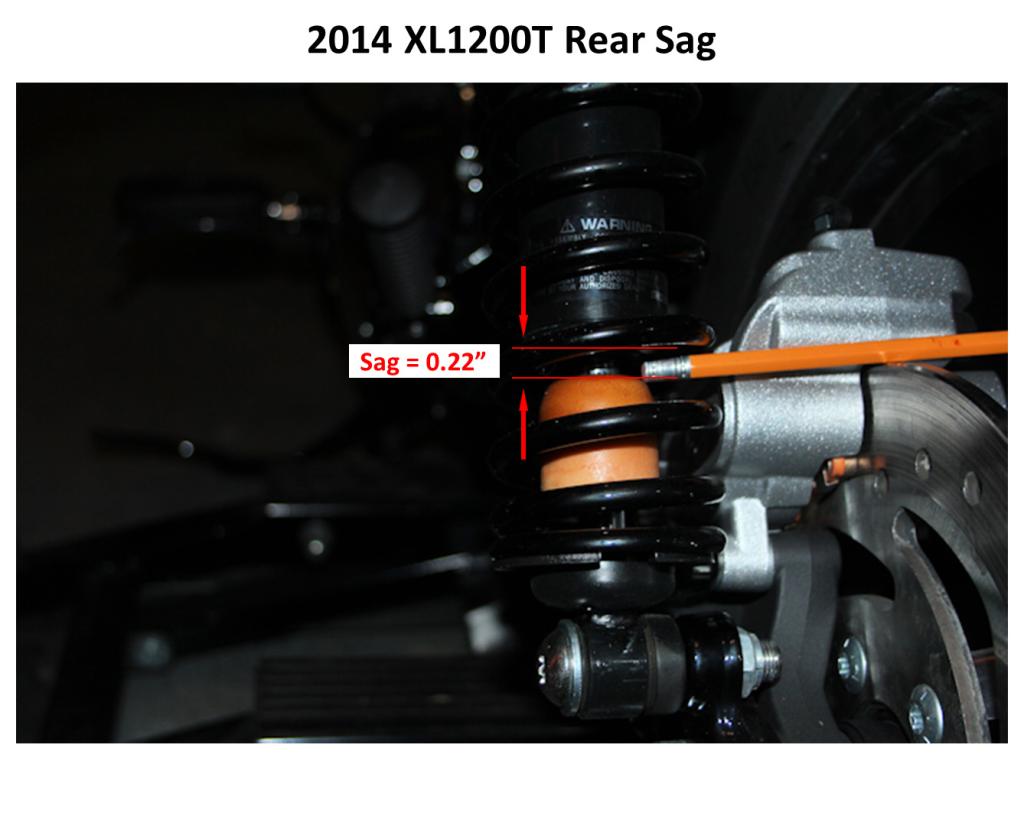
- The T bike has little suspension travel; front and rear. I cannot find what the travel - I looked on line and through the manual. I will have to determine it via testing. The front is likely to be less than 4“ and the rear is only 1.25” depending on which one bottoms out first. The swing arm may move more than 1.06“ or 1.25”, but I will not know until tested.
- Below is my “field” measurement scheme to help dial in the suspension.
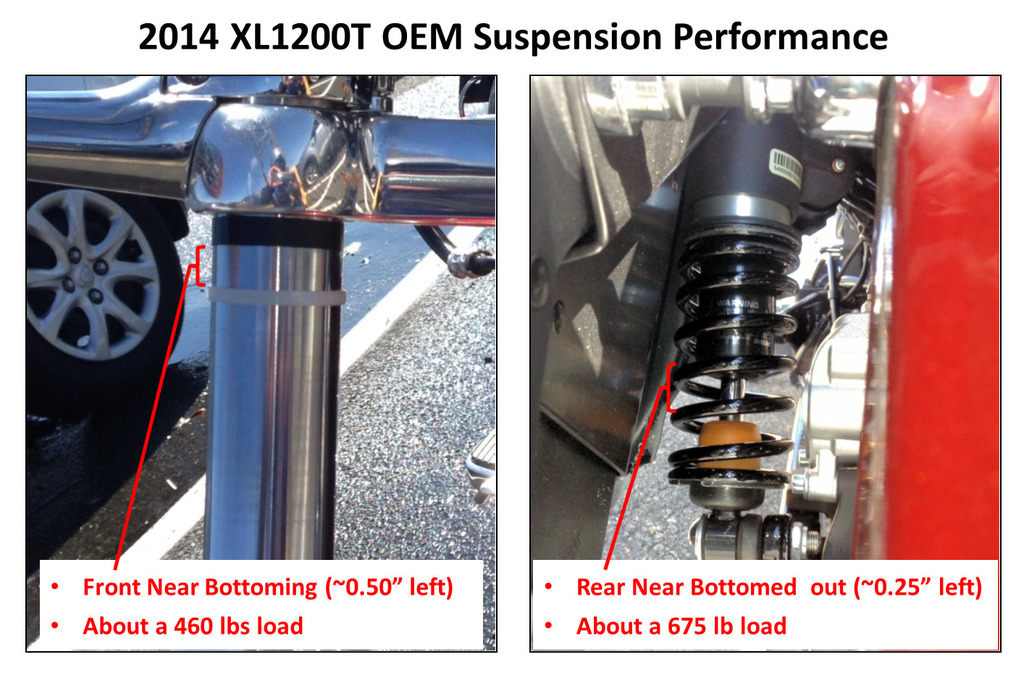 | 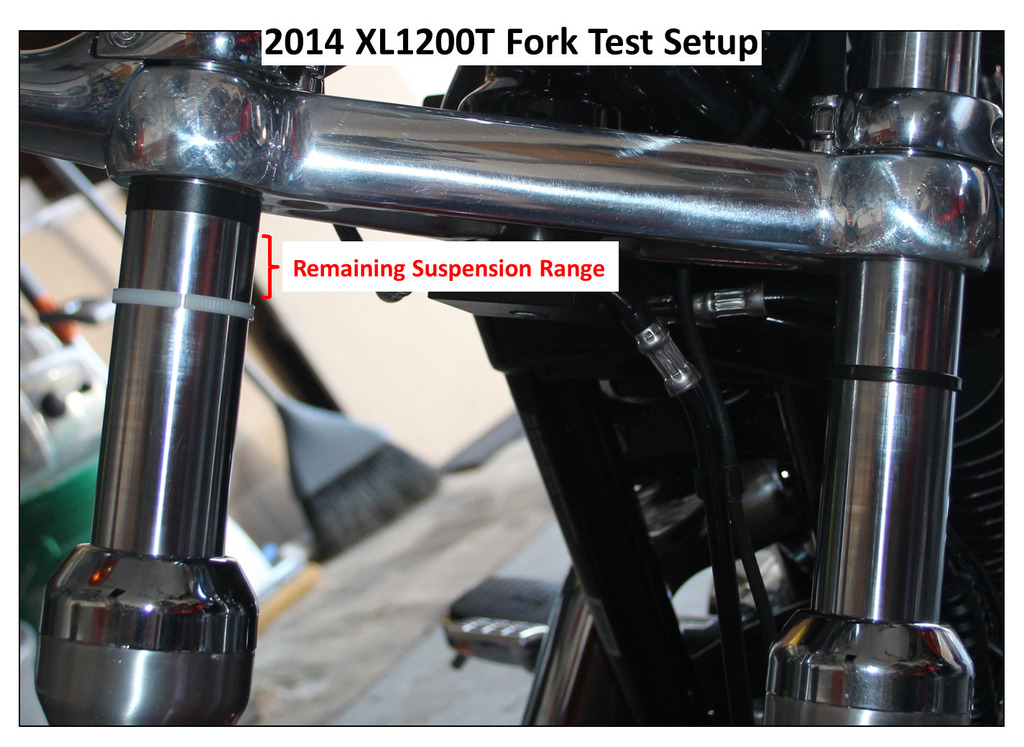 | 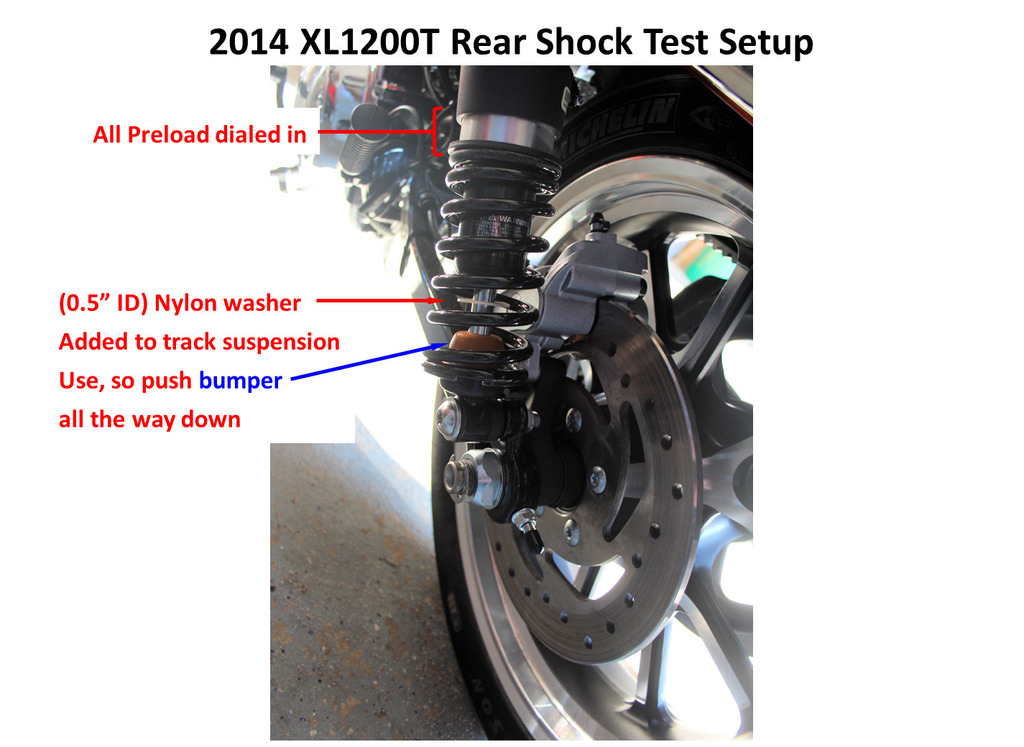 |
| Although I didn't really push the bike (I did scrape a few times), the suspension is near bottoming out 6) | On the front I have a zip tie on each fork tube. On the right fork tube there is a strip of black electrical tape just above the zip tie. The bottom edge of the tape denotes the max travel possible of the fork lower. So, I can get off and see how much of the suspension travel is left by eyeballing the distance between the zip tie and the bottom edge of the electrical tape. I reset the white zip tie every ride so I can see what is the max use every ride. 7) | I use the rubber bumper to track the rear but for the sportster, it is hard to get in there every ride and dig out the stopper so I've added a 0.5“ ID nylon washer to the shock shaft after I've pushed the stopper all the way down. The nylon washer is easy to move and stays in place like the zip tie in front. I carry a Popsicle stick with some measurements on it to measure the front or rear and to push the washer back up on the shock. 8) |
With summaries and charts 9) 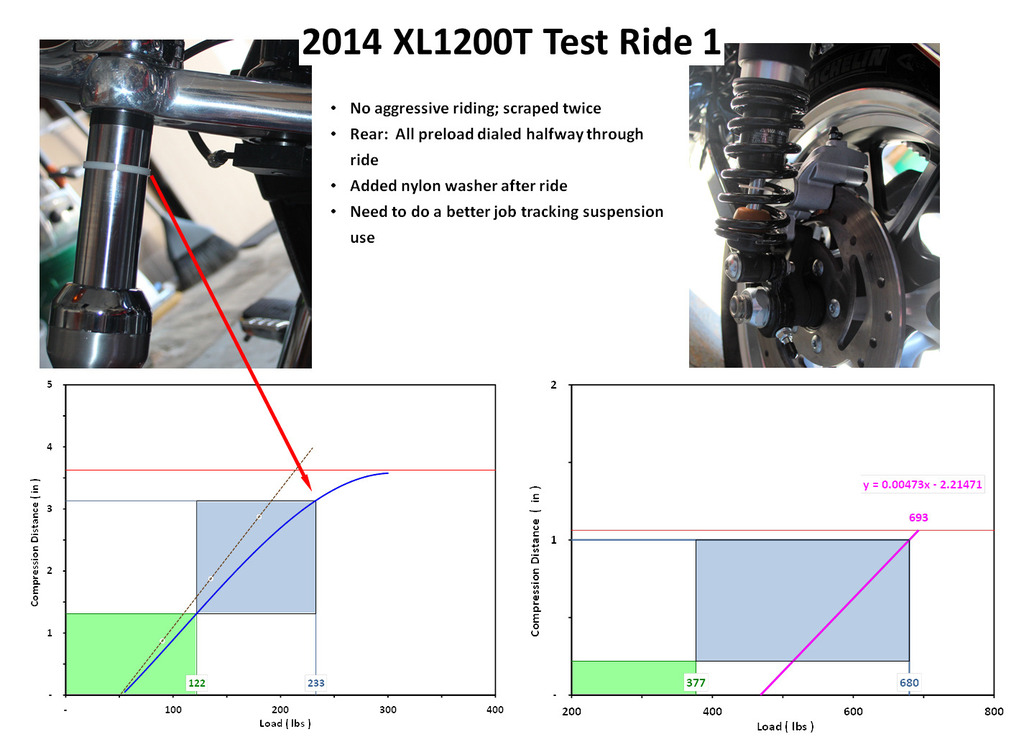
- To quote XLXR, “My general recommendation is to set up the suspension so it gently bottoms out over the biggest bump you would ever hit. This ensures you are using all available suspension travel.” 10)
- Total travel used: 11)
- Front: about 3.13 out of 3.63; I measured about 0.5” left.
- Rear: about 1.0 out of 1.25; I measured about 0.25 left.
- All smooth riding with one good stop (but not near enough to evoke abs). I leaned over after that stop to see how much I used on the front. That was the time I pushed the zip tie as shown in the pic. I accelerated and took some turns to find the pegs, found them twice.
- The ride quality was stiff, not very fluid. I think I need to sort out the springs first, then the damping. I still think I'm going to prefer a little compression damping with most of it on the rebound side for both the front and rear. With so little travel front and rear, they keep things stiff to manage the peak load. On a side note I found the cockpit a bit cramped and I'm 5' 11“ with 31” inseam. I have a set of forward controls, so I think that should help. I also have a Corbin saddle coming as well.
- These shocks might work better for light weight riders in 140 lb - 160] range maybe? That may be the intended buyer.
Shocks
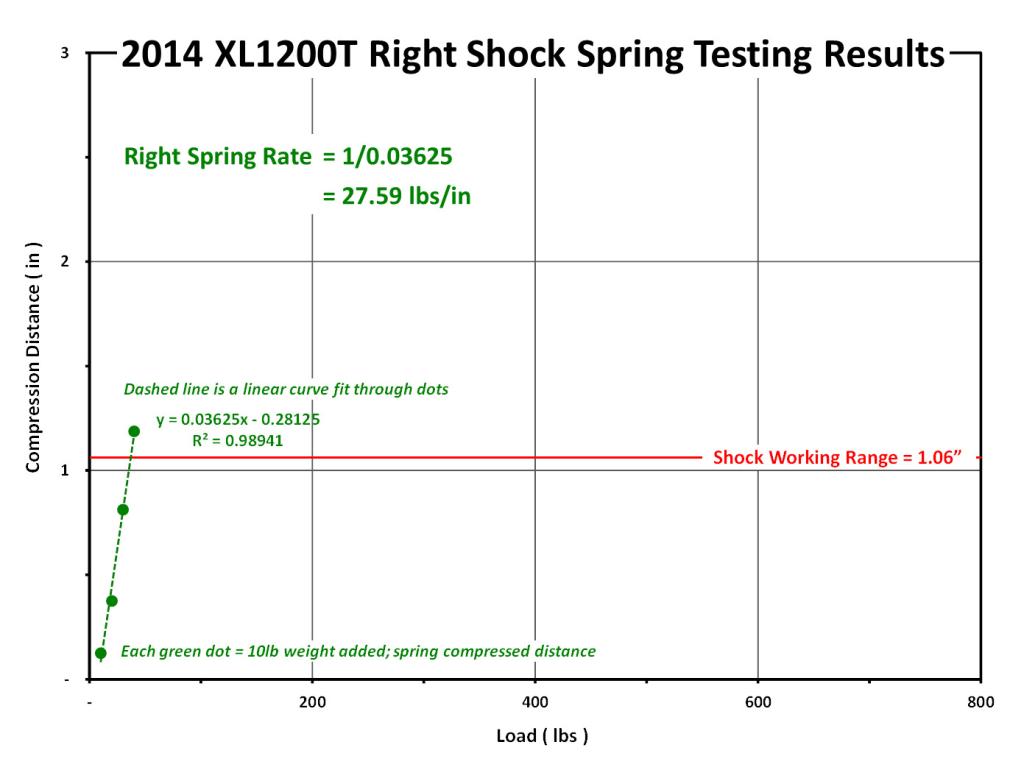 | 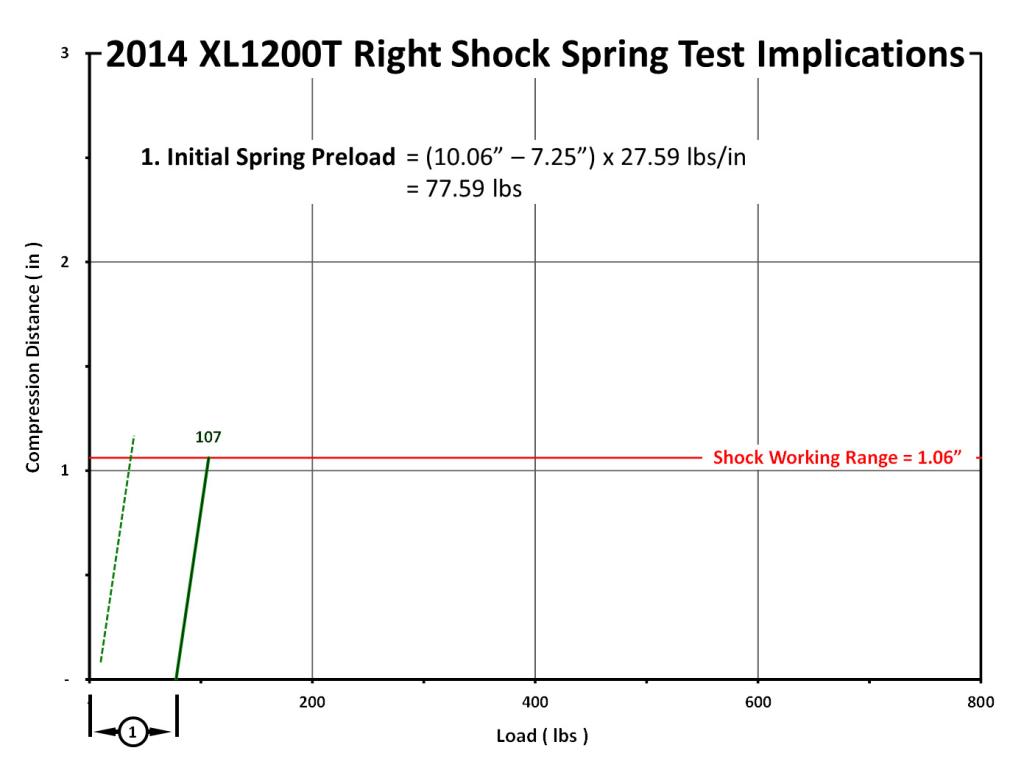 | 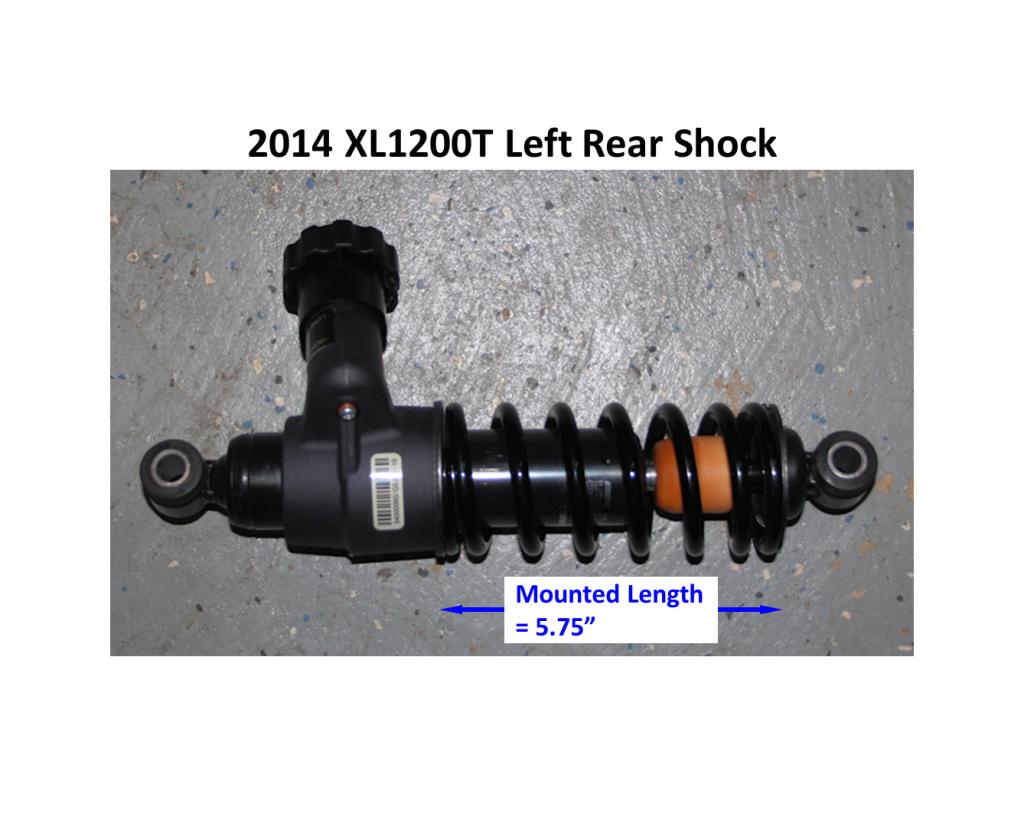 |
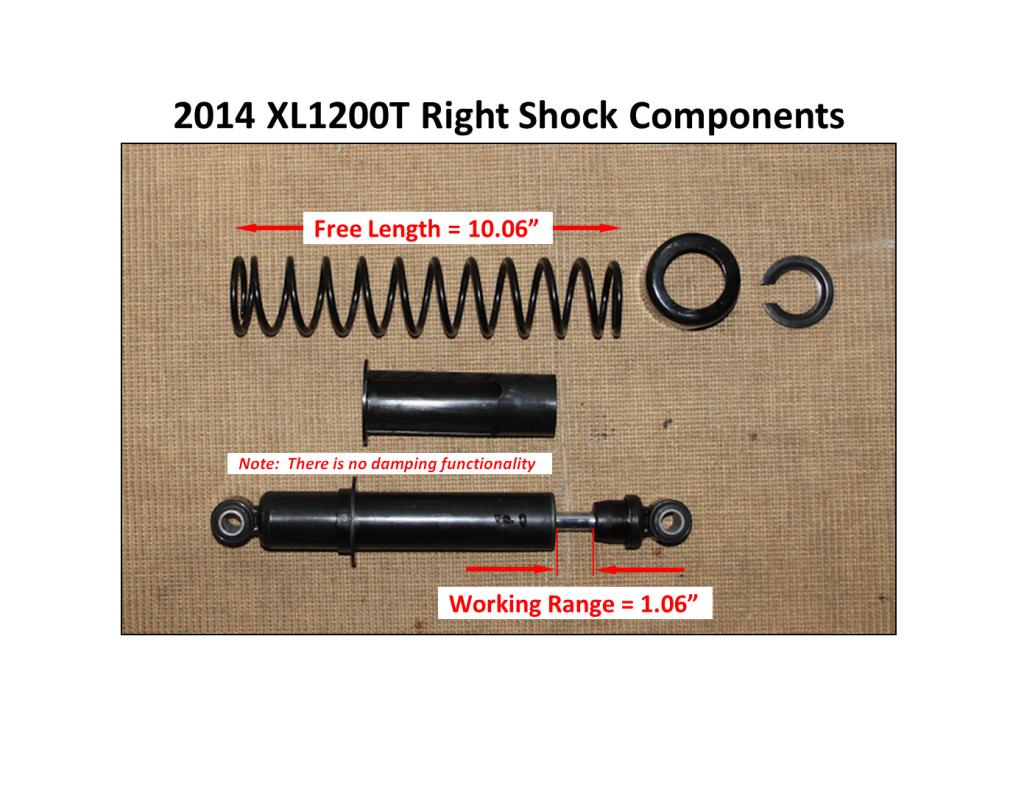
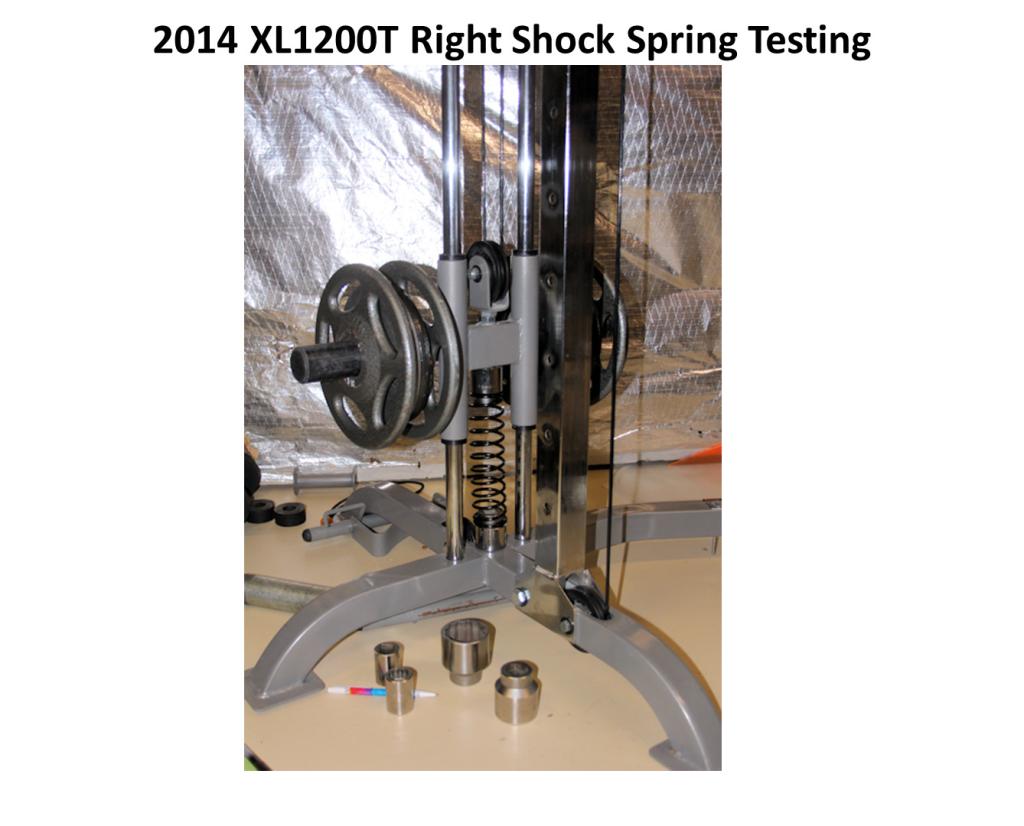
| Test results18) → | Right Shock Capacity19) → | Left Rear shock, the workhorse of the rear suspension20) → |
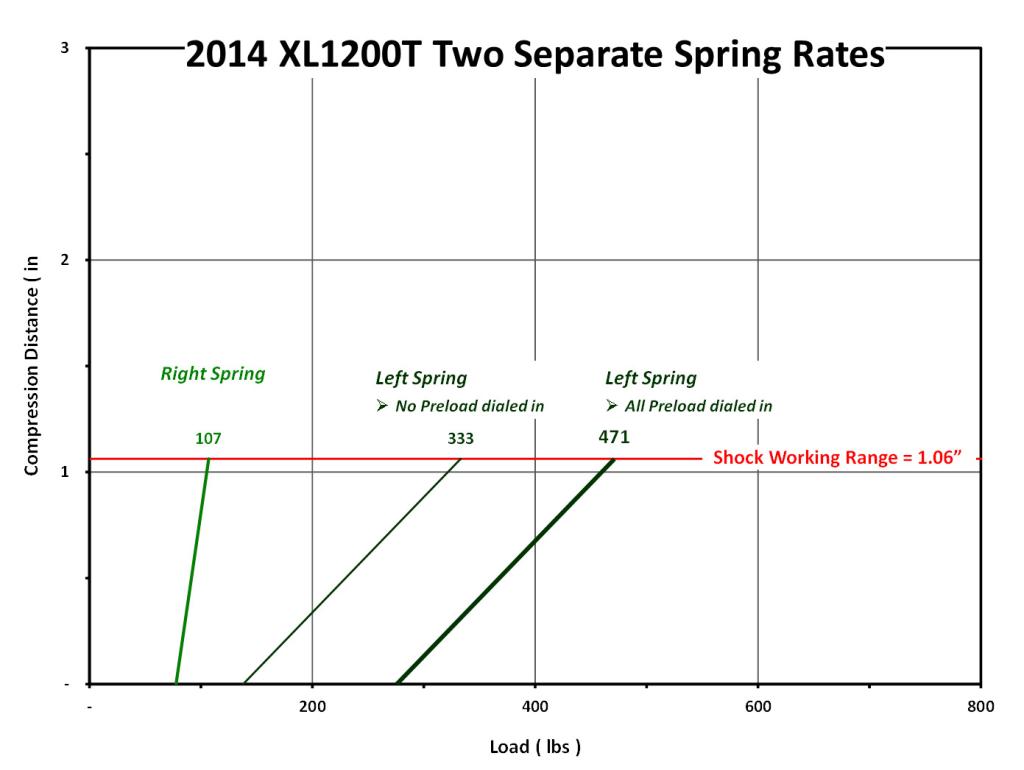
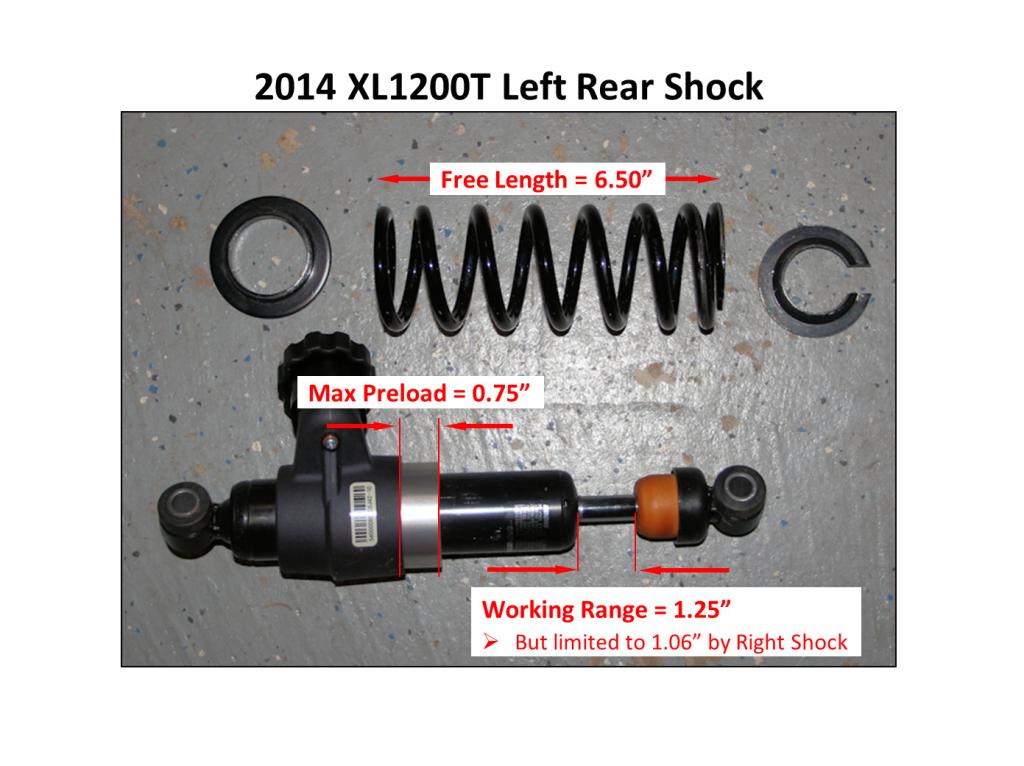 | 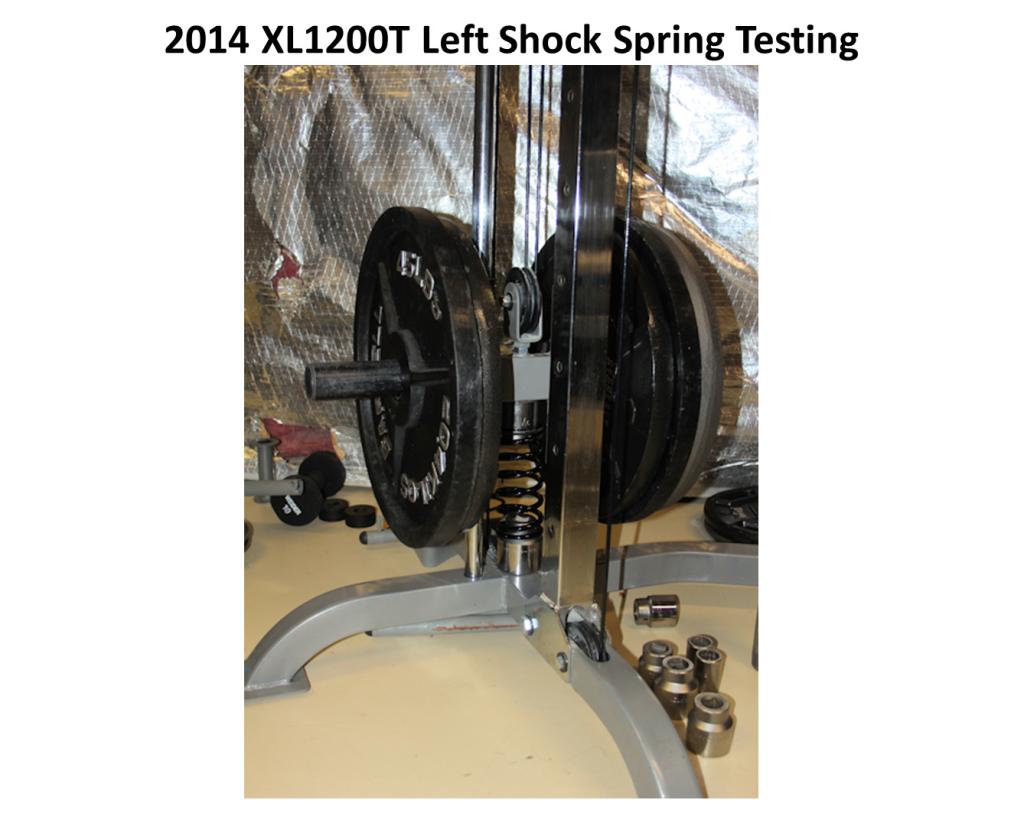 | 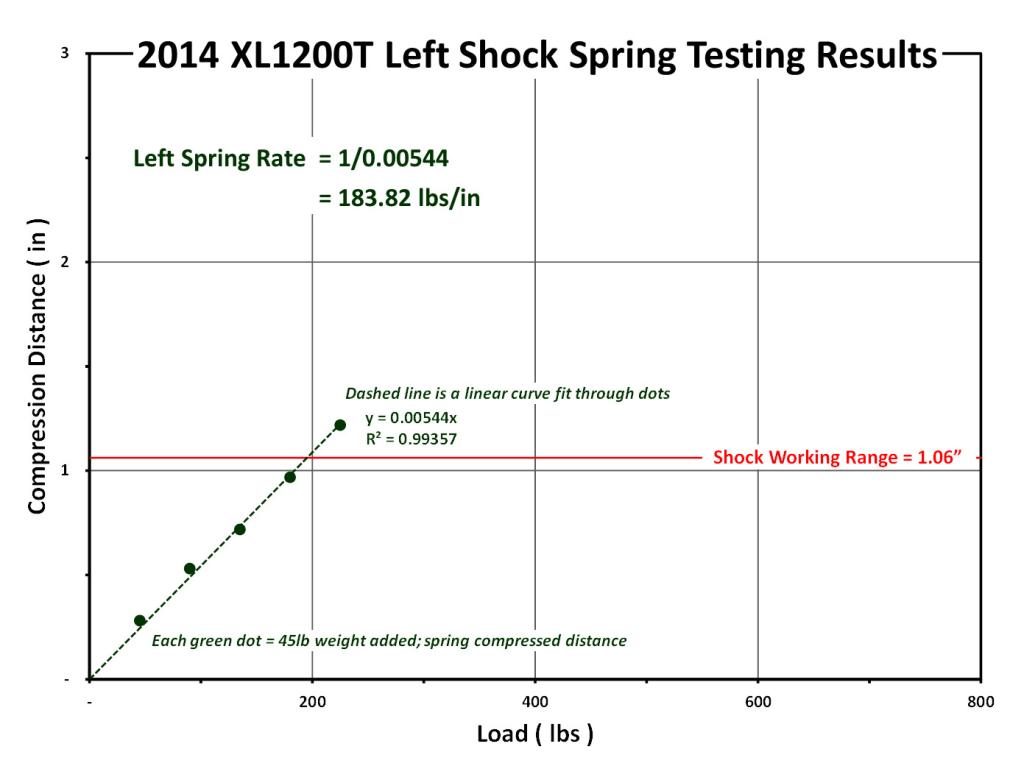 |
| Left Shock disassembled21) → | Left Spring testing: I just load a 45lb weight, then measure spring length; then repeat the process. Pic shows five 45 lb plates compressing the spring enough to exceed the working range of the shock.22) → | Left Spring test results23) → |
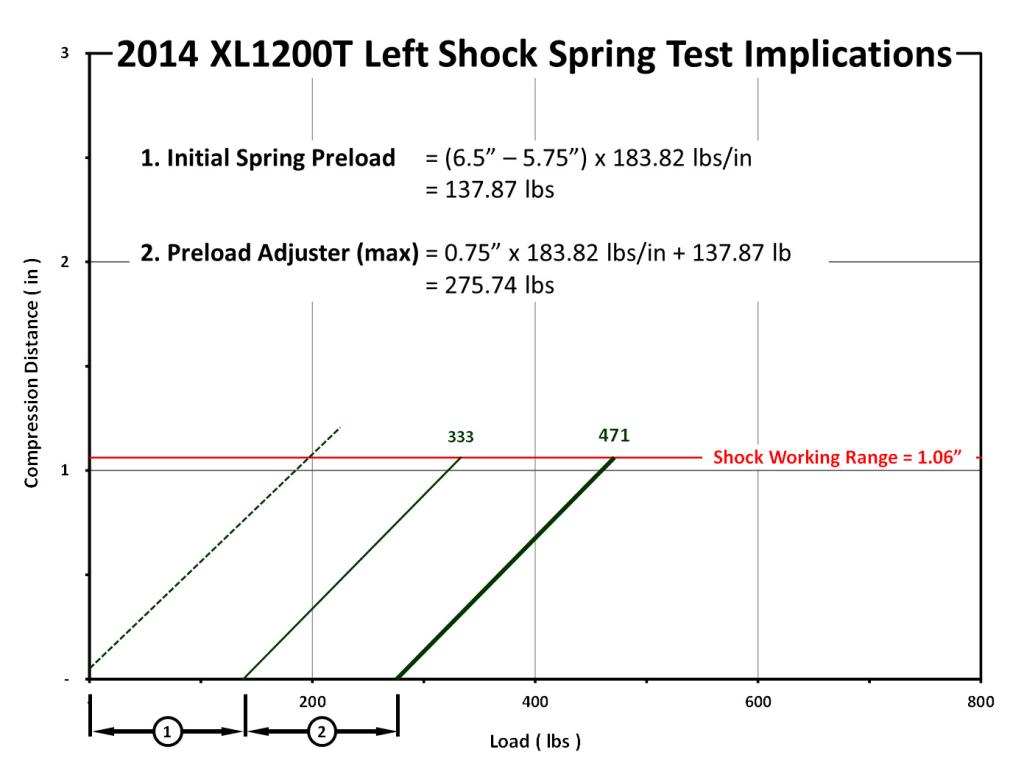 |  | 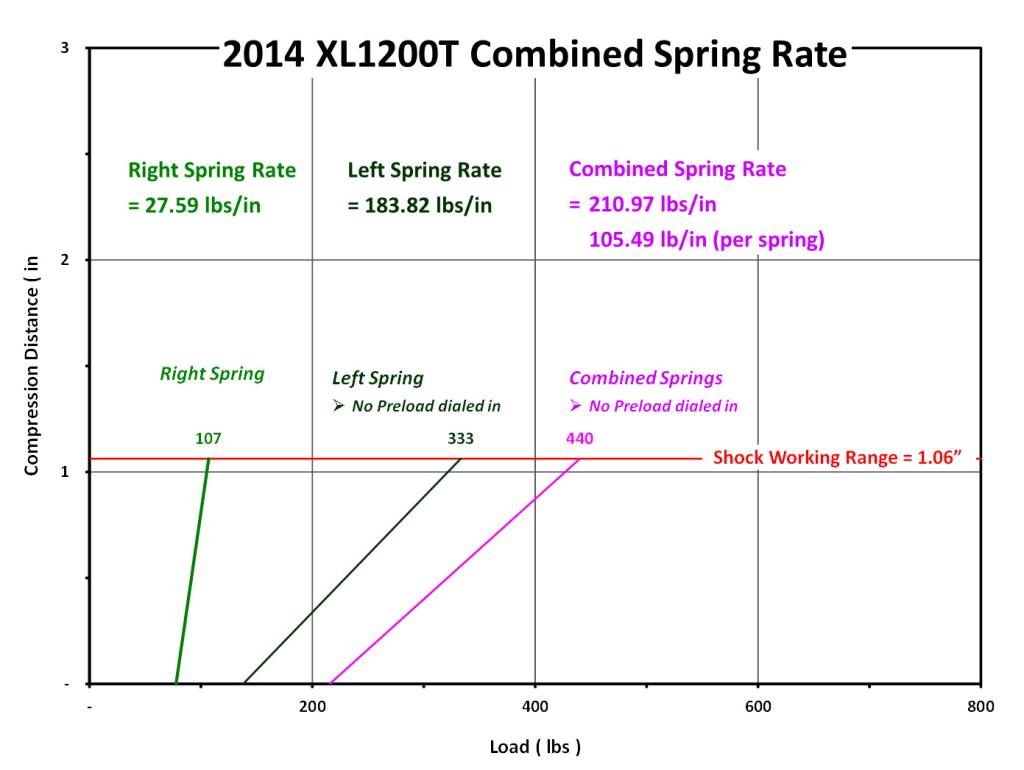 |
| Left Spring test result Implications24) → | Here, you can see the left and right are 2 different springs25) → | Determining the Combined Spring Rate (Magenta line); to get the combined spring rate, you can add them and get the Magenta line. This is the total rear spring rate with no preload dialed in. You can see the max weight it can carry before bottoming out is 439 lbs.26) → |
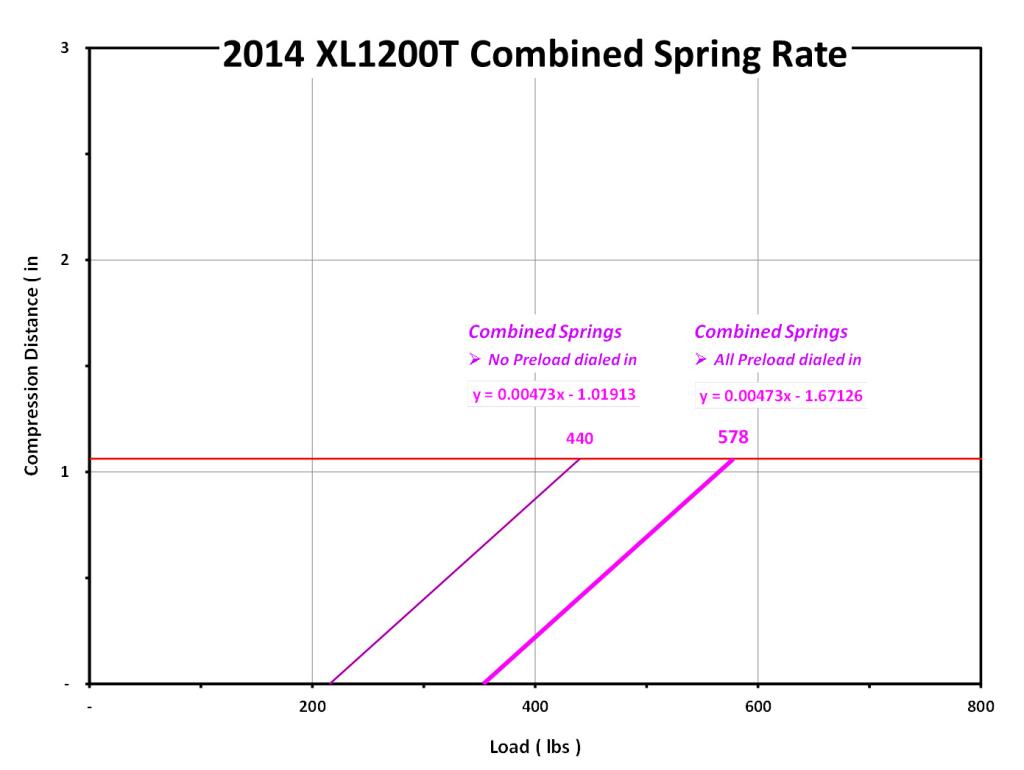 | 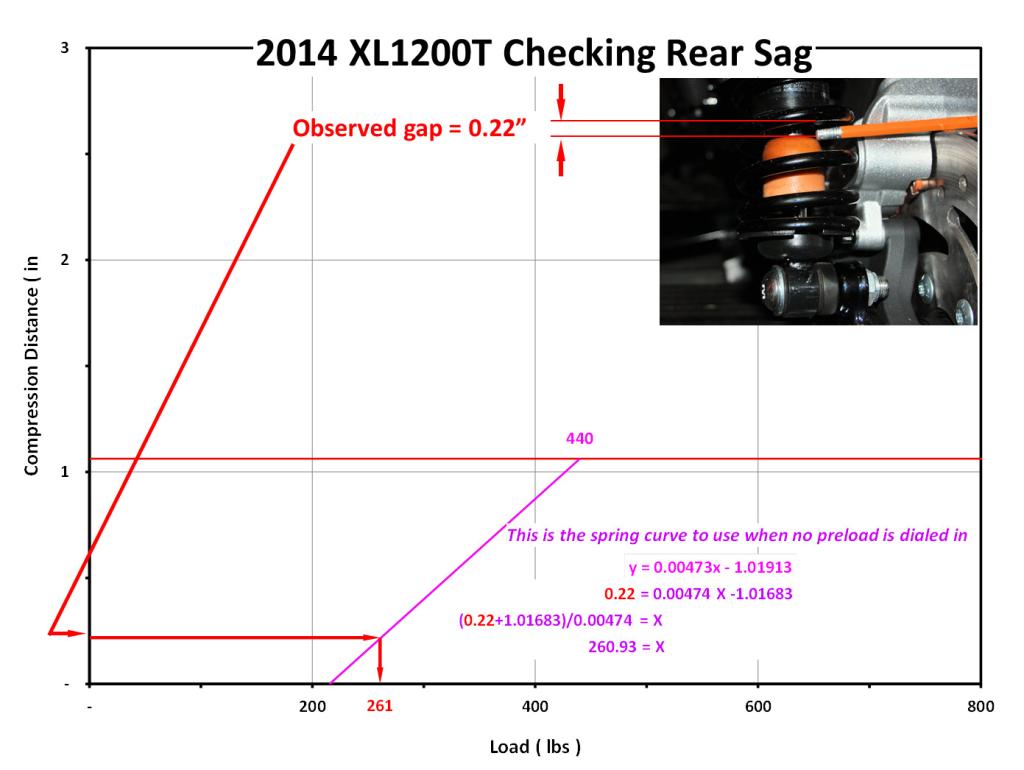 | 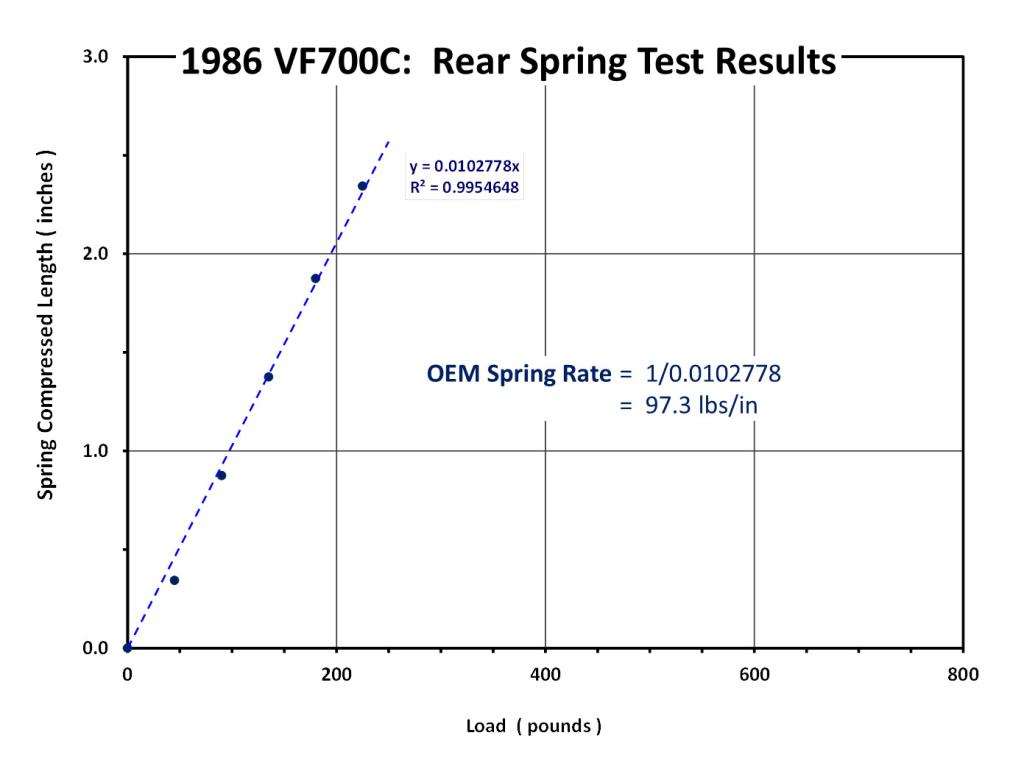 |
| This is the total rear spring rate with no and ALL preload dialed in. You can see the max weight both springs can carry before bottoming out is 577 lbs.27) → | Now, I can measure the gap between the rubber bumper on the left shock to see how far away it is from the shock body when I was checking rear sag. Knowing this distance + having calibrated the rear springs, I can determine the sag weight load through the spring.28) → | I am certain I will need a stronger spring. The oem setup has a small working range (1.06“) and low total capacity (577 lbs). Here is the test results of a different spring from a 1986 Honda VF700C [Showa] shock. It checks out at 97.3 lbs/in.29) → |
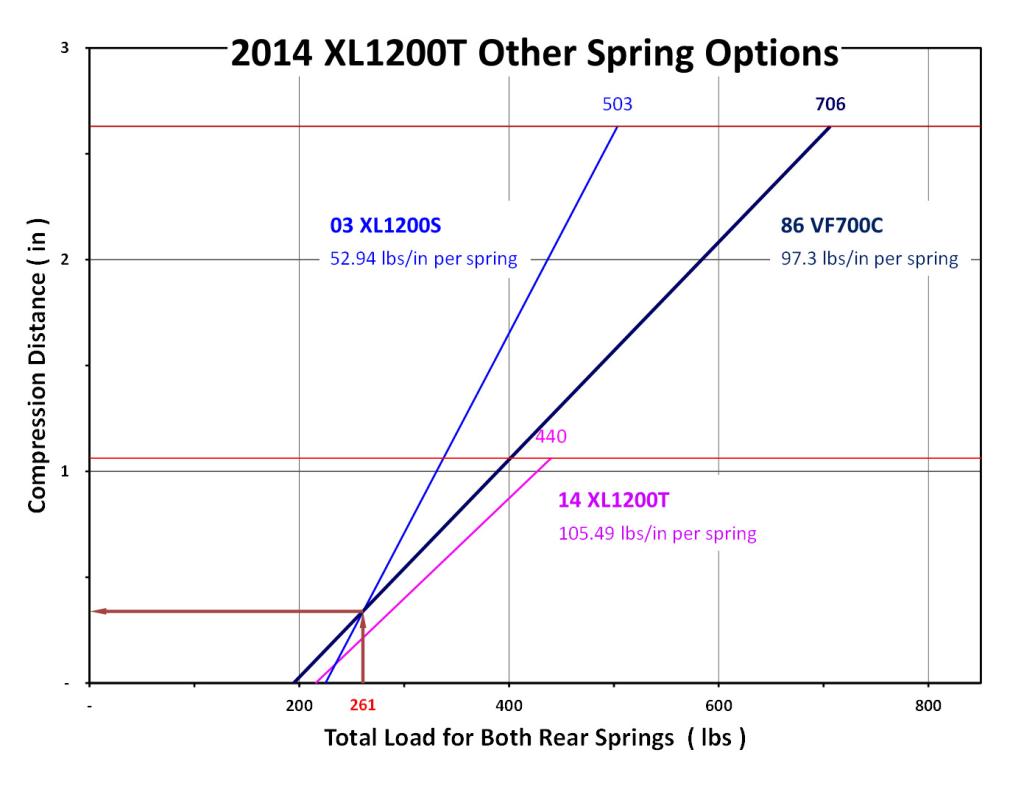 | 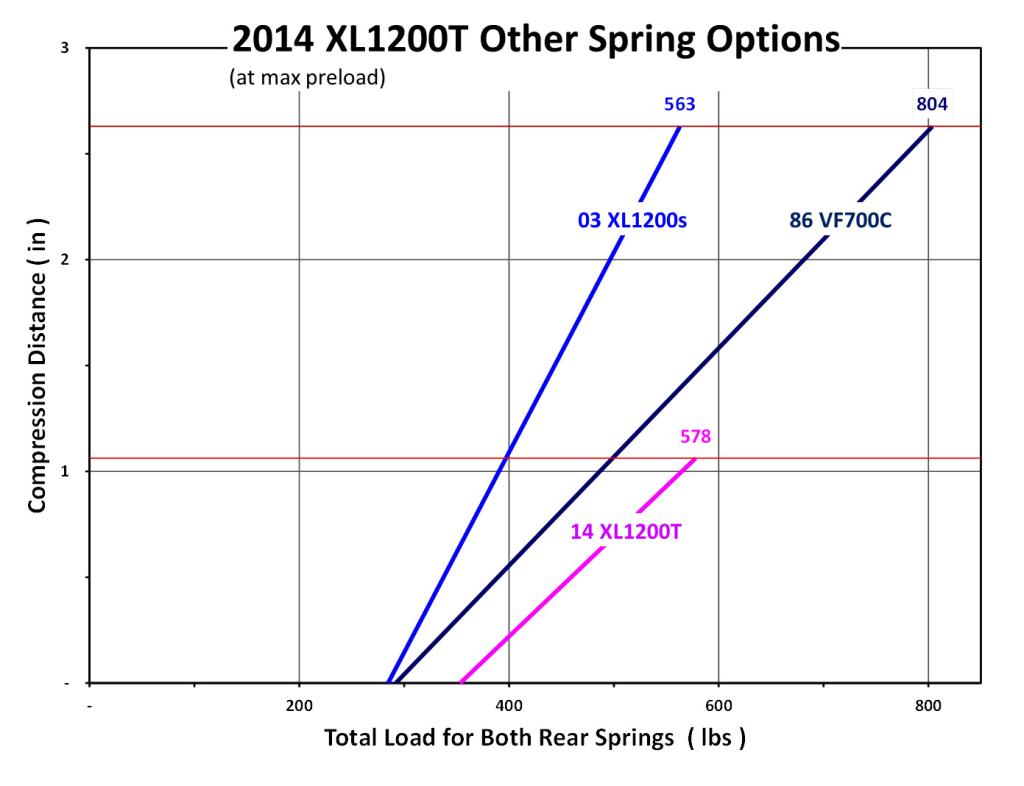 |
| This a pic of 3 different springs; the 2014 XL1200T oem setup, 2003 XL1200R, and the 1986 VF700C spring. The VF700C spring would be mounted on the XL1200R shock and add considerable more top end performance over both the XL springs. This pic shows the comparison with no extra preload dialed in.30) → | This is a another comparison with max preload. Still a great top end performance gain + the spring rate is very close to the OEM 2014 rate.31) ✔ |
- I got the bike back up on the straps and swapped out the rear shocks to the XL1200S shocks without springs. The intent of this test is to:
- Map out the relationship between shock compression and rear axle movement.
- See what clearance issues I might have. 32)
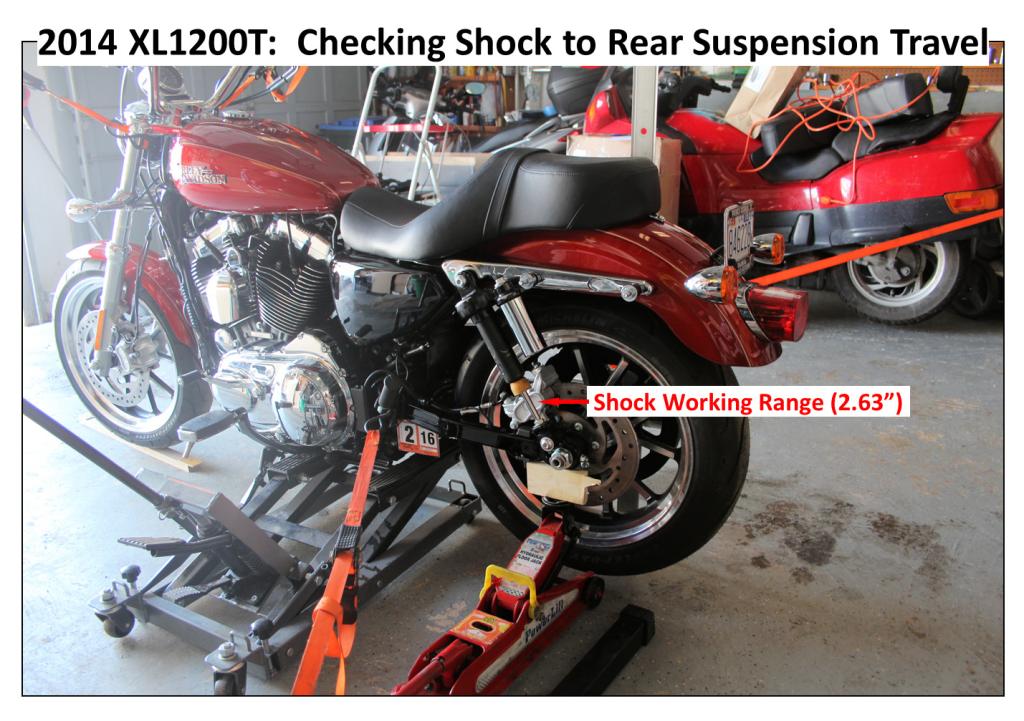 | 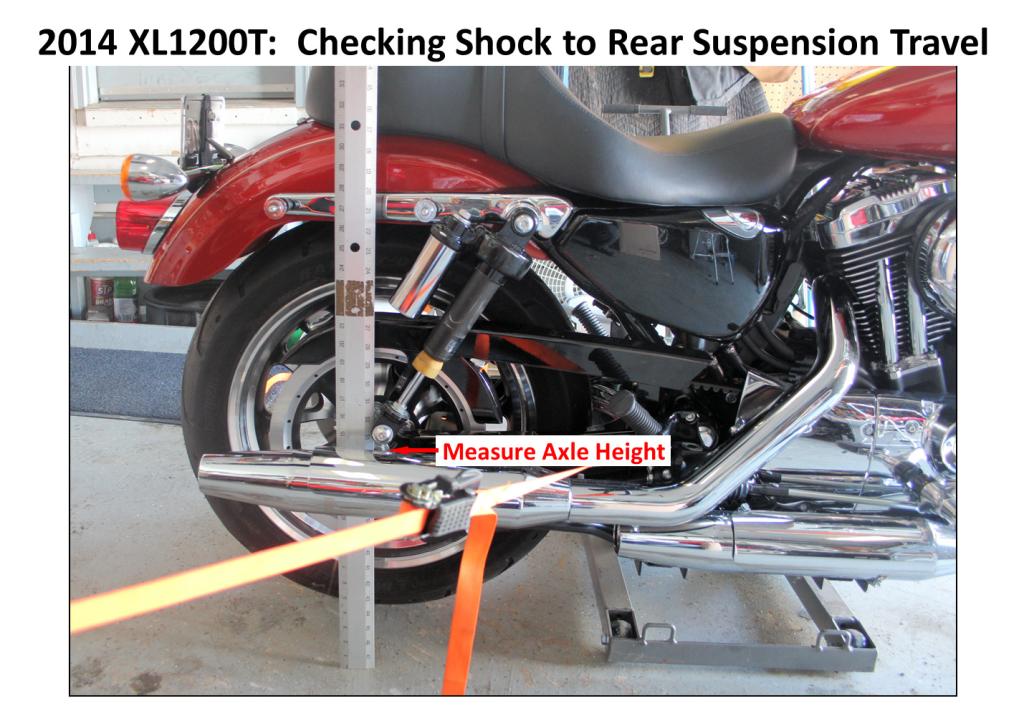 | 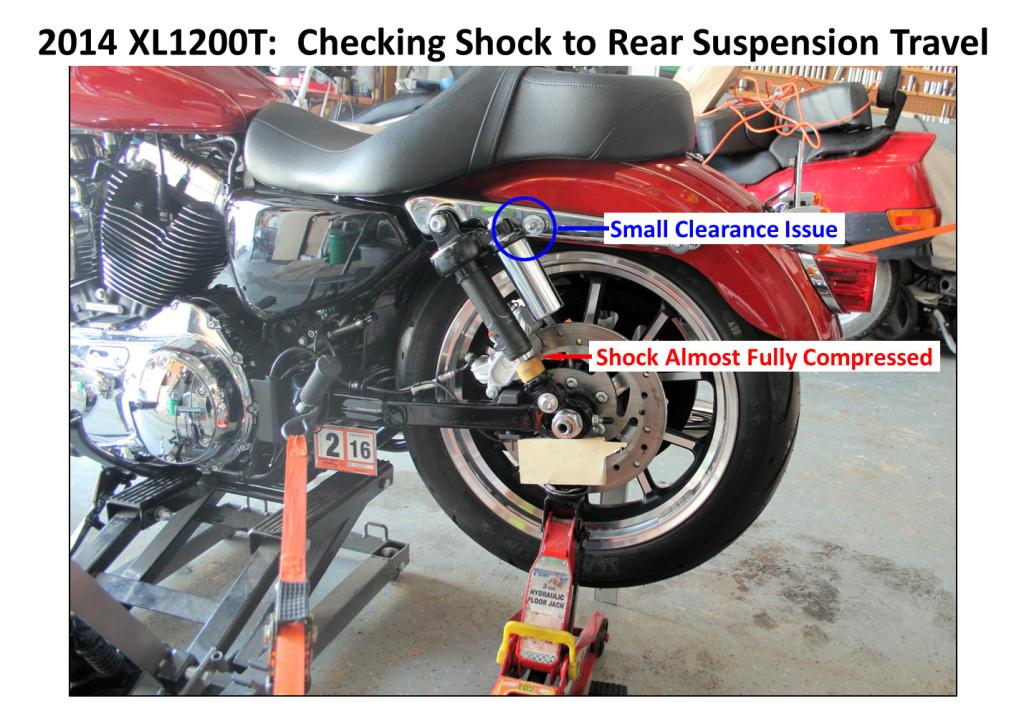 |
| Left rear side of the bike; you can see the working range of the shock using the movement of the rubber bumper. As I use the jack to move the swingarm, I measure the remaining gap, then go to measure how much the axle moved33) → | This is the side where I measure the axle height34) → | Eventually, I get near the top; then find I have a small clearance issue with the front saddlebag mounting point.35) → |
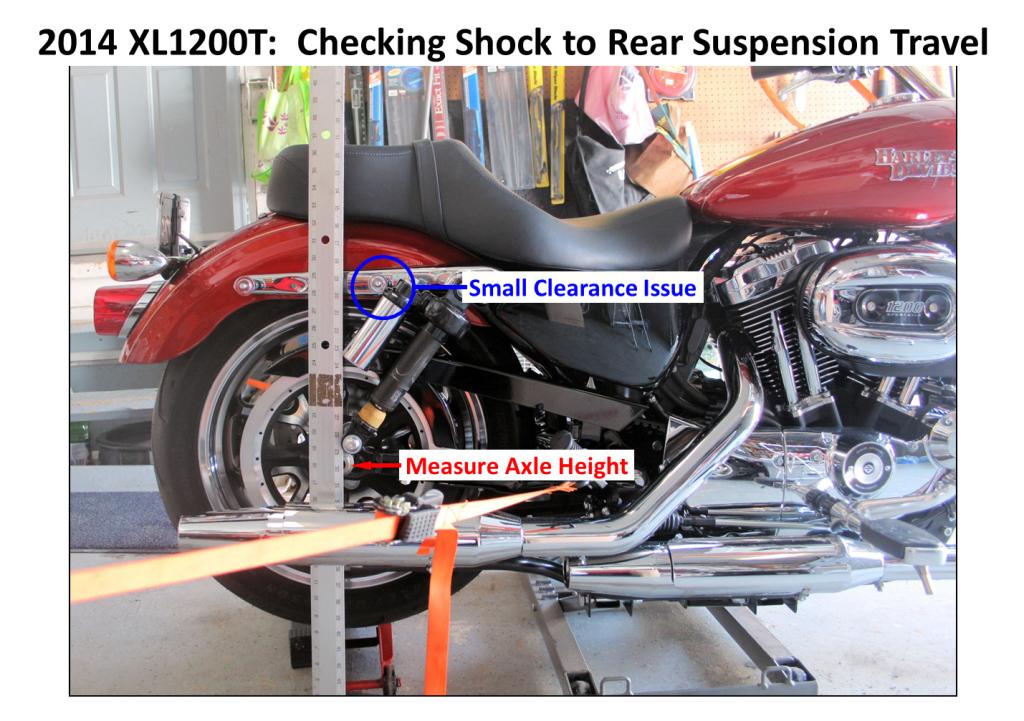 | 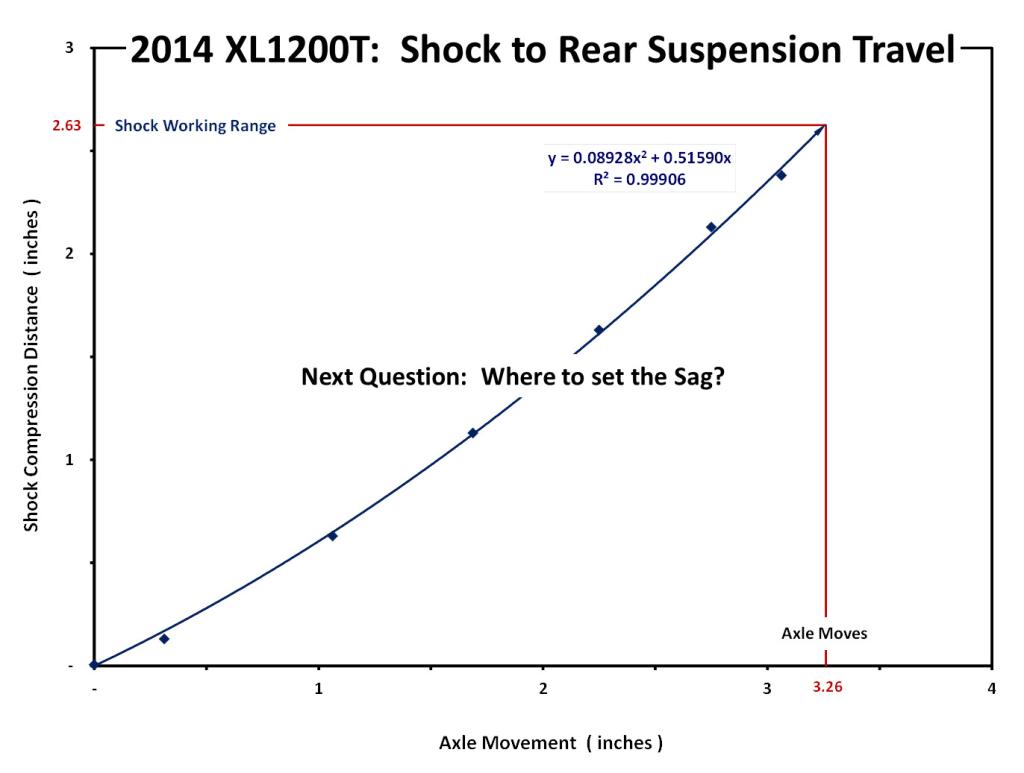 | 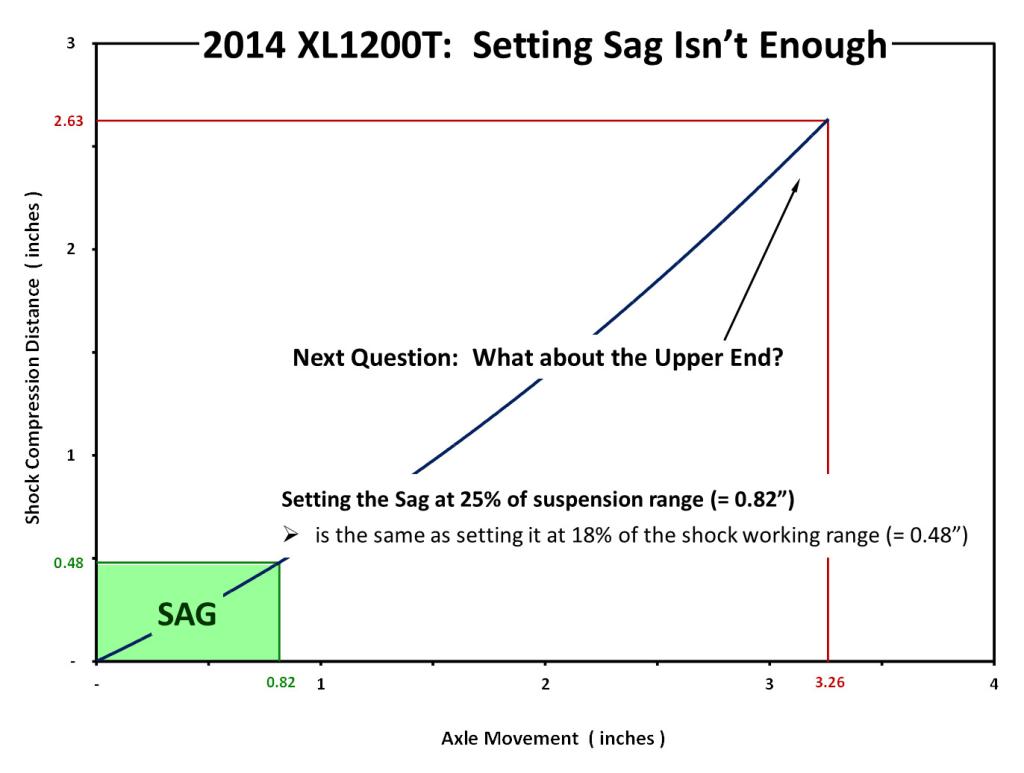 |
| I take the last measurement and see the same clearance issue. It doesn't look to be a big issue to fix - if I stay with these bags36) → | I mapped out the shock and rear suspension relationship. The shock operates over a 2.63” range, and the axle moves over a 3.26“ range. Knowing this relationship helps me set the sag strategy37) → | I will base the sag on 25% of the axle movement range; which translates to on 18% of the shock range. That means with a 2.63” working range, I will commit 0.48“, or about 0.5” using the rubber bumper to make that set. But setting the sag is NOT enough to set up the suspension because you can get a weak spring to make the sag measurement38) → |
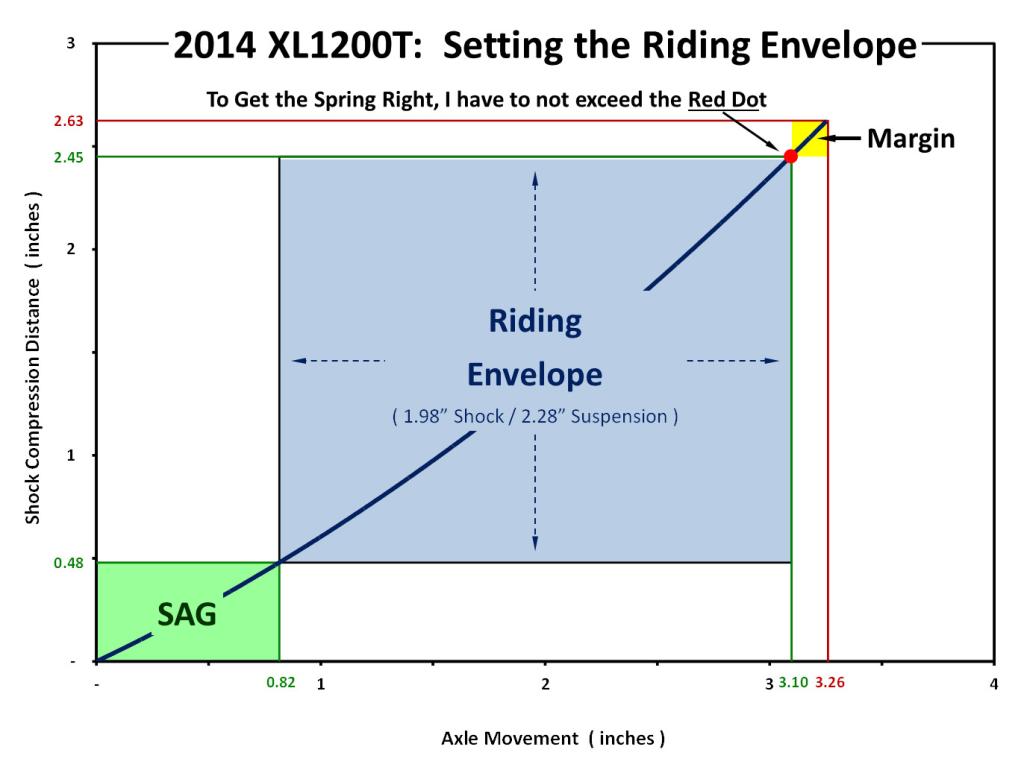 |
| To set up the suspension at the upper end. The only way to do this is to ride the bike, then check where the shock body has pushed the rubber bumper. I set the margin at 5% of the axle range, with translates to 7% on the shock. That means as I check the rear rubber bumper, it should not have moved more than 2.45“ (call it 2.5”) from the body. This is your riding envelope → |
- The blue box in the graph above actually indicates the riding envelope in shock compression from rider sag position. In reality, the complete riding envelope will include the area between the blue box and graph zero axis. That area represents shock extension and the shock rebounds into that area all the time. That area is critical for proper suspension operation. 39)
- In addition, it does not appear that chart adds the distance the rubber bumper will compress, maybe 1/2 to 3/4 full length. Not much, but it can be significant when looking at tire and metal clearance issues. The external reservoir can hit that fender / back rest bolt. 40) However, I found those bumpers to be quite firm. They will not compress much, perhaps a 1/16 to 2/16“, if you have a big bumper. I would say if you are hitting them to see signs of impact, your springs are too weak. 41)
- The belt is tightest when the wheel axle is in line with an imaginary line drawn through center of front pulley and swing arm pivot bolts. At full extension, short shocks won't extend to that line, so the belt is tightest at full shock extension. With longer shocks, I recommend taking the shocks off, statically set wheel axle along that line and setting belt tension so you cannot feel the swing arm bind up as is moves through that line. 1/2 turn on the adjusters can go from binding to not binding. You have to align wheel for true straightness at the same time. 42)
- The belt gets looser when the wheel axle moves in either up or down direction from that line. Some guys have added an idler pulley to help maintain belt tension. This may be important with shocks closer to 14” such as adventure type set ups. I have not bothered to add an idler pulley with my 13 1/2“ Ricor IAS shocks. 43)
- With the rubber mount design, an over-tightened belt will actually jerk the engine backwards when you go over a bump, you can see it. It will also give the bike a wet noodle flexi-frame feel in corners that compress the shock to that line. Be careful, a really over-tightened belt can jerk the wheel out of your hands and pinch some fingers. Over tighten the belt at full extension. If you can lift the wheel through that line, it will pull the wheel out of your hands and suck it up against the fender. Try it, and post pics. 44)
- Keep in mind the rubber bumper can compress a good bit, maybe more than half its un-loaded thickness. I generally recommend taking one shock off (with springs on) and bottoming the other shock to check for clearance issues and full compression. This is also where you need to add a safe distance for additional compression of rubber bumper. The shocks are supposed to bottom out before anything else does. 45)
- Check the lower run of the drive belt. With longer shocks and looser tension, it can drag on the rear break linkage bracket. Usually happens with shocks 13 1/2” and over. 46)
- At first I wondered how to take pictures of ride quality. Then I remembered in the past some guys have used an I-phone app as a G meter to measure before and after ride shock related to suspension changes. 47)
- The XL1200S shocks are off the bike and the OEM ones back on. I checked belt tightness, upper and lower, throughout the testing. It was not tight at anytime (although I could not check the last 0.25“ of shock travel because of the clearance issue). On to the OEM shocks:
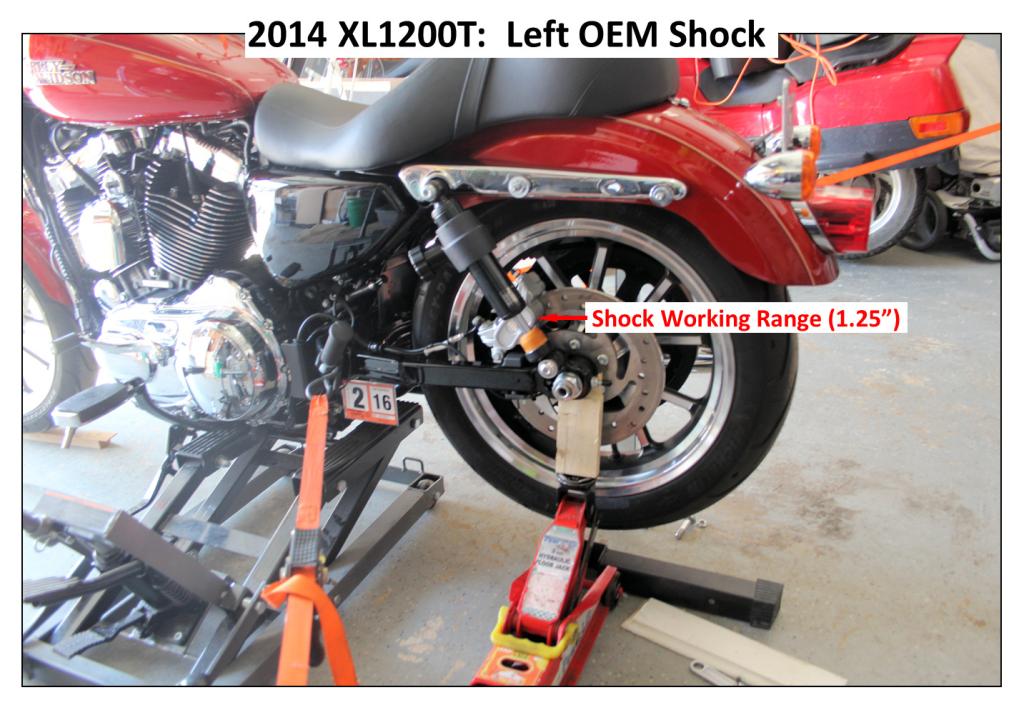 |  | 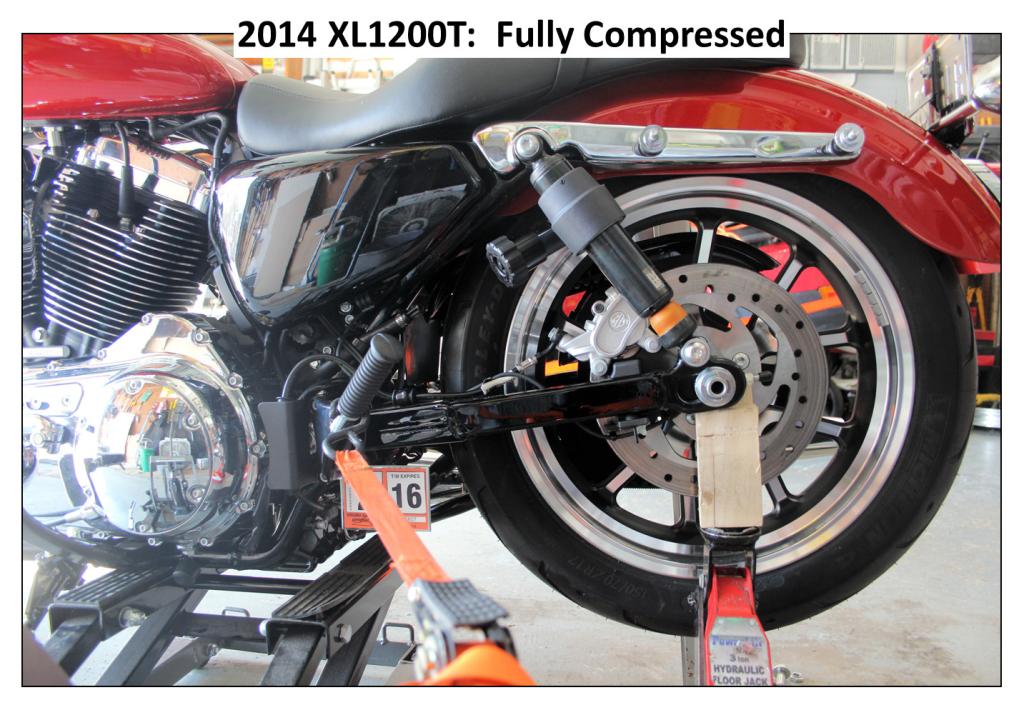 |
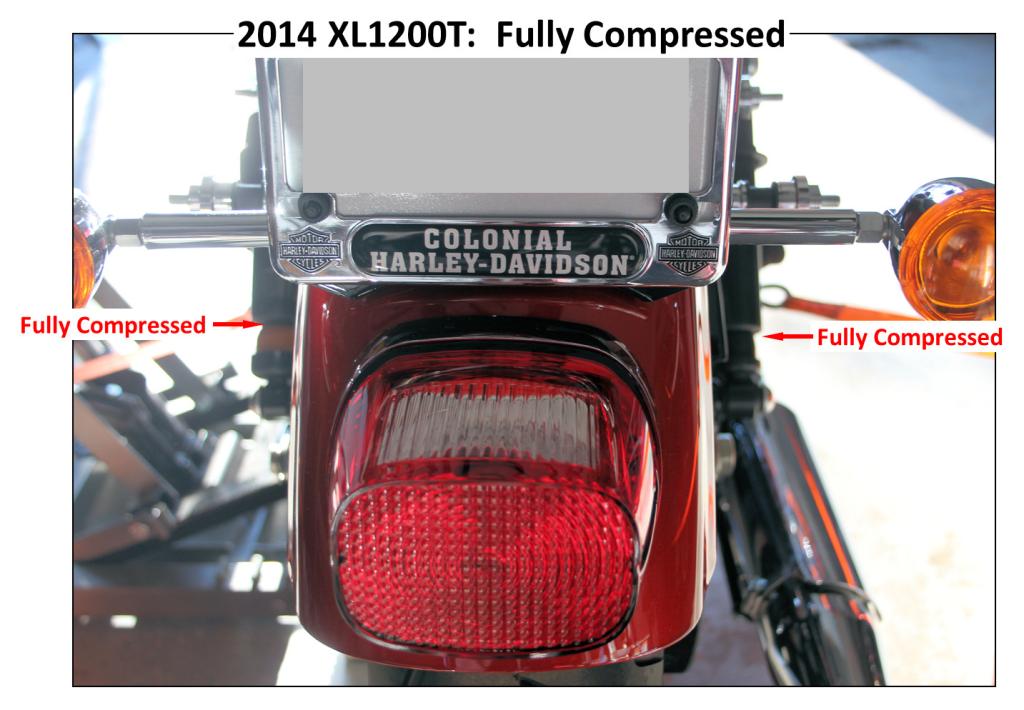
| The left shock is the workhorse so I will only concentrate on it. It has a 1.25” working range 48) → | No Right shock 49) → | Fully compressed 50) → |
 | 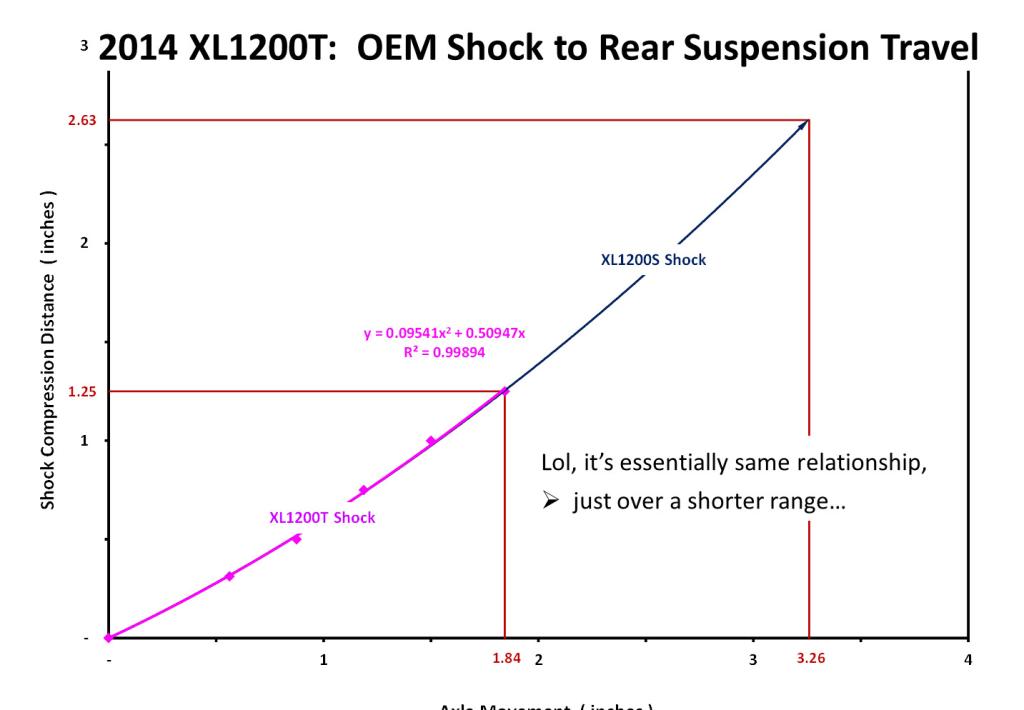 |  |
| I put the right shock to verify the shortest working range of the 2 shocks. They compress at the same time with the working range at 1.25“ 51) → | The oem test results show the same relationship as the XL1200S shock. 52) → | By holding the test setup the same, I can estimate how much the rear will be sitting up; ~1.75” taller in the rear. I am going to need longer fork tubes. I will have to figure that out once I move to the front. 53) → |
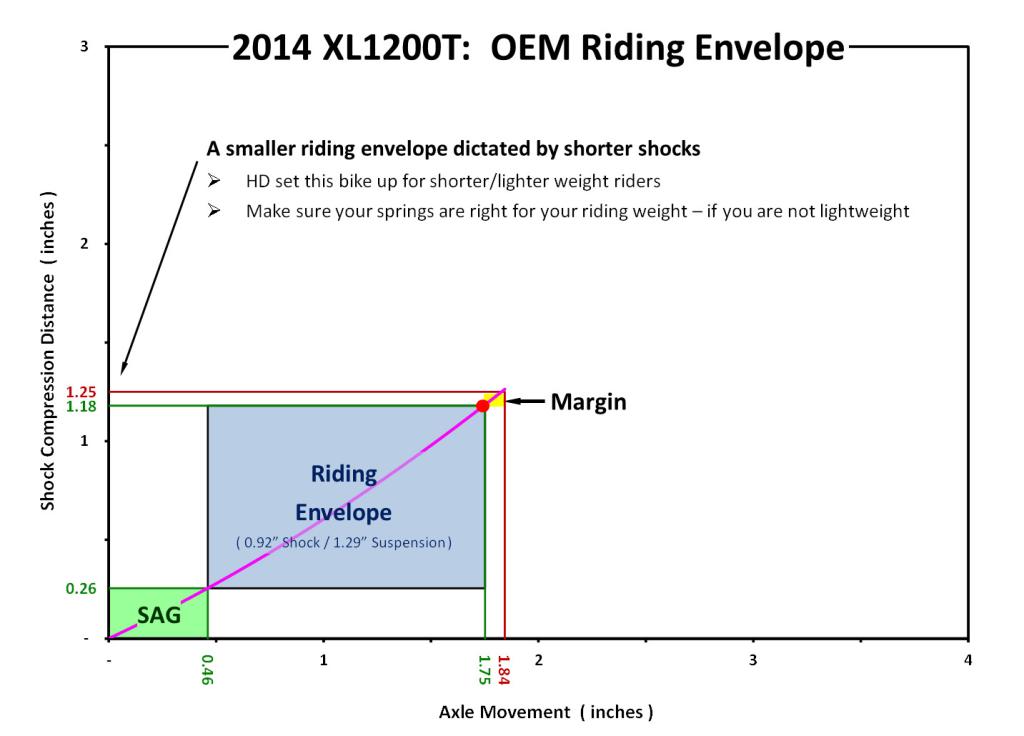 | 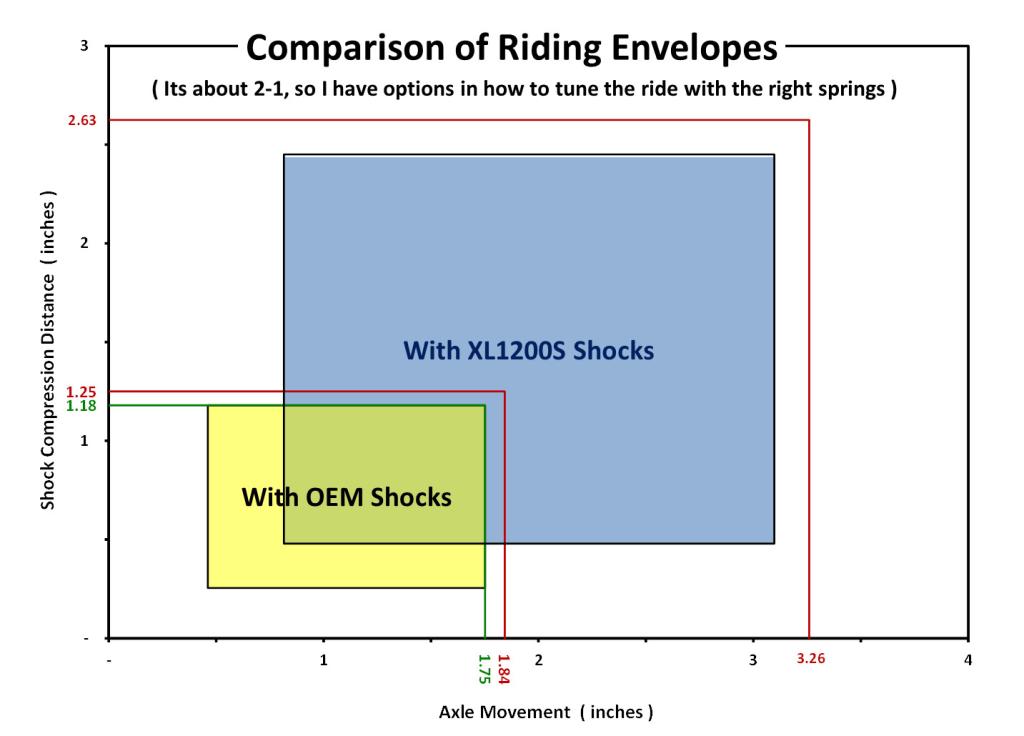 |
| The oem riding envelope is small. I knew that going in, but it is still surprising to see how small. There is only really 0.92“ of shock travel to ride in, that is small. You better have your springs sorted out or you will be riding a “hardtail” 54) → | A comparison of riding envelopes; the larger one will give me flexibility to tune the suspension for my needs as I have some room to work with 55) ✔ |
- I'm going to next move to The damping characteristics of the 1200S shocks so I know how to set the ratio of rebound to compression damping in the 2.5-1 or 3-1 range. Once I finish this, its on to the front forks.
9)
Pic by spacetiger of the XLFORUM http://xlforum.net/forums/showthread.php?t=1863121&page=10
12)
, 14)
, 15)
, 16)
, 17)
, 18)
, 19)
, 20)
, 21)
, 22)
, 23)
, 24)
, 25)
, 26)
, 27)
, 28)
, 29)
, 30)
, 31)
13)
Pic by spacetiger of the XLFORUM http://xlforum.net/forums/showthread.php?t=1863121&page=2