Table of Contents
This is an old revision of the document!

REF: Tools & Fasteners
Warped or Damaged Thread Repair
Cross Threading
The actual failure mechanism of a drain plug: 1)
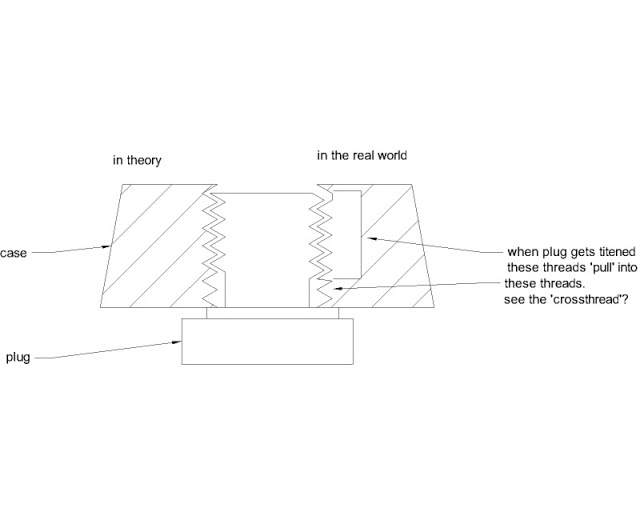
- So when you loosen the plug the upper partially fractured (cast alum don't like flexing) threads will “move back in position” as the plug reengages the 'good' lower threads. 3)
- After a few ins and outs the upper threads let loose from the back and forth flexing. 4)
- Where upon:
- “My plug stripped on the way out”. or “It just spins, won't get tight, won't come out”. or “I didn't even put the juice to it, it just never got tight”. 5)
Thread Repair
Cleaning Threads
Rusty, sealant ridden or chromed over threads can give you unwanted problems.
Rust in the thread pattern will only compile once re-inserted in a threaded hole.
Thread sealant (silicone, Loctite etc.) will affect the amount of torque applied on the fastener once re-installed.
Chromed over threads increase the OD which will affect torque applied as well as the ability to insert them in a mating thread.
Using a wire wheel to clean the fastener threads
Always wear a face mask when using a wire brush.
A fine mist of metal particles with get airborne and end up into your eyes.
Always wash you face and hands afterwards.
You may not feel anything while working, but later, any metal particles landing generally above your eyes can fall into them.
Using a bench grinder with a wire wheel:
This is the more dangerous approach but can be done by successfully with adequate focus and care.
The bolt / fastener is held in hand or with vise grips against the spinning wire wheel.
Then, as the wire wheel cleans one side, the fastener is turned with the wheel spinning until the threads all the way around have been cleaned.
Caution: If you lose grip on the bolt, it will go flying!
Using gloves to hold the bolt can result in less grip control.
Having your hands so close to the wheel can result in losing some meat on your fingers.
Using a Dremil or angle grinder with a wire wheel:
Using taps / dies to chase debris out of the threads
You may find, when chasing threads, that the threads are warped also.
This is common on used fasteners as normal or over torque can warp them.
Some threads are initially cut to a 'tighter than standard' clearance.
And chasing them with standard size taps / dies simply widens that clearance to standard sizes.
Standard tap and dies have sharp cutting edges. \
If the threads have not been warped or damaged, a die will cut through and remove sealants on bolt threads.
Likewise, a tap will cut through and remove grime and dried up sealants in the existing threads.
There are some holes, however, that are purposely tapped undersize at the factory.
Running a standard tap in those holes opens the holes up.
(also the low quality taps from the do-it-yourself store are not held to the cutting tolerance that real ground thread H or L limit taps possess)
- Some factory undersize tapped holes on 1957-1976 motors: 6)
- Oil pump studs
- Cylinder base studs
- Rear motor mount studs
- Tool box stud
Roll form tap and dies have rounded cutting edges.
They will work the same as standard tap and dies without the sharp edges actually cutting the material.
And they are great for cleaning debris out of threads.
See Chasing Threads below.
Chasing Threads
- Clean threads are essential in a achieving proper torque specs.
Torque specs are designed to tighten to a known point that is before the bolt would break and/or before the piece your working on gives or cracks under pressure.
(also given the composite of the bolts)
The practice of proper torque on a bolt / hole can also stress new threads. - Individual threads on a bolt or a threaded hole could have been warped due to material composite, heat, initial torque.
(and pressure applied during (previous) normal operation.
Warp-age could have been been increased from too much initial torque and / or uneven initial torque all around on the piece that had been installed. - That said, these bolts and threaded holes were initially threaded (internal or external respectively) with taps and dies.
Consequently, taps and dies are used to chase the holes / clean the bolts back to their original shape / cleanliness and done with plenty of good cutting oil.- Roll Form Taps- used to pressure form threads in softer material like aluminum.
Roll form taps are used to “restore” damaged threads.
They work well because they will actually push the metal back to shape as opposed to cutting it away.
Word of caution: they use a lot of force and are way easier to break so don't get to western with them.
Use plenty of oil and steady pressure.
Turn in 2 or 3 turns, back off 1 or 2 turns to allow the pressure to come off and if you are using a cut tap the cut material needs to come out.
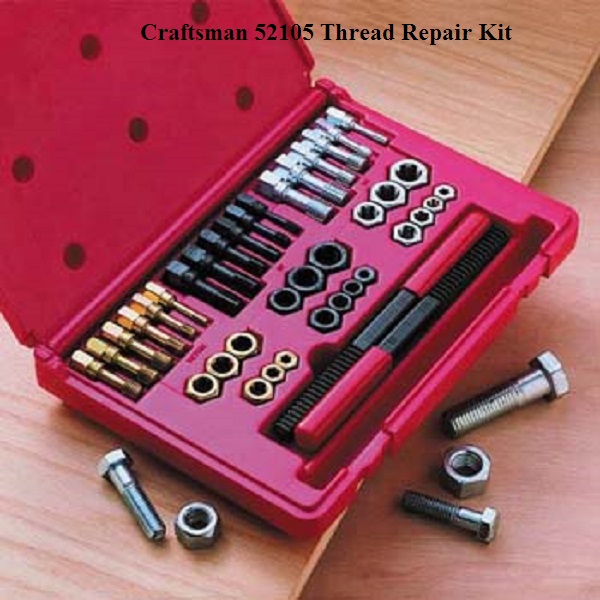
Another word of caution, when you buy taps and dies, sometimes you get what you pay for. 7)
A Craftsman master rethreading kit (52105) looks like a tap and die set but the threading doesn't have the sharp cutting edge.
They are great for cleaning the crud out of threads and straightening out slightly mangled threads.
(by pushing them straight again without removing any material)
The kit comes with thread files that come in handy to clean up threads.
If these don't work, then you can use the regular tap and dies.
Methodically chasing existing threads is never a bad idea.
You just have to make sure you are using the correct size tool and don't get in a hurry and cross thread a tap and really screw things up.
Harbor freight may have a cheaper thread chasing kit.
- While chasing the bolts / holes you will experience metal shavings coming out of the holes and down the bolts.
This is normal and how much depends how much damage has been applied to them.
You are in fact re-shaping these to back to their original shape.
There really isn't much reason to replace a bolt other than cosmetics or rot unless it cannot be re-threaded or has been overly torque stressed.
This is a condition in which, on the way to final torque, the bolt begins to stretch or twist from it's protruding center.
(but not threading any longer into the hole as Evo cylinder head bolts can do) 9) - There are different methods to tapping / chasing holes depending on the situation.
- A through hole is what it says, it goes in one side and out the other of the piece you are working on.
Don't stop turning the tap until it has gone in far enough to reach past the bottom, given the chamfered end of the tap itself. - A blind hole is simply one that does not go through all the way like a 3/4“ thick piece of metal with a 3/8” deep hole in it.
Once you run the tap into it, you can't see the bottom , thus it is a blind hole.
Chasing a blind hole can be more tedious.
As the tap reaches farther in, you aren't quite sure where it will bottom out so you have to use caution when the tap starts turning tighter.
Turning past the bottom can end up cracking your piece or breaking the tap off in the hole.
Turn in about a quarter turn, back out a half turn, run it in until it stops or gets resistance, go in about another quarter turn and back out all the way.
This helps gather the shavings/ trash into the flutes of the tap and away from the threads- which creates resistance.
Clean the tap, blow out the hole of all metal shavings/ trash/ gasket material, then go back in.
- You'll get a feel for it and when it hits bottom, you'll feel that to be harder or more of an end of the journey feeling.
All the while your using cutting oil which can gather in the bottom of the hole and or mix with any trash in the hole.
Truthfully this is the same procedure for tapping any hole as far as touch and feel.
If this is not cleaned out before going back in with the tap, it can hydro lock 10)the end of the tap (pressurize the area between the tap end and the bottom of the hole)
Which, not always but, can stress the piece from the pressurized area and cause cracks or holes especially if you are using a flat ended tap with no tapered point on the end.
If you see oil seepage coming up from the sides of the tap, STOP.
Unscrew it, clean the tap and the hole before going any further. - You can send a pin needle or the like down to the bottom of the hole to see if there is any embedded crap at the bottom. 11)
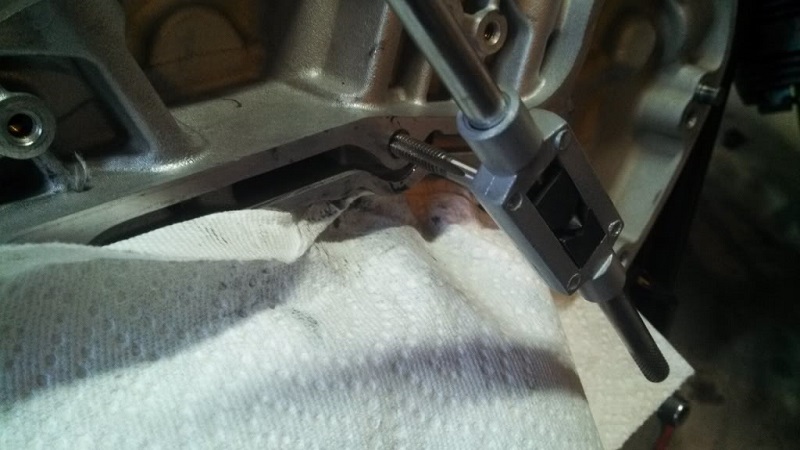
| Chasing cam cover threads. 12) |
 |
Thread File
- This tool is a cross between a tap, a die and a file.
- The end part can be used to put down inside a hole and sort of scrape clean the thread of the same pitch as the tool.
- The side can be used like a file on damaged bolt threads to get them back to form.
On a special thread like the end of a crankshaft that has a large diameter fine pitched thread that no standard die will fit.
Use a thread file with the same number of teeth per inch. 13)
Installing New Threaded Inserts
Before committing to a certain type of insert repair, it's a good idea to research the dims and procedures before buying it.
The type used (or in some cases required) may depend on the dimensions of the insert or the way it must be installed.
Installing any insert requires drilling the existing hole larger to accept it.
If the original threaded hole contains a fastener that seals off liquids / oil, then the hole will need to be straight (90°) fit or the end result will probably be a leak.
Otherwise, if it simply holds another piece on (as in a bracket), you can have a fudge factor while drilling the hole.
Using a Drill Guide
For using a hand drill, it is especially helpful to use a jig to help you line up the bit and keep a 90° line of site while drilling.
It's difficult to watch the drilled hole and hold the drill vertically and horizontally correct all at the same time.
(as well as dealing with lighting and available room and angles)
This leads to the hole being drilled off center even when you began on center.
A guide is also useful while tapping threads to help get the tap started at a straight angle.
A jig (or guide) may come in a kit with the insert to help with that or they can be purchased or machined separately.
 14)
14)
It's basically a sleeve with the correct size hole in it for the drill bit you're using.
It also needs to be machined (at least on one end) at a 90° face and that end fits against the piece to be drilled.
The wider the face that sits against the piece you're drilling into, the less chance of the guide rocking off center and the more straight the drilled hole should be.
Below are some examples of drill guides (can be clamped on or held by hand depending on the certain guide and material used on):
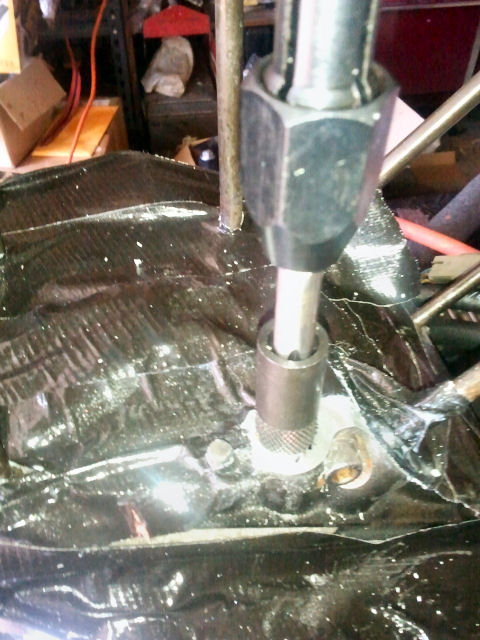
| This drill guide was machined for use on a cylinder stud hole reair 15) | |
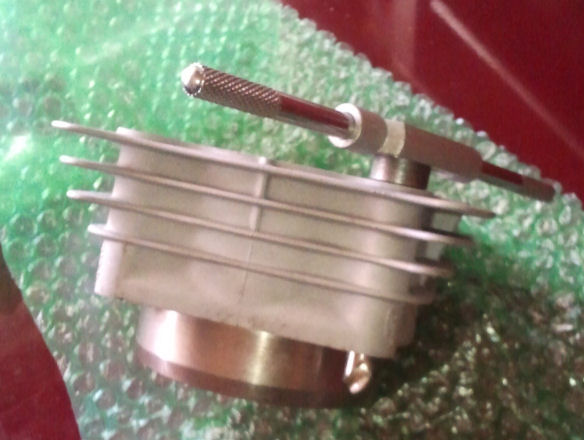 |  |
Using a Stop Collar on a Drill Bit
Stop collars (drill stop) can be purchased at most hardware stores and function as a depth gauge for the drill bit.
The collar is attached to the bit by a set screw.
Once installed, in theory, you can't drill past the collar which sets the depth of the bit.
These collars are subject to moving while drilling so the use of a collar is subjective.
But, use carefully, they can be effective.
You can also remove the set screw and use the collar as a drill guide.
| Drill Bit Stop Collar 16) |
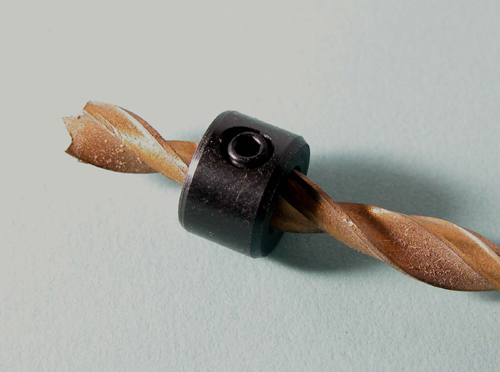 |
Helicoil Inserts
- Engineering supply, auto parts and hardware places sell several kinds of insert kits. \\(I.E. Helicoil, Keensert, Timsert etc)
- A helicoil is a small stainless alloy steel spiral.
The inner diameter is the right thread to match the original bolt.
The outside diameter has a larger thread and the kit has the right size drill bit included for the OD pre-drll size.- Carefully drill out the stripped hole with the 'kit supplied' drill bit.
Use a square to make sure you are drilling square to the surface, and get a buddy to eyeball it as you drill. - Using the supplied tapping bit in the kit, thread the larger hole you have drilled.
Again use an engineer's square to make sure you have it square as it goes in.
If you have no engineer's square, use the corner of a book cover or something you know is 90 degrees.
Check in two directions, back and forth and side to side.
Use appropriate cutting oil or plenty of WD40 if tapping into aluminum. - Always turn the tap about half a turn in, then quarter of a turn back out.
(so the cutting motion is kind of back and forth to clear the swarf chips off the cutting edges) - Use a proper tap wrench to turn the tap. Using a Crescent wrench on a tap is a good way to get it crooked or even break it.
Even in a tight corner, you can get tap wrenches with a sliding cross bar handle.
Although, if really desperate in a tight spot , you can use a 1/4 drive ratchet handle with a socket that fits the tap shank.
This should only be done when there is absolutely no alternative.
The proper tap wrench will save you much heartache. - Make sure the thread is tapped deep enough for the whole insert to fit in the hole.
Inserts can be bought in several depths. - Then clean the new thread and the insert thoroughly with carb cleaner, rubbing alchohol or Loctite cleaner/primer.
Use red Loctite on helicoils on the outer diameter threads only, so they lock to the hole. - Then screw the insert in with the special tool in the kit. Break off the tang of the insert, either with the special tool in the kit, a punch and hammer or long nose pliers.
- Wipe off excess Loctite.
Grease the bolt so it wont stick to the loctite, and screw it in to make sure all is good. - Then take it out and let the loctite cure overnight.
- This repair actually makes a stronger thread than an original aluminium thread. 17)
Time-Sert Inserts
More from Xlforum Threads:
- idahopilot: Is it necessary to “chase” the threads to accessories before adding them to your bike?
- capttawes: No it's not really necessary but sometimes those accessories have a build up of chrome, paint or powder coat that get in the threads making it tight and easy to cross the threads. If you find it necessary or run into a problem where you've stripped/crossed threads on some parts a simple once over with a std. set of tap & dies will do the trick.
- Folkie: I generally try out a nut on a threaded stud of a part or try out a screw in a threaded hole. You can soon tell if the threads are OK. Sometimes just turning the nut or screw back and forth a few times sorts out any roughness. If not, a pass with a die or tap does the trick. If you've got adjustable dies and you use a die holder (I often don't for this sort of thing, just hold it in my fingers), make sure you haven't tightened the screws in the die holder to make the die smaller than standard size. We want to clear the threads, not recut them. If you haven't got a T handle tap holder in your tap and die set, that can be a useful addition. It's less cumbersome to use for this sort of thing. Just make sure you're using the right size tap or die. A cheap vernier caliper and a screw thread gauge are useful to size threads if you're not sure about them.
- Another tip for cleaning out the chrome flashing on new parts is to start the tap at the backside of the hole where you have clean threads. This will allow you to start the tap properly and keep you from messing up the angle of the hole. Once started properly with some lube on it it should just screw right through the hole to the front side and clean out the excess chrome in the threads. If it feels like it is harder to thread in than a bolt in clean threads, STOP!! Back out and try again and doublecheck that you have the proper thread pitch on your tap.
- To check the thread pitch get a thread pitch gauge and check it against the bolt that is supposed to go in the hole. These look like a feeler gauge full of combs and you lay each comb against the threads until you find the one that matches the threads on the bolt that is supposed to go in the hole. Thread gauges are cheap, pick one up and go to ACE Hardware and practice against bolts with a known thread pitch to see how they work. 18)