Table of Contents
This is an old revision of the document!

REF: Service Procedures 9
Ironhead 4 Speed Transmission Removal / Inspection / Installation
This section is not meant to be a replacement to the FSM.
It is meant as a compliment to the FSM with added information with pics that are not in the manual.
Always buy an Factory Service Manual AND a Factory Parts Catalog to help you along your maintenance path.
The Haynes and Clymer brand service manuals for the most part will suffice and they generally have more pics than the HD Service manual.
But the HD manuals will be the most accurate.
All in all, there are discrepancies in all of them including the HD parts and service manuals though.
Voices of Reason
When faced with what do to if transmission damage is suspected, the best policy is to break it down and inspect everything.
All mechanical things will break down in time. Popping out of gear may be gear dog or slot damage.
Shifting from neutral to (in gear) by itself could be a worn shifter cam or other worn parts.
Gear damage (cracks, pits, etc.) can end with case damage.
So if in doubt, take it out and inspect the parts before letting the problem get worse.
- You're the one with the wrist and butt sensors that knows what it feels like. That said, let's say you decide to put the 250 remaining miles on it and it strands you in the process. How difficult will it be to trailer it home? That is the real question. If you have a good way to economically and safely deal with a failure then no worries, go for it. But, if safety or difficulty and expense seem high just call the season now. (Deimus)
- Next year you could be cruising wondering if you really had to rebuild that tranny. Or, in the parallel universe next year,wondering why you didn’t just fix it and how much longer it will be before you can quit that second job to pay for the welder,machinist and parts because you can’t do those highly specialized skills. In the third parallel universe your still putting it into the extra cases you bought. Stay in this universe fix it now. (shooterj2003)
- My '78 used to pop out of second gear when accelerating. I finally removed the trans and discovered a worn shifter fork, bad shimming and a cam with a worn spot. Repaired the cam, bought new forks and replaced all the gears and shafts with Andrews parts. Gearbox now shifts like butter and has no false neutrals. I shimmed everything to perfection and it was worth every penny to have good Andrews parts in there. (ericfreeman)
- The longer you run it, the more damage will be done. Tear it down before you tear up. (ryder rick)
- Nothing wrong with taking your time (inspecting/repairing). Treat it as if you are working on a precision instrument. Because it is! (doodah man)
Gear Inspection
Sub-Documents
With some of these parts, finding imperfections and cracks requires more than just glancing at them for obvouos damage.
Thoroughly cleaning the parts/gears from oil and debris and close attention to detail will do you well.
Inspect every tooth and dog on every gear with a magnifying glass or eye loupe. 1)
![]() 2)
2)
Cracks
Any cracks found in a gear's teeth or body and the gear needs to be replaced.
Some cracks are obvious and some are hard to see on a quick glance as shown below.
When finding damage to a gear's teeth, always check it's corresponding gear's teeth.
Replace both gears as a set when damage is found to avoid the old gear's teeth damaging the new gear's teeth.
Worst case, a gear breaks and cracks your engine cases.
Here is a MS 2nd gear with a crack on the lower side of 1 tooth and dings on it's other gear teeth.
![]() 3)
3)
The dreaded exploding gears are OEM MS 3rd and CS 2nd (20T) gears: the other stock gears are up to stock use. 4)
The 20T gears on the MS and CS more or less transmit power at all times regardless of engagement. 5)
For anyone using OEM MS 3rd and/or CS 2nd gears manufactured after 1972; 6)
These gears have a habit of cracking on the ID were the cross section changes thickness.
Cleaning with some 2000 grit emery revealed the crack better in the Left pic below. 7)
![]()
![]()
Teeth Wear
Repairs
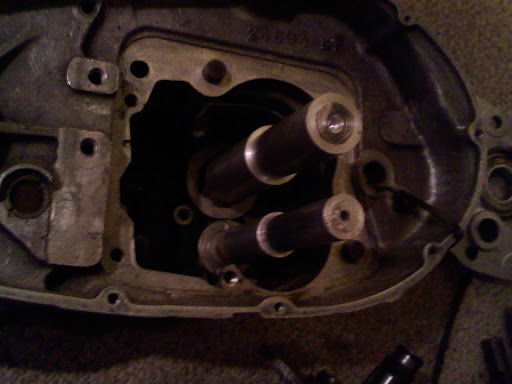
In terms of repairs; the first thing you must make 100% sure of is that there is no damage whatsoever to the case boss. 10) This means you may need to dye penetrate it. Most common radiating cracks seem to appear at 7:30 and 4:30 with these types of breaks.
Also carefully examine the needle bearing in the CS boss in the case. NO rollers can be distorted or hang up. Carefully check it and make sure it moves freely. If you reuse the 4th MS (clutch) gear, make sure the needle there didn't take any unusual force and flat spot or distort.
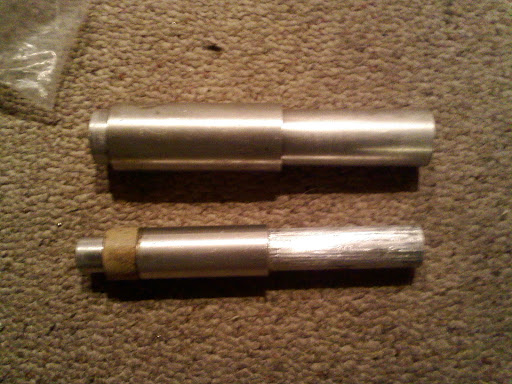
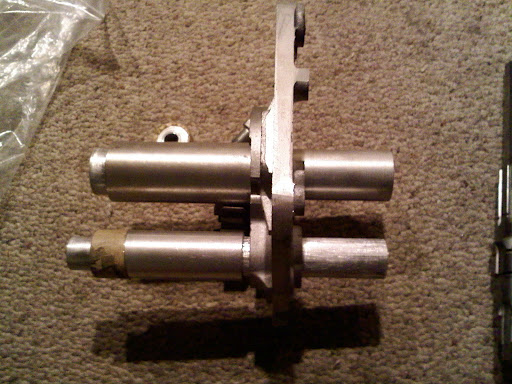
Then, make sure both your shafts are straight and true. Make sure the counterbores are clean and not nicked if you put it between centers; or use v blocks on your lathe bed or surface plate. If they differ more than .001, get new shafts.
Then, go through your gear needs. Buy them one at a time if you need to. And, above all else, do not overlook anything. Do not rush.
When I assemble a transmission for one of these bikes (stroker, not stock) I spend a lot of time taking the transmission in and out until I am 100% happy with it. A lot of guys just shim and that's it. I prefer to observe how the gears interact on the bench and to set clearances to my preferences (ie more engagement of the dogs to hold under power). Others like less engagement so they get a buttery snick every time they hit the lever.
The point is that you can set these transmissions in many ways. You need to start with the FSM, but then put your thinking cap on and understand under what circumstances you may want more engagement (ie 2nd and 3rd gear roll ons) and where you may not need as much (1st gear). As you develop a better intuitive understanding of what I'm laying down – you'll get an idea of how to set it to suit how you're riding the bike and what to expect.
And yes, strokers can destroy parts without trying. You don't have to beat on it to break it. There's massive amounts of torque available in a stroker from idle on up. If you can wheel stand the bike with a clutch dump in 2nd (you can!) then you can get an idea of just how much force the parts have to deal with. It gets way, way worse the bigger you go. Strokers can be an expensive addiction but also a very sweet ride once you sort this stuff.
Replacing Gears
Dr Dick's rust covered opinion on what the order of Andrews upgrade should be if you got to do it bit by bit:
The first 3 are way more important than the last. 11)
- Mainshaft 3rd
- Countershaft 2nd
- Countershaft 3rd
- Mainshaft 2nd
- Clutch Gear
- Mainshaft
- Countershaft
- Mainshaft 1st
- Countershaft Drive
- Countershaft 1st
Shifter
Sub Documents
Transmission Case
Sub-Documents
The exploded case below was originally believed to be due to the chain coming off, locking the transmission. 12)
Upon further inspection of the gears, countershaft low gear had several chips missing from the teeth.
And sometimes 2nd or 3rd gears split and the pieces get wedged between other gears, forcing the two shafts apart (and cracking the case). 13)
![]()
![]()
Access Cover (trapdoor)
Transmission door “alignment” explained. (Dr Dick) 14)
This applies mainly to 1957-1976 cases.
It's most likely accurate for 1977-E1984 cases also because I feel the manufacturing procedure is the same as 1976<.
I can't prove it but I believe it.
If you fit any door other than the one that came with the bike from the factory, you will usually will find that some kind of misalignment between the 4 case to door bolt holes that you didn't have before (if you don't have bolt alignment issues it's probably because the holes in the “new” door are larger than the holes in the original door. NOS factory replacement doors were like this).
That gets you thinking about “matched” components and the possibility that your “not matched” any more. The normal response to this to gather info on how to regain the “match” with your new part set. So you logically turn to the ever-present HD line-ream & line-lap as the remedy to your problem. And line-ream/lap is the right way to realign out of alignment bearing elements in order to get them back into reliable service.
The above paragraph makes the assumption that the bolt hole misalignment will be carried onto other, more critical, alignments. Anyone who is serious about these bikes won't dismiss this misalignment. At least with out a good reason. That's a solid point of view and necessary for refining your ride.
Wanting to grab on to something we can sink our teeth into, each of us will tend to embrace the theory that seems most sensible. Unfortunately, concerning old info, good solid reasons are rare. Lost to time. And because of that, conjecture rules. After awhile the “legend becomes fact”.
Food for thought. Matched cases are definitely machined as a set at the factory. Yet HD would sell you either half or a door as a separate “replacement” part. No special instructions on how to “match” to your existing mate. Why?
I'll try to explain why. Also I really hope this post will show that our bikes weren't built using the procedures in the SERVICE manual. That point, when not taken into account, fosters a lot of misinformation.
They were built using a different, much more informative set of instructions, blueprints.
An informed understanding of how the factory builds these bikes helps separate the cream from the crap in your assessment of “is this a symptom of a deeper problem” versus “it's like this because of how they were made”.
So the 1st two things you need to know are these two facts.
- The very first ancestors of our bikes, the 1952-1953 K, didn't use any transmission door at all. This is important so you can understand how the raw castings were machined into a set of cases. The overall machine procedure on the 1952-1953 is the same as on the 1957-1976 cases.
In this post I'm gonna leave out the 1954-1956 ones. These were the 1st bikes with a door. These doors were removable but weren't manufactured to be interchangeable due to the double tapered cone dowels they used. This is whole thread in itself that's not applicable to OHV bikes.
For 1957-1976 cases, the door gets bolted to left case early on in the manufacturing procedure so it mimics the 1952-1953 (no door) cases. The door/left case assm turns into a one piece artifact as far as the rest of the machining is concerned. It's this bolting on procedure that shows up as misalignment when swapping doors/cases.
In 1952-1953, in order to work on the trans you had to split the cases. And when putting cases together, you needed to have the entire trans and shift tower shimmed and assm'd to the left case as well as the flywheel assembly. - Fact 2: If you bought a new set of replacement cases, when they were available, you got way more than 2 case halfs. Again because of how they were made. you got in addition to the cases:
- A door bolted to cases. (when you unbolt the door its the 1st time its first time its been loosened. ever).
- Gen idler bushing installed pinned and bored to location and size in right case.
- Shifter shaft bushing installed in right case half.
- Kicker bush installed in left case, even if it's not gonna be used (68-76 XLH)
- A few case bolts. The ones HD used to bolt the case halves together well enuff to machine the cylinder base surfaces, holes for cylinder spicket, and drill and tap the cylinder stud holes.
- Dowel pins installed. How many and where depending on year. Case part seam 3 or 2. Cam cover 2 or 1. Kicker cover 2. If hump case 1 for primary cover. Most importantly though 2 for the ever-present pre installed trans door.
- Shift fork shaft hole in right case plugged with expansion plug.
At this point, if cases sets are to be sold as replacement parts, they are done. “ready for you to use”.
On the flip side, if the case set is going to be used for a new motor, more work gets done before they will be considered “ready for use”. Left side gets kicker stop, transfer valve, and 7 studs (3 rear motor mount 4 cylinder studs) installed. If hump motor, gets primary drain plug installed.
Right side gets cylinder studs, cam case strainer screen/gasket/pin, oil line fittings, chain oiler fitting if hump motor, motor and trans drain plugs (except 1970 and E1971), cam torringtons, c shaft torrington, shifter seal,right rear top motor mount stud on some years (67-72?) hump motors. 900's get 5 oil pump studs. And for in house right side gets two more things.
It's here that this thread really starts.
Installed and fitted. Pinion race and main shaft race.
Common belief is that these get line lapped as per the FSM. Not so. They get rigid honed. Without the case halves being assm'd.
This kind of independent fit and finishing is NOT what the fsm prescribes.
It is what you would evolve to if you built motors night and day for 1/2 century. And you would get so good at hitting size, location and finish that every build used the exact same roller size. The “standard” size. pinion, trans mainshaft, con rod big end. And you figured out how to do it without the cumbersome assm-lap-clean-check-repeat routine. You got so good you do it without the trail and error.
So (other than for cyl interface) what I believe really happened in the factory the day your motor was built is that both case halves get machined independently to such tight and repeatable tolerances that any right will fit to any left. Two random halves got put together. All machine work is done except for the cyl interface.
Then when together, the cyl interface got machined as a set. That's when the set got a belly #. That number allowed you to backtrack sequencaly if a problem gets identified. As well to track numurious other parameters. \
If you're still with me-back to the trans door.
Remember 1952/1953 had no door. Let's start there. You got 2 raw castings from the foundry - a right and a left case half. Totally unmachined. You need to hold each raw casting somehow in order to get 1st machining step completed. This 1st hold needs to position casting accuratly enuff that all other machining is on target. This is no small issue. All subsequent work will be based on this 1st operation. After a time you get this 1st operation down solid. In the instance of the left K model case, you machine one “side” then flip casting over, register off the 1st side machining, and machine the opposite (2nd) side.
There are a few machine operations that get carried out afterwards that aren't “face on” to the parting or the parallel primary side. Rear motor mount top mount holes. Tool box stud hole. Timken feed and drain holes. Same for right side. All though the amount of secondary “off flat” machine work is much more extensive.
At this point all the trans machine work is complete. If you didnt do it on the 1st operation, you did it on the 2nd. On both case halves. Before they ever were bolted together as a matched set.
Now add a removable trans door, a 3rd casting.
How? You pre machine the case for door mounting and mount the door to case so this assm is a mimic of the no door earlier one pc case half. This gets done before any trans bearing bores gets done.
You machine a mounting surface into the door casting. Then you put a 4 bolt hole pattern in door casting. The hole pattern is regisitered to the outer profile of door casting. The hole pattern needs to be regisitered to casting outer profile because soon you will put same bolt partern in case. And mill a mating mount surf with boundries consistant to that common pattern into left case half. So the door fits in your case pocket with no interfearence. What locates door to it's case pocket is the 4 bolts (the dowels dont exist yet).
Now your case-door assm mimics the earlier no door k left case half. And you can apply the same tryed and true machining operations. Those machine operations do the main and counter bearing bores. These door bores are located based on the dowel locations at case seam. The holes for door dowels are done now too. This makes the relationship of door dowels to trans bearing bores location consistent.
But the relative position of the 4 bolt holes to the dowels is not constant due to all the positioning variances that come into play when the door is first attached to case half. So the misalignment of the bolts is not indictive of misalignment of the trans bearing bores.
It's getting the dowel holes re-machined with accuracy that I hang my moniker on while the bike is together.
That's a little more challenging.
Check out the bolt holes in this 72 door. This is very common on swapped doors.
Some times guys will move the dowels to “improve” the alignment. Some times after an explosion repair, the case dowels will be hacked back into “position”. Some time when using a heavy after market door, the door isn't made as well as it should be as far as critical locations. None of these scenarios is too cool.
Thinking that the trans is able to tolerate a certain amount misalignment is, imo, a dangerous assumption. Considering most welded cases are welded in the trans area. Exploded transmissions wreck cases 10x more often than exploded motors. Especially on 1972< cases. The 1973> cases and doors are stronger than the earlier. Usually strong enuff to stay in one pc after a trans explosion. Because the 1972< usually blow the cases and door apart when trans lets go, people may conclude that the door/cases let loose taking the trans with it.
I don't agree. I believe most times in a case breaking explosion, a power transmitting component fails. A gear tooth or a dog breaks off. This is more dangerous than blowing a gear in half or snapping either shaft. Because that little pc will not act as fatal when it happens as the split gear or shaft does. So you may keep riding down the road until that little pc gets caught between meshing teeth, forcing the shafts apart. The 1973> can survive this much better.
My point being that misalignment may skew the way the teeth or dogs engage to their mates. Concentrating loads across a smaller area. Breaking them off.
If you got a high powered ride, you really need to have the trans in top build if you figure it to transmit reliability.
So alignment is fundamental. In my head, if alignment isn't assured, explosions may be in the future. A totally unacceptable way for me to build a bike.
Getting screwed up alignment correct is easy when the cases are apart. Doing it with the bike together is a windfall for your wallet. And doing it so the dowels are positioned where they belong brings you to best possible repair.
So, pull the transmission. Pull the dowels. In a mill, reshoot door dowel holes in correct position. Dia of holes to large enuff that the same size hole will give a good bore for case side of new pins to be solid. In position and press fit.
Buy a chucking reamer of correct size that will cut holes in case. This reamer is .001“ smaller than new door holes. So when reaming case the door hole will act as a reamer guide.
For hole position in case to be in correct spot, the reamer needs to be guided at 2 places along it's length. These locations in relation to the case aren't arbitrary. They need to be on location so holes the reamer makes is also on location.
This is how I made that happen. As chevelle said, I made concentric mandrels. One end of each fits in main and counter bear bores of right case. The other end of mandrels fits thru door bear bores.