Table of Contents

IH: Oiling & Lubrication - Sub-01U
Plugging the Transfer Valve
Plug it or Not?
See Further Study of the Transfer Valve Operation and Affects of Plugging the Valve in the Sportsterpedia.
Removing the Transfer Valve
See Removing / Installing the Transfer Valve in the Sportsterpedia.
Plugging the Valve / Hole
Note: If you plug the transfer valve, it is advisable to also add a transmission / primary vent as well.
The transfer valve has a dual function of moving out excess oil leakage from sit sumping and venting the primary compartment to the crankcase.
(where the air is expelled along with crankcase pressure out the breather vent)
Without a vent once the transfer valve is plugged off, primary venting is severely hindered if not bottled up entirely.
It is possible to blow the sprocket seal, starter gasket or primary gasket without a vent to atmosphere over the primary or tranny.
See Venting the Primary below.
Options for plugging the vent/hole:
- Epoxy the valve.
- Using JB Weld to plug the hole in the transfer valve has been done by many with good results.
However, the valve needs to be cleaned of all oil and debris first or it can lose it's adherence, travel, and find it's way into the crankcase.
It's best to remove the transfer valve before plugging it so you don't accidently get anything in the crankcase.
The valve can be removed with a square drive pipe plug that sits flush with left hand crankcase side. 1)
Pop out the screen, (you wont need it) and the hole is behind it. Clean and dry the hole and plug it with JB Weld or something similar. 2)
- Weld the hole in the valve.
- If you can access a welder, you can weld the hole in the valve shut (removed first). 3)
- Plug the valve.
- You can drill & tap the hole in the valve to accept either an #8-32 or #10-32 soft brass screw and thread that screw in there all slathered in red Loctite.
Once it's in there, distort the screw's head by peening it with a small punch so it can't back out. 4)
- Plug the case.
- HD made a plug (24571-72r) for the transfer hole used on XR-750. 5)
- You can remove the transfer valve and make a dummy threaded plug to replace it. The threads are 3/4“-16.
- You could split the cases, remove / discard the transfer valve and drill and tap the hole for a bolt.
Venting the Primary
With the transfer valve plugged, the primary can't breath as it can with the transfer valve functioning.
That air path would now be blocked.
Technically, the primary may have a vent other than the transfer valve being the clearance in the clutch cable where it enters the primary.
That can also act as a vent as air can enter and escape there (the part where the actual cable goes into the threaded piece that screws into the clutch cable hole). 8) 9)
There is slack (slop) where the cable end is pressure fitted ( by slack adjustment of cable) into the threaded piece.
There is air space open along the cables path through the threaded piece also.
This would give you a vent of sorts as this is not sealed up and pressure would escape at this point.
Installing a dedicated primary vent:
- You'd think you could use the hole in the primary access plug as a vent.
- However, any non-tin cover bike with a blocked transfer will piss out the vent of the primary filler plug. 10)
It's usually futile to retain the plug vent due to oil weep. Plugging that vent and installing a vent some where else is a good route. - The primary filler plug part numbers are (34742-52A) for 54-70 and (34742-71) for 71 to 76. (Fridge of the XLFORUM https://www.xlforum.net/forum/sportster-motorcycle-forum/sportster-motorcycle-era-specific-and-model-specific/ironhead-sportster-motorcycle-talk-1957-1985/93964-how-to-remove-the-oil-transfer-valve/page3?t=776527&page=3))
- You can use the 77-80 venting location on 70-76 engines:
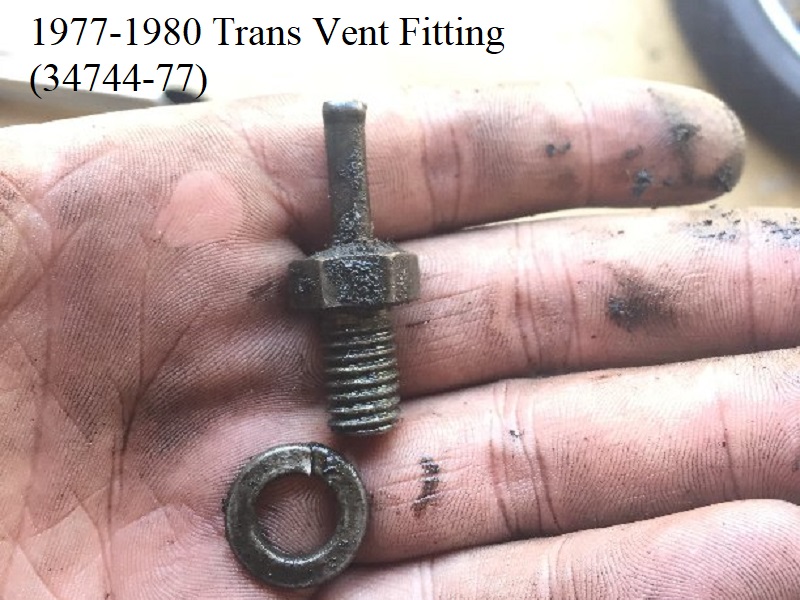
- You can install a vent plug (like the 34744-77 tranny vent) through one of the holes on top of the cases, just in front of the rear engine mount bracket.
- Those two bolt holes are used for the oil tank bracket (xlch model) or battery carrier bracket (xlh model). 11)
'77-up ironheads have this 3/4”x16 vent fitting factory installed in this location (transfer valve deleted in '77). - Short frame cases use 4 bolts and 3 studs to hold rear mount to cases.
- Long frame cases use 2 bolts and 3 studs. 12)
On long frame cases, the front two bolts were dropped to make room for the electric leg. The XLH battery box / oil bracket was bolted in the vacated area. This is where the vent bolt for 77> was positioned.
These bracket bolts are in a position where transmission oil don't seem to get tossed around as much. So they don't eject much oil.
All 76-earlier long frame cases (except 71ch) will accept the '77 vent bolt in it's intended location above the tranny. - The bolt goes in the hole closest to case parting seam.
Conversely, installing the vent bolt in any of the four short frame rear mount bolt holes usually results in drips from the vent. - However, if you use a longer hose, loop it up around the seat post and back down (as 2003-earlier Evos did), it shouldn't drip any oil. 13)
(unless the sprocket shaft seal has blown)
- You can tap a vent above the primary on 57-69 engines:
- You can drill and tap a hole at the top of the case on the primary side and tee into the vent line going to the oil tank. 14)
The vent below was made with a bolt with a hole drilled through the center of it. That hole was counter-bored 7/32“ on top and tapped 1/4”-28 to fit a brake bleeder screw.
The bottom half of the bleeder valve was cut off to make it fit the hole better and to hold the battery stand mount down.
A small hose was slid over the bleeder screw routed down.
1977-1980 models use a fitting (34744-77) with a SAE 3/8“ x 16 (x app. 7/16”) bolt pattern that has a 1/4“ hose nipple on the other end.